
Customizing Layouts in SBN
Customizing Layouts in SBN
Customizing Layouts in SBN
Module: Reference
Overview
You can customize the layouts of some of the programs in SBN to meet the needs of your company. This is sometimes referred to as "screen scraping". When you customize a layout, you can:
Customize fields
q Move a field
q Move a field and label
q Resize a field
q Remove a field and label
q Restore a field to a window
Customize the tab order of fields
Customize grids
You can save your customized layouts as:
Company - All of your users see the same customized layout
User Group - Different groups of users see different layouts
Note: For example, your users outside of the monitoring group can access Customer Data (program #559), but cannot see installation code words.
User - Specific users see highly individualized layouts
To determine if you can customize the layout of a window, right-click any field in the window.
w Most customizable windows have a Toggle Edit Mode option in the right-click menu.
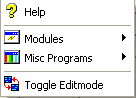
Note: You can still access the right-click Help menu in Toggle Edit Mode.
It is also possible to customize the order of the program tabs in Marketing (program #562), Data Entry (program #559), and Contract Master (program #548). There are three ways to customize the order of these tabs:
Dragging and dropping the program tabs into a different order. (You must enable action 193/49 in your user action profile in program #1502 to use this method.)
Setting up the Prg 562 Tabs, Prg 559 Tabs, and Prg 548 Tabs fields for your user action profile in program #1502
Defining the values of dynamic options tatab, detab, and cmtab
This document covers the following topics:
Viewing the Save Fields Window
Preparing to Customize Layouts
Reload Customized Fields for a New Build
Customizing the Tab Order of Fields
Customizing the Order of Program Tabs in Marketing, Data Entry, and Contract Master
Removing Duplicate Field Labels
Viewing the Save Fields Window
Use the Save Fields window to customize the layout of fields or columns in various programs. There are two Save Fields modes:
Panel Mode -- in which you customize the layout of fields
Grid Mode -- in which you customize the layout of grid columns
The Save Fields window displays different information in Panel Mode than in Grid Mode.
Use the following steps to access the Save Fields Window in Panel Mode:
1. In the program window for which you want to customize a field layout, right-click on any field.
w The right-click menu appears.
2. Choose Toggle Edit Mode.
3. Right-click any field again.
4. Choose Save Field Defaults.
w The Save Fields window opens. The following graphic shows the Save Fields window in Panel Mode for program #548:
Field Descriptions - Panel Mode
The following table describes the fields used in the Save Fields window in Panel Mode.
Field |
Description |
Company |
A check mark in this box indicates the user's company has a field layout defined for the current program. |
Group |
A check mark in this box indicates the user belongs to a group that has a field layout defined for the current program. |
User |
A check mark in this box indicates the user has a specific field layout defined for the current program. |
Current Group |
Group the current user belongs to, if any. |
Current User |
Current user ID. |
Count of Groups |
Number of user groups that have field layouts defined for the current program. |
Count of Users |
Number of users that have field layouts defined for the current program. |
Loaded Group |
User group whose field layout is currently loaded for the selected program. |
Loaded User |
User ID whose field layout is currently loaded for the selected program. |
Module |
SBN module number the selected program belongs to. |
Column Descriptions - Panel Mode
The following table describes the columns used in the Save Fields window in Panel Mode.
Column |
Description |
Name |
Field name. Fields display their names in the program window in Edit Mode when the Save Fields window is open. |
X Position |
Horizontal position of the field. |
Y Position |
Vertical position of the field. |
Option |
Option associated with the field, if any. |
Movable |
An 'X' in this column indicates the field can be moved in Edit Mode. (This column is read-only.) |
Visible |
An 'X' in this column indicates the field is visible in the program window. |
Label Name |
Field label name. |
Label Distance |
Distance in pixels between the field and its label. |
Label Position |
Label position in relation to the field -- to the left, right, above, or below. |
Tab Order |
Indicates when the field is accessed when tabbing from field to field -- first, second, etc. |
Height |
Height of the field in pixels. |
Width |
Width of the field in pixels. |
Color |
Field color. |
Message |
Label that appears beside the field in the program window. |
Use the following steps to access the Save Fields Window in Grid Mode:
1. Open the program for which you want to customize a grid column layout.
2. In the main SBN toolbar, choose Fields.
w The grid default menu appears.
3. Choose Save Defaults.
w The access level menu appears.
4. Choose any access level.
w The Save Fields window opens. The following graphic shows the Save Fields window in Grid Mode for program #548:
Field Descriptions - Grid Mode
The following table describes the fields used in the Save Fields window in Grid Mode.
Field |
Description |
Company |
A check mark in this box indicates the user's company has a grid column layout defined for the current program. |
Group |
A check mark in this box indicates the user belongs to a group that has a grid column layout defined for the current program. |
User |
A check mark in this box indicates the user has a specific grid column layout defined for the current program. |
Current Group |
Group the current user belongs to, if any. |
Current User |
Current user ID. |
Count of Groups |
Number of user groups that have grid column layouts defined for the current program. |
Count of Users |
Number of users that have grid column layouts defined for the current program. |
Loaded Group |
User group whose grid column layout is currently loaded for the selected program. |
Loaded User |
User ID whose grid column layout is currently loaded for the selected program. |
Column Descriptions - Grid Mode
The following table describes the columns used in the Save Fields window in Grid Mode.
Column |
Description |
Position |
Position index number of the column. |
Visible Position |
Visible position of the column in the grid. 1 represents the first column on the left, 2 represents the second column, etc. |
Width |
Width of the column in pixels. A negative number indicates the column is hidden in the grid. |
Sort Order |
Indicates the order in which grid items are sorted: ASC (ascending), DESC (descending), or blank. Only one column may be used to determine the grid sort order. |
Justification |
Indicates whether column data is left or right justified. Note: If you wish to sort the grid by a column that contains numeric data, right justify that column. This causes items to sort in numerical order (1, 2, 3, 4, etc. rather than 1, 11, 2, 22, 3, 33, etc.). If you wish to sort the grid by a column that contains text, left justify that column. |
Message # |
Message number associated with the column label in GUI Messages (program #1606). |
Message (1) |
Label displayed when the column is wide enough to display the full label. |
Message (2) |
Label displayed when the column is wide enough to display only the abbreviated label. |
Message (3) |
Label displayed when the column is wide enough to display only a one- or two-letter abbreviated label. |
Visible |
An 'X' in this column indicates the column is visible in the grid. |
Preparing to Customize Layouts
Before you can customize layouts you must
Activate specific actions in Action Profiles (program #1502)
Create User Groups
Activating Actions
Use the following steps to activate actions for the SBN System Administrator who will create the customized layouts:
1. Go to Action Profiles (program #1502).
2. Choose Zoom.
w The details appear on the tab to the right. The default view shows
l The expandable Main Menu items grouped into sublevels, which can be expanded to the function key level
l The Other Actions list, which provides a complete list of all actions by number
3. In Action/Menu - choose Action.
4. Choose Change Record.
5. Type an X in the following actions:
l Action 193/7 - Extended customization interface
l Action 193/21 - Load System
l Action 193/22 - Load Company
l Action 193/23 - Load Group
l Action 193/24 - Load User
l Action 193/25 - Load as Group
l Action 193/26 - Load as User
l Action 193/32 - Save Company
l Action 193/33 - Save Group
l Action 193/34 - Save User
l Action 193/35 - Save as Group
l Action 193/36 - Save as User
l Action 193/41 - Reset System
l Action 193/42 - Reset Group
l Action 193/43 - Reset User
l Action 193/44 - Reset as Group
l Action 193/45 - Reset as User
l Action 193/46 - Reset all Groups
l Action 193/47 - Reset all Users
l Action 193/48 - Tabs
6. Choose Save.
7. Make sure that these actions are not activated in any other action profile.
Viewing Tab ID
Use the following steps to save defaults:
1. Go to View at the top of SBN, click Options.
w Options screen appears.
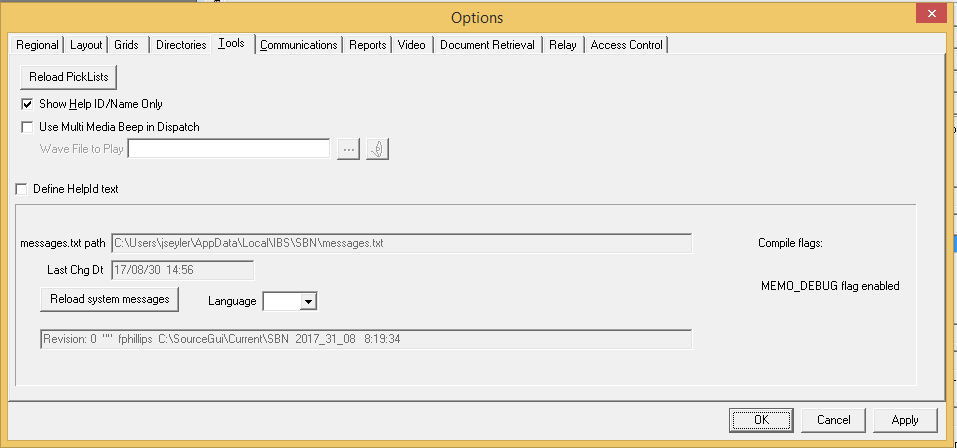
2. Click Tools tab and check Show Help ID/Name Only and click Ok.
3. Go to the Tab you want to move and make sure it is highlighted.
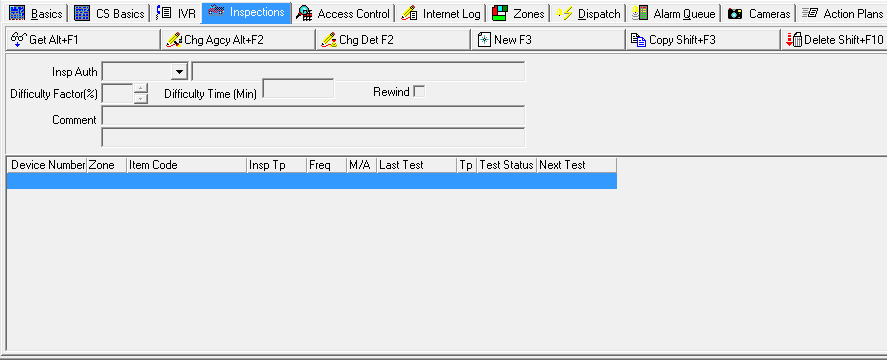
4. Right-click anywhere on a the program you are in.
w The right-click menu appears.
Creating User Groups
Use the following steps to create a User Group:
1. Decide on a name for the customized User Group.
2. Go to Users (program #1501).
3. Select the user ID of the system administrator who will customize the layout.
4. Choose Change Record.
w Fields in the lower pane of the window open for changes.
5. In Group - type the name of the customized User Group.
6. Choose Save.
Note: When this system administrator customizes a layout and chooses Save Group or Save as Group with this User Group name, all users associated with this User Group will see the customized layout.
Customizing Fields
To customize fields, you must
Save defaults
Customize the fields
Save your changes
Saving Defaults
Use the following steps to save defaults:
1. Go to the window you want to customize.
2. Right-click on a field you want to customize.
w The right-click menu appears.
3. Choose Toggle Edit Mode.
4. Right-click again.
w A customization menu appears.
5. Choose Save Field Defaults.
w The Save Fields window opens.
Note: If you have not saved a company default in the selected program, a warning message pops up: "No baseline definition exists. Make sure you save an unmodified screen."
6. Choose Save Company. (You must save a company default layout in a program before you can save any group or user defined layouts.)
7. Choose Exit to return to the program window.
Customizing the Layout of Fields
After you save the Company defaults, you can customize the layout of fields.
Use the following steps to customize the layout of fields:
1. Go back to the program window you want to customize.
2. Right-click a field you want to customize.
3. Choose Toggle Edit Mode.
w When you move your cursor over a field, it appears with an icon of a piece of paper.
Moving a Field
Use the following steps to move a field:
1. In Edit Mode, place the cursor on the field you want to move.
2. Press and hold your left mouse button.
3. Drag-and-drop the field to a new position.
Moving a Field and Label
Use the following steps to move a field and label:
1. In Edit Mode, place the cursor on the field or label that you want to move.
2. Press and hold Ctrl.
3. Drag-and-drop the field and label to a new position.
Saving Your Changes
Use the following steps to save your changes:
1. When you finish moving fields in Edit Mode, right-click in the window.
2. Choose Save Field Defaults.
w The Save Fields window opens.
3. Choose Save [Type] at the level you want to save changes (Company, Group, or User).
4. Choose Exit to return to the program window.
Changing the Size of a Field
Use the following steps to change the size of a field:
1. In Edit Mode, place the cursor on the field you want to resize.
2. Right-click again.
3. Select Save Field Defaults.
w The fields fill with their field names and the Save Fields window opens.
4. Locate the name of the field you want to resize in the Save Fields grid.
Note: Double-click on the Name column header to sort the fields by name.
5. In the Height or Width column for the selected field, select the size you want to change.
w SBN highlights the current height or width of the field and moves it to the left in the column.
6. Change the height or width of the selected field.
7. Choose Save [Type] at the level at which you want to resize the field (Company, Group, or User).
Removing a Field and Label
Use the following steps to remove a field and label:
1. In Edit Mode, place the cursor on the field and label that you want to remove.
2. Press and hold Ctrl.
3. Drag-and-drop the field and label out of the window by dragging it up, to the right, or to the left. Dragging it down and out of the window will not completely remove it from the screen.
4. Choose Save Field Defaults.
w The Save Fields window opens. Notice the X and Y Position values for the field are blank, indicating the field has been removed from the program window.
5. Choose Save [Type] at the level from which you want the field removed (Company, Group, or User).
w The deleted field no longer appears in the program window.
Restoring a Field
Use the following steps to restore a field:
1. Right-click any field in the program window to which you want to restore a field.
2. Choose Toggle Edit Mode.
3. Right-click any field again.
4. Choose Save Field Defaults.
w The Save Fields window opens.
Note: Deleted fields contain blank X and Y Position values.
5. Choose Reset [Type] at the level you want to restore the field (System, Group, or User).
6. Define the following for all fields you want to restore:
l X and Y Position values
l Label name
l Label distance
l Tab order
Note: You can retrieve some of these values by choosing Load System.
7. Choose Save [Type] at the level you want to restore the field (Company, Group, or User).
w The restored fields appear in the program window.
Loading Defined Field Layouts
You can load defined field layouts in Edit mode from the Load Field Defaults menu, or when viewing current layout settings in the Save Fields window.
Use the following steps to load a defined field layout for the selected program from the Load Defaults menu:
1. Right-click any field in the program.
2. Choose Toggle Edit Mode.
3. Right-click any field again.
w A customization menu appears.
4. Choose Load Field Defaults.
w Choose the field layout you want to load:
l System
 -- System Default Layout
l Company
 -- Your Company Default Layout
l User
 -- Your User Default Layout
l User Group
 -- Your User Group Default Layout
w The selected field layout appears in the program screen.
In the Save Fields window, you can load the following defined field layouts:
System Default Layout -- using Load System
Your Company Default Layout -- using Load Company
Your User Group Default Layout -- using Load Group
Your User Default Layout -- using Load User
Any User Group Defined Layout -- using Load as Group
Any User Defined Layout -- using Load as User
Use the following steps to load a defined field layout for the selected program when viewing current layout settings in the Save Fields window:
1. Right-click any field in the program.
2. Choose Toggle Edit Mode.
3. Right-click any field again.
4. Choose Save Field Defaults.
w The Save Fields window opens with the current field layout settings displayed.
5. Choose Load [Type] or Load as [Type] to load another defined field layout.
w The selected field layout appears in the Save Fields window and in the program window.
6. Choose Exit to return to the program window.
Resetting Customized Field Layouts
You can reset customized field layouts to the system default layout for:
Your company -- using Reset System
Your user group -- using Reset Group
Your user ID -- using Reset User
Any user group -- using Reset as Group
Any user ID -- using Reset as User
All user groups -- using Reset all Groups
All user ID's -- using Reset all Users
Use the following steps to reset customized layouts:
1. Right-click any field in the program.
2. Choose Toggle Edit Mode.
3. Right-click any field again.
4. Choose Save Field Defaults.
w The Save Fields window opens.
5. Choose Reset [Type], Reset as [Type], or Reset all [Types].
w A confirm dialog box opens: "Are you sure?"
6. Choose Yes.
w The type you selected is reset to the system default layout.
7. Choose Exit to return to the program window. (You do not need to save changes when resetting a layout.)
Reload Customized Fields for a New Build
When a new build is loaded that includes new fields on a form, any customized layouts will need to be reloaded.
Use the following steps to reload customized layouts:
1. Load the form
2. Right click on the form and select Toggle Editmode.
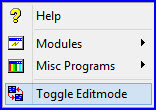
3. Right click again and select Save Field Defaults
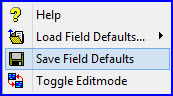
w The Save Field screen displays.
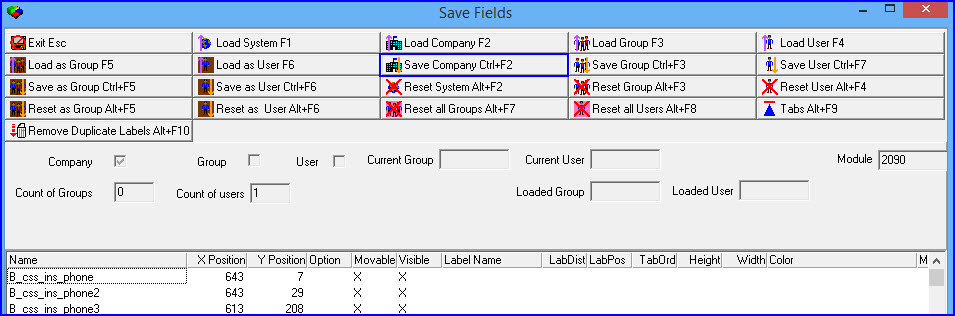
4. Select Save Company.
5. Exit screen and close the form.
w Reopen the form and the new fields will be available for customizing.
Customizing the Tab Order of Fields
In addition to moving or removing fields, you can change the order in which you tab from field to field. You can do this by manually changing the numbers in the Tab Order column of the Save Fields window, or by using the Tabs button in the Save Fields window.
Note: Only visible fields will appear in the Tab Order column. Fields not visible outside of Toggle Mode will not appear in the Tab Order column. When using the Tab key, only visible fields will be highlighted, and tabbing through a window will not highlight non-visible fields.
Use the following steps to change the tab order of fields in the Tab Order column of the Save Fields window:
1. Right-click anywhere in the program window in which you want to change the tab order of fields.
2. Choose Toggle Edit Mode.
3. Right-click again.
4. Choose Save Field Defaults.
w The Save Fields window opens.
5. Double-click on the Tab Order column heading.
w The field list appears in the current tab order.
6. Select the tab order number you want to change.
w The number appears highlighted and moves to the left in the column.
7. Change the tab order number, as needed.
8. Repeat Steps 6 and 7 for each field whose tab order you want to change.
9. Choose Save [Type].
w The new tab order is saved at the level you selected.
Use the following steps to change the tab order of fields with the Tabs button:
1. Right-click any field in the program.
2. Choose Toggle Edit Mode.
3. Right-click any field again.
4. Choose Save Field Defaults.
w The Save Fields window opens with the current field layout settings displayed.
5. Choose Tabs.
w The Tab Order window opens.
6. In the Tab Order window, select the field whose tab order you want to change.
7. Choose Previous or Next until the field appears in the position you want.
w The field appears in the previous or next row, depending on which button you choose. Notice the Tab Order column is numbered from 0 to last, and the field name and description label move to a new position in the list.
8. Repeat Steps 6 and 7 for each field whose tab order you want to change.
9. Choose Save.
w The Tab Order window closes and the Save Fields window reflects the new tab order.
10. Choose Save [Type].
w The new tab order is saved at the level you selected.
Customizing Grids
In any window that contains grids, you can
Customize the width of grid columns
Customize the order of grid columns
Customizing the Width of Grid Columns
You can customize grid column width by manually adjusting the width in the program window or by changing the column width in pixels in the Save Fields window.
Use the following steps to customize the width of a grid column in the program window:
1. In the program window in which you want to customize columns, place your cursor on the dividing line between column headings.
w The appearance of your cursor changes.
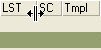
2. While your cursor is on the dividing line, drag the border of the column heading to the left (narrower column) or to the right (wider column).
3. In the upper toolbar, choose Fields.
w The grid default menu appears.
4. Choose Save Defaults.
w The access level menu appears.
5. Choose any access level.
w The Save Fields window opens with the adjusted column widths displayed.
6. Choose Save [Type].
w The new column widths are saved for the type you selected.
7. Choose Exit to close the Save Fields window.
Use the following steps to customize the width of a grid column in the Save Fields window:
1. Open the program in which you want to customize the width of a column.
2. In the main SBN toolbar, choose Fields.
w The grid default menu appears.
3. Choose Save Defaults.
w The access level menu appears.
4. Choose any access level.
w The Save Fields window opens with the current grid column layout settings displayed.
5. In the Save Fields window, select the width of the column you want to change.
w The number appears highlighted and moves to the left in the Width column.
6. Change the number to the width you prefer. This number is the column width in pixels. A negative number indicates the column is hidden in the program window.
7. Repeat steps 5 and 6 for each column width you want to change.
8. Choose Save [Type].
9. Choose Exit to close the Save Fields window.
Customizing the Order of Grid Columns
You can customize the order in which grid columns appear by manually dragging a column to a new position in the program window, or by changing the visible position of the column in the Save Fields window.
Use the following steps to customize the order of grid columns manually in the program window:
1. In the window in which you want to customize the order of grid columns, place your cursor on the column heading you want to move.
2. Drag-and-drop the heading to a new position in the grid.
3. In the upper toolbar, choose Fields.
w The grid default menu appears.
4. Choose Save Defaults.
w The access level menu appears.
5. Choose any access level.
w The Save Fields window opens with the current grid column layout settings displayed.
6. Choose Save [Type].
7. Choose Exit to close the Save Fields window.
Use the following steps to customize the order of grid columns in the Save Fields window:
1. Open the program in which you want to customize the order of grid columns.
2. In the upper toolbar, choose Fields.
w The grid default menu appears.
3. Choose Save Defaults.
w The access level menu appears.
4. Choose any access level.
w The Save Fields window opens with the current grid column layout settings displayed.
5. Select the visible position of the column you want to change.
w The number appears highlighted and moves to the left in the Visible Position column.
6. Change the visible position of the column as needed. 1 indicates the column appears in first position (farthest left column), and the highest number indicates the column appears in last position (farthest right column).
7. Repeat steps 5-6 for each column whose position you want to change.
8. Choose Save [Type].
9. Choose Exit to close the Save Fields window.
w The column appears in its new position in the program window.
Customizing the Order of Program Tabs in Marketing, Data Entry, and Contract Master
You can customize the order of the program tabs in Marketing (program #562), Data Entry (program #559), and Contract Master (program #548). There are three ways to customize the order of these tabs:
Dragging and dropping the program tabs into a different order. (You must enable action 193/49 in your user action profile in program #1502 to use this method.)
Setting up the Prg 562 Tabs, Prg 559 Tabs, and Prg 548 Tabs fields for your user action profile in program #1502
Defining the values of dynamic options tatab, detab, and cmtab
SBN determines the order of the tabs in Marketing, Data Entry, and Contract Master primarily based on the settings of the Prg 562 Tabs, Prg 559 Tabs, and Prg 548 Tabs fields for your user action profile in program #1502. If these fields are blank, SBN uses the values of options tatab, detab, and cmtab to determine the order of the tabs. If the option values are blank as well, SBN orders the tabs in their default sequence (listed in the table below).
Each tab is numbered according to its default sequence. Use these numbers to customize the tab order in Actions (program #1502) and in Options (program #1887) when defining options tatab, detab, and cmtab.
Program Tab Numbers
The following table lists the numbers SBN uses to identify the default order of each program tab in Marketing, Data Entry, and Contract Master.
Note: The order of the Basics tabs of Marketing and Data Entry cannot be changed; these tabs always appear first.
Number |
Tab |
Marketing (program #562) |
|
01 |
Basics Note: This tab cannot be moved. |
02 |
TM Queue |
03 |
Event Log |
04 |
Work Orders |
05 |
Referral |
06 |
Referral Log |
Data Entry (program #559) |
|
01 |
Basics Note: This tab cannot be moved. |
02 |
Overflow (Removed in Release 74) Note: Since this tab has been removed, SBN ignores this number when entered in the Prg 559 Tabs field of program #1502 and in the value of option detab. |
03 |
CS Basics (Removed in Release 74) Note: Since this tab has been removed, SBN ignores this number when entered in the Prg 559 Tabs field of program #1502 and in the value of option detab. |
04 |
Dispatch |
05 |
Alarm Queue |
06 |
Zones |
07 |
Cameras |
08 |
Action Plans |
09 |
Notification Note: This customer specific tab appears if option sdi002 is on. |
10 |
Notify Account Note: This customer specific tab appears if option sdi002 is on. |
11 |
O/C Schedule |
12 |
Inspections |
13 |
Alarm Log |
14 |
Customer Specific Note: This tab appears if option sdi002 is on. |
15 |
Service Log |
16 |
O/C Log |
17 |
Change Log |
18 |
Texts |
19 |
Insert Test |
20 |
O/C Status |
21 |
Test Queue |
22 |
Service Aging |
23 |
Work Orders |
24 |
Internet Log |
25 |
Floor Plans |
26 |
Phasing |
27 |
SIM Phone |
28 |
Installed Components |
29 |
Pending Service |
30 |
Access Control |
Contract Master (program #548) |
|
01 |
Work Orders |
02 |
Collections |
03 |
Account Adjustments |
04 |
Account Change Log |
05 |
Contract Search |
06 |
Installation Data |
07 |
Miscellaneous Fields |
08 |
Invoice Status |
09 |
Payment Status |
10 |
Contract Change Log |
11 |
Contracts on Account |
12 |
Cycle Fee Change Log |
13 |
Cycle Fees |
14 |
Contract Texts |
15 |
Payment Methods |
16 |
Linked Billing Accounts |
17 |
Reminder Log |
18 |
Financed Work Orders |
Dragging and Dropping Tabs
Use the following steps to customize the order of program tabs using the drag and drop method:
1. In the program window in which you want to customize the order of program tabs, select the tab you want to move by clicking on it with the mouse.
w SBN highlights the tab you selected.

2. Drag and drop the tab to a new position. (When you move your cursor to the position where you want to drop the tab, it appears with an icon of a piece of paper.)

w The tabs appear in the new order.

Changing Program Tab Order in Actions
Use the following steps to customize the order of program tabs for your user action profile:
1. Go to Actions (program #1502).
2. Select the action profile assigned to your user ID (in program #1811) by double-clicking it, or highlighting it and choosing Get.
3. Choose Change.
w The fields in the Details pane open for changes.
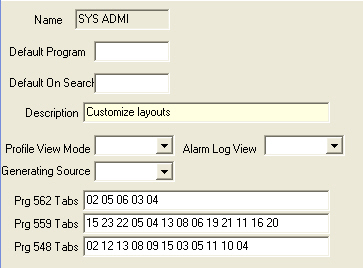
4. In the Prg 562 Tabs, Prg 559 Tabs, and Prg 548 Tabs fields, enter the tab numbers in the order you want them to appear in each program, (as in the example below).
Note: SBN will display the tabs you do not enter in the fields to the right of the specified tabs in default order when you open the programs. The Overflow and CS Basics tabs, formerly tabs 02 and 03, have been removed. SBN ignores these numbers if you enter them in the Prg 559 Tabs field.
5. Choose Save.
w SBN displays the program tabs in the order you entered when you open Marketing, Data Entry, or Contract Master.
Using Options to Change Program Tab Order
Use the following steps to change the order of program tabs with options:
1. Go to Options (program #1887).
2. Select the option for the program you want to change the tab order for by double-clicking it, or highlighting it and choosing Get. Option tatab is for Marketing, detab is for Data Entry, and cmtab is for Contract Master.
3. Choose Change.
w The Value field of the selected option opens for changes.
4. Enter the tab numbers in the order you want them to appear in each program, (as in the example below).
Note: SBN will display the tabs you do not enter in the Value field to the right of the specified tabs in default order when you open the programs. The Overflow and CS Basics tabs, formerly tabs 02 and 03, have been removed. SBN ignores these numbers if you enter them in the value of option detab.

5. Choose Save.
w SBN displays the program tabs in the order you entered when you open Marketing, Data Entry, or Contract Master.
Note: If your user action profile has a tab order set up in the Prg 562 Tabs, Prg 559 Tabs, and Prg 548 Tabs fields of program #1502, the tabs will appear in that order rather than the order defined by options tatab, detab, and cmtab.
Removing Duplicate Field Labels
When you save a customized layout, sometimes a message will appear notifying you of duplicate field labels in the form. After IBS corrects duplicate labels with a GUI update, you may use the Remove Duplicate Labels button to remove duplicate field labels from all saved customized program layouts. Note that you must save at least one layout (Company, Group, or User) in order to use this button.
After removing duplicate labels, you may use script icl/copy_app_field_tables to copy all customized program layouts from one server to another. Both servers must be at the same revision level. Be sure to create backup copies of existing files before executing this script.
Note: icl/copy_app_field_tables can only be run from the Unix command line.
Use the following steps to remove duplicate field labels:
1. Right-click anywhere in the program window you want to customize.
2. Choose Toggle Edit Mode.
3. Right-click again.
4. Choose Save Field Defaults.
w The Save Fields window opens.
5. Choose Save [Type] at any level (Company, Group, or User). (This is necessary to use the Remove Duplicate Labels button.)
6. Choose Remove Duplicate Labels.
w SBN removes duplicate labels from all saved customized layouts.
Related Programs
The following table lists programs related to customizing layouts.
Program |
Number |
Document Link |
Description |
Actions |
1502 |
Activate actions to enable extended layout customization interface. |
|
Users |
1501 |
Assign users to specific groups that program layouts can be defined for. |
Button Functions
The following table displays the buttons and describes the actions and functionality.
Button |
Name |
Action |
Description |
|
Exit |
Close Save Fields window. |
|
|
Load System |
193/21 |
Load system default layout, ignoring any group or user definition. |
|
Load Company |
193/22 |
Load company defined layout, ignoring any group or user definition. |
|
Load Group |
193/23 |
Load group defined layout for current user, ignoring user definition. |
|
Load User |
193/24 |
Load defined layout for current user. |
|
Load as Group |
193/25 |
Select and load any group defined layout in the system. |
|
Load as User |
193/26 |
Select and load any user defined layout in the system. |
|
Save Company |
193/32 |
Save current defined layout as company definition. |
|
Save Group |
193/33 |
Save current defined layout as definition for current user's assigned group. |
|
Save User |
193/34 |
Save current defined layout as definition for current user. |
|
Save as Group |
193/35 |
Save current defined layout as definition for any user group in the system -- select a group. |
|
Save as User |
193/36 |
Save current defined layout as definition for any user in the system -- select a user ID. |
|
Reset System |
193/41 |
Reset company defined layout to system default. |
|
Reset Group |
193/42 |
Reset current user group defined layout to system default. |
|
Reset User |
193/43 |
Reset current user defined layout to system default. |
|
Reset as Group |
193/44 |
Select and reset any user group defined layout in the system. |
|
Reset as User |
193/45 |
Select and reset any user defined layout in the system. |
|
Reset all Groups |
193/46 |
Reset all user group defined layouts in the system. |
|
Reset all Users |
193/47 |
Reset all user defined layouts in the system. |
|
Tabs |
193/48 |
Display and change the order in which you access fields when tabbing from field to field. |
|
Remove Duplicate Labels |
193/50 |
Remove duplicate field labels from all saved customized layouts. |





















Modifications and Updates to Customizing Layouts
The following table lists modifications and updates to the Customizing Layouts document.
Mod Number |
Date |
Description |
07.02.17148, 08.03.06047 |
08/21/08 |
New buttons and actions added. Document enhanced. |
08.03.07819 |
09/22/10 |
Module field added. |
07.02.19611, 08.03.07450 |
11/02/10 |
Added ability to customize order of program tabs in 562, 559, and 548. |
07.02.20415, 08.03.08019 |
02/08/11 |
Removed Overflow and Customer Service Basics tabs from Data Entry tab order. |
08.03.08469 |
10/18/11 |
Added Remove Duplicate Labels button. |
n/a |
08/14/14 |
Images updated. |
08.82.09882 |
04/09/15 |
Included note that tab key and Tab Order column will only respond to visible fields. |
08.87.11125 |
08/31/17 |
Added "Tab ID" to the "Help ID“ display screen. User can view the "Tab ID“ within “Help ID� window and can now set the order of that tab within the “Actions� screen more easily. |
n/a |
08/31/17 |
Updated pictures to reflect new Tab ID being displayed within Help ID screen. |