
Branch Inventory
Branch Inventory
Branch Inventory
Program #: 1757
Module: Account Generation
Overview
Branch Inventory (program #1757) works with the Purchasing and Accounts Payable modules to provide a smooth flow of information into the General Ledger. These various modules support branch accounting. Use Branch Inventory to view and update branch inventories, view item history, determine inventory needs, transfer items between branches or satellites, check the status of items in transit, and enter physical item counts.
The Satellite Inventory section of this program is only available if purchased. Satellite Inventory is a separate module, but is included within the Branch Inventory program, if available. If you do not use Satellite Inventory, please disregard any information that pertains to this section of the program. Action 1757/202 controls access to Satellite Inventory for individual users.
This document covers the following topics:
Navigating to Branch Inventory
Adding a New Item to Inventory
Entering Inventory Transactions
Picking or Returning Work Orders
Viewing Satellite and Branch Availability
Viewing Open Requisitioned Items
Sorting Inventory Transactions by Branch
Navigating to Branch Inventory
Use the following steps to access the Branch Inventory program:
1. From the main SBN toolbar, select Menu.
2. From the drop-down menu, select Go To.
3. In the Go To Program dialog box, type in "1757" and press Enter.
w Branch Inventory opens. SBN defaults the Branch field to the branch defined in the user’s branch profile.
Branch Inventory Options
You can manipulate the Branch Inventory window and functionality by using a number of options. The settings of the following options control different aspects of Branch Inventory and how it relates to other programs. For detailed information on an option and its default setting, see SBN Options.
Option ba155 – When on, work orders must be in Approved status before you can use the Pick/Return function in Branch Inventory.
Option ba339 – If a work order count contains a negative value and this option is on, the Quantity column of the Pick/Return window defaults to 0 instead of using the negative value from the work order. When this option is off, the Quantity column of the Pick/Return window displays the negative value from the work order.
Option bl058 – When on, SBN does not validate General Ledger account numbers. When off, the GL Account Number field displays as a single field, and the menu originates from program #1835.
Option bl169 – When on, if you receive a purchase order for a satellite, SBN automatically transfers the items on the purchase order from the branch to the satellite inventory (using transaction type INTR). When off, if you receive a purchase order for a satellite, SBN adds the items on the purchase order to the branch inventory. You must transfer from the branch to the satellite manually in Branch Inventory.
Option in006 – When on, SBN creates an instant transfer when you pick a work order to the destination center designated in the Work Order Type.
Option ub050 – When on, this option enables branch/satellite to branch/satellite transfer. In Branch Inventory (#1757), users see both branch/satellite in the Type dropdown, allowing them to transfer from one satellite to another in a different branch. The different branch must be selected in order to work.
The Branch Inventory Window
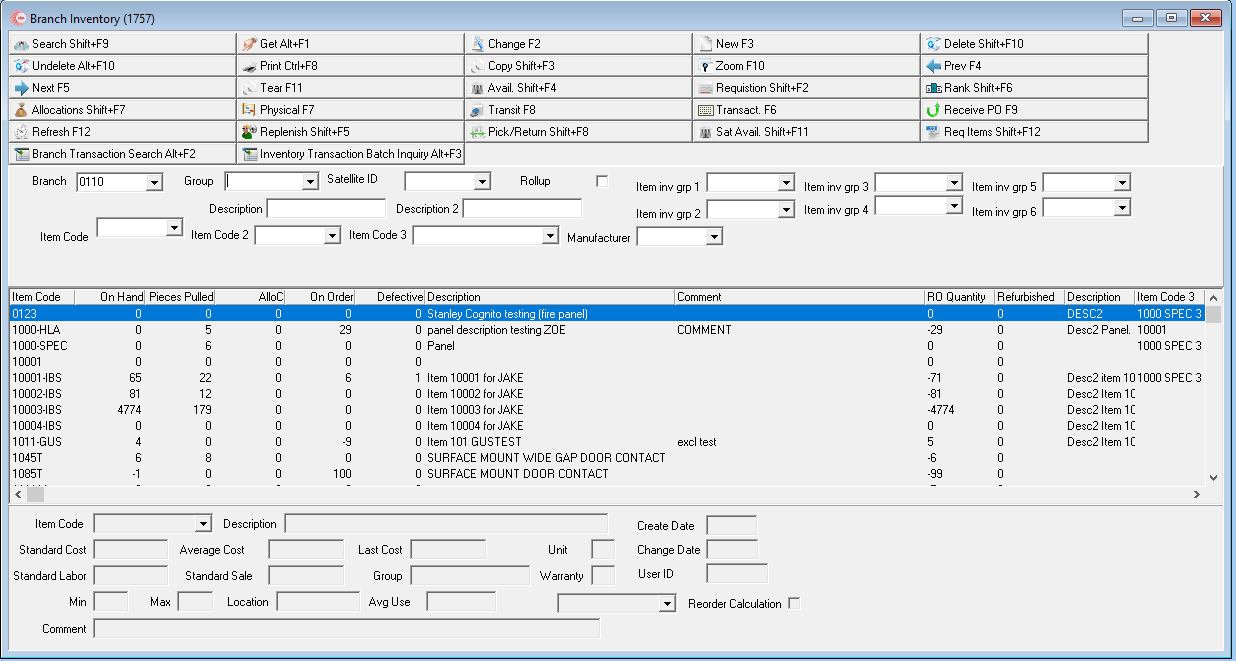
The Branch Inventory window contains three panes:
The upper pane contains search parameters
The middle pane displays search results
The lower pane displays item details - a user must highlight an Item and choose Get to view details.
The following graphic shows the Branch Inventory window.
Field Descriptions - Search Parameters
The following table describes the fields used in the search parameters pane.
Note: If a user does not select a Branch, Group, or Satellite, SBN will not return any results.
Field |
Description |
Branch |
Menu of available branches in SBN. (This menu originates from program #1530.) Note: The available branches listed in the drop-down menu depend on whether the Inventory check box in the Branch Profiles window (program #1530) is selected. If at least one branch has the Inventory check box selected, only the selected branch or branches appear in the Branch drop-down menu. If no branches are selected, then no branches appear in the Branch drop-down menu. Note: You may only view or make changes to branches listed in your user branch profile. Branch profiles are assigned to user ID's in Personnel (program #1811). Note: If your user ID has a Miscellaneous User Access profile assigned in program #1811 that has a branch assigned in program #1745, that branch appears in this field by default when you first open the Branch Inventory program. If the default branch determined by the Misc User Access profile assigned to your user ID in program #1811 does not have the Inventory check box selected in program #1530, this field is blank by default. |
Group |
Menu of available inventory groups of items. (This menu originates from program #1764/08.) |
Satellite ID |
Menu of satellite warehouse locations, if available, and Personnel name. (This menu originates from program #1605.) Personnel Name column also added in Satellite Availability grid screen. |
Rollup |
Select this check box to roll branch and all satellite warehouse quantities together to determine the total inventory needs of the branch and its satellites. Note: If this box displays a check mark, SBN ignores any specific satellite warehouse. |
Description 1 |
Text description of the item. |
Description 2 |
Second text description of the item. |
Item Inv Grp 1-6 |
Item Inventory Group 1-6. (Defined in program 1764 Miscellaneous Inventory Fields - abbr 21-26) |
Item Code |
Item identifier. |
Item Code 2 |
Additional item identifier. |
Item Code 3 |
Additional item identifier. |
Manufacturer |
Manufacturer of item. |
Column Descriptions - Search Results
The following table describes the columns used in the search results pane.
Column |
Description |
Item Code |
Inventory item code. Define items in program #1535. |
On Hand |
Quantity of the item currently available for use. |
Pieces Pulled |
Quantity of this item that you have pulled from inventory, but that you have not invoiced. The invoicing process decreases this quantity. |
Pieces Allocated |
Quantity of this item included in current allocations to be used for installation jobs. (See Viewing Inventory Allocations.) Note: Job 15 in Background Tasks (program #1712) determines the number of days included in the allocation calculation. |
On Order |
Quantity of this item that is on order with a vendor, but that you have not yet received. |
Defective |
Quantity of this item that has been flagged defective. |
Description |
Text description of the item. (This description comes from the Item Master in program #1535.) |
Comment |
You can type a comment for the item in the lower pane of the window. This field allows up to 60 characters. |
Reorder Quantity |
Item quantity to reorder. (This amount is the difference between the Allocated quantity and the On Hand and On Order quantities. Allocated - On Hand - On Order = Reorder Quantity) Note: A Reorder Quantity of 0 or a negative amount indicates that you do not need to reorder the item. |
Refurbished |
Item quantity consisting of inventory that has been refurbished. |
Description |
Additional Text description of the item. (This description comes from the Item Master in program #1535.) |
Item Code 3 |
Additional item identifier. |
Field Descriptions - Items Details
The following table describes the fields located in the Item Detail pane.
Field |
Description |
Item Code |
Item code number. |
Description |
Text description of the Item. (This description comes from the item master in program #1535.) |
Create Date |
Date the item inventory record was added to the selected branch. |
Standard Cost |
The standard cost of the item from the item master in program #1535. This cost can be updated by Inventory Close (program #703). Choose the Transfer to Average Cost to Standard Cost checkbox. |
Average Cost |
The average cost of the item from the item master in program #1535. This cost can be updated by Inventory Close (program #703). Choose the Transfer to Average Cost to Standard Cost checkbox. |
Last Cost |
Last price paid for the item, which is automatically updated from Purchasing (program #571). When adding a new item to the branch, this cost comes from the last cost of the primary vendor for the item. Note: You can update this information in this program if you know the last price paid for the item. |
Unit |
Type of unit used for purchase and issue. |
Change Date |
Date the last change was made on this item record for this branch, such as a change to the item quantity, cost, comment, etc. |
Standard Labor |
Standard installation units for this item. (This information comes from the item master in program #1535.) |
Standard Sale |
Standard overhead units for the item. (This menu originates from program #1535.) |
Group |
Displays the inventory group for the item. (This menu originates from program #1535.) |
Warranty |
Number of months for the vendor warranty for this item. (This menu originates from program #1535.) |
User ID |
ID of the user who made the last change to this item for this branch. |
Min |
Minimum inventory quantity to have on hand for this branch. Note: Minimum must be less than or equal to the maximum quantity. Note: The Min and Max fields are set to zero when you choose the Reset Min/Max button on the Inventory tab in Items (program #1535). |
Max |
Maximum inventory quantity to have on hand for this branch. Note: The Min and Max fields are set to zero when you choose the Reset Min/Max fields button on the Inventory tab in Items (program #1535). |
Location |
Physical warehouse location or shelf designation for the item. |
Avg Use |
SBN-calculated average monthly usage. Use Inventory Close (program #703) to update this average. Note: SBN uses the following Transaction Types to calculate the Average Use when you use Inventory Close:
(See Entering Transaction Types for more information.) |
Comment |
Free-form text comments for this item for the selected branch. |
Searching for Items
To display items in the Branch Inventory window, you must first complete a search with a branch and one or all of the other search parameters selected. You may narrow your search by selecting a Group and/or Satellite ID.
Note: You may only view or make changes to branches included in your user branch profile.
Use the following steps to search for items:
1. Select your search parameters in the upper pane.
Note: You can choose the Rollup flag if you want to combine the satellite inventory and the branch inventory together without specifying the satellite.
2. Choose Search to complete the search.
w SBN displays the results in the middle pane of the window.
Note: If your action profile includes action 1757/400, SBN suppresses loading and refreshing the Search Results pane of the main Branch Inventory window.
Adding a New Item to Inventory
You can add a new inventory item to a specific branch or satellite. You must first perform a search for a particular branch or satellite, otherwise SBN enters the item for the first branch displayed.
Note: You can use an existing item as a template for a new item, but you must select a new Item Code for the new item. Action 1757/14 controls access to the copy button in Branch Inventory.
Use the following steps to add a new item to a branch or satellite inventory:
1. After performing a search for the desired branch or satellite, choose New.
w Some fields in the Item Details pane open to add the item.
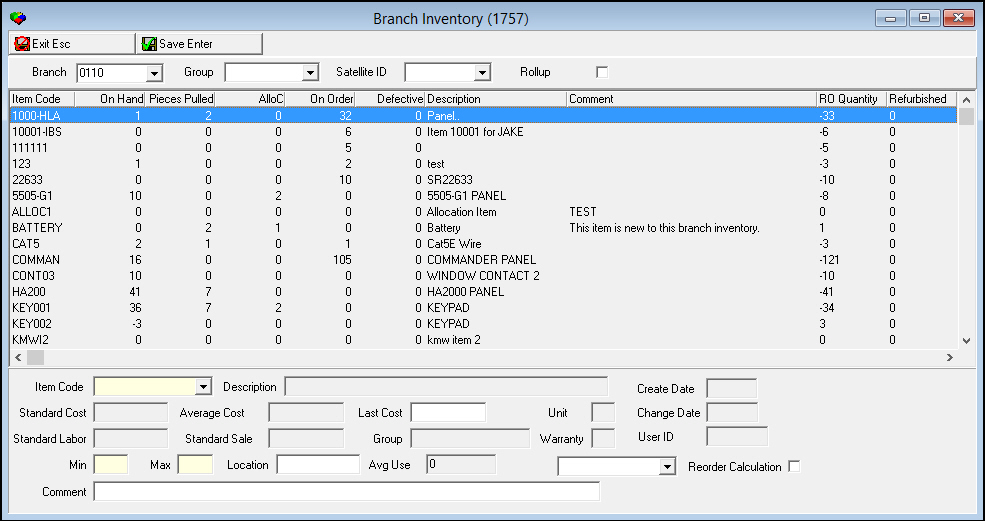
2. Select an item code from the menu.
3. Enter other information as needed.
4. Choose Save.
w SBN adds the item to the branch or satellite inventory displayed in the middle pane of the window.
Changing an Item
You can change some details of an existing inventory item including the last cost, the minimum and maximum amounts to be kept on hand, location, associated GL, whether to include the item in reorder calculation, and comment text.
Note: If action 1757/200 is off, you cannot edit the Last Cost and GL Account number fields.
Use the following steps to change the details of an item:
1. Select the item from the inventory list that you want to change by choosing Get to populate the Item Details pane.
2. Choose Change.
w Some fields in the Item Details pane open for changes.
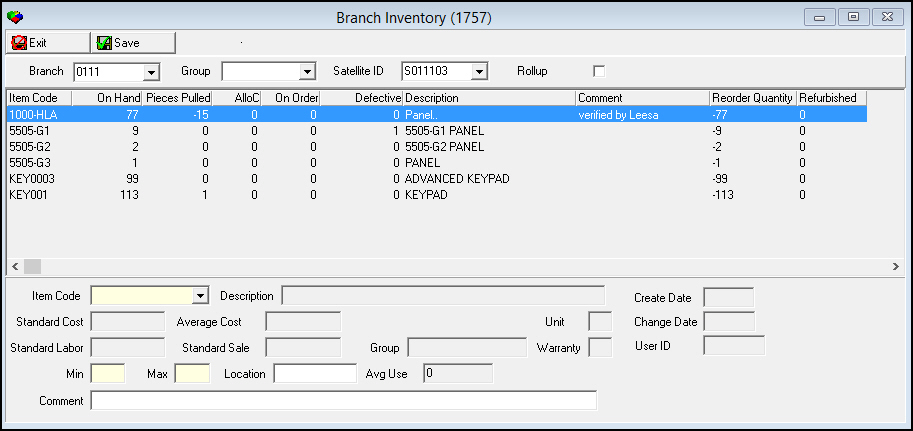
3. Change details as needed.
4. Choose Save.
Deleting an Item
You can remove inventory items from a specific branch or satellite. You must first perform a search for the correct branch or satellite to get a list of inventory items.
Use the following steps to delete an item from the inventory:
1. After performing a search for the desired branch or satellite, select the item from the inventory list that you want to delete.
2. Choose Delete.
w A Confirm dialog box opens: "Delete [Item]/[Branch Number]?"
3. Choose Yes.
w The item is deleted from the inventory.
Note: You cannot delete an item with a quantity greater than 0 on hand. If the item is on hand, an error message appears: "Cannot delete an item that has an inventory attached." To view the number of items in each branch, select an item and choose Availability. The Availability window opens and displays the totals of the selected item for all branches. You cannot delete an item in "on order" status either. If you are trying to remove an item from inventory completely, you must delete the item from each branch individually.
Restoring a Deleted Item
You can restore deleted inventory items to a branch or satellite. You must first perform a search with the correct branch or satellite to get a list of inventory items.
Use the following steps to restore a deleted item to the inventory:
1. After performing a search for the desired branch or satellite, choose Undelete.
w A list of deleted items opens.
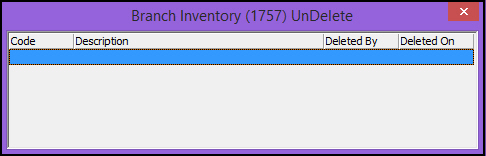
2. Double-click the item you want to restore to the inventory.
w The item is restored to the inventory displayed in the middle pane of the window.
Zooming into the Sublevel
The Branch Inventory window contains a sublevel that has three tabs for additional information for each inventory item:
The Log tab
The Open Order tab
The Purchase History tab
To access the sublevel tabs, choose Zoom in the Branch Inventory toolbar.
Note: The Satellite Inventory sublevel contains only the Log tab. The Open Order and Purchase History tabs do not appear in the Satellite Inventory sublevel.
The Log Tab
The Log tab displays detailed information of transactions made for the selected inventory item. The following graphic shows the Log tab with information displayed.

Column Descriptions - Log Tab
The following table describes the columns used in the Log Tab.
Column |
Description |
Date |
Transaction date for the selected item. |
Time |
Transaction time for the selected item (in HH:MM:SS format). |
User ID |
User who entered the transaction. |
Type |
Transaction type. |
Comment |
Comment entered at the time of the transaction. Comment field populated from RTM window accessed in Program 571 and 1757. |
Sequence # |
Work order sequence number for the item. When the transaction pertains to a kit or package of items picked from or returned to a work order, the individual items appear in the Log with the same work order and line number, and each item has its own sequence number. |
Quantity |
Item quantity in the transaction. |
Branch |
Branch ID to where the selected item was transferred or from where the item was transferred. |
Reference Number |
Reference number associated with the transaction. Depending on the type of transaction, this may be a purchase order number, a work order number, or a reference number entered at the time of the transaction. |
Line Index |
Line number where the item appears on the referenced Work Order. |
Satellite |
Satellite to which the selected item was transferred. This column allows you to track transfers from Branch Inventory to Satellite Inventory. |
PO Work Order Number |
Work order number associated with the purchase order for the selected item. |
Log Only Transaction Types
Some transaction types listed in the Log tab appear in the Type drop-down menu of the Inventory Transactions window. These are described under Entering Inventory Transactions. Some transaction types only appear in the log when you perform actions in other areas of SBN. These types are described below.
The following table describes transaction types that only appear in the Log tab.
Type |
Description |
ORDE |
Appears in the Log tab when you convert a requisition that contains the selected item into a purchase order in Purchasing (program #571). |
RECE |
Appears in the Log tab when you receive items on a purchase order using the Receive PO button. |
PICK |
Appears in the Log tab when you pick items from a work order in the Pick/Return Work Order window. |
RTRN |
Appears in the Log tab when you return items to a work order in the Pick/Return Work Order window. |
OHCK |
Appears in the Log tab when you enter an On Hand count for an item in the Physical Count window that is higher or lower than the current inventory count. |
DECH |
Appears in the Log tab when you enter a Defective count for an item in the Physical Count window. |
REST |
Appears in the Log tab when you use the Reset button in the Pick/Return Work Order window to clear the Complete column. |
The Open Order Tab
Use the Open Order tab to view any outstanding purchase orders for the selected branch that contain quantities of the item currently selected. The order count, receive count, vendor ID, and expected date all come from the purchase order.
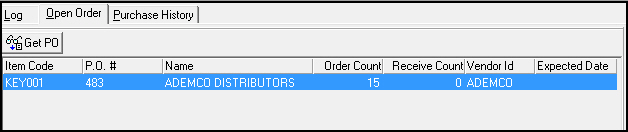
Column Descriptions - Open Order Tab
The following table describes the columns used in the Open Order Tab.
Column |
Description |
Item Code |
Item ordered from the vendor. |
P.O. # |
List of outstanding purchase order numbers. |
Name |
Name of the vendor company supplying the ordered item. |
Order Count |
Quantity of the selected item ordered. Count received from the PO. |
Receive Count |
Quantity of the selected item received. Count received from the PO. |
Vendor ID |
Vendor ID (abbreviation) supplying the ordered item. ID received from the PO. |
Expected Date |
Date the item is expected to arrive. Date listed on the PO. |
Getting the Purchase Order
You can open and view any of the purchase orders in the Open Order tab by highlighting the PO you want and choosing Get Purchase Order. The purchase order opens in a separate window in read-only mode.
The Purchase History Tab
Use the Purchase History tab to view all purchase orders for the Vendor in a selected branch that contain quantities of the item currently selected.

Column Descriptions - Purchase History Tab
The following table describes the columns used in the Purchase History Tab.
Column |
Description |
Vendor ID |
Vendor ID (abbreviation) supplying the ordered item. |
Name |
Name of the vendor company supplying the ordered item. |
P.O. # |
Purchase order number. |
Creation Date |
Date the purchase order was created. |
Order Count |
Quantity of the selected item ordered. |
Price |
Price paid for the selected item. |
Getting the Purchase Order
You can open and view any of the purchase orders in the Purchase History tab by choosing Get Purchase Order. The purchase order opens in a separate window in read-only mode.
Creating a New Return to Manufacturer Order
Choose New RTM to create a Return to Manufacturer order to return received items on a purchase order to the manufacturer or vendor.
Use the following steps to create a Return to Manufacturer order:
1. Select the purchase order with items you want to return from the Purchase History tab.
Note: You can only create RTM's for purchase orders with items you have received. (See Receiving Purchase Orders.)
2. Choose New RTM.
w The Return to Manufacturer window opens.
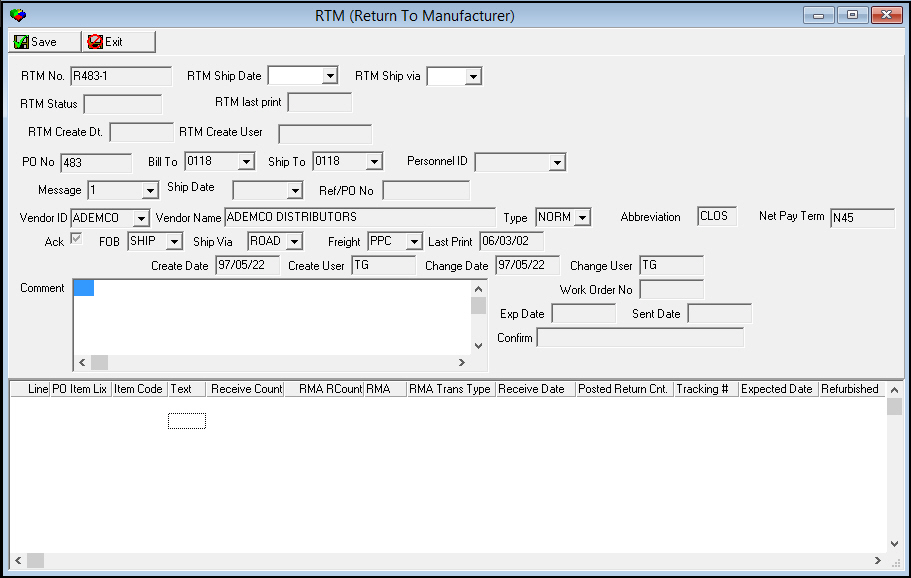
3. Enter details for the items you are returning.
4. Choose Save.
Viewing a List of Return to Manufacturer Orders
To view a list of open Return to Manufacturer orders, choose List RTM. You may enter an RTM or RMA number in the search parameters or select an RTM from the displayed list. Choose Get RTM to open the Return to Manufacturer window and make changes to an existing RTM.
Note: When the Open RTM's window opens, completed RTM's do not appear in the list. Select the Completed check box and choose Search to include completed RTM's in the list.
The following graphic shows the Open RTM's window.
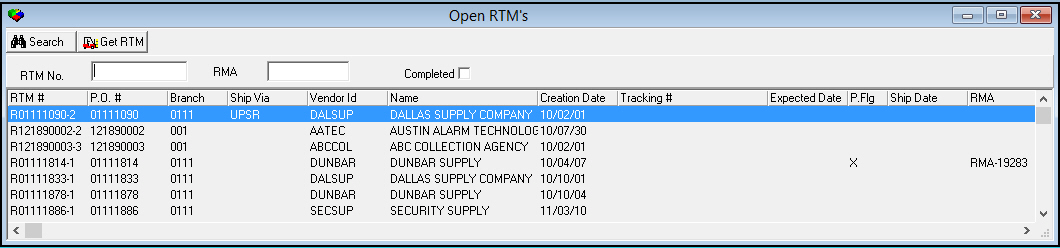
Choose Get RTM to open the Return to Manufacturer window for the selected RTM.
w The Return to Manufacturer window opens for the existing RTM.
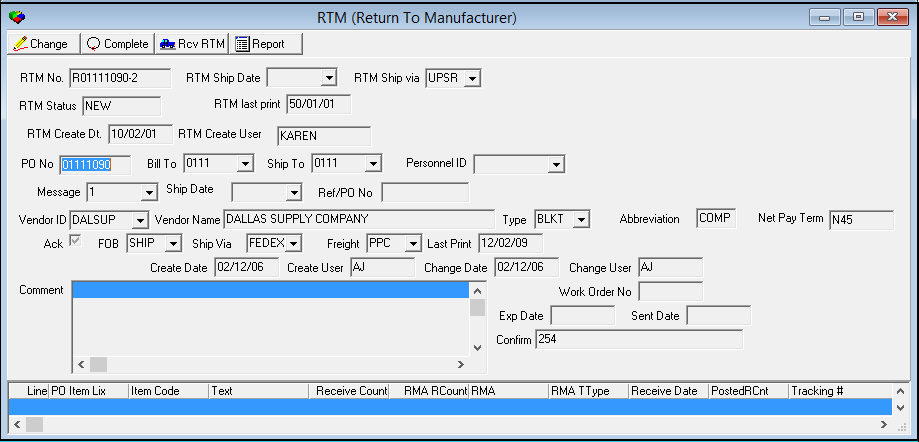
In this window you can choose Change to edit the selected RTM, Complete to close the RTM and prevent further editing, or Receive RTM to enter details on the RTM to prepare items for return to the manufacturer. In Receive RTM mode, you can select RMA types in the RMA Transaction Type column that appear on the Return to Manufacturer forms when you print report #2175.
RMA Transaction Types
The following table describes the available RMA Transaction Types.
Transaction Type |
Description |
RMAR |
Repair |
NEWA |
New Advance Replacement |
FURB |
Refurbish Advance Replacement |
CRED |
Credit Note: This is the only RMA Transaction Type that affects inventory counts. When you enter this type and receive the selected RTM, SBN decreases inventory for the selected items for the branch. |
Printing the Return to Manufacturer Report
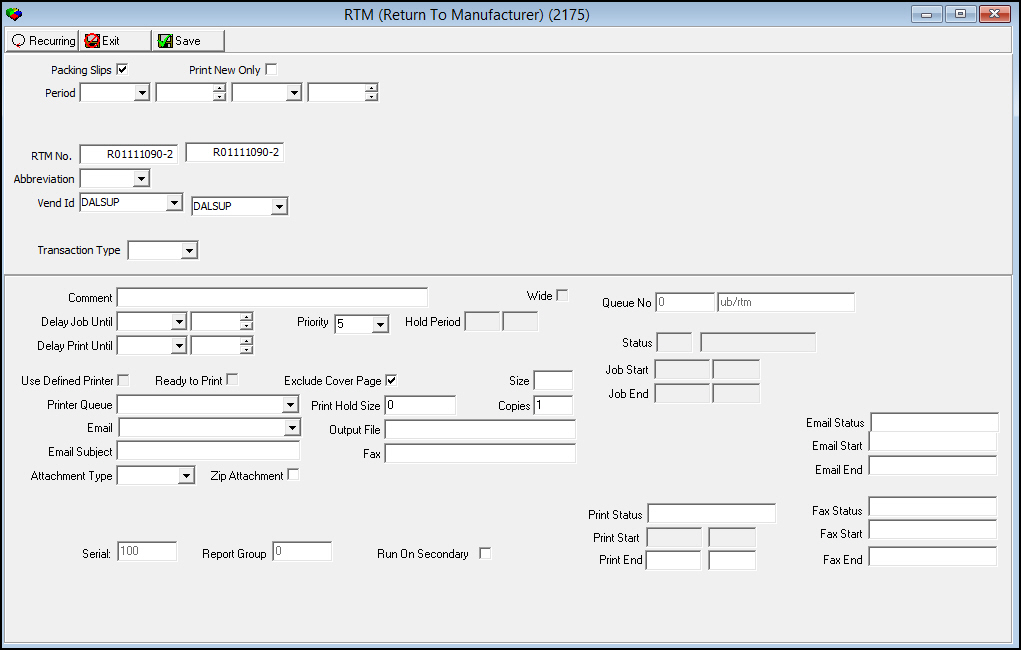
Report #2175 produces individual Return to Manufacturer forms to send to the manufacturer or vendor with defective items. If you choose the Run Report button in the Return to Manufacturer window, report #2175 opens with the select RTM number and Vendor ID automatically referenced.
For more information about this report, see Return to Manufacturer Report.
The following graphic shows the Return to Manufacturer report as it appears when you access it from the Return to Manufacturer window.
Viewing Availability of Items
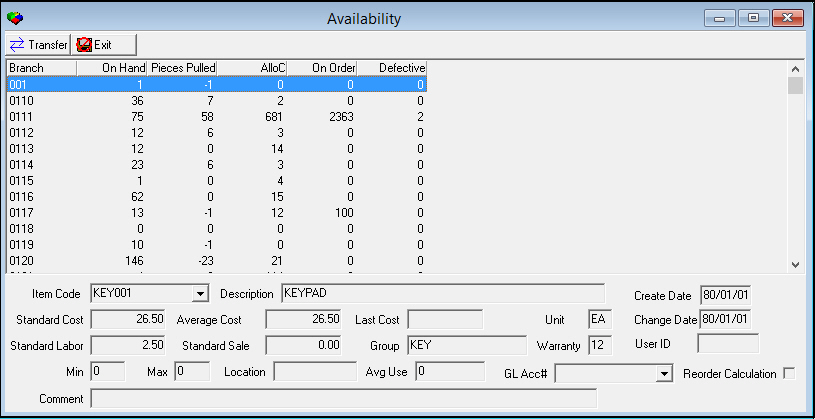
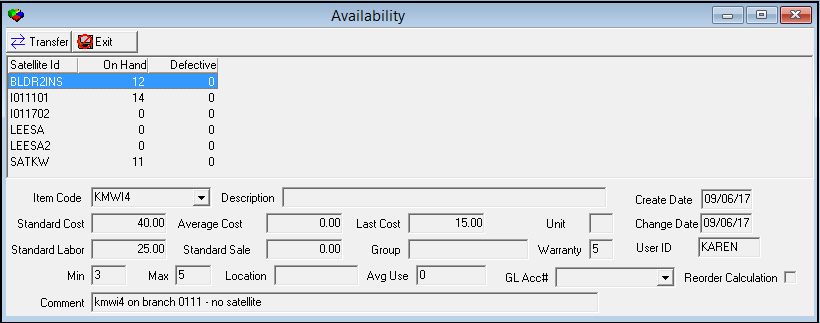
Choose Availability to view the number of items in each branch or satellite. The availability window displays different information for the branch view and for the satellite view.
Use the following steps to view availability for branches:
1. Perform a search with a branch ID.
2. From the search results, select a specific item.
3. Choose Availability.
w The Availability window opens and shows the totals for the selected item for all branches.
Use the following steps to view availability by satellite:
1. Perform a search with a satellite ID.
2. From the search results, select a specific item.
3. Choose Availability.
w The Availability window opens and shows the totals for the selected item for all satellites.
Transferring Items Between Branches or Satellites
In the Availability window, you can transfer items between branches or satellites by using Transfer.
Note: Action 1757/201 controls access to the Transfer button in the Availability window.
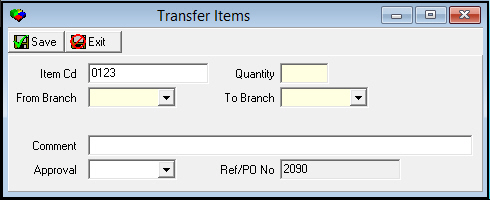
When you view the Availability window, the type of search you performed, branch or satellite, determines which Transfer Items dialog box opens.
The following graphic shows the Transfer Items dialog box for Branches.
The following graphic shows the Transfer Items dialog box for Satellites.
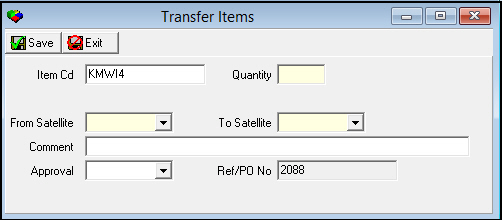
Use the following steps to complete an item transfer:
1. In the Availability window of the item you want to transfer, choose Transfer.
w The Transfer Items dialog box opens. The Item Code field is automatically filled in with the item for which you viewed availability.
2. Complete the Quantity, From Branch (or From Satellite), and To Branch (or To Satellite) fields.
3. Complete the remaining fields, as needed.
4. Choose Save.
w SBN transfers the items from the specified branch or satellite. The receiving branch or satellite inventory will not display the items transferred to it until the receiving branch or satellite performs a Transfer Receive transaction. (See Entering Inventory Transactions.)
Requisitioning Items
Use Requisitions to create and maintain product requisitions for inventory replenishment. A requisition is a request for inventory items that, when closed by the branch, is sent to Purchasing (program #571) where it is converted to a purchase order. Purchase orders are sent to vendors, who ship the requested items to the branch that requested them.
The Requisition window contains three panes:
The List pane - displays previously entered requisitions not yet converted to purchase orders
The Details Fields pane - contains fields changing or adding to the selected requisition
The Details Columns pane - contains columns for viewing the selected requisition items
The following graphic shows the Requisitions window with information displayed.
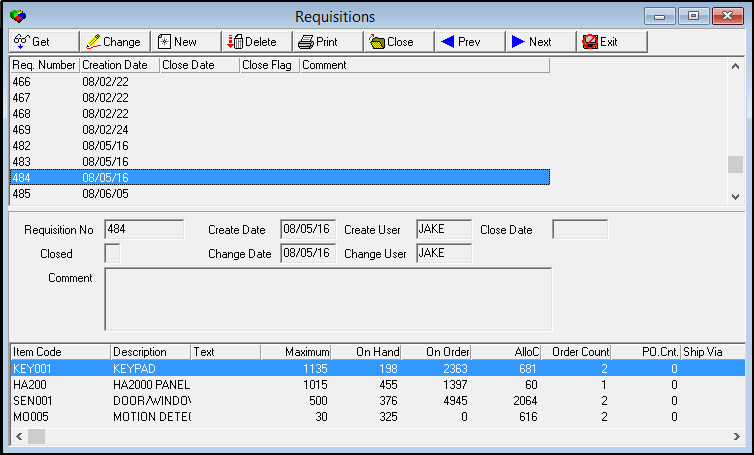
Field/Column Descriptions — Requisitions
The following table describes the fields and columns in the Requisitions window.
Field/Column |
Description |
Requisition Number |
Identification number SBN assigns to the requisition for use in Branch Inventory and Purchasing (program #571), where it may be converted to a purchase order. |
Creation Date |
Date the requisition was created. |
Close Date |
Date the branch closed the requisition and transferred it to Purchasing. (See Closing a Requisition.) Note: A requisition must be closed in Branch Inventory before it appears in the requisitions list in Purchasing. |
Close Flag |
If this field displays: l X — the requisition is closed and no lines have been converted to purchase orders l * — the requisition is closed and at least some of the lines have been converted into purchase orders l # — the requisition is closed and has been completely converted into purchase orders |
Comment |
Free-form text a user enters about the requisition. |
Requisition Number |
Requisition number created in Branch Inventory (program #1757). |
Create Date |
Date the requisition was created. |
Create User |
User name of person who entered requisition. |
Close Date |
Date the requisition was transferred to the purchasing program. |
Closed |
Indicates the close status. If this field displays: l X — the requisition has been transferred to purchasing, but not converted into a purchase order l * — the requisition has been transferred and some of the items have been converted into a purchase order l # — the requisition has been transferred and completely converted to purchase orders. |
Change Date |
Date the requisition was last changed. |
Change User |
User who last changed the requisition. |
Comment |
Free-form text about the requisition. |
Item Code |
Item code you are ordering. (This menu originates from program #1535.) |
Description |
Text description of the item attached to the item code. |
Text |
Free-form text that shows up in the Text 2 field of the purchase order. |
Maximum |
Maximum quantity of the item to stock for the selected branch. |
On Hand |
Number of units currently on hand at the selected branch. |
On Order |
Number of units on order (if the requisition item has been converted to a purchase order). |
Pieces Allocated |
Number of units allocated. |
Order Count |
Number of units ordered in the requisition. |
Purchase Order Count |
Number of units included on the purchase order (if the requisition item has been converted to a purchase order). |
Ship Via |
Preferred shipping carrier for this order. (This menu originates from program #1764, abbreviation 01.) |
Creating a Requisition
Use the following steps to create a new requisition:
1. Choose Requisitions.
w The requisitions window opens.
2. Choose New.
w Fields in the details pane open for new information. (The fields that do not open will fill automatically when you choose Save.)
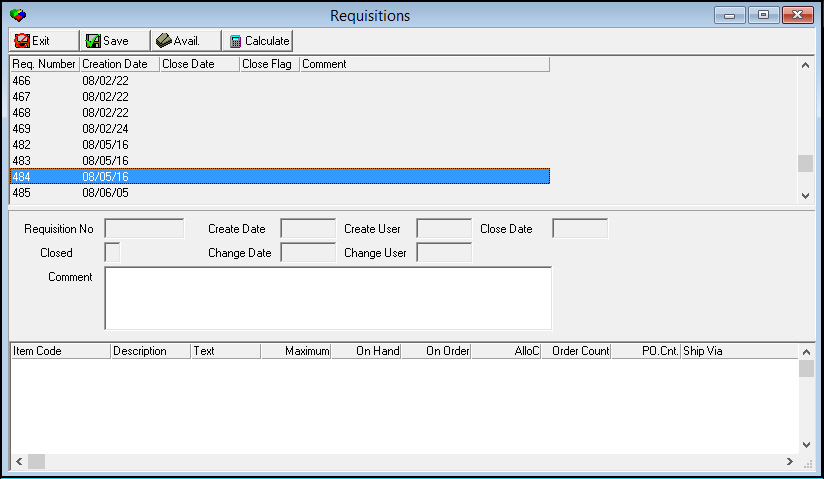
3. In the Comment text box, you may enter a comment to identify your requisition.
4. In the Details columns, choose the Item code of the first item you wish to order. (When you choose an item, the Description, Maximum, On Hand, On Order, and Pieces Allocated columns automatically fill in.) You may enter text describing the requisition. Enter an Order Count (how many units to order), and choose a shipping method, if preferred.
Note: The Purchase Order Count is read-only. It will display 0 until the requisition is converted to a purchase order in program #571.
5. Enter the rest of the items you wish to order.
Note: A requisition that is not in inventory cannot accept an added item. If attempting to add an item to this type of requisition, error message displays, stating: "SEN001 must be added to inventory before it may be added to a requisition."
6. Choose Save.
w The Requisition Number, Create Date, and Create User automatically populate.
You may change an existing requisition by selecting one from the list and choosing Get. Then choose Change, and alter the requisition as needed. Choose Save.
Closing a Requisition
If the requisition is complete and ready to send to Purchasing (program #571), choose Close. Closed requisitions with an X in the Close Flag column can be reopened for changes by choosing Close again. If the Close Flag column displays an asterisk (*), some of the items have been converted to purchase orders and the requisition cannot be reopened.
Viewing Availability of a Requisition Item
You may view the availability of an item in the Details Columns pane (upper pane) by selecting the item and choosing Availability.
Viewing the Purchase History of a Requisition Item
You may view the purchase history of an item in the Details Columns pane (upper pane) by selecting the item and choosing Purchase History.
Ranking Inventory
Use Rank Inventory to view the inventory for a branch and to sort the columns to rank by:
Last cost
Month-to-date purchases
Annual and monthly cost
Percentage of total inventory
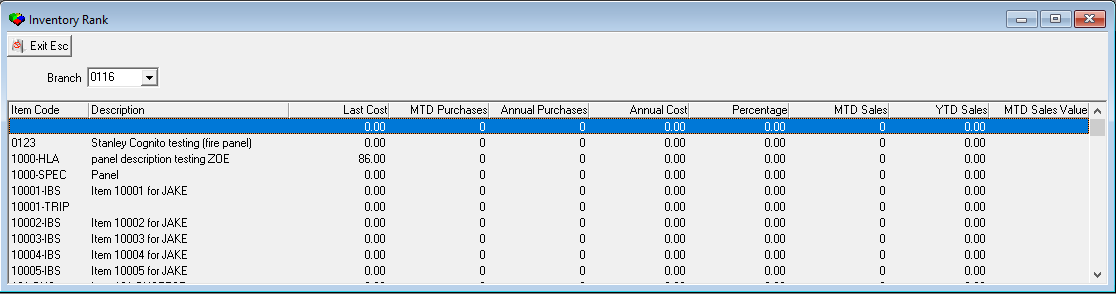
Field Descriptions - Ranking Inventory
The following table describes the columns used in Inventory Rank
Field |
Description |
Branch |
Branch with inventory currently displayed. |
Item Code |
Item Code Numbers |
Description |
Description of Item |
Last Cost |
Last Cost associated with Item. |
MTD Purchases |
Quantity of this item purchased in the current month. |
Annual Purchases |
Quantity of this item purchased in the previous 12 months. |
Annual Cost |
Value of the annual purchases (Annual * Last Cost) |
Percentage |
Percentage of annual purchases that apply to this item. (Annual Cost of this item/Sum of annual cost for all items.) |
MTD Sales |
Quantity of this item sold in the current month. |
YTD Sales |
Quantity of this item sold in the previous 12 months. |
MTD Sales Value |
Sale value of item sold in the current month. |
Viewing Inventory Allocations
Allocated items are set aside for the work orders that require them. Though the items are technically still part of inventory, allocations indicate items will soon be taken from the branch to be used in a customer installation.
Use Allocations to view all items needed for a specific date range. You can view:
Items
Quantities
Work orders that contain the items
The items that appear in red need to be ordered as soon as possible. These items have a negative or zero On Hand quantity, a zero On Order quantity, and an Allocation Summary quantity greater than zero.
Note: An item kit must exist in the selected branch's inventory for a work order containing that item kit to appear in the Allocations window.
If a work order contains an item kit (defined in Items - program #1535), SBN saves the item kit contents when you approve the work order. The Allocations window displays item kit contents as they were when the work order was approved. If you change the item kit in program #1535 after approving the work order, your changes will not appear in the Allocations window.
To view the allocations, choose Allocations [SHIFT+F7].
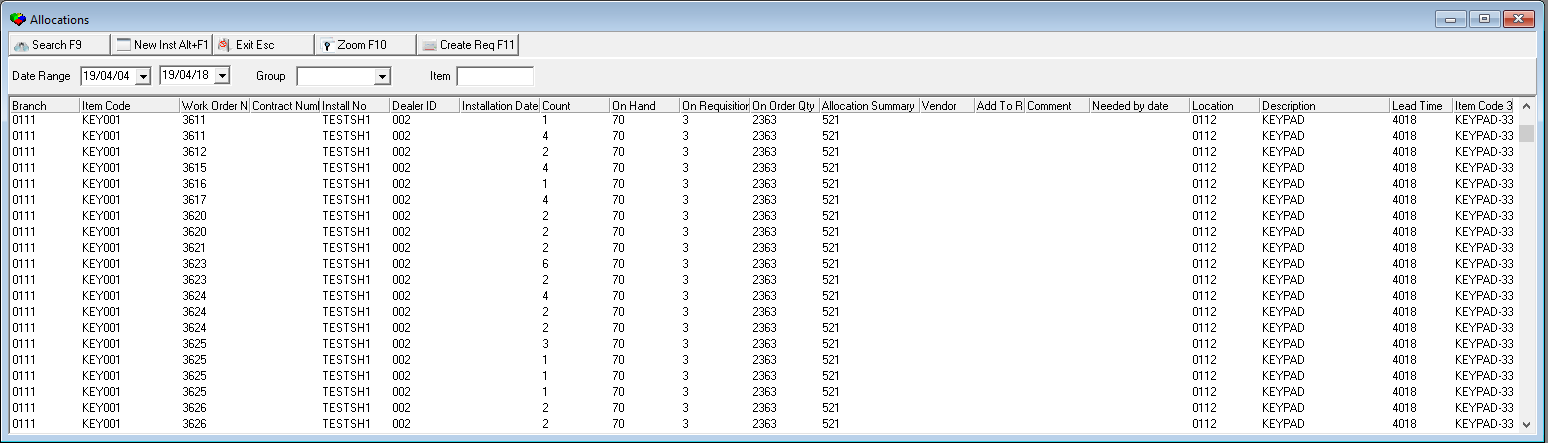
Field Descriptions - Search Parameters
The following table describes the fields used in the Allocations search parameters pane.
Field |
Description |
Date Range |
Allows search parameters within a specific date range of possible allocations. |
Group |
Allows search parameters based upon the type of item. |
Item |
Allows search parameters based upon an entered item number. |
Column Descriptions - Search Results
The following table describes the columns used in the Allocations search results pane.
Column |
Description |
Branch |
Branch where the allocated item is currently located. Note: You may only view or make changes to branches listed in your user branch profile. |
Item Code |
Item code of the allocated item. |
Work Order Number |
Work order that contains the allocated item. |
Contract Number |
Contract associated with the work order that contains the allocated item. |
Install No |
Identifies the installation number associated with the selected work order. |
Dealer ID |
Dealer of the installation associated with the work order. |
Installation Date |
Displays the date of item installation. |
Count |
Displays the number of items available. |
On Hand |
Based upon the item quantity in stock. Repeats if it displays more than once. |
On Requisition Qty |
Quantity of the item on both open and closed requisitions that have not yet been converted to purchase orders. |
On Order Qty |
Quantity of the item that has been ordered but not yet received. |
Allocation Summary |
Total number of the selected item allocated on all work orders for the dates entered in the Date Range Search parameters at the top of the Allocations screen. |
Vendor |
Displays the primary vendor name associated with the selected item. |
Add to Requisition |
When checked, the selected item is added to the created requisition. |
Comment |
Displays the customer name and/or the work order number. |
Location |
Displays the Bin Location of the item. |
Description |
Displays the Description the item being allocated. |
Needed By Date |
Displays the Date that a Work Order is needed by. (This originates from the Work Order Details tab.) |
Lead Time |
Average time in days to receive the item. |
Item Code 3 |
Additional Item Code. |
Counting Items
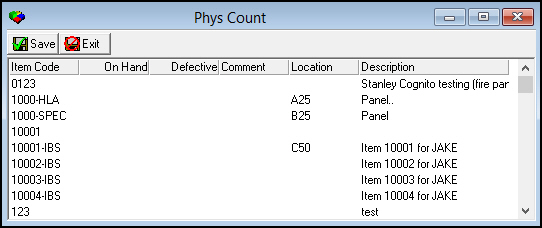
Use Physical Count to enter physical counts of items for inventory. This window displays a list of all items for the branch selected. You can enter
On Hand and Defective quantities for each item
Comments
w A comment typed in this window updates the comment for the item in the main window of Branch Inventory. A blank comment does not update the item record.
Item locations, if needed
Note: Previously entered locations appear in the window.
To open the Physical Count window, choose Physical Count.
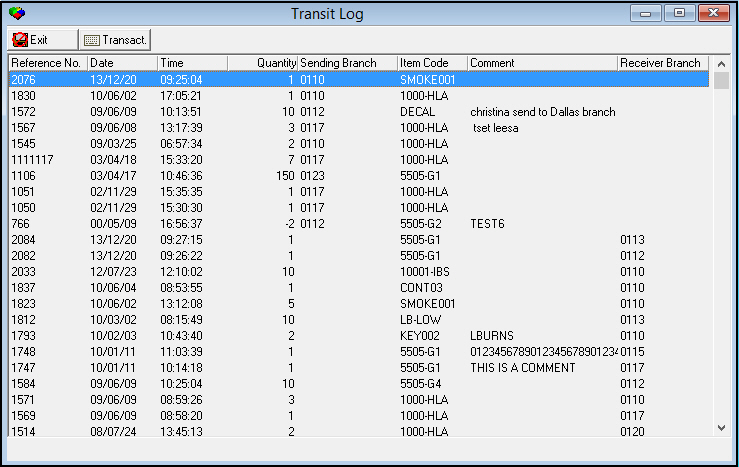
Viewing the Transit Log
Choose Transit Log to view a list of transfers that are in transit from other branches. You need to receive these transfers before they are available for distribution.
Entering Inventory Transactions
From the Transit Log, choose Inventory Transactions to enter positive and negative inventory adjustments. Each inventory transaction must have a Transaction Type. This type defines how SBN changes the inventory quantities.
Note: There is an action for each transaction type in program #1502, (actions 1757/300-314). Administrators can select which transaction types appear in the Type drop-down menu of the Inventory Transactions window.
The Log tab in the Branch Inventory sublevel displays the following transaction types when they are used, as well as a few transaction types that do not appear in the Transaction Type drop-down menu. The log-only transaction types are described under The Log Tab.
Transaction Types
The following table describes transaction types and whether they are available for Branches or Satellites.
Type |
Description |
Branch |
Satellite |
TRAN |
Use to enter a transfer to another branch. This deducts from on-hand quantities and adds to the transit log for the intended branch. |
X |
|
DEFE |
Use to place an item in the Defective status. This deducts items from on-hand quantities and adds to the defective quantities. |
X |
X |
REPA |
Use to place a defective item back into inventory. This adds to the on-hand quantity and deducts from the defective quantity. This transaction requires an entry of the original purchase price. |
X |
X |
TREC |
Use to enter the receipt of items transferred from another branch. This adds to the on-hand quantity. If the item does not exist in your branch, SBN adds it for you. Note: SBN displays a message when you change the quantity on this type of transfer. |
X |
X |
INTR |
Use to record instant transfer of items to another satellite within the same branch. This deducts from the sending satellite on-hand inventory and adds to the receiving satellite on-hand inventory. |
X |
|
REPL |
Use to replenish satellites. This deducts from the on-hand quantity. |
X |
|
UADJ |
Use to make positive manual inventory adjustments. This adds to the inventory. |
X |
X |
DADJ |
Use to make negative manual inventory adjustments. This subtracts from the inventory. |
X |
X |
INRN |
Internal use. Use to make negative manual inventory adjustments for use with other internal departments in the company. This subtracts from the inventory. When you select this transaction type, SBN defaults the item code of the item that was highlighted when you chose Enter Transactions into the Item Code column of the grid. Note: The comments cell contains a menu for this transaction type. (This menu originates from program #1764/11.) |
X |
|
SERV |
Use to identify transfers to the service department. This deducts from the on-hand quantity. |
X |
|
TSTO |
Use to identify transfers to the truck inventory. This deducts from the on-hand quantity. Note: If you are using Satellite Inventory, you would not use this transaction type. This is a special designation. |
X |
X |
RTBR |
Use to identify new items that a partner returns to a branch. SBN adds the quantity back to the On-Hand column. |
X |
X |
DUAD |
Use to manually adjust the defective quantity up. Note: Adjustments with this type only affect the count in the Defective column of the item list. This does not affect the on hand quantity. |
X |
X |
DDAJ |
Use to manually adjust the defective quantity down. Note: Adjustments with this type only affect the count in the Defective column of the item list. This does not affect the on hand quantity. |
X |
X |
The Inventory Transactions Window
The following graphic shows the Inventory Transactions window with information displayed.
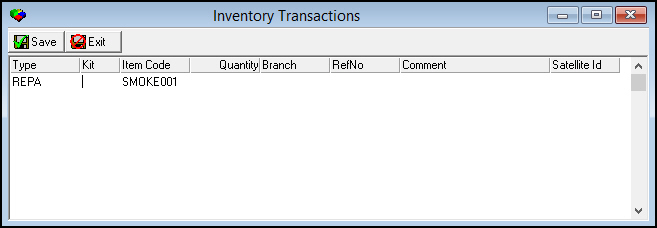
Note: If you enter a manual inventory adjustment using transaction type DADJ or UADJ that would bring the On Hand quantity of an item below zero, SBN displays an error message: "Not enough items on hand."
Receiving Purchase Orders
Choose Receive PO to:
Receive purchase orders in the Branch Inventory program
Enter receipts for the selected purchase order
The PO Receipts Detail pane in the lower part of the window lists all items for the purchase order that you have not completely received or flagged as complete.
Note: Use the menu in the PO No. field to search all open purchase orders.
Note: If option bl169 is on when you receive a purchase order for a satellite, SBN automatically transfers the items on the purchase order from the branch to the satellite inventory (using the Instant Transfer transaction: type INTR). You can see the Instant Transfer in the Log tab of the branch and the satellite. If option bl169 is off when you receive a purchase order for a satellite, SBN adds the items on the purchase order to the branch inventory. You must transfer from the branch to the satellite manually using Inventory Transactions.
Use the following steps to receive purchase orders:
1. Choose Receive PO.
w The Purchase Order window appears.
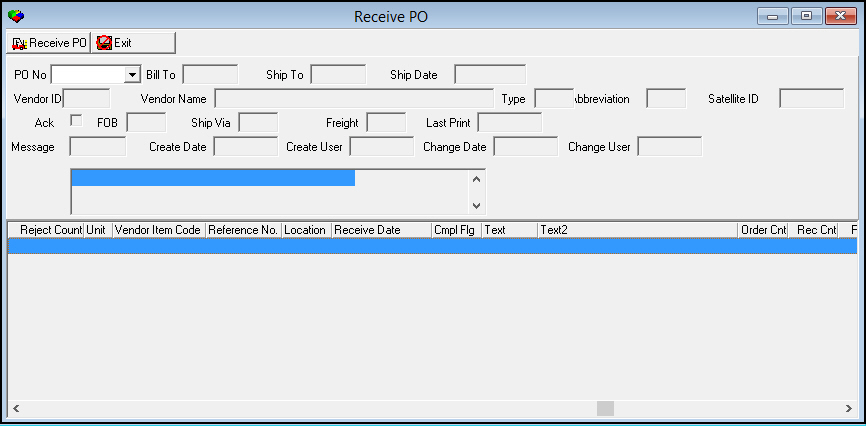
2. From the menu, select the purchase order you want to receive.
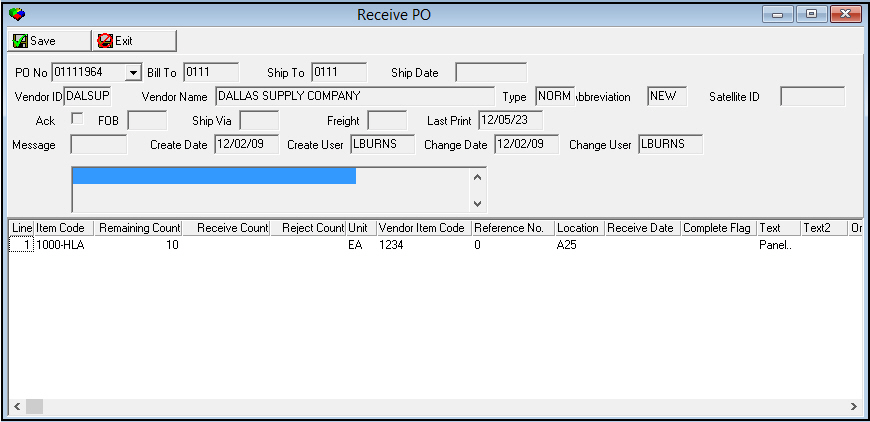
3. Choose Receive PO.
w The Receive PO window appears.
4. Type the received count for each item listed.
5. Choose Save.
w SBN displays the Inventory batch number.
6. Choose OK.
Replenishing Satellites
Use Replenish Satellites to calculate the replenishment needs of the satellites.
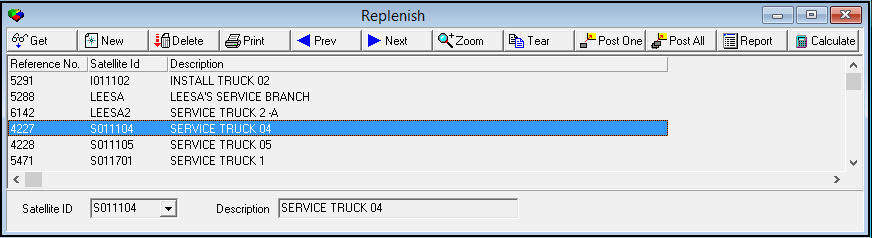
Note: Use the Post One button to post only the highlighted inventory batch. Use the Post All button to post all displayed batches.
Zooming in/out of the Sublevel
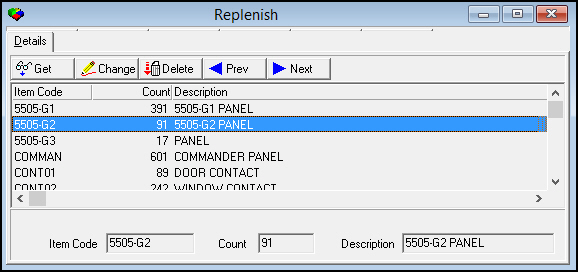
Choose Zoom In/Out of Sublevel to view the details of each replenishment record. The Details tab displays the following information for each item that needs replenishment:
The item code
The count of each item
The description of each item
From the Details tab, you can also change or delete items for each record.
Picking or Returning Work Orders
Use Pick or Return Work Order to pick or return all or part of the items needed for a work order. Entries saved in this window update job costing. Once you have selected a work order number, SBN fills in the items and quantities contained on that work order.
Note: The Pick/Return Work Order window displays item kit contents as they were when the work order was approved. If you change an item kit in program #1535 after approving a work order that contains the kit, your changes will not appear in this window.
Note: Items deleted from a work order (by entering a blank in the Count column of the Work Order Details tab) do not appear in the Pick/Return Work Order window.
After picking the work order, use Report to open the parameter window for the Work Order Report (program #2002) with the work order number filled in for the last picked work order.
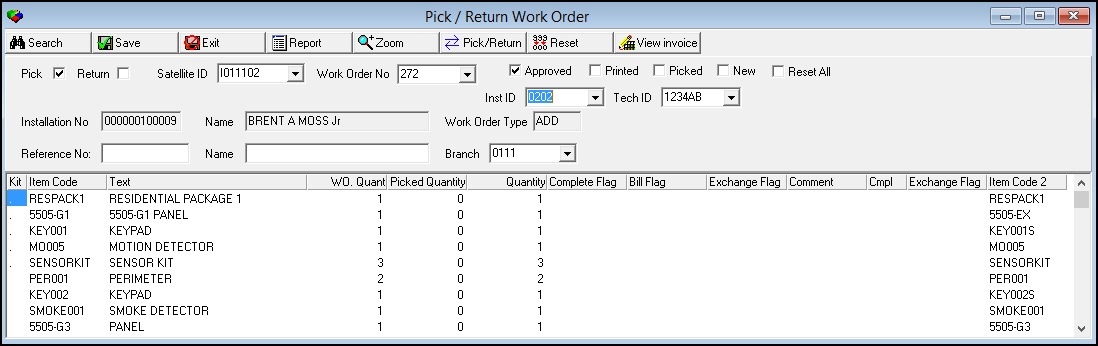
If you pick a work order and the branch does not have enough items on hand, SBN displays an error message and forces the focus of the window to the Quantity column of the item for which the branch does not have the full quantity.
The Reset button is available if you search on a work order. The Reset button clears the Completed column. Confirm your choice when asked in the pop up window. The new log type REST can be seen in the log when you reset the Complete flag.
Note: Action 1757/15 controls the Pick/Return Reset button.
Field Descriptions - Search Parameters
The following table describes the fields in the pane of search parameters.
Field |
Description |
Pick |
Indicates that you want to pick the items from inventory. When you save the transaction, SBN deducts the items from inventory. |
Return |
Indicates that you want to return the items previously picked. When you save the transaction, SBN adds the items into inventory. |
Satellite ID |
Indicates the Satellite ID from which you pick inventory. |
Work Order Number |
Menu containing all open work orders. Note: When option ba155 is on, the menu displays only approved work orders. |
Approved |
Select this check box to limit the menu of work order numbers to approved uninvoiced work orders. |
Printed |
Select this check box to limit the menu of work order numbers to printed work orders. |
Picked |
Select this check box to limit the menu of work order numbers to picked work orders. |
New |
Select this check box to limit the menu of work order numbers to new work orders. |
Reset All |
Select this check box to display all open work orders in the Work Order Number drop-down menu. |
Inst ID |
Installer ID. |
Tech ID |
Technician ID |
Branch |
This field appears only when option in006 is on. You may select a branch ID to limit the results of searches using the following status flags to those work orders associated with the selected branch: l Approved l Printed l Picked l New Note: If you leave this field blank, the search returns all work orders with that status. |
Installation No |
Identifies the installation number associated with the selected work order. |
Name (No Label) |
First and Last name associated with the selected account. |
Work Order Type |
Identifies the type of work order. |
Destination Center |
Branch to which you want to transfer the inventory picked for this work order. Note: To use this function, you must l Turn on option in006 l Enter a check mark in Inv Transfer to Installation Branch or Inv Transfer to Service Branch on the work order type. |
Reference No |
Reference number for the items transferring to the destination center. |
Name |
Reference name for the items transferring to the destination center. |
Branch |
Receiving branch for the items transferring to the destination center. |
Column Descriptions - Search Results
The following table describes the columns used in the pane of search results.
Column |
Description |
Kit |
If this field displays a >, the selected item is a kit. If this field displays a -, the selected item is a component of a kit. Note: You can pick kit items separately. |
Item Code |
Code of the item contained in the work order. (This menu originates from program #1535.) |
Text |
Text description of the item contained in the work order. (This description originates from program #1535.) |
WO Quantity |
The quantity of the item contained in the work order. |
Picked Quantity |
The quantity of the item previously picked. |
Quantity |
The quantity that you want to pick on this transaction. Note:
If the work order count displays a
negative value and option ba339 is
on, the quantity in this pane defaults to 0 instead of the
negative value on the work order. |
Complete Flag |
When you have finished picking the selected item, enter an X in this column. Note: You can mark an item as complete even if the picked quantity is less than the original quantity of the work order. |
Bill Flag |
Enter an X in this column to add an item on the picking window that SBN adds to the work order as a chargeable item. |
Exchange Flag |
Enter an X in this column if you are picking the selected item as an exchange for another item. SBN adds the exchange item to the work order at no charge. |
Comment |
You may type a free-form comment about the selected item. |
Completed |
SBN displays an X in this column if the selected item has been completely picked or previously marked as completed. |
Exchange Flag |
SBN displays an X in this column if the selected item has been previously marked as an exchange. |
Item Code 2 |
Item Code 2 for the item contained in the work order. (This menu originates from program #1535.) |
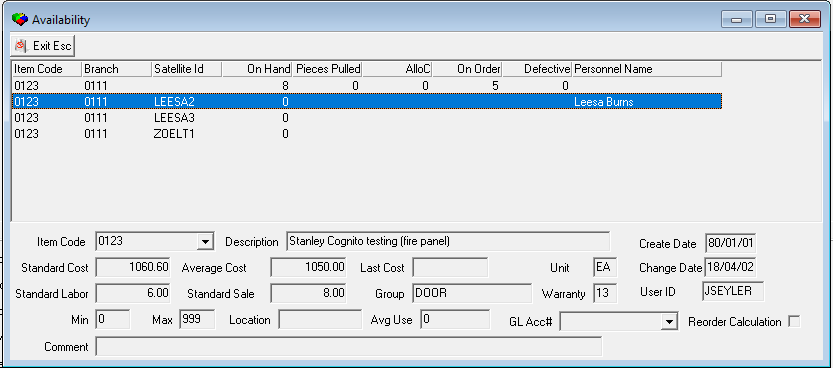
Viewing Satellite and Branch Availability
Choose Satellite/Branch Availability to view the availability for satellite and branch combined. This read-only window displays the inventory information for the branch and all satellites.
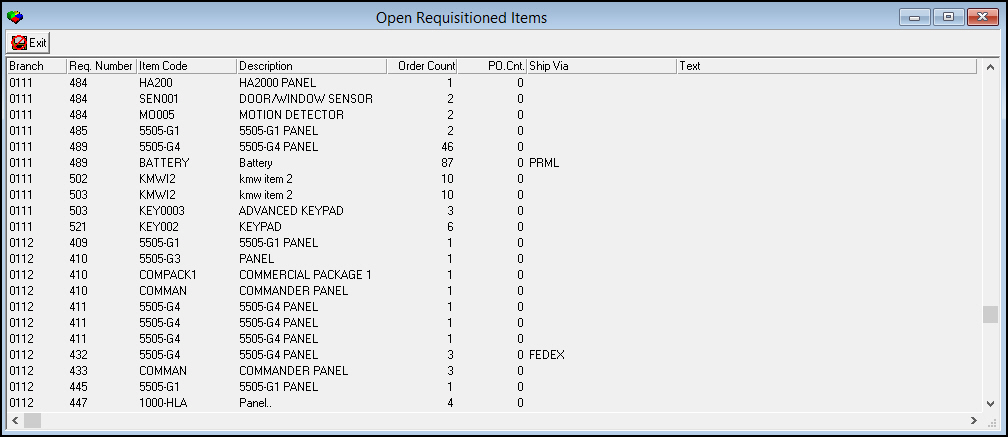
Viewing Open Requisitioned Items
Choose View Open Requisitioned Items to view all open requisitions that have not yet been converted into purchase orders. This is a read-only window.
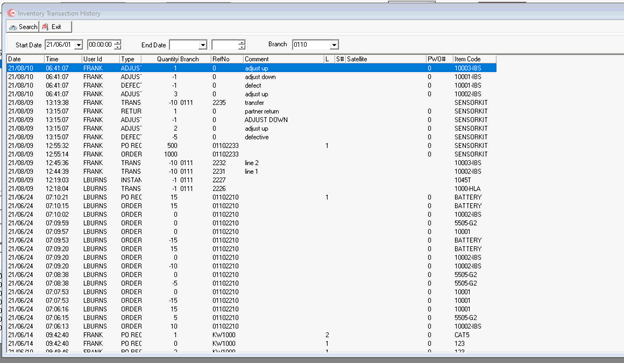
Sorting Inventory Transactions by Branch
Users can sort inventory transactions by Branch by selecting Branch Transaction Search.
w The Branch Transaction window opens.
Field Descriptions - Search Parameters
The following table describes the fields used in the Inventory Transactions by Branch search parameters pane.
Field |
Description |
Date Range |
Allows search parameters within a specific date range of possible allocations. |
Branch |
Allows search parameters based upon the Branch. |
Column Descriptions - Search Results
The following table describes the columns used in the Inventory Transactions by Branch search results pane.
Column |
Description |
Date |
The date of the inventory transaction. |
Time |
The time of the inventory transaction. |
User ID |
The user who performed the inventory transaction. |
Type |
The type of transaction performed. |
Quantity |
Item quantity in the transactions |
Branch |
Branch ID to where the selected item was transferred or from where the item was transferred. |
Reference Number |
Reference number associated with the transaction. Depending on the type of transaction, this may be a purchase order number, a work order number, or a reference number entered at the time of the transaction. |
Comment |
Comment entered at the time of the transaction. |
Line Index |
Line number where the item appears on the referenced Work Order. |
Sequence Number |
Work order sequence number for the item. When the transaction pertains to a kit or package of items picked from or returned to a work order, the individual items appear in the Log with the same work order and line number, and each item has its own sequence number. |
Satellite |
Satellite to which the selected item was transferred. This column allows you to track transfers from Branch Inventory to Satellite Inventory. |
PO Work Order Number |
Work order number associated with the purchase order for the selected item. |
Item code |
Item ordered from the vendor. |
Batch Number |
Batch number associated with the selected inventory transaction. |
Inventory Transaction Batch Inquiry
Users can view a history of items previous entered for a specific Batch by selecting Inventory Transaction Batch Inquiry..
w The Transaction Batch Inquiry window opens.
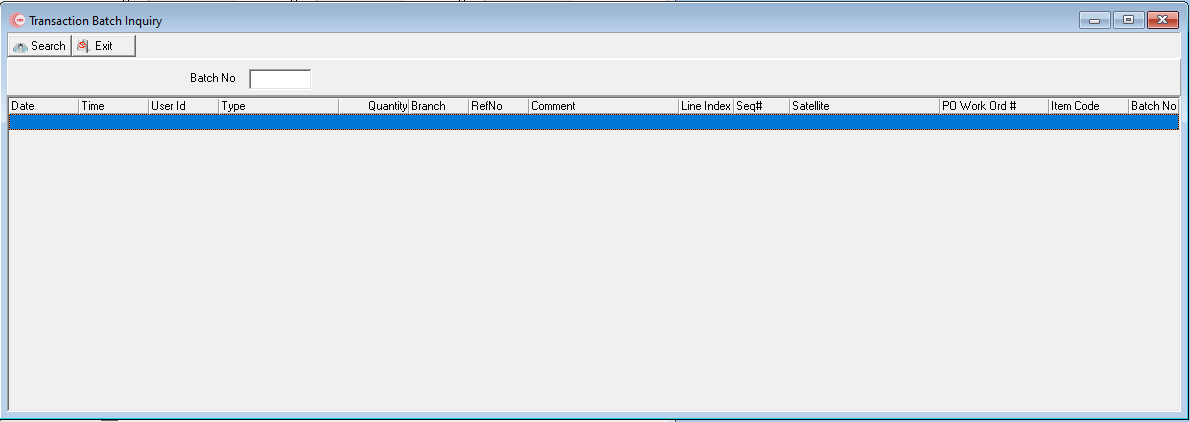
Field Descriptions - Search Parameters
The following table describes the fields used in the Inventory Transactions by Branch search parameters pane.
Field |
Description |
Batch Number |
Enter a valid Batch Number to see all Items entered for that specific Batch. |
Column Descriptions - Search Results
The following table describes the columns used in the Inventory Transactions by Branch search results pane.
Column |
Description |
Date |
The date of the inventory transaction. |
Time |
The time of the inventory transaction. |
User ID |
The user who performed the inventory transaction. |
Type |
The type of transaction performed. |
Quantity |
Item quantity in the transactions |
Branch |
Branch ID to where the selected item was transferred or from where the item was transferred. |
Reference Number |
Reference number associated with the transaction. Depending on the type of transaction, this may be a purchase order number, a work order number, or a reference number entered at the time of the transaction. |
Comment |
Comment entered at the time of the transaction. |
Line Index |
Line number where the item appears on the referenced Work Order. |
Sequence Number |
Work order sequence number for the item. When the transaction pertains to a kit or package of items picked from or returned to a work order, the individual items appear in the Log with the same work order and line number, and each item has its own sequence number. |
Satellite |
Satellite to which the selected item was transferred. This column allows you to track transfers from Branch Inventory to Satellite Inventory. |
PO Work Order Number |
Work order number associated with the purchase order for the selected item. |
Item code |
Item ordered from the vendor. |
Batch Number |
Batch number associated with the selected inventory transaction. |
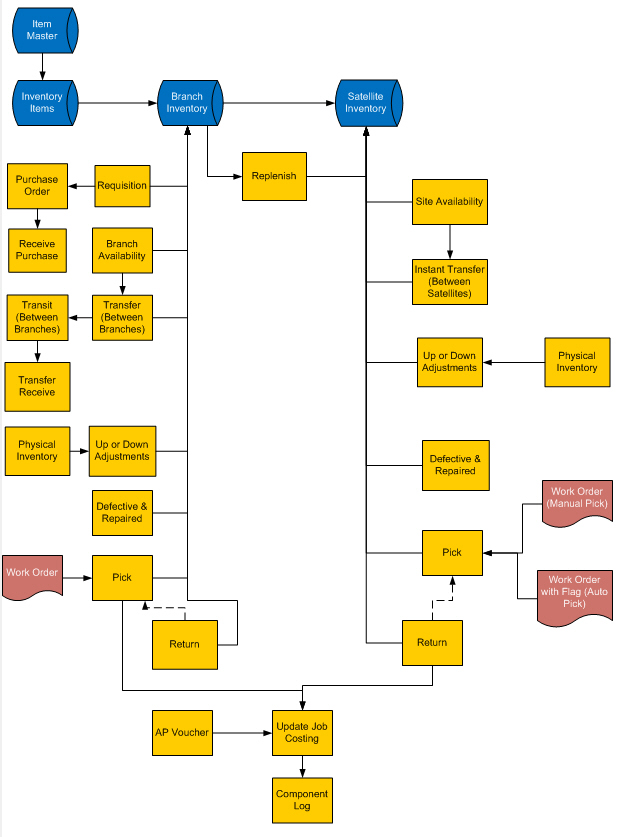
Inventory Flow Chart
The following graphic shows the flow of inventory through the SBN system.
Related Programs
The following table lists programs related to Branch Inventory.
Program |
Number |
Document Link |
Description |
Purchasing |
571 |
Converts inventory requisitions into purchase orders. |
|
Branch Profiles |
1530 |
Define and maintain branch profiles where inventory is located. |
|
Miscellaneous Inventory Fields |
1764 |
Define the Group drop-down menu of Branch Inventory search parameters. (Go to Index #8 Inventory Groups in Miscellaneous Inventory Fields to define the menu of available inventory groups of items.) |
|
Satellite Warehouses |
1605 |
Define inventory locations that are sub-sites of the branch inventory. |
|
Background Tasks |
1712 |
Background Job 15 determines the number of days included in the inventory allocation calculation. |
|
Items |
1535 |
Define, change, and delete any items used in Branch Inventory. |
|
Inventory Close |
703 |
Close specific inventory periods. This updates the Average Cost and Average Use of items in Branch Inventory. |
|
Chart of Accounts |
1835 |
N/A |
Define the menu of valid Inventory GL numbers used when creating purchase orders. |
Inventory Reports |
|||
Work Order Report |
2002 |
N/A |
Provides detailed information about the work order, including equipment to install, instructions for installation and picking information for items. |
Consolidated Inventory with Branch Details Report |
2039 |
N/A |
View the number of days of inventory on hand for up to nine branches. |
Inventory in Transit Report |
2149 |
N/A |
View totals of inventory items transferred from one branch to another during a specified period. |
Inventory List with Price Report |
2019 |
N/A |
View the last price paid for inventory items. |
Inventory Movement by Branch Report |
2020 |
N/A |
View receipts to and releases from inventory for items. |
Inventory Special Transactions Report |
2150 |
N/A |
Display summaries of items by transaction type. |
Inventory Summary Report |
2013 |
N/A |
View a summary of the total value of inventory for each defined inventory group. |
Periodic Inventory Report |
2015 |
N/A |
View an inventory snapshot and value of stock by item for a specific branch. |
Physical Count Worksheet Report |
2014 |
N/A |
View lists of items by branch or satellite with blank spaces for writing in physical counts. |
Reorder List Report |
2018 |
N/A |
View inventory items that are flagged for reorder. |
Satellite Replenishment Report |
2140 |
N/A |
Use as a picking document for the replenishment needs of satellite warehouses. |
Usage by Items Report |
2017 |
N/A |
View usage by item within inventory groups. |
Work In Process Inventory Report |
2093 |
N/A |
Identifies items that have been pulled from inventory, but not billed. |
Return to Manufacturer Report |
Generate individual Return Merchandise Authorization request forms to send items back to manufacturers or vendors. |
||
Open RTM List Report |
View a list of open Return to Manufacturer orders. |
||
Button Functions
The following table displays the buttons, describes the shortcut keys, actions, and functionality.
Button |
Name |
Shortcut Key |
Action |
Description |
|
Search |
shift+f9 |
1757/ 7 |
Search for inventory items. |
|
Get Record |
alt+f1 |
1757/ 1 |
View details of selected inventory item. |
|
Change Record |
f2 |
1757/ 2 |
Change details of selected inventory item. |
|
New Record |
f3 |
1757/ 3 |
Add a new item to the inventory. |
|
Delete Record |
shift+f10 |
1757/ 4 |
Delete selected inventory item. |
|
Select Record to Undelete |
alt+f10 |
1757/ 5 |
Restore deleted inventory items. |
|
Print Selected Records |
ctrl+f8 |
1757/ 6 |
Print selected records. |
|
Copy Current Record |
shift+f3 |
1757/14 |
Use selected inventory item as a template for a new item. |
|
Zoom in/out of sublevel |
f10 |
1757/71 |
Access sublevel tabs. |
|
Previous Record |
f4 |
Go to previous record. |
|
|
Next Record |
f5 |
Go to next record. |
|
|
Tear Away Selected Tab |
f11 |
View selected tab in separate window. |
|
|
Availability |
shift+f4 |
1757/ 8 |
View number of items in each branch or satellite. |
|
Requisitions |
shift+f2 |
1757/50 |
Create and maintain product requisitions for inventory replenishment. |
|
Rank Inventory |
shift+f6 |
1757/80 |
View inventory for a branch and sort columns to rank. |
|
Branch Inventory Allocations |
shift+f7 |
1757/70 |
View all items needed for a specific date range. |
|
Physical Count |
f7 |
1757/60 |
Enter physical counts of items for inventory. |
|
Transit Log |
f8 |
1757/40 |
View list of transfers in transit from other branches. |
|
Enter Transactions |
f6 |
1757/ 9 |
Enter positive and negative inventory adjustments. |
|
Receive PO |
f9 |
1757/10 |
Receive purchase orders or enter receipts for selected purchase order. |
|
Refresh Interval |
f12 |
1757/11 |
Set interval for screen to refresh. |
|
Replenish Satellites |
shift+f5 |
1757/100 |
Calculate replenishment needs of satellites. |
|
Pick or Return WO |
shift+f8 |
1757/13 |
Pick or return all or part of the items needed for selected work order. |
|
Satellite/Branch Availability |
shift+f11 |
View availability for satellite and branch combined. |
|
|
View Open Requisitioned Items |
shift+f12 |
1757/12 |
View all open requisitions that have not yet been converted into purchase orders. |
|
Branch Transaction Search |
ALT+F2 |
1757/10 |
Opens window pane to the Inventory Transaction History pane where users can search for all inventory transactions. |
|
Inventory Translation Batch Inquiry |
ALT+F3 |
1757/111 |
Opens window pane to the Inventory Batch Inquiry screen where users can search a specific Batch Number see all the Items typed in for that specific Batch Number. |
|
Exit without saving |
esc |
Exit without saving changes to selected record. |
|
|
Save Existing Record |
enter |
Save changes to selected record. |





























Modifications and Updates to Branch Inventory
The following table lists modifications and updates to the Branch Inventory document.
Mod Number |
Date |
Description |
n/a |
07/10/08 |
document rewritten |
07.02.18415 |
05/12/09 |
Added Satellite column to sublevel Log tab |
07.02.18633 |
06/10/09 |
Included Transaction Types SERV and TSTO in Average Use calculation |
08.03.06876, 07.02.18642 07.02.18416 |
06/12/09 |
Added Item Code 2 column to the Pick/Return grid |
07.02.18865 |
09/01/09 |
Added option bl169 to automatically transfer items from branch to satellite when receiving a purchase order for a satellite. |
07.02.19092, 08.03.07122 |
10/25/09 |
SBN does not allow you adjust the On Hand quantity of an item below zero. |
07.02.19286 |
08/02/10 |
Added ability to track return of defective items to the manufacturer with New RTM and List RTM buttons in the Purchase History tab. |
07.02.20136 |
10/07/10 |
Added actions 1757/300-314 for transaction types in the Type menu of the Inventory Transactions window. |
07.02.20195 |
02/11/11 |
Added PO Work Order Number column to Log tab. |
07.02.20815, 08.03.08269 |
04/12/11 |
Added Reset All check box to Pick/Return Work Order window. |
07.02.20952 |
08/24/11 |
Added action 1757/400. |
07.02.21129, 08.03.08428 |
11/07/11 |
Added Completed check box to Open RTM's window. |
08.79.09239, 07.79.22650 08.79.09224, 07.79.22616 |
07/08/13 |
Added note about Reset Min/Max button added to Items (program #1535). |
07.79.22868, 07.79.22863 |
08/16/13 |
Items deleted from a work order do not appear in the Pick/Return Work Order window. |
n/a |
07/11/14 |
Images updated. |
07.82.24019, 07.82.24018 |
04/09/15 |
Changed note in Branch dropdown menu from "all branches" to "no branches". |
08.88.11313, 07.88.25751, 08.88.11312, 07.88.25750, 08.88.11308, 07.88.25746 |
04/05/18 |
Added new Description 2 field and Item Inv Grp 1-6. Updated images to show new fields. |
07.89.25850, 07.89.25852 |
05/25/18 |
Add Location and Description fields to the Allocation screen. |
08.89.11363, 07.89.25833 |
05/25/18 |
Added Needed By Date field to the Allocation screen. |
08.89.11385, 07.89.25872, 08.88.11329, 07.88.25776 |
06/11/18 |
Added Item Code 1 and 2, and Manufacturer. Updated image. |
07.88.25808 |
06/12/18 |
Added following columns to Ranking Inventory: MTD Sales, YTD Sales, and MTD Sales Value. Image updated. |
07.89.26035, 07.89.26032 |
10/22/18 |
Added Personnel Name to the Satellite ID dropdown as well as in Satellite Availability grid. Images updated. |
08.90.11667, 07.90.26162, 07.90.26164 |
04/04/19 |
Item Code 3 search parameter and result column added on Branch Inventory. Item Code 3 field added to Allocation screen. Images updated. |
08.93.12042, 07.93.26754 |
09/21/21 |
New Branch Transaction Search button. When this button is selected, a new pane is opened that allows the users to search all transactions by a data range and their respective Branch. Images updated. |
07.93.26760, 08.93.12049, 07.93.26762, 08.93.12052 |
10/08/21 |
New Inventory Transaction Batch Inquiry button added within Branch Inventory (#1757). When this button is selected users are taken to a new Transaction Batch Inquiry screen. When here, users can enter a Batch Number and select Search. The results will display all the Items typed in for that specific Batch Number. |
07.93.26776, 08.93.12060, 08.93.12070 |
11/18/21 |
Added new option ub050 in options section. |