
Integrated Video Viewers
Integrated Video Viewers
Integrated Video Viewers
Module: Account Management
Overview
SBN supports the following integrated video viewers:
Teldat
Installing a Teldat Integrated Video Viewer
For the central station:
Install the Teldat server software
For each workstation:
Install the Teldat client software.
Install the SBN video integration software.
Note: When you install the Teldat workstation software, be sure to use the fully-qualified domain name of the server (for example, servername.domain.net) or the ODBC connection may fail when it connects to the server.
Note: User names, passwords, and file names cannot contain the asterisk * character.
Install the Teldat Server
Use the following steps to install the Teldat server, if Teldat has not already installed it:
1. Install and configure the Teldat server software per instructions from Teldat.
2. Insert the SBN Video Integration CD into the CD drive.
w The installation wizard appears.
3. From the installation options, choose only Teldat Server.
4. Follow the instructions of the installation wizard to finish setting up the server software.
Install the Teldat Client Software
Use the following steps to set up the Teldat client software for each workstation:
1. Install and configure the Teldat client software per instructions from Teldat.
2. Insert the SBN Video Integration CD into the CD drive.
w The installation wizard appears.
3. Add a client login to the Teldat server for this workstation.
Note: Give this client login access to all Teldat centers.
4. Create a unique login to the Teldat server.
Note: These user names and passwords are repeated in the SBN setup Sybase login.
Install the SBN Video Integration Software
Use the following steps to install the SBN video integration software:
Note: You must install and configure the Teldat server software and Teldat client software before you install the SBN video integration software.
1. In SBN, add a Sybase username and password that matches the username and password of the Teldat user for this workstation.
Note: Usernames and passwords cannot contain the * character.
2. Insert the SBN Video integration CD into the CD drive.
w The installation wizard appears.
3. Choose the Teldat client installation option.
Note: Be sure to install the integration into the same folder that contains SBN.exe. Many companies install SBN.exe to this folder: C:\Program Files\IBS\SBN.
4. In the SBN toolbar, go to View > Options or press [CTRL+O].
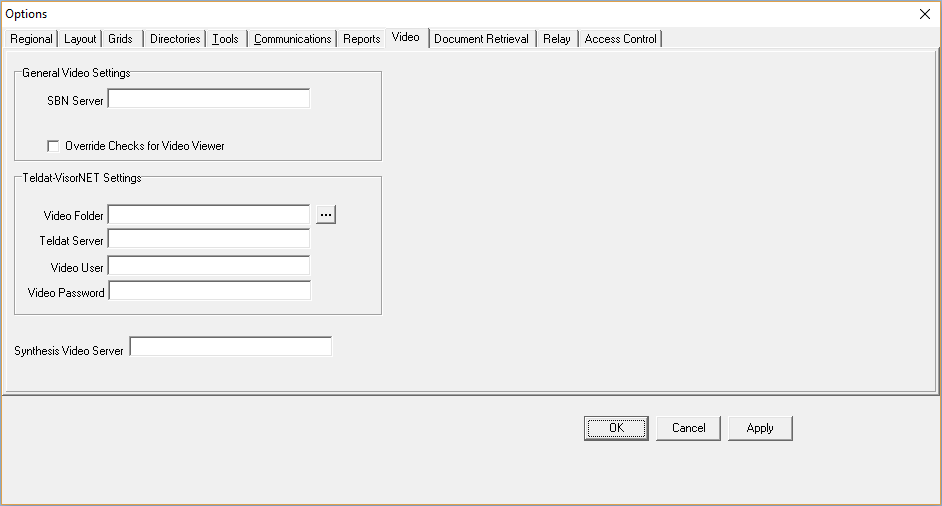
5. Select the Video tab.
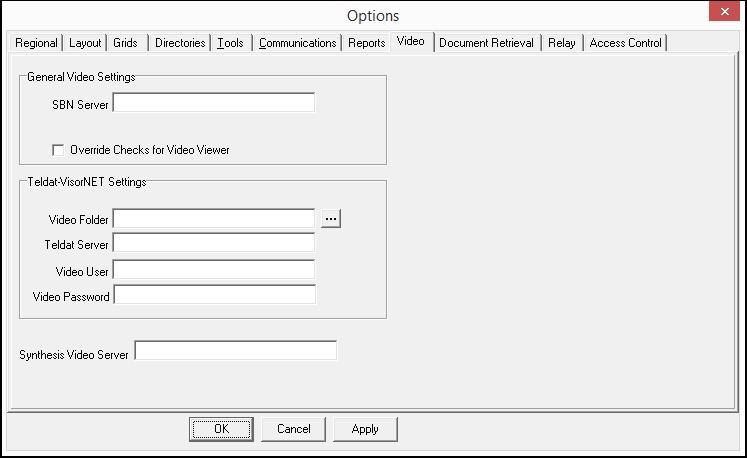
6. Enter information in the following fields
l Video Folder - select the drive mapped to the Teldat video files share on the Teldat server.
l Teldat Server - type the name or IP address of the Teldat server.
l Video User - type the Teldat video user name.
l Video Password - type the Teldat password.
7. Choose OK.
Meeting Teldat Requirements
To use Teldat, monitoring stations must meet the following requirements:
Each workstation must have the Teldat workstation software installed.
Each workstation must have the Teldat Server configured with at least one login.
Each login must have access to all configured Teldat centers.
The Teldat server must have the Sybase Client library installed.
Each workstation must have a dsedit entry to the SBN server configured and tested (ping).
Each Teldat center Name must match the corresponding CID in SBN.
Note: This match allows SBN to associate a center with a customer.
Before configuring the Options tab in SBN, each workstation must have a mapped drive to the Teldat �Visornet_recordings� share on the Teldat server.
Understanding Teldat Video Alarms
Teldat provides both standard video alarms and live camera video.
Panel Types
SBN knows that video signals originate from Teldat units if the panel type IDs for the installation begin with �TELDAT.� For example, a two-camera Teldat unit would be defined in panel types as �TELDATC2.� Define panel types in Panel Types (program #1742).
Zones
Currently, the Zone field in Zones must match the camera number defined in the Teldat server for the Teldat center. For example, if camera 1 in the Teldat center is defined as �0000,� the zone in SBN for this camera must also be �0000.�
Standard Video Alarms
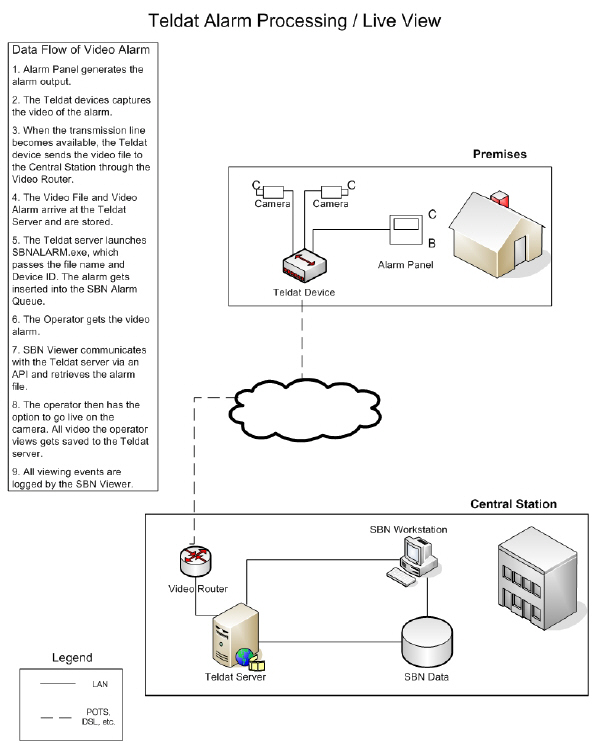
Teldat and SBN generate standard video alarms in the following sequence:
1. Two events occur concurrently:
A Panel alarm is generated at an installation and sends a signal to SBN.
An alarm is initiated at the Teldat center at the installation.
2. SBN receives the Panel alarm in the normal way.
w SBN places the alarm in queue.
3. The Teldat center sends the video alarm to the Teldat server.
4. The Teldat server records the alarm file in .AVI format to the Recordings Shared folder.
5. The Teldat server launches the IBS-provided �sbnalarm.exe� and sends the name (CID) of the file as a parameter to SBN.
6. �sbnalarm.exe� generates a video alarm in the SBN alarm queue.
w SBN appends the file name, with the prefix TEL-AVI, to the Comment field in the Alarm Log.
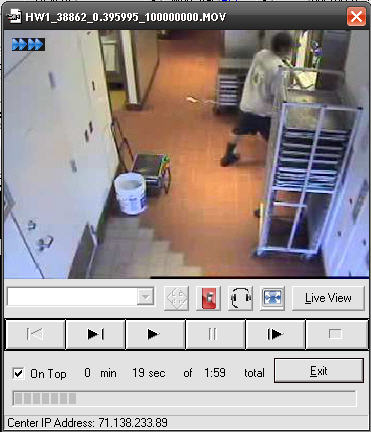
7. A monitoring operator can now handle the alarm by choosing Display Image in the Alarm Log or View Camera in Dispatch.
w SBN opens the Video Viewer.
Live Camera Video
Teldat and SBN generate Live Camera Video in the following sequence:
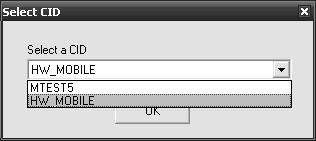
1. Following an alarm event, the monitoring operator chooses View Camera in the Dispatch to view live video.
w The Select CID window allows you to choose the desired video panel.
2. The Video Viewer launches.
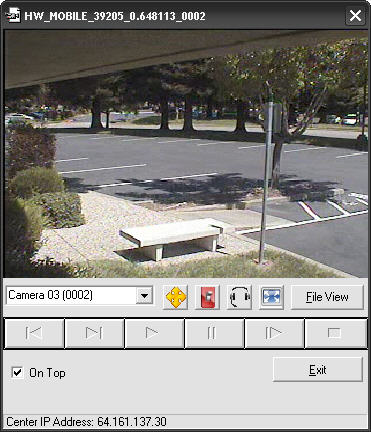
w The Video_Logger.exe logs all video actions into the SBN Alarm log.
Note: For more information on the Teldat Live Viewer, refer to Using the Teldat Camera Viewer.
Teldat Alarm Processing/Live View
Using the Teldat Camera Viewer
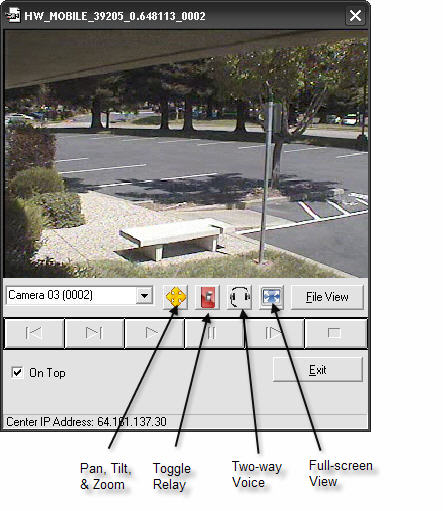
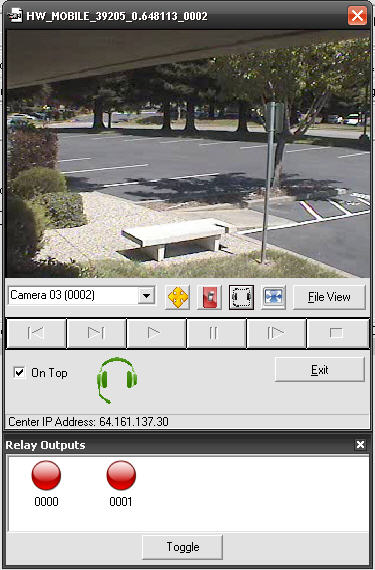
The Teldat camera viewer offers several camera control features:
Pan, zoom, and tilt.
Two-way voice integration
Toggle relay
Full screen viewing
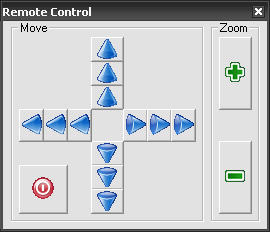
Pan, Tilt, Zoom
When the a camera is configured for pan, tilt, zoom, the Remote Control button becomes active. The following graphic shows the available controls.
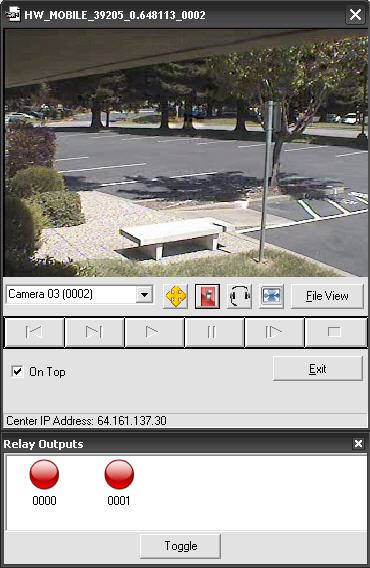
Toggle Relay Button
The Toggle Relay button opens the Relay screen. This allows the user to turn the configured Teldat relays on and off. The following graphic shows the Relay controls.
Two-Way Voice Button
The two-way voice button allows the operator to toggle the two-way voice of the device. To activate / deactivate the two-way voice click the Headphone icon. The following graphic displays the two-way voice control.
Full Screen Mode
The Full Screen button allows the operator to view the video in the full available screen. The Full screen button appears in the left hand corner while in full screen mode, to allow the user to return to the minimized version.
OZ Vision
Installing an OZ Vision Integrated Video Viewer
For the central station:
Install the OZ Vision server.
For each workstation:
Install the OZ Vision Client software.
Install the SBN Video Integration software.
Note: When you install the OZ Vision workstation software, be sure to use the fully-qualified domain name of the server (for example, servername.domain.net) or the ODBC connection may fail when it connects to the server.
Note: Usernames, passwords, and file names cannot contain the asterisk * character.
Installing the OZ Vision Server
Use the following steps to install the OZ Vision server (if OZ Vision has not already installed it):
1. Install and configure the OZ Vision server software per instructions from OZ Vision.
2. Insert the SBN Video Integration CD into the CD drive.
w The installation wizard appears.
3. From the installation options, choose only OZ Vision Server.
4. Follow the instructions of the installation wizard to finish setting up the server software.
Installing the OZ Vision Client Software
Use the following steps to set up the OZ Vision client software for each workstation:
1. Install and configure the OZ Vision client software per instructions from OZ Vision.
2. Insert the SBN Video Integration CD into the CD drive.
w The installation wizard appears.
3. Add a client login to the OZ Vision server for this workstation.
Note: Give this client login access to all OZ Vision centers.
4. Create a unique login to the OZ Vision server.
Note: These usernames and passwords are repeated in the SBN setup Sybase login.
Installing the SBN Video Integration Software
Use the following steps to install the SBN video integration software:
Note: You must install and configure the OZ Vision server software and OZ Vision client software before you install the SBN video integration software.
1. In SBN, add a Sybase username and password that matches the username and password of the OZ Vision user for this workstation.
Note: Usernames and passwords cannot contain the asterisk * character.
2. Insert the SBN Video integration CD into the CD drive.
w The installation wizard appears.
3. Choose the OZ Vision client installation option.
Note: Be sure to install the integration into the same folder that contains SBN.exe. Many companies install SBN.exe to this folder: C:\Program Files\IBS\SBN.
4. In the SBN toolbar, go to View > Options.
5. Select the Video tab.
6. Enter information in the following fields
Note: All configurations in SBN > View > Options > Video tab exist only to allow monitoring operators to view live camera video.
l SBN Server - type the same server that has SBN databases.
l Override Checks for Video Viewer - you may enter a check mark in this box to prevent all checks to panel types or alarm log lines and to send the current (or top, if none selected) alarm log line to the video viewer.
Note: You use the fields in the section labeled �Teldat_VisorNET Settings� only when you set up Teldat.
7. Choose OK.
Meeting OZ Vision Requirements
To use OZ Vision, monitoring stations must meet the following requirements:
Each workstation must have the OZ Vision workstation software installed.
Each workstation must have the OZ Vision server configured with at least one login.
Each login must have access to all configured OZ Vision centers.
Each OZ Vision Center Name must match the corresponding CID in SBN.
Note: This match allows SBN to associate a center with a customer.
Note: Any use of OZ vision after Release 67 of SBN should prepend 'OSZ' to the alarm translations for these signals.
Understanding OZ Vision Video Alarms
OZ Vision provides standard video alarms.
Panel Types
SBN knows that video signals originate from OZ Vision units if the panel type IDs for the installation begin with �OZ-VID.� For example, a four-camera OZ Vision unit would be defined in panel types as �OZ-VID4CAM.� Define panel types in Panel Types, program #1742.
Zones
Currently, the Zone field in Zones must match the camera number defined in the OZ Vision server for the OZ Vision center. For example, if camera 1 in the OZ Vision center is defined as �0000,� the zone in SBN for this camera must also be �0000.�
Standard Video Alarms
OZ Vision and SBN generate standard video alarms in the following sequence:
1. Two events occur concurrently:
A Panel alarm is generated at an installation and sends a signal to SBN.
An alarm is initiated at the OZ Vision center at the installation.
2. SBN receives the Panel alarm in the normal way.
w SBN places the signal in the Alarm Queue.
3. The OZ Vision center sends the video alarm to the OZ Vision server.
4. The OZ Vision server records the alarm file in .AVI format to the Recordings Shared folder.
5. The OZ Vision server launches the IBS-provided �sbnalarm.exe� and sends the name (CID) of the file as a parameter to SBN.
6. �sbnalarm.exe� generates a video alarm in the SBN alarm queue.
w SBN appends the file name, with the prefix TEL-AVI, to the Comment field in the Alarm Log.
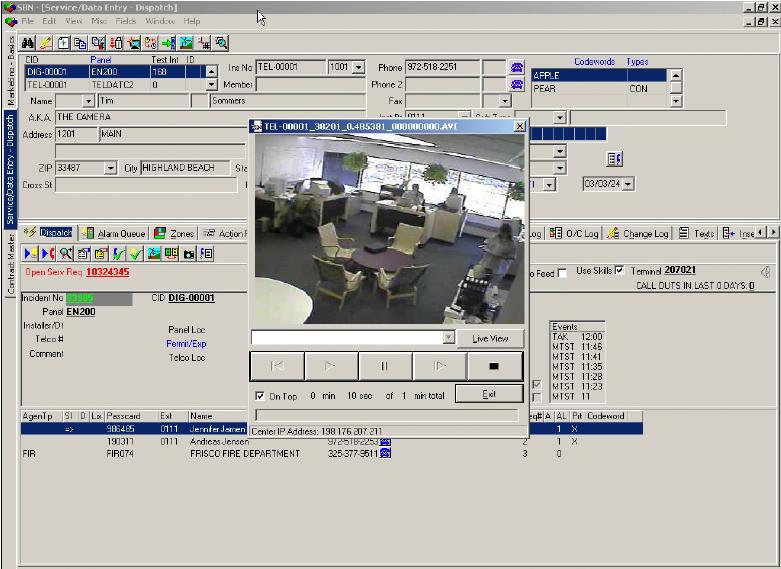
7. A monitoring operator can now handle the alarm by choosing one of the following functions in the Alarm Log or in Dispatch:
Display Image
View Camera
w SBN opens the Video Viewer.
DigiOp
Installing a General Solutions (DigiOp) Integrated Video Viewer
For each workstation
Install the SBN video integration software.
Installing the SBN Video Integration Software
Use the following steps to install the SBN video integration software:
1. In SBN, add a Sybase username and password that matches the user name and password of the General Solutions user for this workstation.
Note: User names and passwords cannot contain the asterisk * character.
2. Insert the SBN Video integration CD into the CD drive.
w The installation wizard appears.
3. Choose the General Solutions client installation option.
Note: Be sure to install the integration into the same folder that contains SBN.exe. Many companies install SBN.exe to this folder: C:\Program Files\IBS\SBN.
4. In the SBN toolbar, go to View > Options.
5. Select the Video tab.
6. Enter information in the following fields
Note: All configurations in SBN > View > Options > Video tab exist only to allow monitoring operators to view live camera video.
SBN Server - type the same server that has SBN databases.
Override Checks for Video Viewer - you may enter a check mark in this box to prevent all checks to panel types or alarm log lines and to send the current (or top, if none selected) alarm log line to the video viewer.
Note: You use the fields in the section labeled �Teldat_VisorNET Settings� only when you set up Teldat.
7. Choose OK.
Meeting General Solutions Requirements
To use General Solutions, monitoring stations must meet the following requirements:
Each workstation must have the General Solutions workstation software installed.
Each workstation must have a dsedit entry to the SBN server configured and tested (ping).
Each General Solutions center Name must match the corresponding CID in SBN.
Note: This match allows SBN to associate a center with a customer.
Understanding General Solutions Video Alarms
General Solutions provides standard video alarms.
Panel Types
SBN knows that video signals originate from General Solutions units if the panel type IDs for the installation begin with �GS-VID.� For example, a two-camera General Solutions unit would be defined in panel types as �GS-VID2CAM.� Define panel types in Panel Types (program #1742).
Zones
Currently, the Zone field in Zones must match the camera number defined in the General Solutions server for the General Solutions center. For example, if Camera 1 in the General Solutions center is defined as �0000,� the zone in SBN for this camera must also be �0000.�
Standard Video Alarms
General Solutions and SBN generate standard video alarms in the following sequence:
1. Two events occur concurrently:
A Panel alarm is generated at an installation and sends a signal to SBN.
An alarm is initiated at the General Solutions center at the installation.
2. SBN receives the Panel alarm in the normal way.
w SBN places the alarm in queue.
3. The General Solutions center sends the video alarm to the General Solutions server.
4. The General Solutions server records the alarm file in .AVI format to the Recordings Shared folder.
5. The General Solutions server launches the IBS-provided �sbnalarm.exe� and sends the name (CID) of the file as a parameter to SBN.
6. �sbnalarm.exe� generates a video alarm in the SBN Alarm Queue.
w SBN appends the file name, with the prefix TEL-AVI, to the Comment field in the Alarm Log.
7. A monitoring operator can now handle the alarm by choosing one of the following functions in the Alarm Log or in Dispatch:
Display Image
View Camera
w SBN opens the Video Viewer.
Live Camera Video
General Solutions and SBN generate Live Camera Video in the following sequence:
Note: All configurations in SBN > View > Options > Video tab exist only to allow operators to view live camera video.
1. Following an alarm event, a monitoring operator can view file or live video by choosing one of the following functions in the Alarm Log or in Dispatch:
Display Image
View Camera
2. SBN launches the SBN Video Viewer with the name (CID) passed in as a parameter.
Note: The SBN Video Viewer uses the General Solutions API to locate the General Solutions server and request information about the center it is trying to contact.
3. The Video Viewer launches the Video_logger.exe; passing the
CID
Incident number
Event type for live or file view
Note: The Video_Logger.exe logs all video actions into the SBN Alarm log.
4. When the Video Viewer contacts the General Solutions center, the View Live button becomes active on the viewer.
w The monitoring operator can view live video from the center.
Video Protein
Configuring a CID to Use VideoProtein
You may use VideoProtein to access IP-based live video web sites.
Use the following steps to configure a CID to use VideoProtein:
1. In Data Entry (program #559), open the account for which you want to configure the CID to use VideoProtein.
2. From the toolbar, choose Change Record.
w SBN opens fields in Data Entry.
3. Choose Zoom in/out of Sublevel.
w SBN opens the CID Zoom dialog box.
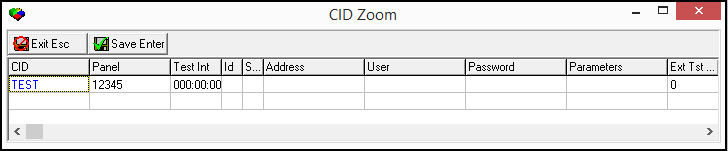
Note: Action 559/19 controls access to the CID Zoom dialog box.
4. In the CID grid, complete the following fields.
In Panel - select the VideoProtein panel installed at the installation.
In Address - type www.videoprotein.com.
In User - type the user name to access video from this panel for the selected CID.
In Password - type the password needed to access video from this panel for the selected CID.
5. Complete additional fields in the CID grid, as needed.
6. Choose Save.
7. Choose Save again.
Viewing Video with VideoProtein
In Dispatch, a monitoring operator can view video associated with an alarm through VideoProtein.
Use the following steps to view video through VideoProtein:
1. In Dispatch, while handling the associated alarm, choose View Camera.
w If you have more than one CID associated with the selected installation, SBN opens the Select CID dialog box.
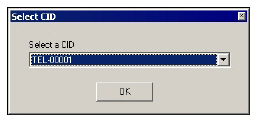
Select the CID for which you want to view video.
Choose OK.
2. SBN launches your web browser with the login page of VideoProtein.
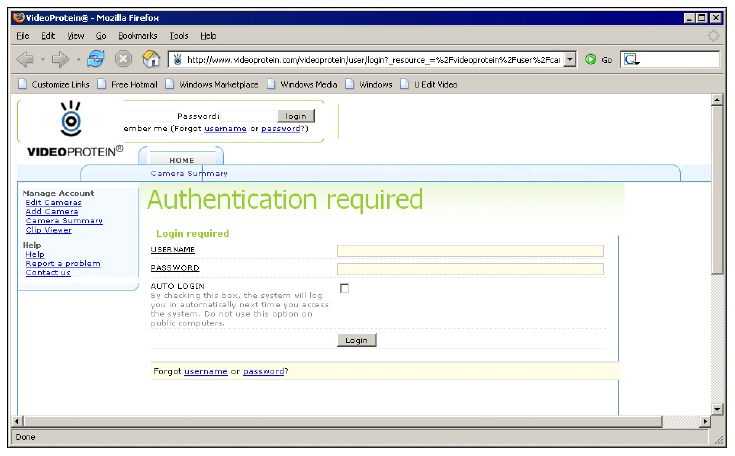
3. Complete the USERNAME and PASSWORD fields.
4. Choose Login.
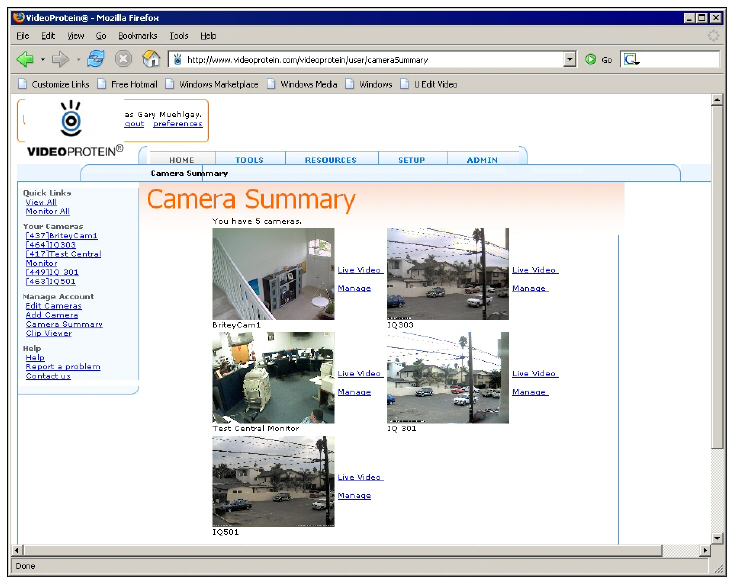
w VideoProtein launches the video page for the selected CID/installation.
Rapid Eye
RapidEye must exist in the same folder as sbn.exe and should only be run as a stand-alone application when debugging from Delphi. A large number of parameters must be passed from SBN in order for this to operate correctly. RapidEye properties can be configured from the RapidEye Properties in SBN Service Manager.
Create FileMonitor.exe to poll a specified directory for new .rem files, move them to another specified directory, and add an alarm log entry into the SBN database. This application must exist on a machine with the Sybase system files (so it may connect to the SBN database) and access to the source and destination directory.
Parameters for connecting to SBN database are stored in associated .ini file and must grant the application enough access to login and add entries to the Alarm Log.
SureView
Installing a SureView Integrated Video Viewer
For the central station:
Install the SureView server. Sureview properties can be configured from the Axis Properties in SBN Service Manager.
For each workstation:
Install the SureView IMMIX Workstation software.
Install the SBN Video Integration software.
Note: When you install the SureView workstation software, be sure to use the fully-qualified domain name of the server (for example, servername.domain.net) or the ODBC connection may fail when it connects to the server.
Note: Usernames, passwords, and file names cannot contain the asterisk * character.
Installing the SureView Server
Use the following steps to install the SureView server:
1. Install and configure the SureView server software per instructions from SureView.
2. Insert the SBN Video Integration CD into the CD drive.
w The Installation Wizard opens.
3. From the installation options, choose only SureView Server.
4. Follow the instructions of the Installation Wizard to finish setting up the server software.
Installing the SureView Workstation Software
Use the following steps to set up the SureView software for each workstation:
1. Install and configure the SureView Workstation software per instructions from SureView.
2. Insert the SBN Video Integration CD into the CD drive.
w The Installation Wizard opens.
3. Add a workstation login to the SureView server for this workstation.
Note: Give this client login access to all SureView centers.
4. Create a unique login to the SureView server.
Note: These usernames and passwords are repeated in the SBN setup Sybase login.
Installing the SBN Video Integration Software
You must install and configure the SureView server software and SureView workstation software before you install the SBN video integration software.
Use the following steps to install the SBN Video integration software:
1. In SBN, add a Sybase username and password that matches the username and password of the SureView user for this workstation.
2. Insert the SBN Video integration CD into the CD drive.
w The Installation Wizard opens.
3. Choose the SureView client installation option.
Note: Be sure to install the integration into the same folder that contains SBN.exe.
4. From the main SBN toolbar, select View > Options.
w The Options window opens with the Regional tab displayed.
5. Choose the Video tab.
w The Video tab opens.
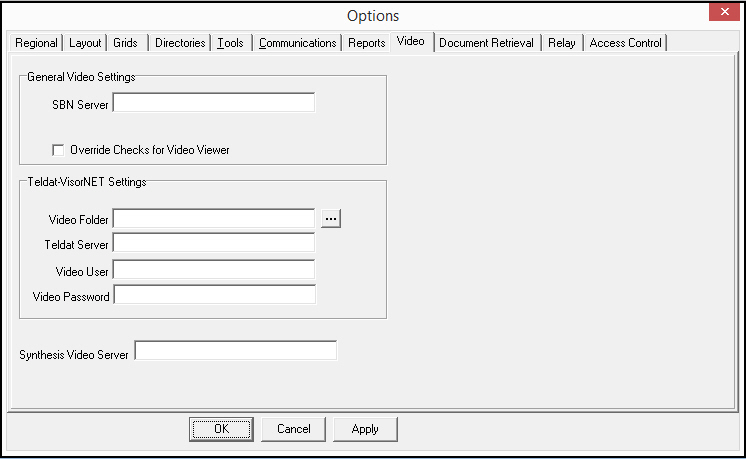
6. Enter information in the following fields:
l SBN Server - type the same server that has SBN databases.
l Override Checks for Video Viewer - you select this check box to prevent all checks to Panel types or Alarm Log lines and to send the current (or top, if none selected) Alarm Log line to the video viewer.
7. Choose OK.
Meeting SureView Requirements
To use SureView, monitoring stations must meet the following requirements:
Each workstation must have the SureView workstation software installed.
Each workstation must have the SureView server configured with at least one login.
Each login must have access to all configured SureView centers.
Each SureView center Name must match the corresponding CID in SBN.
Note: This match allows SBN to associate a center with a customer.
Configuring SBN for SureView Video Alarms
SureView provides standard video alarms. Set up panels in Panel Types (program #1742) normally. Set up Zones in the Zones tab of Data Entry (program #559) normally.
Handling Video Alarms
SureView and SBN generate standard video alarms in the following sequence:
1. An alarm is generated at an installation site, and an alarm is initiated at the SureView center.
2. SBN receives the alarm and places the signal in queue.
3. The SureView server records the alarm file in .AVI format to the Recordings Shared folder.
4. The SureView server launches the IBS-provided �sbnalarm.exe� and sends the name (CID) of the file as a parameter to SBN.
5. �sbnalarm.exe� generates a video alarm in the SBN Alarm Queue.
w SBN records the signal in the Alarm Log. The Comment column indicates it is a SureView video alarm and displays the video clip number: SUREVIEW XXX.

6. An operator can now take the alarm in Dispatch (program #537).
7. Choose the Display Image or View Camera button in the Alarm Log or Dispatch.
w SBN opens the SureView Immix window.
8. Continue handling the alarm in Dispatch.
w SBN records each operator action in the Alarm Log.
Note: For more information on handling an alarm in SBN, see Dispatch.
AXIS
The AXIS video integration requires two configurations: AXIS camera configuration and SBN configuration. This section describes these configurations for use with AXIS alone, not with AVHS. (AVHS is described in the next section.)
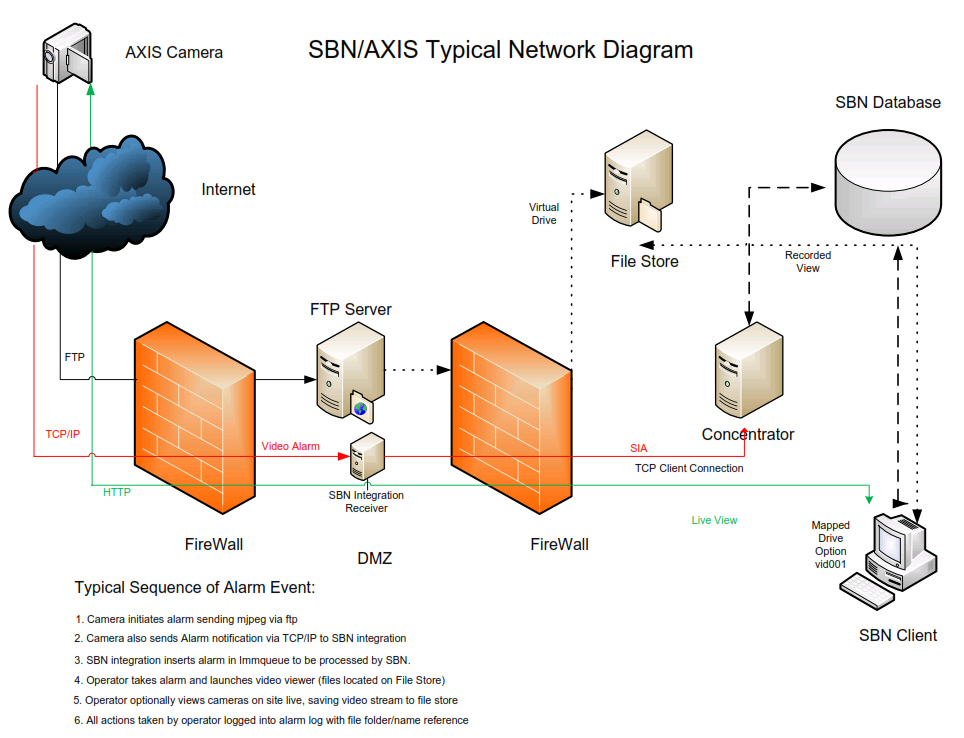
AXIS Camera Configuration
Define a new panel type in program #1742 for the AXIS integration. Add and configure AXIS cameras for an installation in the Cameras tab of Data Entry (program #559).
AXIS Panel Type
Add a panel type in program #1742 called 'AXIS-VID'. The Dispatch and Alarm Log programs use this panel type to determine how to display videos from AXIS cameras.
Mapped File Storage Drive
Define a mapped file storage drive on each workstation that matches the value of dynamic option vid001. The value of option vid001 should include the trailing backslash, (ie: vid001=x:\).
Cameras Tab of Data Entry
Add cameras for the installation in the Cameras tab of program #559. All fields in the tab must be populated in order for the AXIS integration to work properly.
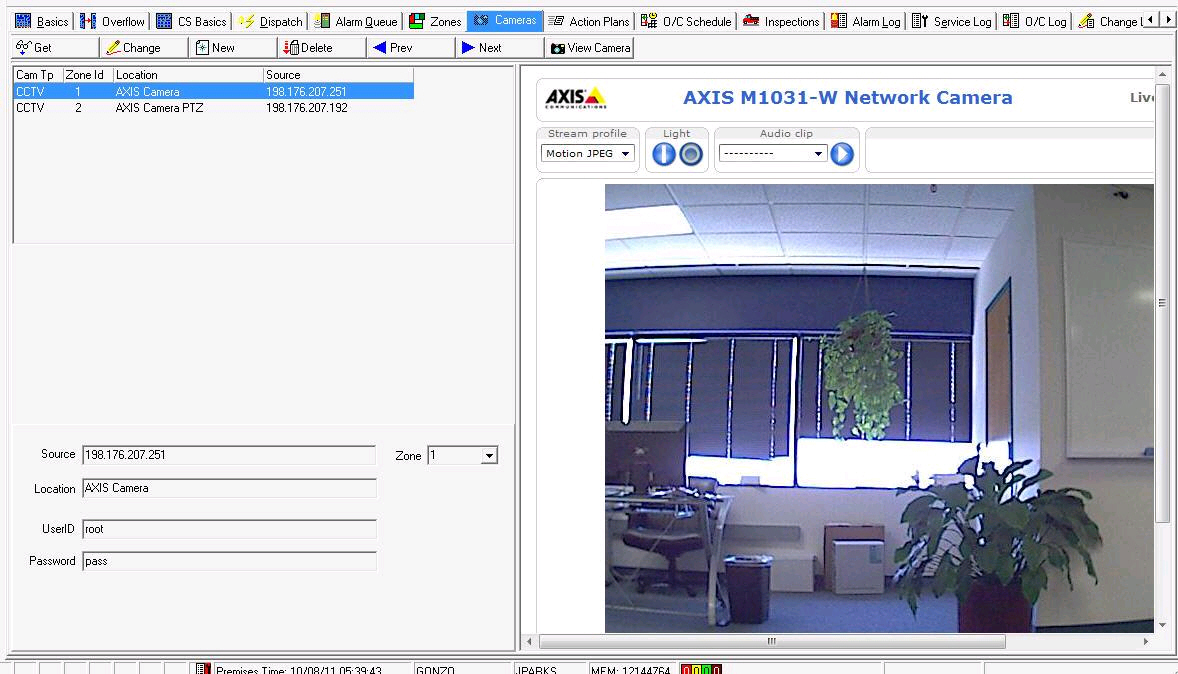
(For descriptions of the fields in the Cameras tab, see the Cameras document.)
When you save data for an AXIS camera in all the fields in the Cameras tab, the View Camera button in the tab allows you to go directly to the camera. The camera can now be configured to communicate with SBN.
Event Server Configuration
Define two event servers for each AXIS camera: one FTP server and one TCP/IP server. The FTP server is used to download pre- and post-alarm images from the camera to the central station. The TCP/IP server is used to send video alarm signals to the central station (through the SBN Integration exe).
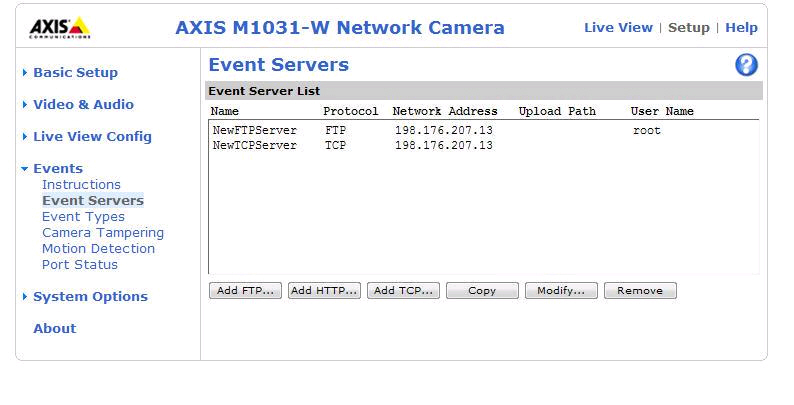
FTP Event Server Configuration:
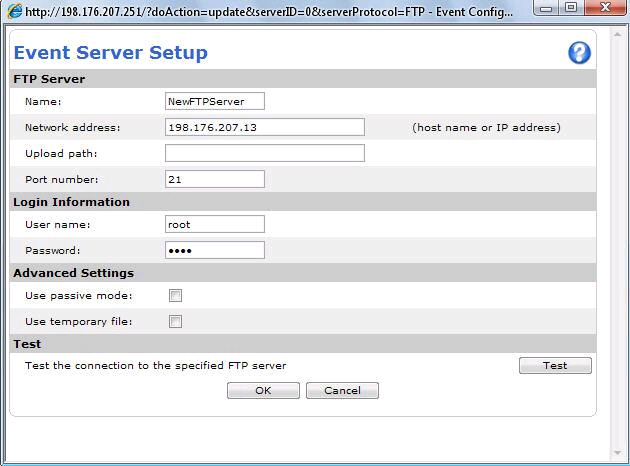
TCP Event Server Configuration:
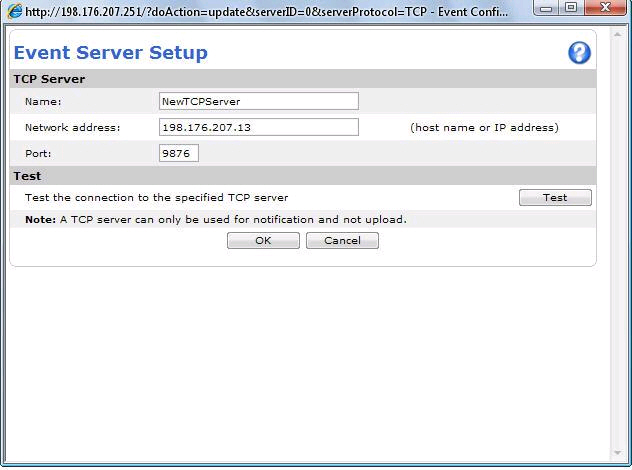
The FTP and TCP servers are for the SBN integration only and are separate from any other event servers you may use apart from the SBN integration.
Note: The SBN/AXIS integration will not work unless both these event servers are set up.
Event Types Setup
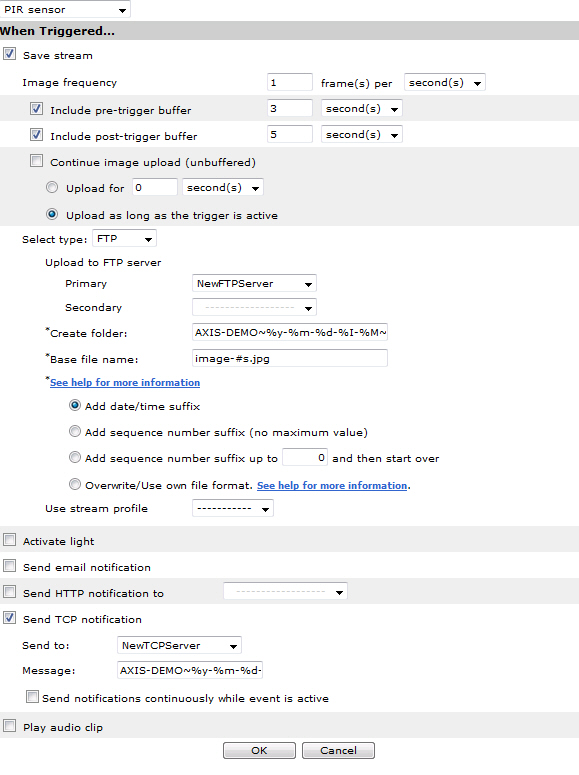
The fields that are important to the SBN integration are required as shown and should be entered exactly as listed for each AXIS camera.
FTP Server:
Add Date/Time Suffix radio button should be selected
Create Folder field must contain: AXIS-DEMO~%y-%m-%d-%I-%M~000 (The format is CID~%y-%m-%d-%I-%M~3 char zone)
Base File Name field must contain: image-#s.jpg
TCP Server:
Message field must contain: AXIS-DEMO~%y-%m-%d-%I-%M~000 (The format is CID~%y-%m-%d-%I-%M~3 char zone)
Note that the entries in the FTP Create Folder and the TCP Message fields must match.
The following graphic shows a typical Event Type setup for an AXIS camera.
SBN Configuration
The system administrator must configure both Alarm Translation Tables (program #1876) and the Concentrator in order for SBN to receive alarm signals from AXIS cameras.
Create an entry in program #1876 to match XX%. %3%4%5 is the zone and %r06-99 is the comment.
Here is an example of the format of an SIA message: 'S012[#AXIS-DEMO|NXXQQQAXIS-VID AXIS-DEMO\-10-08-22-05-57\zzz]'#20
For Concentrator configuration, use type 52 (MLR 2000). The conc port should be set up as a server.
AXIS.ini file:
Note: The SBNSERVER section is only required for non-concentrator mode.
[SBNSERVER]
SBNServer=server name:port number
SBNDatabase=sbnpro
SBNUser=sbn0
SBNPassword=******
[ALARMS]
PreFix=AX______##RW (Note: Only needed for non-concentrator mode)
Portnumber=9876 #port number for camera TCP connection
ConcPort=9875 #port number for concentrator
ConcIP= #IP address of Concentrator
Mode=Conc #enter 'non-Conc' for database mode
ErrorAcct=ZREC001 #error account for improper messages from cameras
KeepAlive=30 #number of seconds to send keep alive message; set to 0 to disable
ConcPrefix=AXIS-VID # this can be anything you want for program #1876; just keep in mind you need to replace what you put here with AXIS-VID so the comm_gen field has the proper value
AXIS AVHS
The current AVHS to SBN integration is specific to the MOZY.com AVHS API modified specifically to work with SBN. No other providers have been certified by IBS. Any client who would like to take advantage of the AVHS integration will need to contract with MOZY.com to provide AVHS services at this time.
SBN has been modified to accommodate connection to (and display of) video from the AVHS provider (currently MOZY.com). SBN can display both live video and recorded video from the MOZY cloud service. SBN also makes entries in the Alarm Log with information necessary to find these videos from the AVHS server. Display of live and recorded video is built into SBN to mimic current video integrations.
AVHS video can only be viewed in Dispatch (program #537) and not in the Cameras tab of Data Entry (program #559).
AVHS Options
Use the following options to set up the AVHS video integration:
vid006 – Use this option to define the AXIS AVHS logon user name for all SBN workstations. This becomes part of the URL that opens when you use the View Camera button in Dispatch (program #537).
vid007 – Use this option to define the AXIS AVHS logon password for all SBN workstations. This becomes part of the URL that opens when you use the View Camera button in Dispatch.
vid008 – Use this option to define the AXIS AVHS base URL that opens when you use the View Camera button in Dispatch.
vid009 – When on, this option activates a debug tab in AVHS mode of the SBN Video Viewer.
vid010 – Use this option to define the AXIS AVHS cloud URL that opens when you use the View Camera button in Dispatch. (This option is not yet used.)
Note: AXIS properties may be viewed or changed in the AXIS Services program in SBN Service Manager.
AVHSDBServer.exe
AVHSDBServer.exe is a software “receiver� that can reside in the CS DMZ to communicate with the AVHS provider. AVHSDBServer.exe receives notification from the provider to pass to the AVHSFEServer.exe.
AVHSFEServer.exe
AVHSFEServer.exe is a true Frontend specifically designed to parse messages from AVHSDBServer.exe. This program resides behind the business firewall and must have database access to the SBN Database server. AVHSFEServer.exe and AVHSDBServer.exe communicate with each other via TCP port through the firewall.
Cameras Tab of Data Entry
Add AVHS cameras to the Cameras Tab in Data Entry (program #559). The Source field should contain the serial number (or “Mac Address�) of the camera. This and a zone selection is all the information that SBN requires to find the camera and videos with the AVHS server. (Note that AVHS video can only be viewed in Dispatch (program #537) using the View Camera button and not in the Cameras tab.)
Added panel type AVHS-VID to program #1742. This panel type appears in the Alarm Log to notify SBN that a camera and video clips are available through AVHS.
Videofied/Frontel
Frontel Option
Use option vid011 to define the file path of the FrontelAlarmViewer.exe that SBN uses for client workstations.
Installing a Frontel Integrated Video Viewer
The Frontel software is installed on Windows operating systems (XP, Vista, Windows 7), 32-bit only. For installation, this machine must have administration rights.
For the Central Station:
The installer called Frontel Alarm Client will install the Frontel Alarm Viewer and the Frontel Alarm Server. This installation option is only used with Microkey Automation Software.
Videofied may set up your Frontel Alarm Server remotely. Contact Videofied for more information at www.videofied.com.
For each workstation:
The installer called Frontel Alarm Viewer will install only the Frontel Alarm Viewer. This installation is normally used for integrations where GI is used that do not have Microkey Automation Software. In this installation, Frontel Alarm Viewer is launched by the automation platform.
Note: It is important that you use the correct installer for your integration. If you have any questions, contact Videofied technical support.
Note: AXIS properties may be viewed or changed in the Videofied Services program in SBN Service Manager.
Installing the Frontel Server
Installation instructions are subject to change. Contact Videofied for the most current installation instructions.
Use the following steps to set up the Frontel server software for the Central Station:
1. Download the Frontel Alarm Client installer from Videofied. Installation files download in a zipped folder.
2. Extract the Frontel Alarm Client installer to the workstation under administrator login.
3. Open the extracted folder, highlight and copy the contents.
4. Create an installation folder on the C:\Program Files\ drive of the workstation. (This folder must be called Frontel2.)
5. Paste the copied contents into the Frontel2 folder that you just created.
6. Double-click the start.bat file.
w A command window will open and close, then FrontelConfig will launch.
7. When FrontelConfig opens, click on the Network tab. Type in the IP/DNS for the Frontel database and click Apply. (Alternatively, if the DNS name for the Frontel database appears in the list to the left, click on it and click Apply.)
8. Click on the Alarm Server tab and choose a unique ID for this server. Click Connect then click Apply in the upper right hand corner. (This configuration is only required when installing the Frontel Alarm Server. The Alarm Server tab will not be visible when installing only the Frontel Alarm Viewer.)
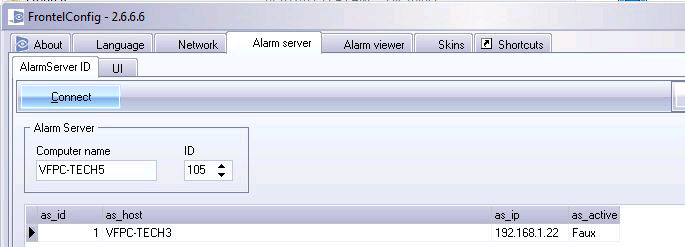
9. After clicking Connect, a list of other connected alarm servers will appear below. If an error appears after clicking Connect, contact Videofied technical support for additional database configuration steps.
10. Click Exit in the bottom right hand corner when all configuration has been completed.
w You will see the Frontel Alarm Server window open; you can close this.
Installing the Frontel Alarm Viewer Software
Installation instructions are subject to change. Contact Videofied for the most current installation instructions.
Use the following steps to set up the Frontel Alarm Viewer software for each workstation:
1. Download the Frontel Alarm Viewer installer from Videofied. Installation files download in a zipped folder.
2. Extract the Frontel Alarm Viewer installer to the workstation under administrator login.
3. Open the extracted folder, highlight and copy the contents.
4. Create an installation folder on the hard drive of the workstation with this file path: C:\Program Files\RSI\Frontel2. (This folder must be called Frontel2.)
5. Paste the copied contents into the Frontel2 folder that you just created.
6. Double-click the start.bat file.
w A command window will open and close, then FrontelConfig will launch.
7. When FrontelConfig opens, click on the Network tab. Type in the IP/DNS for the Frontel database and click Apply. (Alternatively, if the DNS name for the Frontel database appears in the list to the left, click on it and click Apply.)
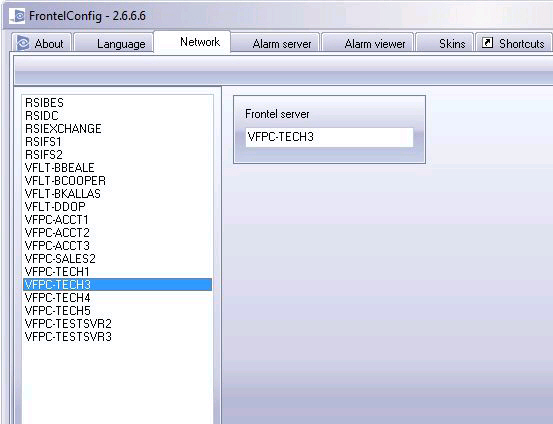
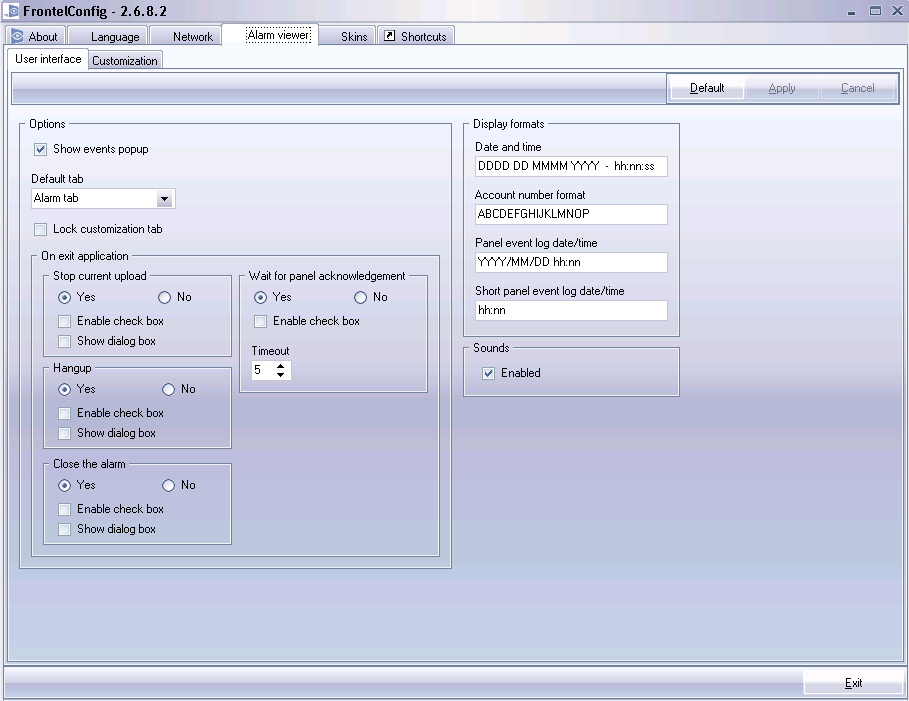
8. The Frontel Alarm Viewer can be customized from the Alarm Viewer tab.
9. Click Exit in the bottom right hand corner when all configuration has been completed.
w You will see the Frontel Alarm Viewer window open; you can close this.
Panel Types
SBN identifies Frontel video alarms by the panel type from which the alarm signals generate. If the panel type begins with RSIVID, SBN knows the signal is a Frontel video alarm. Define panel types in program #1742. CIDs that will receive Frontel video alarms must have the correct panel type assigned in program #559.
Handling Frontel Video Alarms
Use the following steps to handle incoming Frontel video alarms in SBN:
1. When an armed Frontel motion sensor detects movement, the Frontel camera begins recording in that location and generates an alarm.
2. SBN receives the alarm and places it in the Alarm Queue.
3. A monitoring operator takes the alarm in Dispatch (program #537). The Alarm Log indicates there is video available with the text Alarm Camera #. (SBN displays the assigned camera number.)
4. The operator can view the related video by choosing the Display Image button in Dispatch.
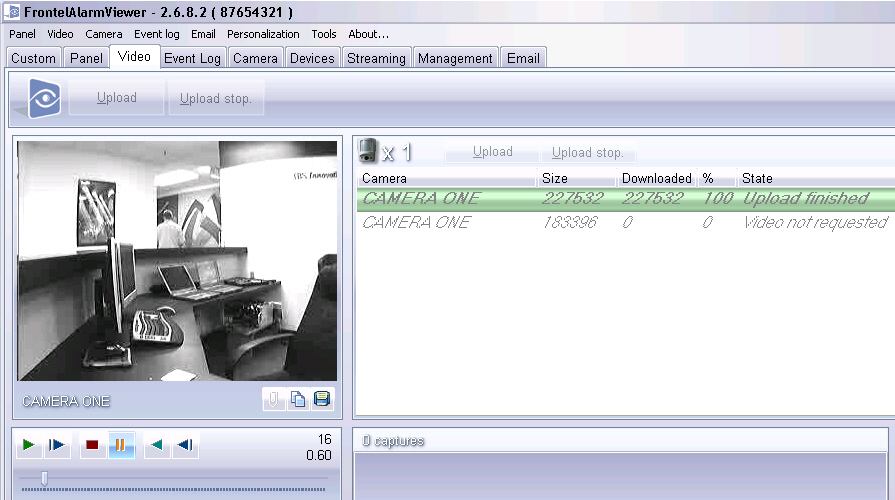
w The Frontel Alarm Viewer opens. Choose the Video tab in the viewer to see the video related to the alarm.
5. After resolving the alarm in Dispatch, operators may view the related video at any time by selecting the alarm record in the Alarm Log and choosing the Display Image button.
ViewNow
The ViewNow video integration uses the same data connection method as the FrontelAlarmViewer.exe and requires installation of a SYBASE ADO provider.
When the ViewNow integration has been configured in SBN, you can access ViewNow videos in Dispatch (program #537) and the Alarm Log tab of program #559.
Note: ViewNow properties may be viewed or changed in the ViewNow Services program in SBN Service Manager.
Panel Types
SBN identifies ViewNow video alarms by the panel type from which the alarm signals generate. If the panel type is VIEWNOW, SBN knows the signal is a ViewNow video alarm. Define panel types in program #1742. CIDs that will receive ViewNow video alarms must have the correct panel type assigned in program #559.
Installing the ViewNow Integration
ViewNow.exe communicates with XML Relay from cameras, (supplied by the vendor, I-View Now). Contact I-View Now for details about Relay and its configuration.
Relay supports two SBN ViewNow.exes running on different machines to provide redundancy. One ViewNow.exe should point to the primary SBN server, and the other ViewNow.exe should point to the secondary SBN server.
EarthCam
The EarthCam video integration uses the same data connection method as the AXIS2.
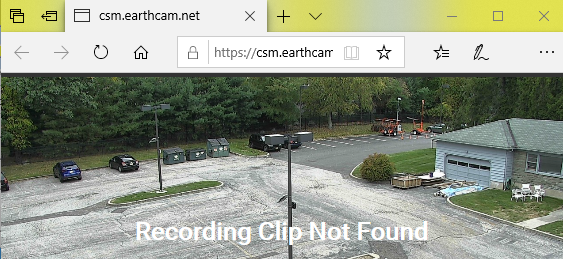
SBN has been modified to accommodate connection to (and display of) video from the EarthCam camera/video provider. SBN also makes entries in the Alarm Log with information necessary to find these videos from the EarthCam server. Display of the video is built into SBN to mimic current video integrations.
EarthCam video can be viewed in Dispatch (Program #537) and in the Alarm Log tab of Data Entry Master and Basics (#559) using the image button.
Receiver Type
EarthCam video integration works by using a defined receiver type. In the initial integration, Innovative used "EA" as the receiver type within Alarm Translation Tables (program #1876). Other receiver types can be used and companies are not restricted to using "EA."
Options
The following dynamic options for EarthCam integration within Options (program #1887) must be set correctly in order to view video through SBN:
earth1 – Use this option to define the EarthCam logon user name for all SBN workstations.
earth2 – Use this option to define the EarthCam logon password for all SBN workstations.
Dahua Video Viewer
The Dahua video integration uses an IP connection set up within the CID grid of Data Entry Master and Basics within the installation the camera will be associated with.
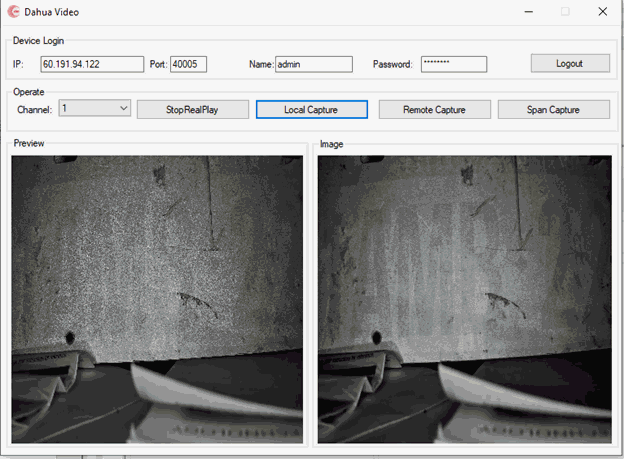
SBN has been modified to accommodate connection to (and display of) video through DahuaVideo.exe. SBN also makes entries in the Alarm Log with information associated with the viewing of video from the Dahua Viewer.
Dahua video can be viewed in Dispatch (Program #537) and in the Alarm Log tab of Data Entry Master and Basics (#559) using the image button.
Field/Column Descriptions
The following table describes the field and columns in the Dahua Video Viewer
Column |
Description |
Device Login |
|
IP |
IP of the Camera. |
Port |
Port associated with the camera. |
Name |
Username to login to the camera. |
Password |
Password associated with the username to login to the camera. |
Logout |
Select Logout to exit the camera and close the Dahua Video Viewer. |
Operate |
|
Channel |
An abstract concept of the communication and video stream transmission between Dahua Video Viewer and devices. For example, if a number of cameras (SD, IPC) are mounted on a storage device (NVR), the storage device manages the cameras as video channels which are numbered from 0. If Dahua connects to the camera directly, the video channel is usually numbered as 0. |
RealPlay |
Select to start live feed. Select again to stop and close. |
Local Capture |
Loads a previous still image. |
Remote Capture |
Takes still image based on live feed. |
Span Capture |
Takes a video based on live feed. |
Preview |
Live feed from camera. |
Image |
Captured image from live feed. |
Receiver Type
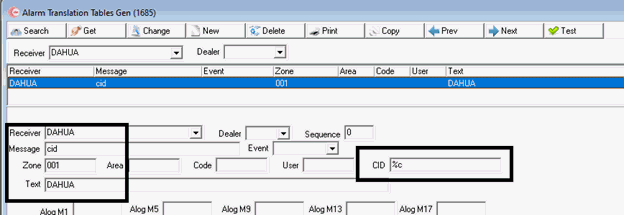
Dahua video integration works with receiver type "DAHUA" in Alarm Translation Tables Gen (program #1685). It is possible have various alarm translations for different Dahua events.
SBN Video Client
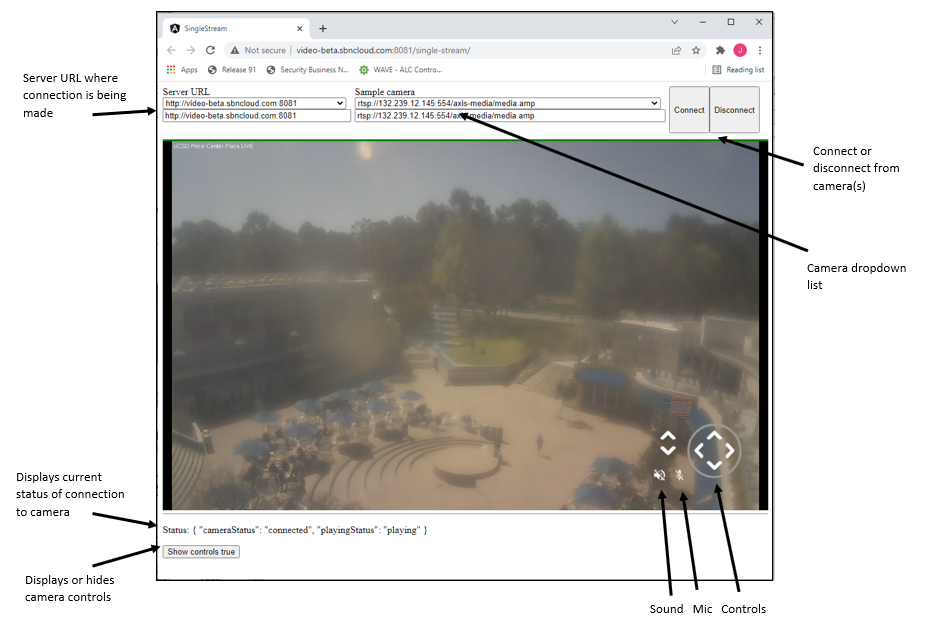
SBN Video Client is a simple to use single-stream video viewer which companies can set up and use to view live video as well as playback recorded video clips. The SBN Video Server, as well as the SBN Video client, uses a combination of both the Real-time Streaming Protocol (RTSP) and Real-time Transport Protocol (RTP) to allow the connection and playback of various video camera devices by different manufacturers. Media is controlled using RTSP to transmit over TRP. The SBN Video Client can issue various commands such as play, record, or pause, as well as tilt, rotate, sound, and mic (if applicable to the camera). This allows them to facilitate real-time control of the media streaming from the server to the client or from a client to the server.
For additional information on SBN Video Server, proceed here.
For additional information on the SBN RTSP service, proceed here.
Modifications and Updates to Integrated Video Viewers
The following table lists modifications and updates to the Integrated Video Viewers document.
Mod Number |
Date |
Description |
08.79.09295, 08.79.09296 |
08/30/13 |
Added ViewNow integration |
n/a |
07/22/14 |
Images updated. |
n/a |
10/23/14 |
Updated information on SBN Service Manager on AXIS, SureView, RapidEye, Videofied, and ViewNow. |
08.92.11893, 07.92.26490, 07.92.26491, 08.92.11894, 07.92.26492, 07.92.26493 |
10/07/20 |
New EarthCam Video integration added. Images updated. |
08.92.11916, 07.92.26532, 08.92.11924, 07.92.26543, 08.92.11939, 07.92.26568 |
11/17/20 |
Dahua Video Viewer integration added for viewing of Dahua cameras. Images updated. |
n/a |
03/07/22 |
SBN Video Client added. Images updated. |