
Installation Phasing
Installation Phasing
Installation Phasing
Program #: 1846
Module: System Administration
Overview
Use Installation Phasing (program #1846) to specify the phases and punch list items to use in the Phasing tab. Each phase, with description, sequence, and invoice type appears in the Phase tab in Service/Data Entry (program #559). Installation Phasing also contains a sublevel in which you specify items for the Punch List Items menu in each phase in the Phase tab.
The Installation Phasing Window
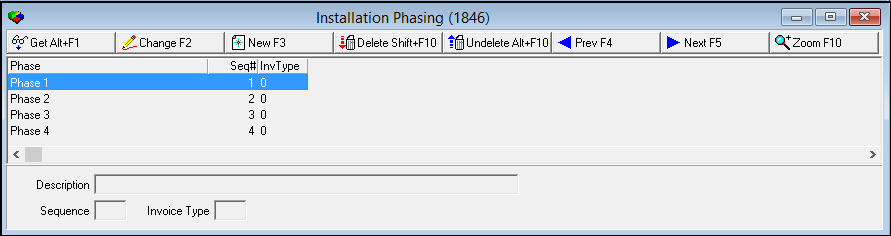
The following graphic shows Installation Phasing as the program opens. The upper pane displays previously defined phases.
Field/Column Descriptions
The following table describes the fields and columns used in the main window of Installation Phasing.
|
Field/Column |
Description |
|
Phase |
Phase description. |
|
Seq# |
Sequence number of the phase. |
|
InvType |
Number that determines if the phase gets invoiced, and if so, at what stage. l 0 = No Invoice l 1 = Invoice when job starts l 2 = Invoice when completed |
Note: Phases appear in the grid in order of sequence number rather than alphabetically.
Using Common Functions
See the reference document Common Functions in SBN for more information.
Zooming into the Sublevel of Installation Phasing
Installation Phasing contains a sublevel in which you specify items for the Punch List Items menu in each phase in the Phase tab.
The Punch List Tab
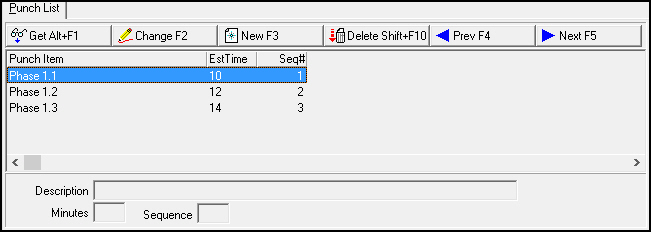
The following graphic shows the punch list tab. The tab displays punch list items previously associated with the selected phase.
Field/Column Descriptions
The following table describes the fields and columns used in the Punch List tab.
|
Field/Column |
Description |
|
Punch Item |
Description of the item. |
|
EstTime |
Estimated time in minutes for the installation of the item. |
|
Seq# |
Identifies the sequence position of the selected phase. |
Note: Punch items appear in the grid in order of sequence number rather than alphabetically.
Button Functions
The following table displays the buttons, describes the shortcut keys, actions, and functionality.
|
Button |
Name |
Shortcut Key |
Action |
Description |
|
|
Get |
ALT+F1 |
1846/ 1 |
Get record. |
|
|
Change |
F2 |
1846/ 2 |
Change selected record. |
|
|
New |
F3 |
1846/ 3 |
Create new record. |
|
|
Delete |
SHIFT+F10 |
1846/ 4 |
Delete selected record. |
|
|
Undelete |
ALT+F10 |
1846/ 5 |
Restore deleted record. |
|
|
Zoom |
F10 |
1846/999 |
Zoom in/out of sublevel. |
|
|
Previous |
F4 |
1846/ 999 |
Select last record. |
|
|
Next |
F5 |
1846/ 999 |
Select next record. |
|
|
Exit without saving |
ESC |
1846/ 999 |
Exit without saving changes to record. |
|
|
Save New Record |
ENTER |
1846/ 999 |
Save changes to record. |





Modifications and Updates to Installation Phasing
The following table lists modifications and updates to the Installation Phasing documentation.
|
Mod Number |
Date |
Description |
|
n/a |
8/18/14 |
Images updated. |
F1 Help
| Delphi Forms | baphasesform |
| Program Numbers | 1846 |