
Phasing
Phasing
Phasing
Module: Account Management
Overview
Use the Phasing tab in Data Entry (program #559) to track phases of an installation at a new customer's premises. Monitor the installer's progress to determine how the actual work time compares to the estimated time and to keep track of phase start and end dates. You may associate a work order with each phase and assign an invoice type to determine at which points in the installation process you bill the customer.
You can use the Punch List tab in the sublevel to break each phase into individual components. You can assign installers to specific roles or Punch items.
This document covers the following topics:
Navigating to Phasing
Use the following steps to navigate to Phasing:
1. From the main SBN toolbar, select Menu.
2. From the drop-down menu, select Go To.
3. In the Go To Program dialog box, type in "559" and press Enter.
w Data Entry Master and Basics opens.
4. Choose the Phasing tab in the lower pane of Data Entry.
The Phasing Tab
The following graphic shows both the Phasing tab and the sublevel Punch List tab with information displayed.
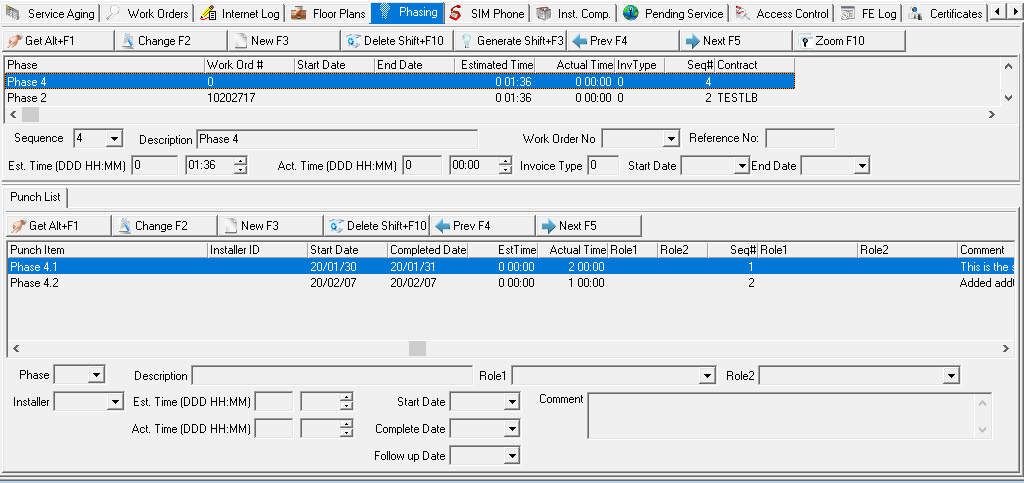
Field/Column Descriptions
The following table describes the fields and columns used in the Phasing tab.
Field/Column |
Description |
Sequence # |
Identifies in what order the phases will take place. (This menu originates from program #1846.) |
Description/Phase |
Description of the phase. (This originates from program #1846.) |
Work Order No. |
Work order specified for this phase. This drop-down menu contains work orders associated with the selected installation. |
Reference No. |
Reference number of the selected work order. This field automatically populates with information entered in the Reference Number field of the Work Orders tab. |
Start Date |
Date the phase began. |
End Date |
Date the phase ended. |
Estimated Time |
Estimated time in days, hours, minutes for the installation of the phase. |
Actual Time |
Actual time in days, hours, minutes for the installation of the phase. Note: SBN populates the Actual Time field after you entering both the Start Date and End Date. |
Invoice Type |
Number that determines at which the phase gets invoiced. l 0 = No Invoice l 1 = Invoice when job starts l 2= Invoice when completed |
Contract |
Contract Number. This column originates from Work Order. If a Work Order has no contract number defined, this column will remain blank. |
Punch List Sublevel Tab |
|
Phase |
Phase number and Punch Item assigned to the selected phase. (This menu originates from the sublevel of program #1846.) |
Description/Punch Item |
Text description of the selected phase. |
Role 1 |
Personnel ID specified for Role 1 of this punch list item. (Specify IDs in the Role 1 check box from program #1811.) |
Role 2 |
Personnel ID specified for Role 2 of this punch list item. (Specify IDs in the Role 2 check box from program #1811.) |
Installer |
Installer ID attached to this punch list item. |
Est. Time (DDD:HH:MM) |
Estimated time marker for the installer indicating when they were en route in the Service Queue or Scheduler. |
Act. Time (DDD:HH:MM) |
Actual time the installer was en route in the Service Queue or Scheduling (program #563). |
Start Date |
Start date for this punch list item. (Defaults to current date if no date is selected). |
Complete Date |
Estimated date of completion for this punch list item. |
Comment |
Comment field for additional information (2000 characters). |
Sequence # |
Identifies in what order the punch items will take place. (This menu originates in Installation Phasing, program #1846.) |
Role 1 (full name) |
First and last name of the installer specified for Role 1. (This name originates from program #1811.) |
Role 2 (full name) |
First and last name of the installer specified for Role 2. (This name originates from program #1811.) |
Follow Up Date |
Follow up date for this punch list item. (If no date is selected, the date will default to following day). |
Viewing Phase Details
You can view the details of a phase in the fields in the lower pane.
Use the following steps to view the details of a phase:
1. Select the phase for which you want to view the details.
2. Double-click your selection or choose Get.
w The fields in the bottom pane fill with the details of the selected entry.
Creating a Phase
Use the following steps to create an installation phase:
1. Choose New Record.
w Fields open in the bottom pane to enter new phase information.
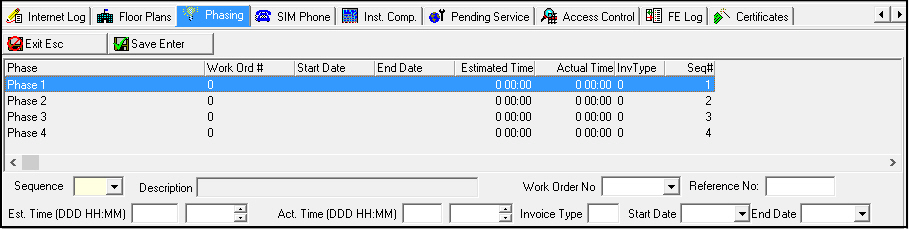
2. In Sequence, select a sequence number from the phases defined in Installation Phasing (program #1846).
Note: If you select a phase that already exists for the installation, SBN displays an error upon Save: "Duplicate Entry!"
3. Complete the remaining fields, as necessary.
4. Choose Save.
Generating All Phases
Choose Generate to include all phases defined in Installation Phasing (program #1846) for the selected installation. You cannot choose generate if you have already defined phases for the selected installation.
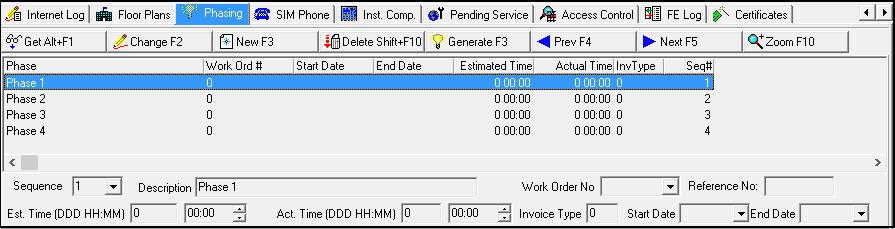
Changing Phase Details
After you create a phase, you can edit information such as:
Work order number
Estimated and actual time
End and start dates
Invoice type
Use the following steps to change the details of a phase:
1. Select the phase you want to change.
2. Choose Change.
w Fields in the bottom pane that can be changed open for changes.
3. Complete the fields, as needed.
4. Choose Save.
Deleting a Phase
Deleting a phase automatically deletes all punch items in the Punch List tab associated with that phase.
Use the following steps to delete a phase:
1. Select the phase you want to delete.
2. Choose Delete Record.
w The deleted phase no longer appears in the main Phasing window.
Adding Punch List Items
Use the sublevel tab to add punch list items to a phase. When you add a new Punch Item to a list of existing Punch Items, SBN populates the Role1 and Role2 fields with the existing Role1 and Role2 users.
Use the following steps to add punch list items to a phase:
1. Select the phase to which you want to add punch list items.
2. Double-click your selection or choose Get.
3. Choose Zoom In/Out of Sublevel.
w The Punch List tab appears.
4. In the Punch List tab, choose New.
w The fields in the lower pane of the Punch List tab open for changes.
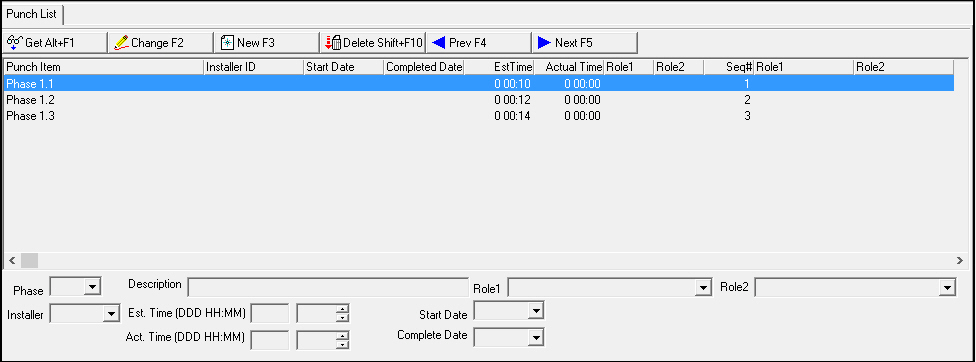
5. In Phase, choose a Punch Item from the drop-down menu.
6. Complete the remaining fields, as needed.
7. Choose Save.
Related Programs
The following table lists programs related to the Phasing tab.
Program |
Number |
Document Link |
Description |
Installation Phasing |
1846 |
Create and define phases and punch items used in the Phasing tab. |
|
Data Entry Master |
559 |
Program from which you can access the Phasing tab. View and edit details of the installation that is in Phasing. |
|
Personnel |
1811 |
Define personnel IDs to include in the Role1 and Role2 fields of the Punch List subtab. |
|
Work Orders |
N/A |
View and edit details of a work order related to the installation that is in Phasing. |
|
Scheduling |
563 |
Mark an installer en route to the installation. |
Button Functions
The following table displays the buttons, describes the shortcut keys, actions, and functionality.
Button |
Name |
Shortcut Key |
Action |
Description |
Phasing tab |
559/435 |
|||
|
Get Record |
ALT+F1 |
559/436 |
Get record. |
|
Change Record |
F2 |
559/439 |
Change selected record. |
|
New Record |
F3 |
559/440 |
Create a phase. |
|
Delete Record |
shift+F10 |
559/441 |
Delete a phase. |
|
Generate |
F3 |
559/442 |
Generate phases automatically. |
|
Previous |
F4 |
559/438 |
Select last record. |
|
Next |
F5 |
559/437 |
Select next record. |
|
Zoom in/out of sublevel |
F10 |
559/443 |
Zoom into or out of sublevel tab to add punch list items to a phase. |
Punch List tab |
||||
|
Get Record |
ALT+F1 |
559/444 |
View details of the phase. |
|
Change Record |
F2 |
559/447 |
Change the phase details. |
|
New Record |
F3 |
559/448 |
Create a new phase. |
|
Delete Record |
shift+F10 |
559/449 |
Delete the selected phase. |
|
Previous |
F4 |
559/446 |
Select last record. |
|
Next |
F5 |
559/445 |
Select next record. |
|
Exit |
esc |
559 |
Exit without saving. |
|
Save |
enter |
559 |
Save existing record. |





Modifications and Updates to Phasing
The following table lists modifications and updates to the Phasing document.
Mod Number |
Date |
Description |
n/a |
04/04/08 |
document rewritten |
n/a |
08/06/09 |
document rewritten |
n/a |
07/29/14 |
Images updated. |
08.89.11520, 07.89.26005, 08.89.11506, 07.89.26001 |
10/22/18 |
New Comment field added in Punch List Sublevel Tab. |
07.90.26138, 07.90.26136 |
02/15/19 |
New Contract number column added under Phasing tab. |
07.92.26475, 07.92.26476 |
08/31/20 |
Creating, editing, and deleting of phases is now logged in the Change Log tab. |
07.92.26584, 08.92.11954, 07.92.26601, 08.92.11960 |
10/06/21 |
New Follow Up Date field and column on the Punch List screen. Images updated. |