
SBN Anywhere
Module: Utilities
Overview
SBN Anywhere is a browser-based alarm monitoring application intended to assist operators, administrators and dealers in the monitoring of alarms and the viewing or editing of information on individual installations or groups of installations connected by the same CID. From this application, administrators may also edit action plans, create open/close schedules, and insert individual CIDs and zones into test, and more.
To use SBN Anywhere, you will need a device such as a workstation, mobile smartphone, or tablet with an internet connection. This application works on Windows, iOS and Android devices (provided there is an internet connection).
This document covers the following topics:
Authenticating
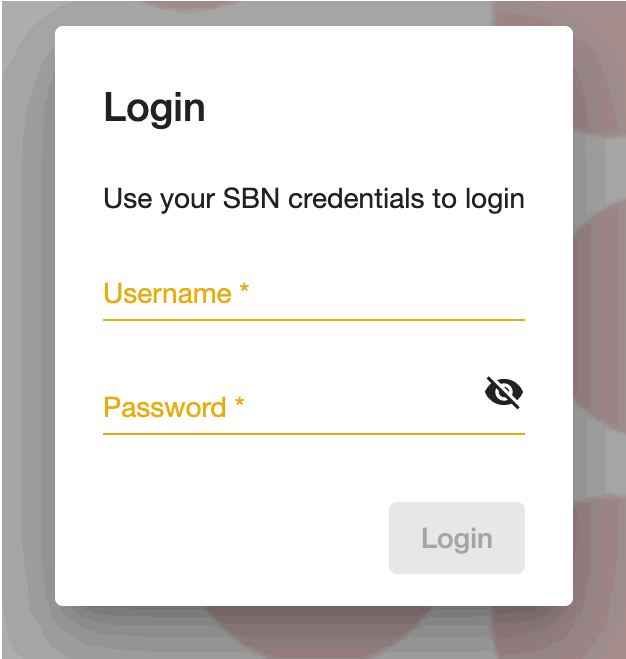
Login using your SBN user name and password that has been provided to you.
Dual Factor Authentication
SBN Anywhere is integrated to use Dual Factor Authentication with Duo - a third-party two-factor authentication (2FA) application.
Note: In order to use 2FA, central stations must have the Duo application and maintain a list inside Duo of all usernames associated with 2FA.
Note: The following options must be enabled and have the correct information related to Duo entered into each. Each option is dealer-specific. If there are no entries at the top level then those users that have no dealer defined will not take part in the dual authentication.
Option duoakey - Duo 2-factor authentication application key.
Option duohost - Duo 2-factor authentication host URL.
Option duoikey - Duo 2-factor authentication integration key.
Option duoskey - Duo 2-factor authentication secret key.
Use the following steps to log onto SBN Anywhere with 2FA:
1. Enter your username/password on the login screen and hit enter.
w The Duo screen appears.
Note: If user does not exist in the Duo application, user will be presented with an Access denied message.
2. User is prompted for additional authentication by either a Push notification or entering a Passcode.
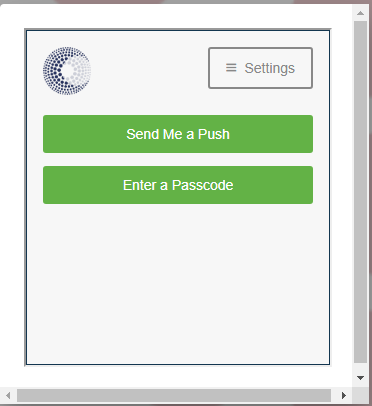
Note: If token is used you can bypass the duo authentication.
3. Enter additional Duo information.
w User is authenticated and logged into SBN Anywhere.
Navigation
Accessing functionality
The
functionality menu provides access to diferent areas of SBN Anywhere.
Areas that require an account to be visible to access are dimmed. The
menu is access using the menu  in
the top left corner.
in
the top left corner.
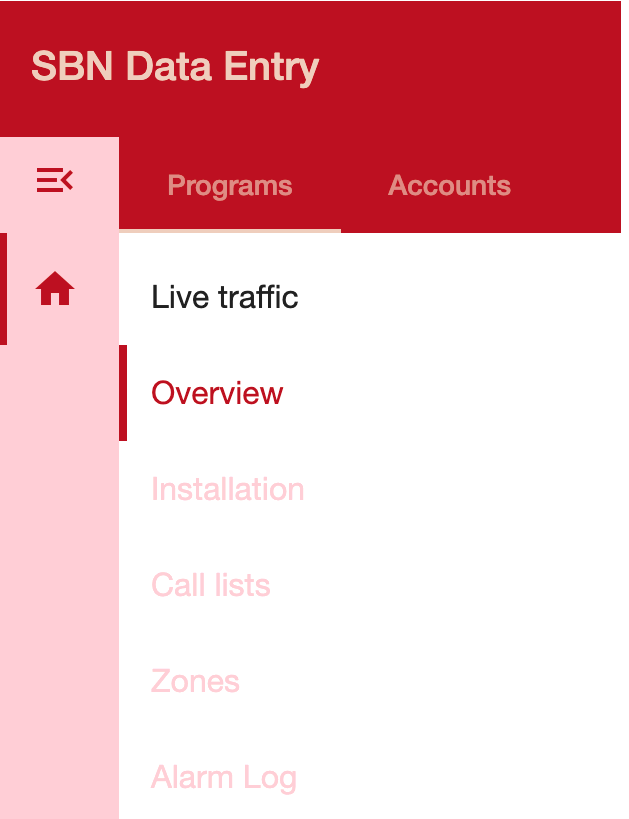
The above is Desktop view.
When the functionality menu is closed, or a picker is displayed, the different functionality is available in tabs, allowing quick switching.

Accessing the account
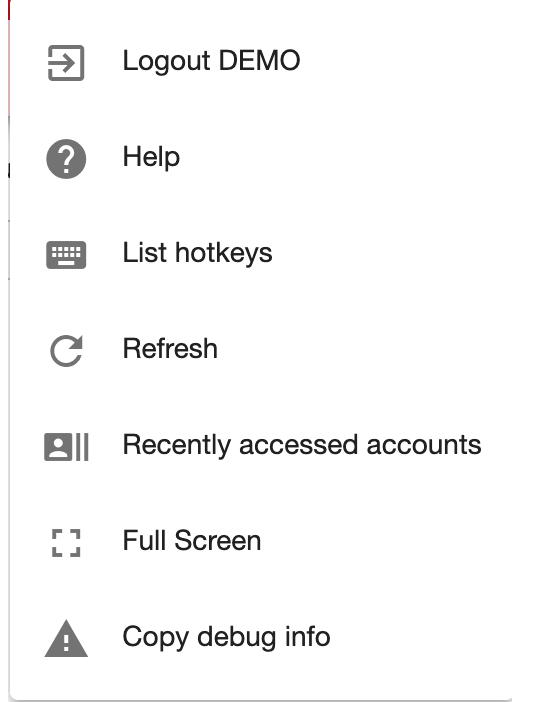
The account menu provides access to your account details.
Home
When first logged in, SBN Anywhere navigates to home. Home allows you to:
- Search for an installation
- View live traffic
- View the most active installations with the most signals in the previous 24 hours
- Access recently viewed installations
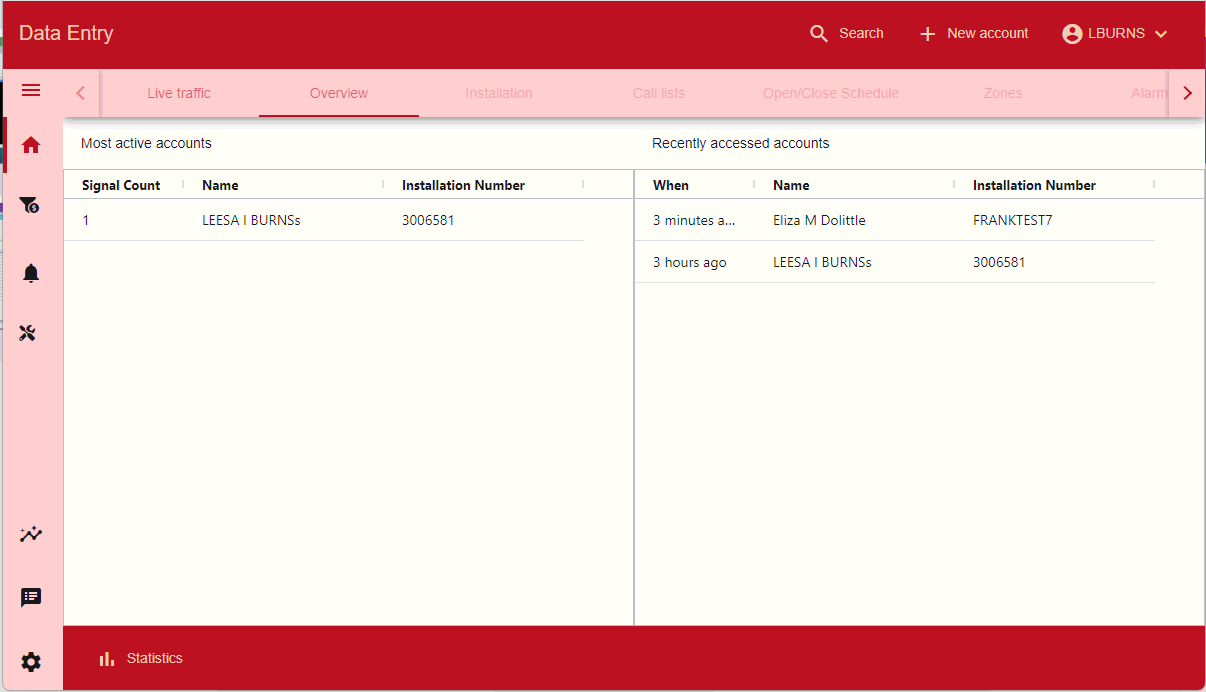
Live traffic
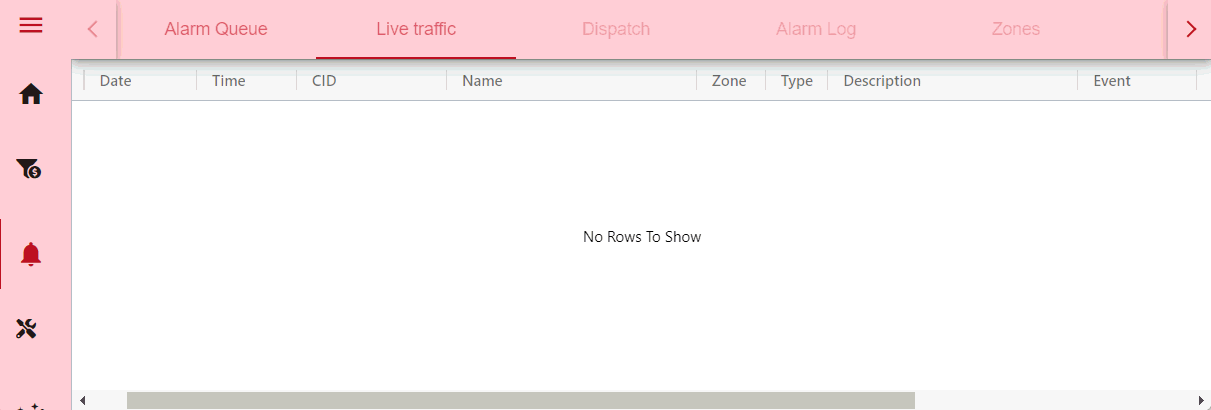
Live traffic displays signals as they are received by SBN. The data is refreshed every 90 seconds. It is possible to navigate to the alarm log of an installation where a signals has been received by clicking on the relevant row.
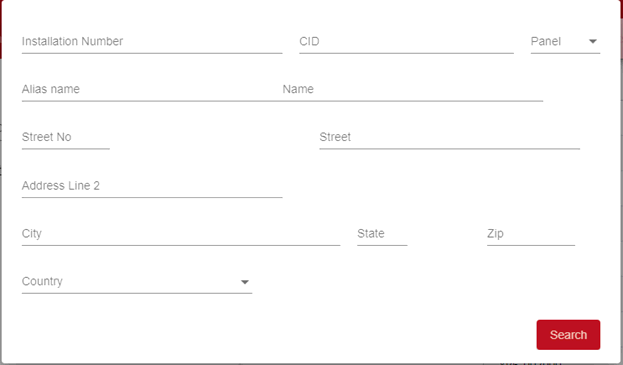
Searching for an installation
Installations
can be searched using the  command
on the top bar. The following search criteria are available:
command
on the top bar. The following search criteria are available:
Settings
The Settings can be found at the bottom-left of the screen, symbolized by the gear icon. When this gear is selected, users are taken within the settings screen.
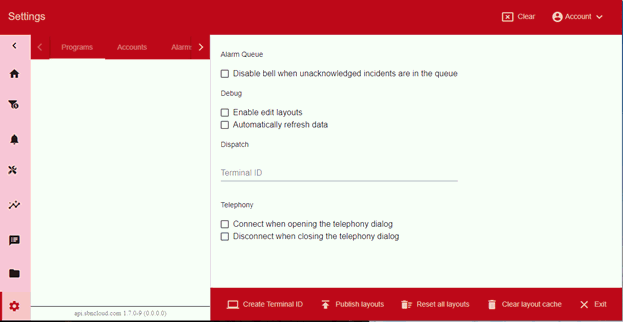
Here, users can change various settings related to the Alarm Queue, Dispatching, Telephony, and debugging. Users can also publish the layouts of various screens and fields.. (Editing will be discussed later in this document).
Note: Certain settings will not be displayed within the settings screen until the user navigates to that setting’s respective module/program. For example, items related to telephony will not appear until the user selects an account first.
Adding a new account
Adding a new account is a guided step-by-step process. Here, adding an account leads the user through a series of screens, each asking for specific information before moving to the next part.
Use the following steps to begin adding a new account:
1. Select the "+ New Account" button at the top of the screen
w The New account dialog box opens.
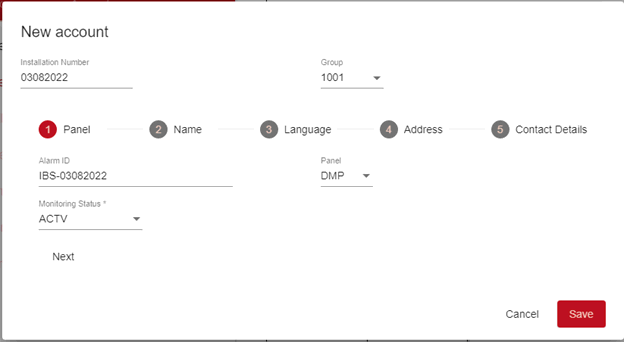
2. Complete the following fields and select “Next†when complete:
In Installation Number type a unique alpha/numeric number (This installation number cannot already exist within SBN.)
In Group, select your Dealer.
In Alarm ID, enter your primary CID associated with the installation. (CID is the reporting device on premise and cannot be “anything you wantâ€. Usually there is a prefix associated with it to make it unique to your dealers or subdealers. For example, a 4-digit panel account number of 1234 may be prefixed as “ABC-001234†to guide signals to your dealer(s) and your dealer(s) only.)
In Panel, choose the panel that is on Premise. (If you do not know the exact panel model, SBN has “Unknown†as well as general panel brands such as “Boschâ€, “DMPâ€, etc., for general use.)
Select the Monitoring Status of the new account. (Being as it is a new account and most likely not monitored yet, you can select “Trial Periodâ€, “Pendingâ€, or even “Log Only†until the account is fully brought online and considered “Activeâ€.)
Note: As a user completes steps, the circles associated with each step go from “Grey†to “Red†for simple indication of what has already been completed, as well as where current focus is in the next steps for adding a new account.
3. Press NEXT.
4. On the Name screen, complete the following fields and select “Next†when complete:
In Title, select an appropriate title for an individual person (if applicable).
In the Names fields, enter the name of the person (residential) or name of the business (commercial).
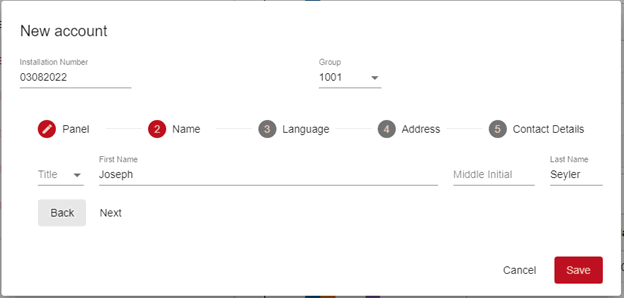
5. Press NEXT.
6. On the Language screen, choose a language and select “Next†when complete:
In Title, select an appropriate title for an individual person (if applicable).
In the Names fields, enter the name of the person (residential) or name of the business (commercial).
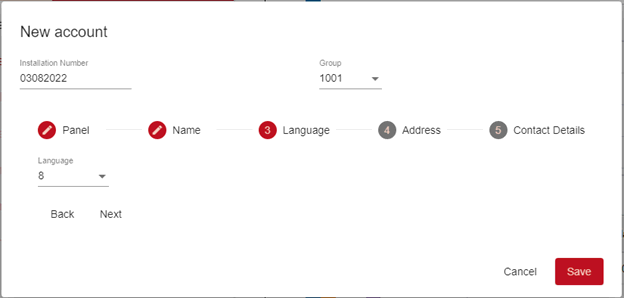
7. Press NEXT.
8. On the Address screen, fill in the address fields and time zone and select “Next†when complete:
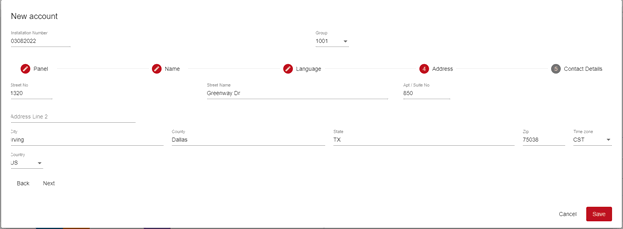
9. Press NEXT.
10. On the Contact Details screen, fill in at the Primary Phone and the primary e-mail address. Users can also enter 2 additional phone numbers and 2 additional e-mail addresses (if applicable).
Note: Usually Primary Phone 1 is the Premise location phone number.
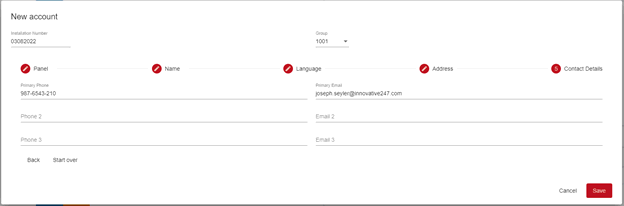
11. Press Save.
w All information is saved and user focus is taken to the newly added account.
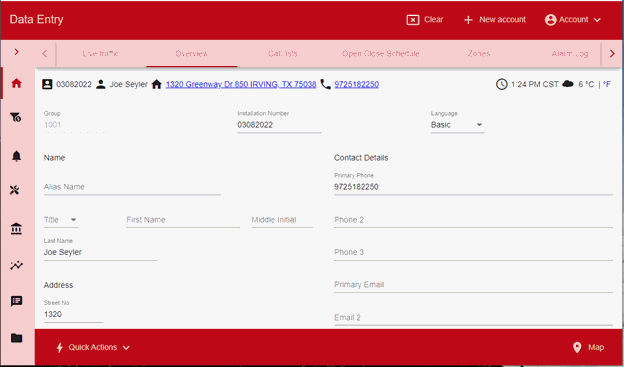
Note: Once all information is filled in, users can select “Back†to check their work, “Start Over†which clears everything currently inputted and starts the user back on Step 1 Panel, or they can select “Save†at the bottom. (Cancel acts the same as Start Over).
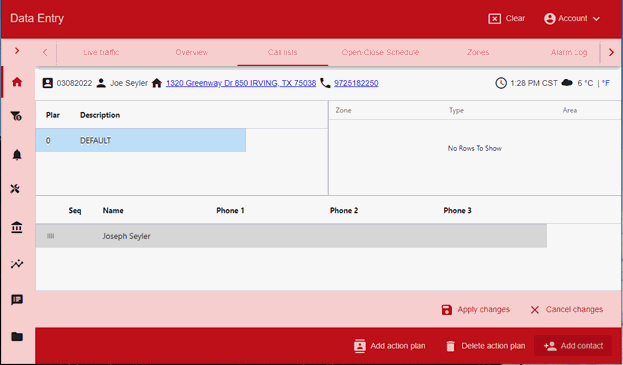
Adding a contact to the default call list (Action Plan)
By default, when a new account is created, it comes with a blank Call List (Action Plan). At least 1 action plan is required per installation. Users can choose to fill in the default action plan, or create a completely new action plan, and then delete the Default action plan after.
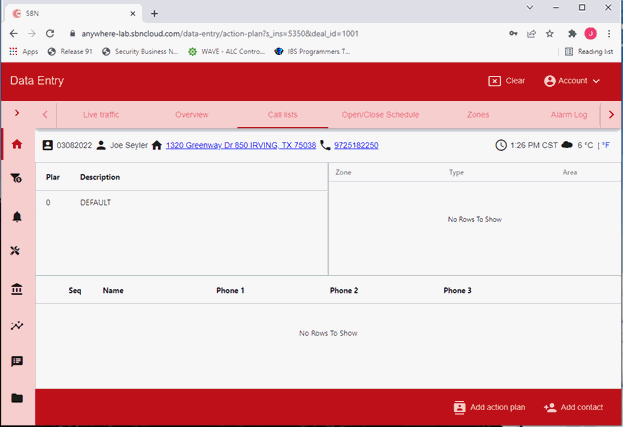
Use the following steps to begin adding a new contact:
1. Select the "Add contact" button at the top of the screen
w The New contact dialog box opens.
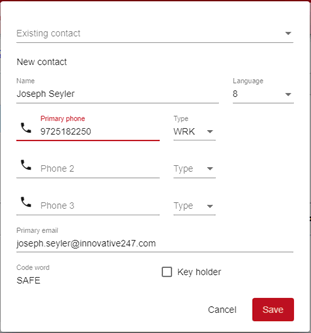
2. Complete the following fields and select “Save†when complete:
In Name type the name of the first person called. For residential, this can be whoever is living in the home or a family member. For commercial, it can be the premise phone number, a manager, etc.
For Phone 1-3, enter any phone number associated with either the property or the individual associated with the premise location. (Note: Only Phone 1 is required).
In Type, select the type of phone being accessed. (For example, selecting “SMS†can allow the user to be set up to receive text notification when alarms occur on premise, where selecting WRK (Work) will not allow alarm notifications via text message.)
In Primary Email, enter an email for the contact (if applicable). (Note: It is possible to also set up email notification through regular SBN if an email address is associated with the contact.)
In Codeword, enter a codeword that is unique to this specific contact. (Having a code word defined is an additional security measure operators can ask for in a holdup to help indicate if an alarm is real and if the operator is speaking with the correct person and not the burglar.)
In Key holder, check this field if the contact being added is a person who can unlock doors (either by keys or access cards) on the premise location.
3. Select “Save†when complete, then select “Apply Changesâ€. If this is not selected, the contact(s) added will not be saved.
Contacts are displayed within the bottom pane for the Call list highlighted.
Helpful Hint: Existing Contact dropdown
Once a contact is added, the “Existing contact†dropdown above the name field will pre-populate with any contacts added. This makes it simple for users to add the same contact(s) to multiple Call Lists without entering their information over.
Adding a new action plan
By default, when a new account is created, it comes with a blank Call List (Action Plan). At least 1 action plan is required per installation. Users can choose to fill in the default action plan, or create a completely new action plan, and then delete the Default action plan after.
Use the following steps to create a new action plan:
1. Select the "Add action plan" button at the top of the screen
w The New action plan dialog box opens.
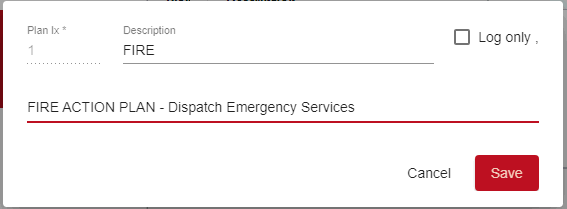
2. Complete the following fields and select “Save†when complete:
In Description, type a title for the action plan. Example can include Log Only, Fire, Burg, Medical, etc.
For Text field, enter the “Action plan text†which helps describe to the operator what actions should be taken when a signal associated to a zone that is tied to said action plan occurs.
For Log only, check this field only if you want no actions taken on specific signals tied to a ‘Log only’ action plan. A use case for why you may want various signals to be logged only can include test signals on specific zones, Supervisory signals, or more.
3. Select “Save†when complete, then select “Apply Changesâ€. If this is not selected, the new action plan will not be saved. The new action plan appears in the list of all action plans.
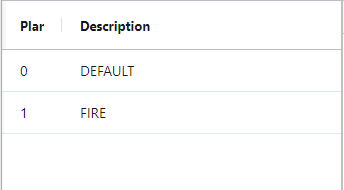
3. Repeat the steps described in Adding a contact to the default call list section above to add contacts to your new action plan call list.
Adding a call list or contact
Deleting a call List or a specific contact works the same. Select the appropriate row, the corresponding delete button appears, users selects this button, and then applies changes.
Use the following steps to delete a call list or contact:
1. Highlight the appropriate row, and select Delete. If you choose an Action plan, the “Delete Action plan†button appears the bottom of the screen. If you choose a contact within said action plan, the “Delete contact†button appears.
w The following image below displays both the Delete action plan and Delete contact buttons.
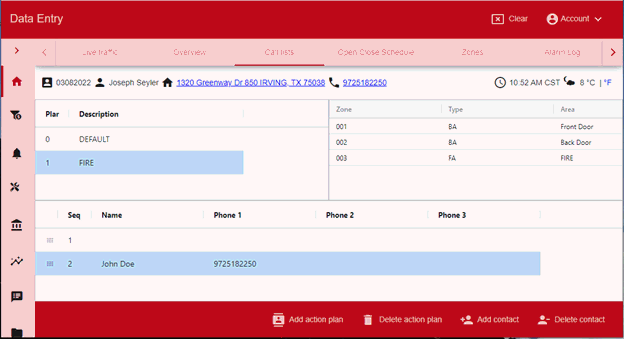
2. Once you choose what/who to delete, select the Apply Change button.
Note: Deleting a single contact off an action plan will not delete the action plan. It will remain with no contacts to call.
Note: Users may also not be able to delete an action plan if said action plan has zones associated to it. Change the zones first, then delete the action plan.
Open/Close
Use the Open/Close Schedule tab to manage schedules for installations for which you want to monitor open/close times. Schedules contain operational information such as hours, holidays, and temporary schedules for individual installations. You can create multiple schedules for seasonal, weekend, or holiday hours. You can also create temporary one-time schedules.
Use the following steps to navigate to the Open/Close Schedule tab:
1. Once an account is selected, from the main SBN toolbar on the left, select the Home icon.
w The New action plan dialog box opens.
2. From the top toolbar, tab or select the Left/Right arrows until you land on Open/Close Schedule.
3. Select Open/Close.
w The Open/Close Schedule window opens.
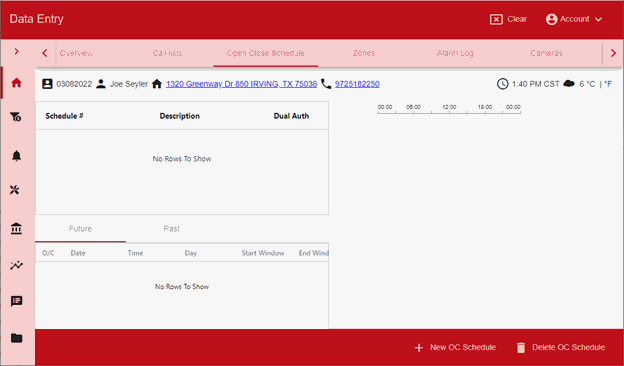
The Open/Close Schedule Tab
The Open/Close Schedule tab displays basic information about schedules for installations. The upper pane of the tab lists the schedules and the lower pane of the tab displays a composite schedule view for the selected schedule. The right-hand window displays ….
Field/Column Descriptions - O/C Schedule Tab
The following table describes the columns used in the upper pane of the Open/Close Schedule tab.
Field/Column |
Description |
Schedule # |
Schedule number assigned to the selected schedule. |
Description |
Manually entered schedule description. |
Dual Authorization |
If this column displays an X, the schedule requires authorization from two passcard holders (within a 4-hour period) to change the schedule. |
Current Status |
Status currently reported to SBN. |
Expected Status |
Status SBN expects in accordance with the schedule. |
The Composite Schedule view
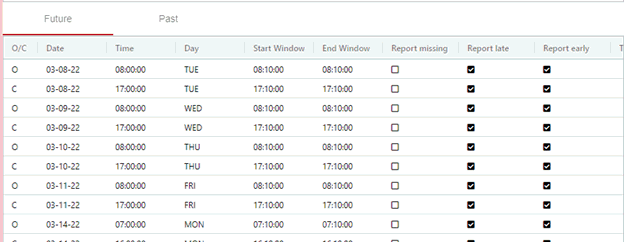
A composite schedule is the running schedule’s current and upcoming status, as well as Past. The current composite schedule appears in the lower left pane of the tab. Information in this pane is for reference only.
Change Log
The Change Log tab lists the changes made to an installation in Data Entry, newest first. The tab is shown to users who have access to the Change Log action (action 559/220), the same access that controls the Change Log tab in SBN.
Each user's changes are grouped into editing sessions. A session heading shows the date, the time span, the user, and the number of changes. A new session starts when more than two minutes pass between a user's changes.
Each change shows the field that was edited. The old value is struck out and the new value is in italics. A field that had no previous value is marked (new), and a field that was emptied is marked (cleared).
The tab loads the 100 most recent changes. Scroll down to load older changes, 100 at a time. If a load fails, select Retry.
To limit the list to a period, select the date range button in the tab header and pick a start and end date. The selected period is shown next to the tab title. Select Clear to show all changes again.
On a phone, Change Log is a card in the installation picker, after Action Plans.
SBN field Service can included Calendar tab, Service Queue, Service Request, Work Order, Installed Components, Zones, Alarm Log, and Service Log.
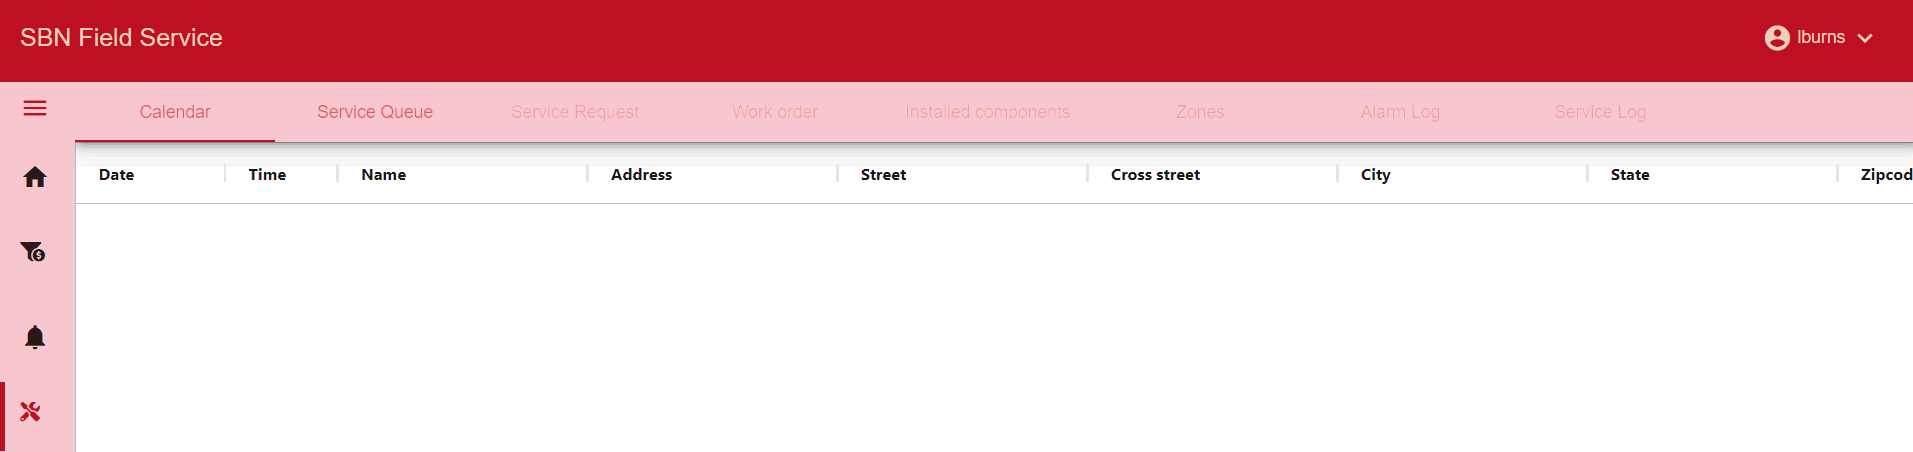
The Calendar tab is a list of service records by resource for a particular installation or by a resource type.
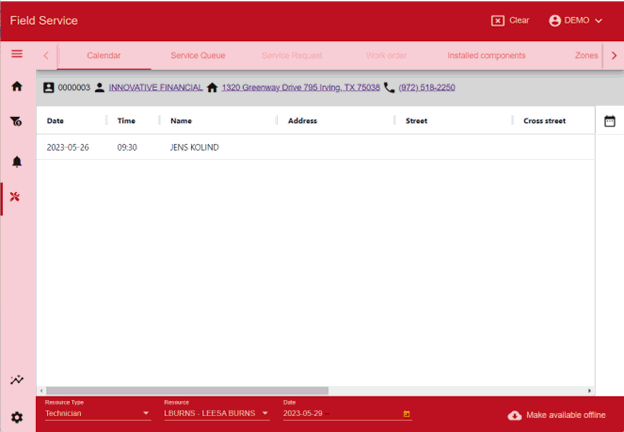
The above example is an installation that has a service request scheduled for a technician (resource – LBURNS) on 05-26 am. This can be used by technicians, installers, and/or sales resources by selecting from the dropdown "Resource Type" and then "Resource".
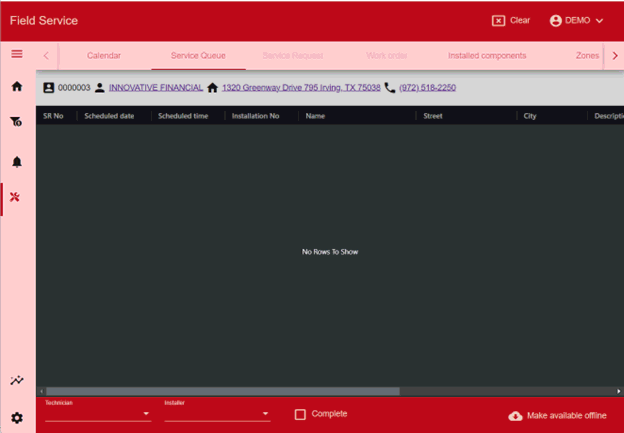
The Service Queue tab is a list of service records by resource type. You can select a Technician or Installer to show. You can also show a completed service request by selecting the “Complete†check box at the bottom.
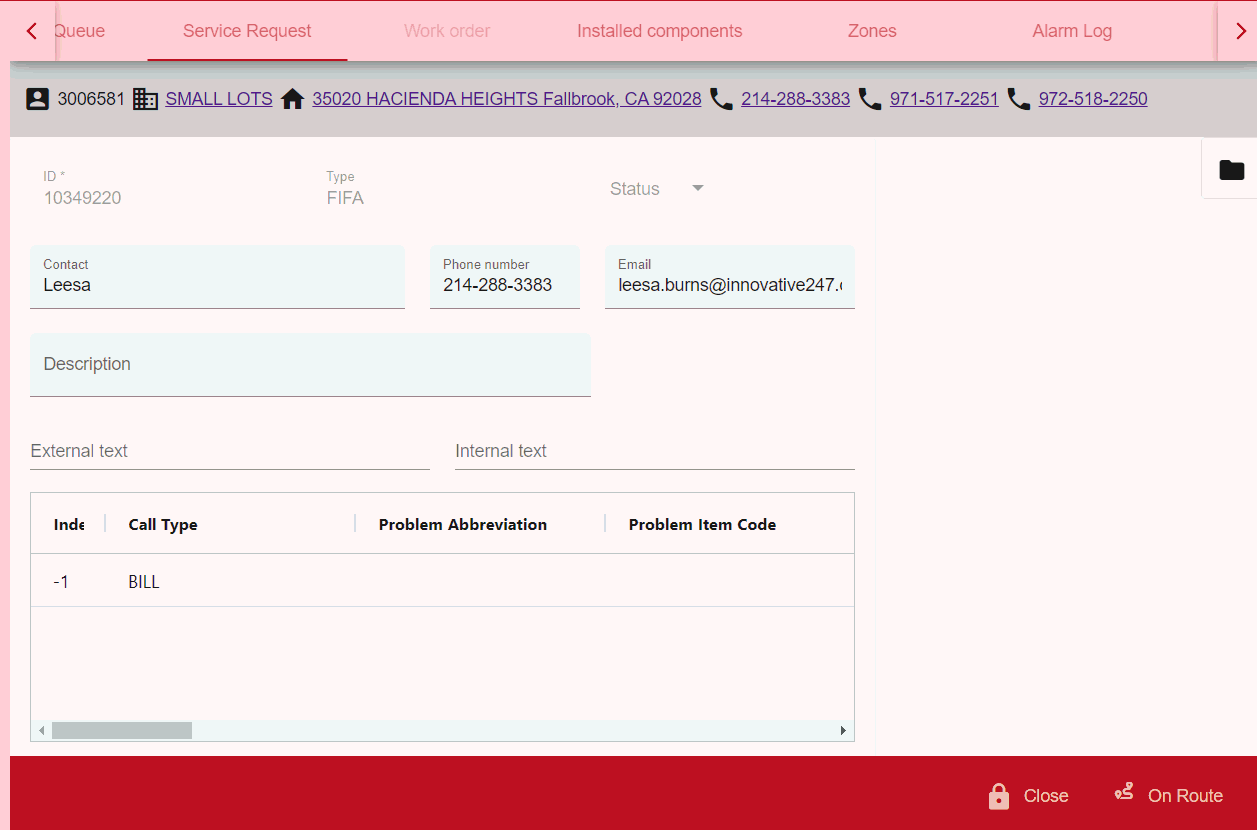
The Service Request tab shows a particular service request for a specific installation.
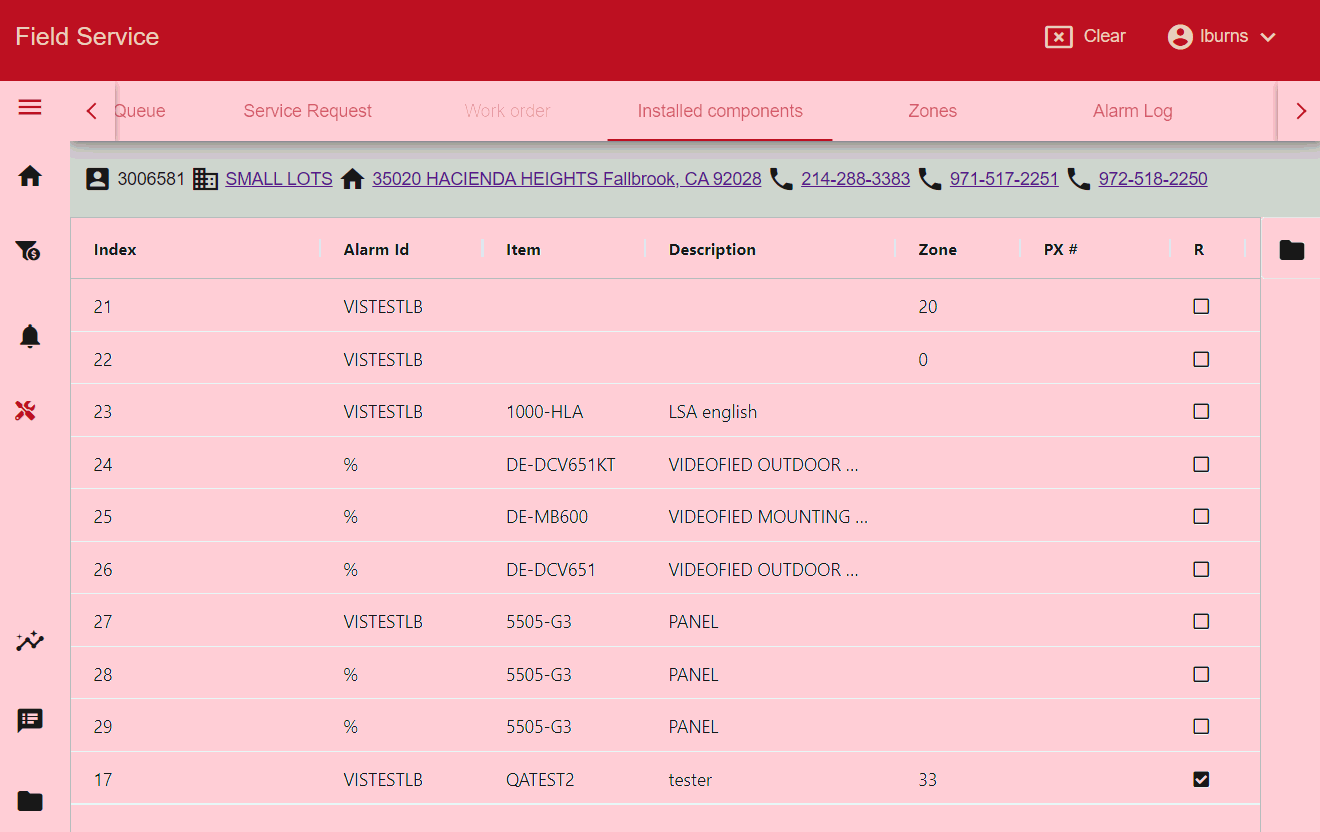
The Installed Components tab shows the installed components for a specific installation.
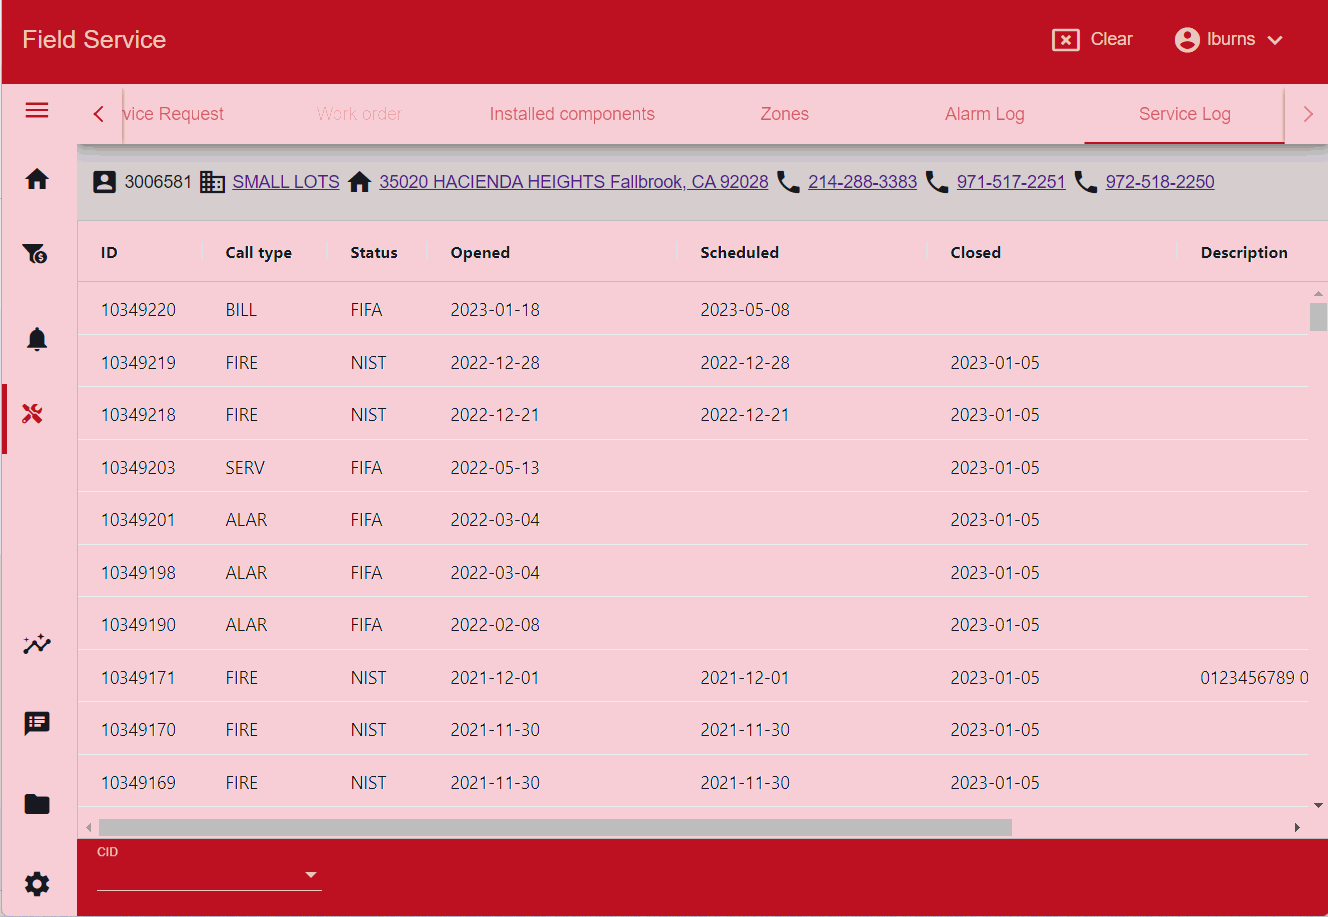
The Service Log tab shows the service log for a specific installation.
Release 94 Anywhere Updates
SBN Anywhere user password change works correctly, logging in with an inactive user is blocked, and change-log access was added.
Release 95 Anywhere Updates
Manual SMS can be sent from SBN Anywhere, and the dispatch call list includes contacts with an SMS phone type and shows agency dispatch status (on-site, done, cancelled). Alarm and zone status can be changed manually. SBN Anywhere receives the installation's main dealer and the information needed to take and treat alarms, and logging a general message on a customer was corrected.
Modifications and Updates to SBN Anywhere
The following table lists modifications and updates to the SBN Anywhere document.
Mod Number |
Date |
Description |
N/A |
07/31/20 |
Created document. |
| 08.91.11828,07.91.26384 | 07/31/20 |
Ability to dial out from SBN Anywhere using Twilio added. |
| 08.92.11928, 07.92.26549, 07.92.26555, 08.92.11940 | 05/21/21 |
Duo 2-factor authentication added to SBN Anywhere. Images updated. |