
Service Training
Service Training
Service Training
Release 90
innovating a safer world
innovative247.com/onpremise
Table of contents
Viewing the Service Log Entries – Service Request / Tickets
Creating a New Service Request
Viewing the Miscellaneous Service Log
Paging a Technician or Installer from the Service Request
Searching for Open Service Requests
Assessing the Service Ticket Report
Viewing Details of an Installation
Marking the Status of a Technician
Viewing the Miscellaneous Service Log
Outdating / Closing the Service Request
Assigning Work Orders to Resources
Adding/Changing Schedule Comments
Changing the Status of a Resource
Dragging Information in the Schedule Grid
Creating a New Return to Manufacturer Order
Viewing a List of Return to Manufacturer Orders
SERVICE LOG
Module topics
This module includes the following topics:
The Service Log Tab
Viewing Service Log Entries – Service Tickets
Creating a New Service Request
Changing a Service Request
Closing a Service Request
Viewing the Miscellaneous Service Log
Paging a Technician or Installer from the Service Request
Reopening a Service Request
The Service Log Tab
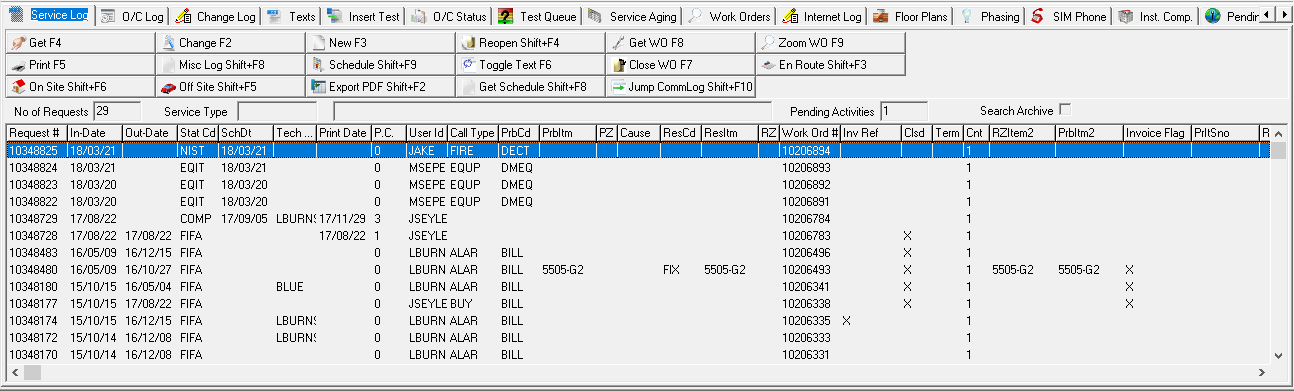
Use the Service Log tab of Data Entry (program #559) to view all service issues entered for the selected installation. The initial view of the Service Log tab shows the service history in list form.
The following graphic shows the Service Log as it opens.
Viewing the Service Log Entries – Service Request / Tickets
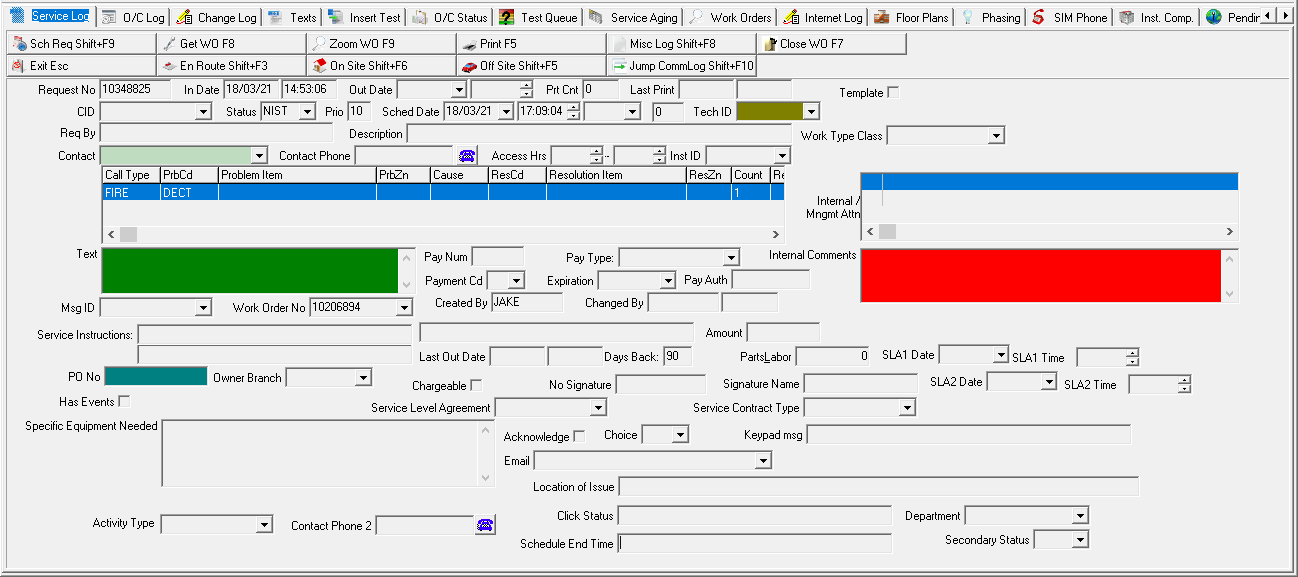
To view entries for a specific service request, choose Get [F4]. The Service Log Details window appears.
Creating a New Service Request
From the Service Log tab, you can create a new service request for the selected installation. Before the details window opens in New mode, SBN may display the following messages or windows:
A message if this installation has an overdue balance
A message if another service request is still open on this installation.
A message stating the last date, time, and days back since the last closed service request.
1. Choose New Record [F3]. Messages may appear. See possible messages above.
2. To continue with the new service request, choose Yes on each message. The Details window opens in New mode. The CID field defaults to “%”.
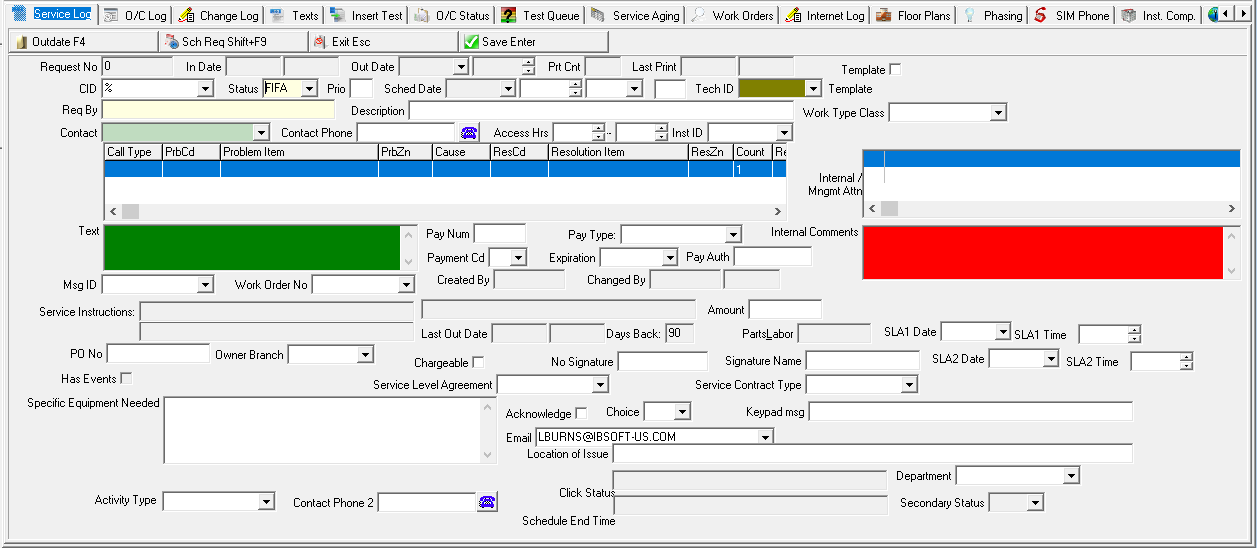
Note: The layout of the Problem / Resolution grid is now user-controlled.
3. Complete the fields.
4. Choose Save [ENTER].
Each problem in the Service Request creates a separate line on the Service Log tab.
Changing a Service Request
You may only change details of a service request if the associated work order is open / un-invoiced. To change service request information, follow the steps below.
1. From the Service Log tab select the service request you want to change.
2. Choose Change [F2]. The Details window opens in Change mode.
Note: When option sv074 is on and the selected installation has Service Instructions in the Basics tab of Data Entry (program #559), a pop-up window appears displaying the Service Instructions.
3. Change the information, as needed.
4. Choose Save [ENTER].
Note: You may not save changes to a service request if the associated work order is closed / invoiced. If you try to save changes and the associated work order has been closed / invoiced, SBN displays the message “Invalid Entry!”
Closing a Service Request
From the Detail window in Change mode, you can close or outdate a completed service request. You can also close or outdate a service request from the Detail window in New mode.
1. From the Detail window in Change mode, choose Outdate / Close Request [F4]. SBN asks for a confirmation.
2. Choose OK to confirm that you want to close this service request. Additional fields appear in the lower pane of the window.

3. Complete the fields.
Note: the mileage, time, and total fields default from information entered in Scheduling or through interface systems such as the Voice Response Unit (VRU) or Mobile SBN.
4. Choose Save [ENTER].
Viewing the Miscellaneous Service Log
The Miscellaneous Service Log tracks information about the status of each service request. You may access the Miscellaneous Service Log from the main Service Log tab and from the Detail window in the following modes:
View
Change
To view the Miscellaneous Service Log, follow the steps below.
1. Select the appropriate service request.
2. Choose View Service Request [F4].
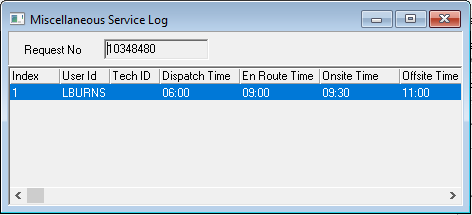
3. Choose Miscellaneous Service Log [SHIFT+F8]. SBN displays the Miscellaneous Service Log for this service request.
Paging a Technician or Installer from the Service Request
You can page a technician or installer directly from the Details window in the following modes:
Change
1. Select the appropriate service request.
2. Choose Change Service Request [F2].
3. Choose Paging [SHIFT+F11]. The Paging box appears.
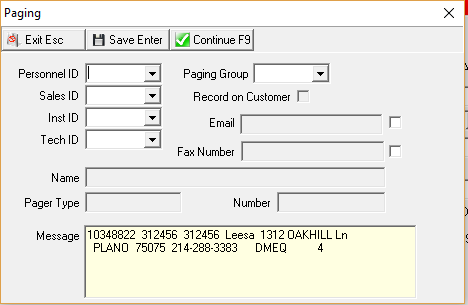
4. Enter any additional information into the Paging dialog box.
5. Choose Save [ENTER].
Reopening a Service Request
From the main Service Log tab, you can reopen a service request that has previously been outdated.
1. Select the outdated service request that you want to reopen.
2. Choose Reopen Service Request [SHIFT+F4].
SBN reopens the service request for you to use.
Secondary Status Required Check Box
A Secondary Status Required check box and column was added to Service Request Codes (program #1525). If you select this check box for a status code, a Select Secondary Status dialog box appears when you attempt to change the status of a service request from this status in the Service Log tab. If you do not select a Secondary Status in the dialog box, SBN does not change the service request status.
Added an Is Secondary Status check box and column to program #1525. The status codes for which you select this check box appear in the drop-down menu of the Secondary Status field in the Select Secondary Status dialog box of the Service Log tab.
A read-only Secondary Status field was added to the Service Request Details window of the Service Log tab. This field displays the Secondary Status of the service request as assigned in the Select Secondary Status dialog box.
SERVICE QUEUE
Module topics
This module includes the following topics:
The Service Queue
Searching for Open Service Requests
Accessing the Service Ticket Report
Viewing Details of an Installation
Marking the Status of a Technician
Viewing the Miscellaneous Service Log
Outdating / Closing the Service Request
Paging a Resource
Setting the Refresh Interval
The Service Queue
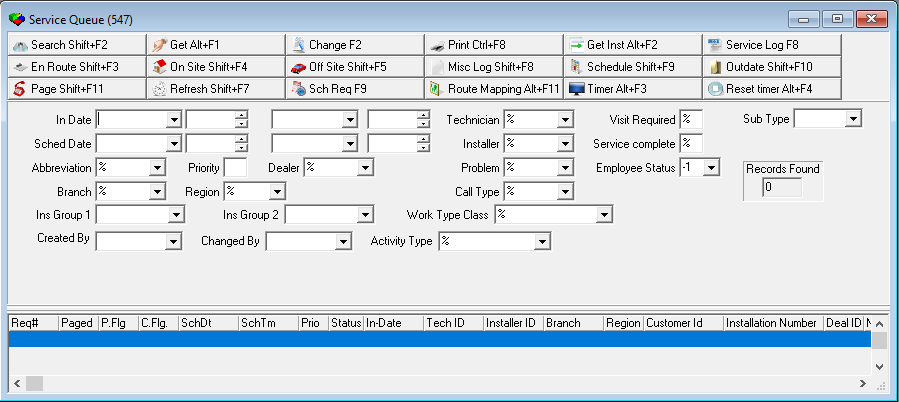
Use the Service Queue to view a comprehensive list of all service requests in the system. The window of the Service Queue appears blank until you perform a search.
The following graphic shows the Service Queue as the program opens.
Searching for Open Service Requests
To search for open service tickets, follow the steps below.
1. In Service Queue, select your search parameters.
2. Choose Search [SHIFT+F2]. The search results appear in the lower pane of the window.
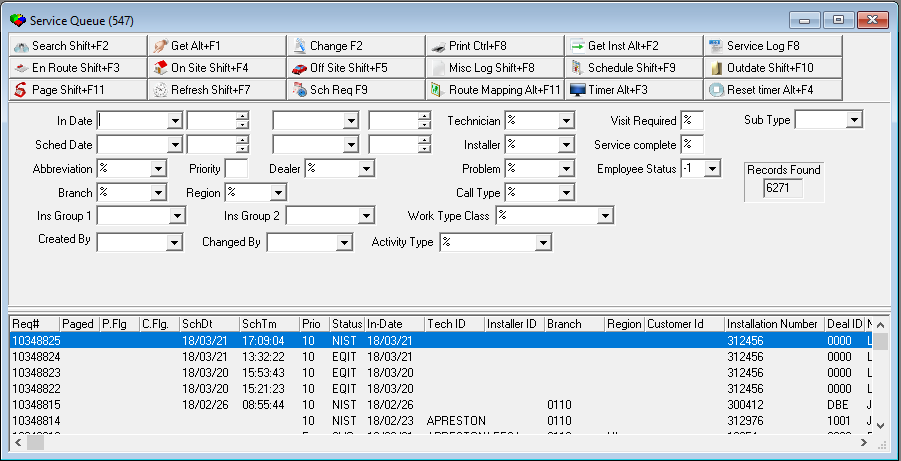
Note: If you change search parameters, you must choose Search again to display the new results.
Assessing the Service Ticket Report
To access the Service Ticket Report (report #2008) follow the steps below:
1. In Service Queue, search for open service tickets.
2. From the search results, select the service ticket you want to print.
3. Choose Print [CTRL+F8]. The Service Ticket Report opens with the selected service request number.
4. Select a Sort By code.
5. Choose Save [ENTER]. SBN send the report to the Report Queue (program #1558).
Viewing Details of an Installation
To view details of the installation associated with the service ticket, complete the following steps.
In Service Queue, search for open service tickets.
From the search results, select the service ticket for which you want to view installation details.
Choose Get Installation [ALT+F2].
SBN displays the details in the main Data Entry window.
Close the Data Entry Master to return to the Service Queue.
Marking the Status of a Technician
You can use the Service Request to flag a technician’s status as enroute, onsite, or offsite. Once you flag the technician’s status SBN changes the color of the service request to indicate the location of the technician. The colors appear as follows:
| STATUS | COLOR |
|---|---|
| En Route | Red |
| On Site | Blue |
| Off Site | Green |
When option ba153 is on and you flag a technician as On Site or Off Site, the Insert Test tab automatically opens. The following steps show the process with the option on.
1. In Service Queue, search for open service tickets.
2. From the search results, select the service ticket you want to update.
3. Choose one of the following functions:
En Route [SHIFT+F3]
On Site [SHIFT+F4]
Off Site [SHIFT+F5}
The Change Status dialog box opens.
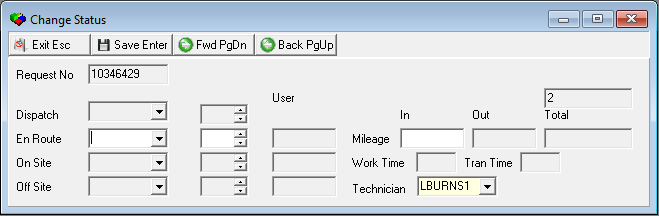
4. In Technician – select the ID of the employee servicing the request.
5. SBN defaults the date and time to the current system date and time when you choose Save. You can override these defaults.
6. When marking them En Route or On Site you can type the mileage reading in the In and Out fields.
7. Choose Save [ENTER]. When you mark a technician as Off Site, SBN asks if the service is complete.
8. Choose Yes or No.
Note: When you choose Yes, SBN sets the Complete flag in the Service Queue.
Viewing the Miscellaneous Service Log
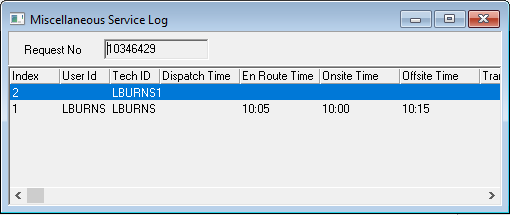
The Miscellaneous Service Log displays the technician ID and times for the service request. This log supports multiple lines for multiple trips and multiple resources.
To access the Miscellaneous Service log, choose Miscellaneous Service Log [SHIFT+F8]. The following graphic shows the Miscellaneous Service Log with information displayed.
Outdating / Closing the Service Request
Use Outdate / Close Request [SHIFT+F10] to go directly to the selected service request in the Service Log so that you can outdate the request and enter closing information.
Paging a Resource
To page a resource directly from the Service Queue, follow the steps below:
1. In Service Queue, search for open service tickets.
2. From the search results, select the service ticket about which you want to page the resource.
3. Choose Paging [SHIFT+F11]. The Paging dialog box opens.
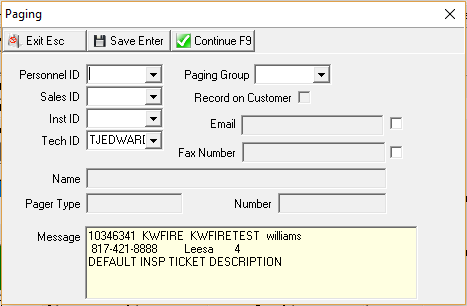
Note: If Technician or Installer IDs have been specified in the Service Request, the paging dialog box defaults with the correct ID.
4. Select the Personnel ID, Sales ID, Installer ID, or Technician ID (if not defaulted) of the resource to who you want to send the page.
5. Type any additional information in the Message field.
6. Choose Save [ENTER].
Setting the Refresh Interval
You can set the refresh interval for the service request screen, so that SBN automatically refreshes the screen with the latest information. To set, choose Refresh Interval [SHIFT+F7].
From the menu, select the number of seconds between each refresh.
WORK ORDERS
Module topics
This module includes the following topics:
Work Orders
Viewing a List of Work Orders
Creating a Work Order
Approving a Work Order
Closing a Work Order
Work Orders
The Work Order tab and the Work Order window combine provide comprehensive information and control over work orders.
The Work Orders Tab
Use the Work Order tab to view information about:
Existing work orders
Closed work orders
Invoiced work orders
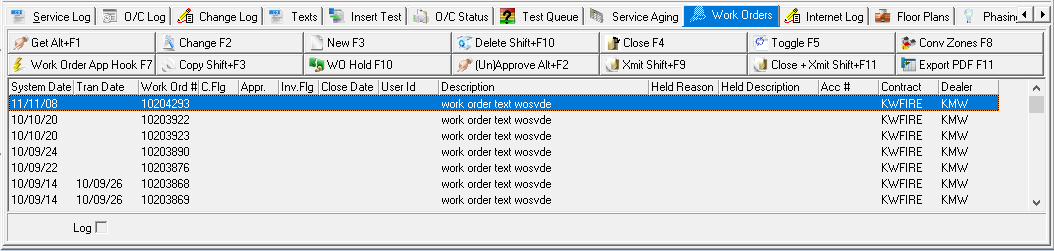
The following graphic shows the Work Order tab with customer information displayed.
The Work Order Window
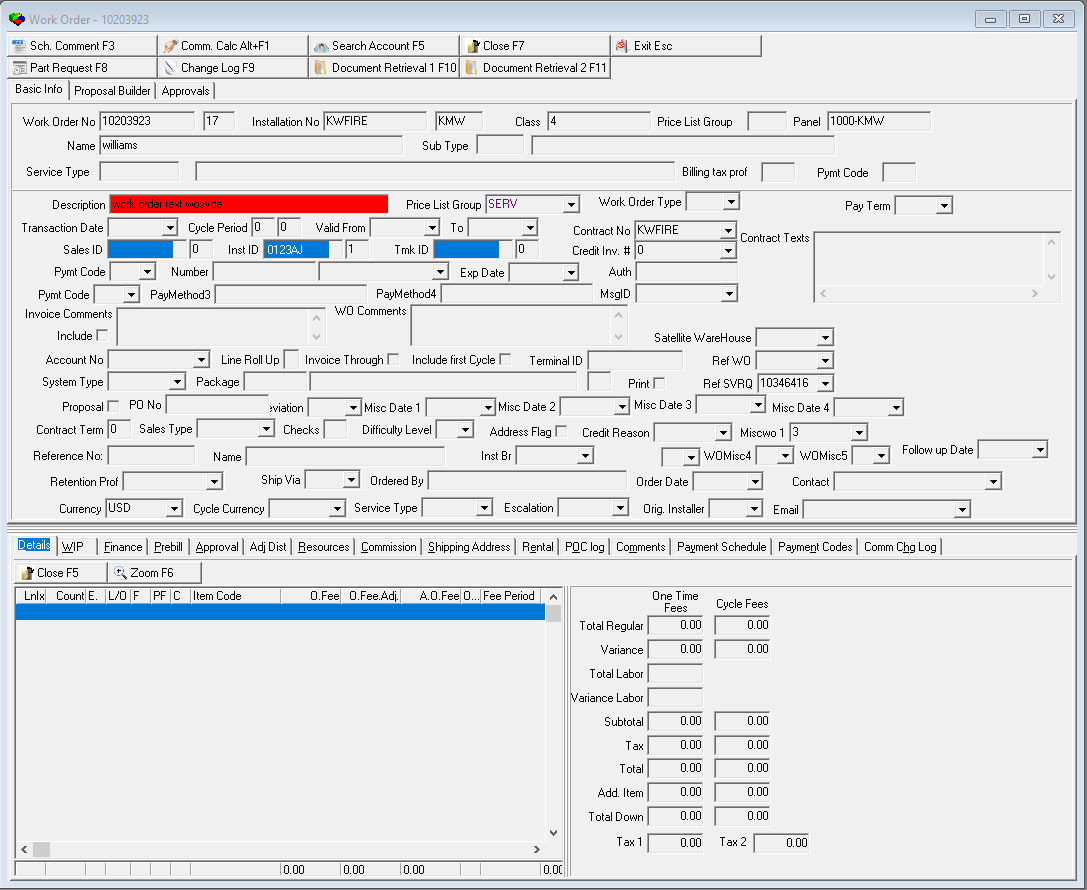
Use the Work Order window to approve and close specific work orders. The work order contains three panes:
Work Order Details – the upper pane displays specific information once the work order has been saved.
Work Order Information – the middle pane contains fields and menus for specifying how to process the work order and other account related information.
Work Order Costing and Commission Tabs – the lower pane contains ten tabs for selecting and entering products for the work order, and for figuring discounts, finance changes, and commission percentages.
The following graphic shows a work order window.
Note: You may have a selected work order open in only one screen at a time.
Work Order Details Window
Replaced the Log, Commission Change Log, and WIP Change Log tabs of the Work Order Details window with a single Change Log window, which you can access by choosing the Change Log button.
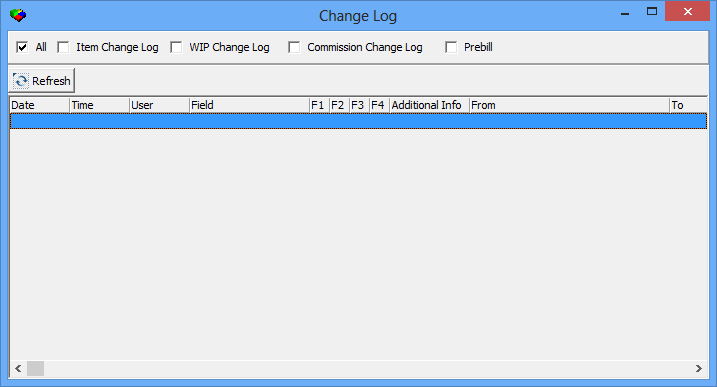
The Change Log window displays all log entries by default and allows you to filter the log entries by selecting one or more of the following check boxes:
Item Change Log
WIP Change Log
Commission Change Log
Prebill Change Log
Viewing a List of Work Orders
You can view a list of work orders associated with an account, installation, or contract by choosing the Work Orders tab from Marketing, Service/Data Entry, or Contract Master.
To view details of a work order, follow the steps below:
1. From the Work Order tab, select the work order for which you want to view details.
2. Choose Get Record [ALT+F1].
The Work Order window opens and displays details of the selected work order.
Creating a Work Order
Each work order has several sections of information that can be entered or viewed to track job costing, calculate commission, and log work order changes.
To enter a work order, follow the steps below:
1. From the Work Order tab, select New [F3]. The work order screen opens.
2. Complete the fields in the work order details section. Please see the following sections for information on each tab:
Item Details
The Items tab allows you to input individual items, kits, packages, and systems. You can make adjustments to one-time and cycle fees. This tab also shows the subtotals and final totals with tax.
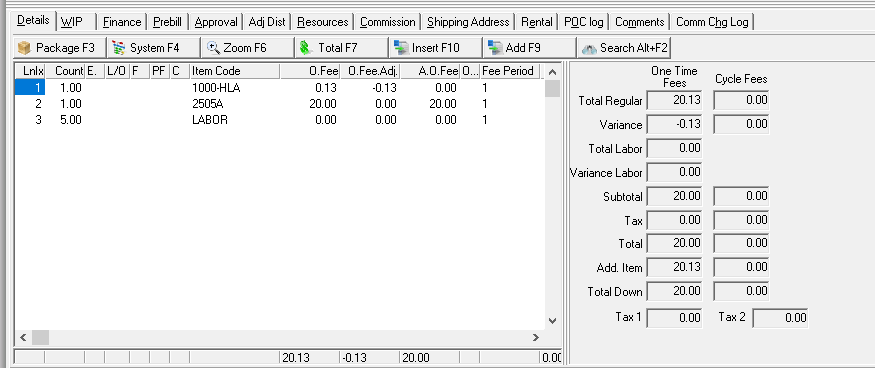
Note: Items on a work order that have been picked in Branch Inventory (program #1757) are locked in the Details tab and users cannot edit them.
Prebill Tab
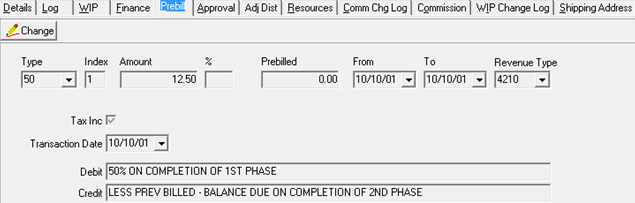
You can create multiple pre- or process billings against the same work order. SBN does not tie pre-billing to a specific line of the work order but applies it to the total. When you close the work order, the pre-billed amount displays as a credit on the invoice and SBN redistributes the revenue to the correct revenue type for each of the lines. To enter pre-bill information and change pre-bill terms you must first save the work order, and then reopen the work order in Get Record mode.
The following graphic shows the pre-bill tab with information displayed.
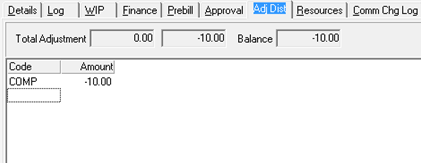
Adjustment Distribution
Use the Adjustment Distribution tab to allocate the adjustment total to one or more adjustment codes. Once you have entered the Adjustment Distribution tab, you cannot save the work order until you have assigned all adjustments and they are equal to the total amount of adjustments for the work order.
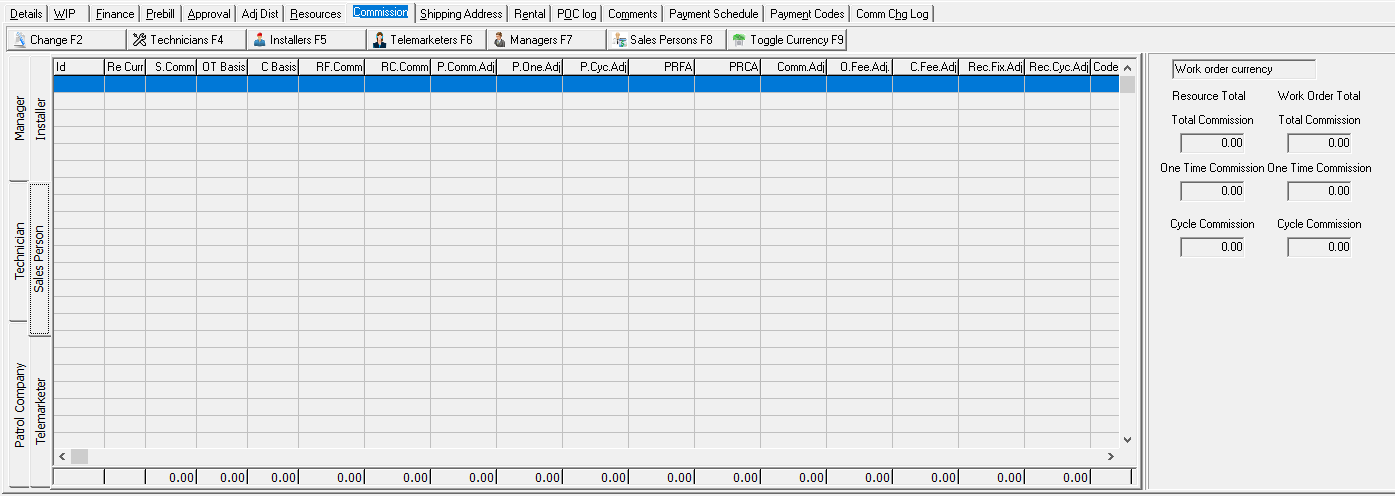
Commission
Approving a Work Order
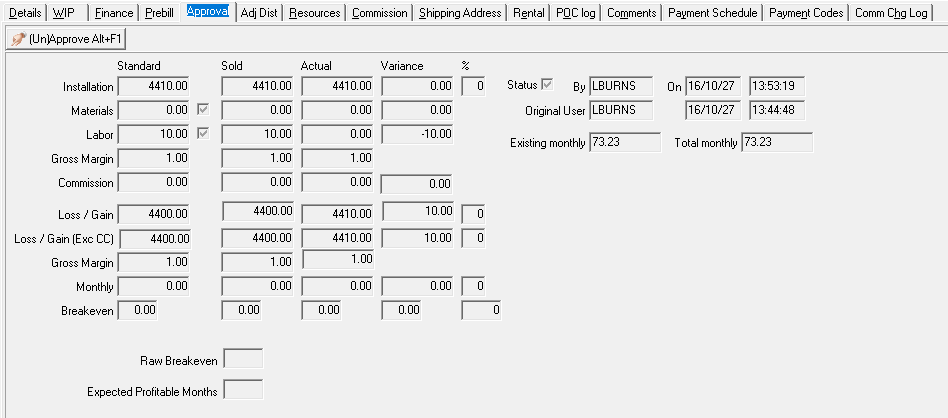
Use the Approval tab in the lower pane of the Work Order window to approve a work order. To approve a work order, you must first save the work order and then open the work order in Get [ALT+F1] mode.
Note: Before you can approve a work order, you must attach it to a contract.
The following graphic shows the Approval tab with information displayed.
1. From the Work Order tab, select the work order that you want to approve.
2. Choose Get Record [ALT+F1].
The Work Order window opens, with information displayed.
3. Select the Approval tab.
4. Choose Approve / Unapprove work order [ALT+F1].
Note: Action 250/94 is required to unapprove work orders with items that have been picked in Branch Inventory (Program #1757).
Closing a Work Order
You can access the Close button from the Work Order tab or the Work Order window. Before you close a work order:
You must approve the work order.
You must attach the work order to a contract.
If you attach only one contract to the installation, SBN automatically designates that as the billing contract.
If you attach multiple contracts but only one of them is active, SBN automatically designates the active contract as the billing contract.
If you attach more than one active contract to the installation, you must indicate which contract to use in the work order window.
1. In Work Order tab, select the work order you want to close.
2. Choose Close / Reopen [F4]. The Transaction Date field appears at the bottom of the tab.
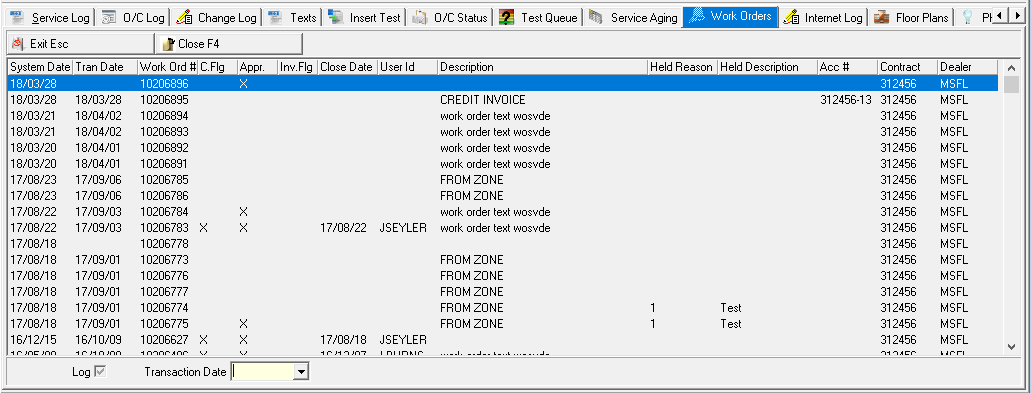
3. In Transaction Date – select the close date.
4. When you close a work order created from Service, you can type an Invoice Ref number, if needed. This number will update the Invoice Ref field in the Service Ticket.
5. Choose Close / Reopen [F4] to complete the close process.
To close a work order from the Work Order window, follow the steps below:
1. In the Work Order tab, select the work order you want to close.
2. Choose Get [ALT+F1]. The Work Order window opens.
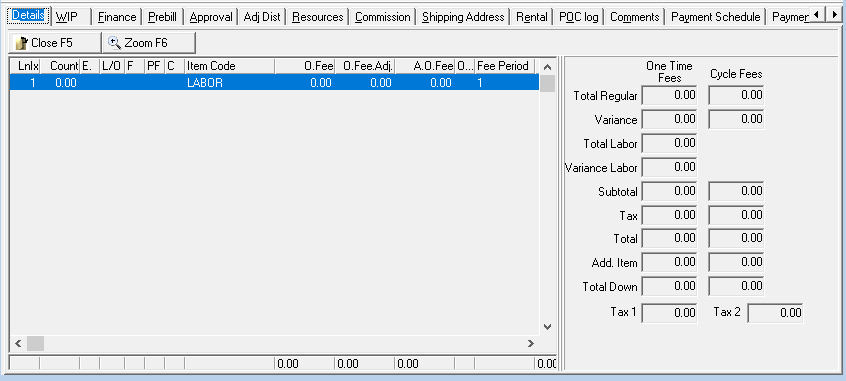
3. Choose Close / Reopen [F7]. SBN asks if you are sure.
4. Choose Yes. SBN confirms that it successfully closed the work order.
5. Choose OK. SBN enters the current date as the close date.
WORK ORDER QUEUE
Module topics
This module includes the following topics:
Searching for Work Orders
Assigning Work Orders to Resources
Adding / Changing Schedule Comments
Holding / Releasing Work Orders
Searching for Work Orders
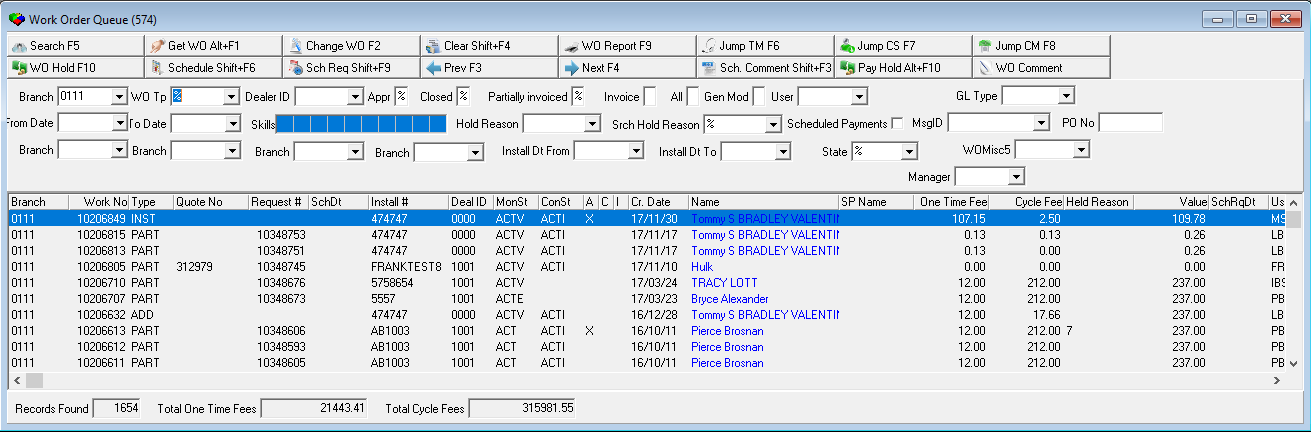
Use the Work Order Queue to search the database of open work orders to identify records that need additional action.
1. In the Work Order Queue, input search parameters.
2. Choose Search [F5]. The Work Order Queue displays the search results.
Assigning Work Orders to Resources
The Work Order Queue allows you to assign a job to a specific resource. You may also assign a possible schedule time, date, and comment.
1. In the Work Order Queue, choose Schedule Request [SHIFT+F9]. The Schedule Request screen opens:
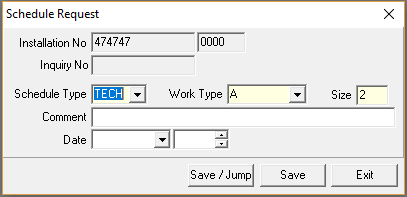
2. Select the resource and work type. You may also enter a comment and a suggested date/time.
3. Choose Save.
Note: The Save / Jump option saves the record and takes you directly to the Schedule Board.
Adding/Changing Schedule Comments
You can add or change schedule on any work order that has been pre-scheduled.
1. In the Work Order Queue, select a work order line.
2. Choose Sch. Comment [SHIFT+F3]. The Comment box opens.

3. Enter or change any comment attached to the selected work order.
4. Choose Save [ENTER].
Holding/Releasing Work Orders
Work Orders can be placed on hold from the Work Order tab or from the Work Order Queue.
1. In the Work Order Queue, select a work order.
2. Select a hold reason.
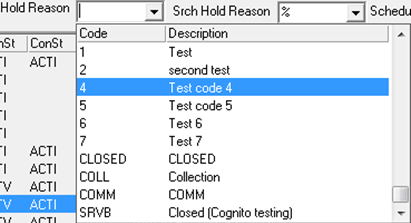
3. Choose WO Hold [F10].
The system asks to confirm the work order hold reason.
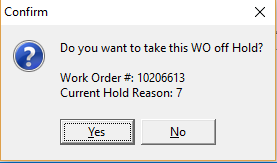
4. Choose Yes.
SCHEDULE CAPACITY
Module topics
This module includes the following topics:
The Schedule Capacity Program
Creating Default Week
Generating Schedules
The Schedule Capacity Program
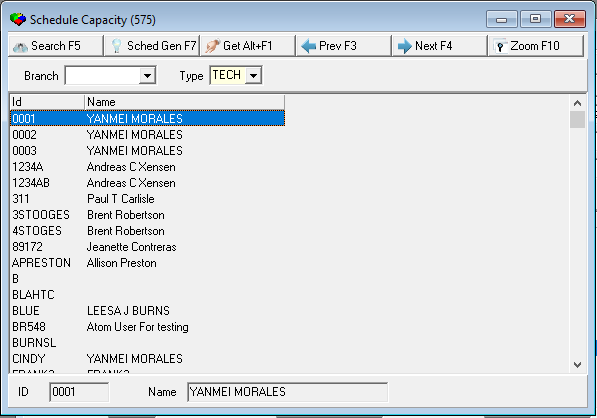
The Schedule Capacity program allows you to define the days, times, and types of work resources can perform for scheduling purposes.
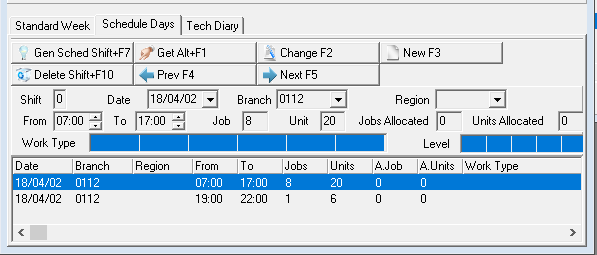
The following graphic shows the Schedule Capacity program with information displayed.
The Schedule Capacity Zoom Screen
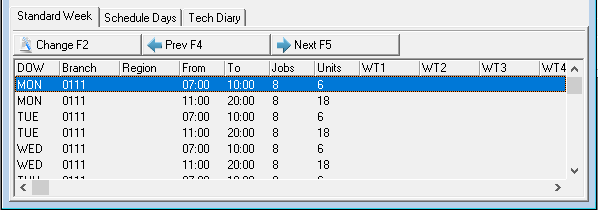
The Schedule Capacity program contains a sublevel for entering and view the schedule details for a specific resource.
Creating Default Week
The default week sets up a resource so that the system can automatically generate the ongoing schedule based on the information entered in this tab.
1. Select the desired employee.
2. Choose Zoom [F10]. The sublevel opens.
3. Choose Change [F2]. The tab opens for editing.
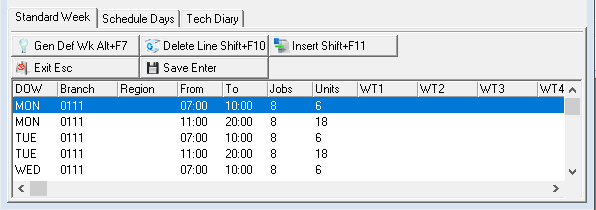
4. Enter information for at least one day. To copy the information to all days, choose Gen Def Wk [ALT+F7].
5. Choose Save [ENTER].
Generating Schedules
When the default weeks are defined for each resource, you can manually generate the schedules. You have the option to generate for a single resource, or for all resources.
1. Choose Schedule Generation [F7]. The Generate Schedule window opens.
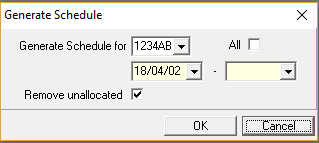
2. To generate the schedule of one resource, select the resource ID and the date range. To generate schedule for all resources, select the All checkbox.
3. Choose OK. To view the generated schedule; select the Schedule Days tab in the zoom screen.
SCHEDULE BOARD
Module topics
This module includes the following topics:
The Schedule Board
Searching for Resources
Setting Resource Codes
Schedule Detail / Week View
Working with Resources
Viewing Slot Details
Changing Status of a Resource
Unallocating Jobs
Dragging Information
The Schedule Board
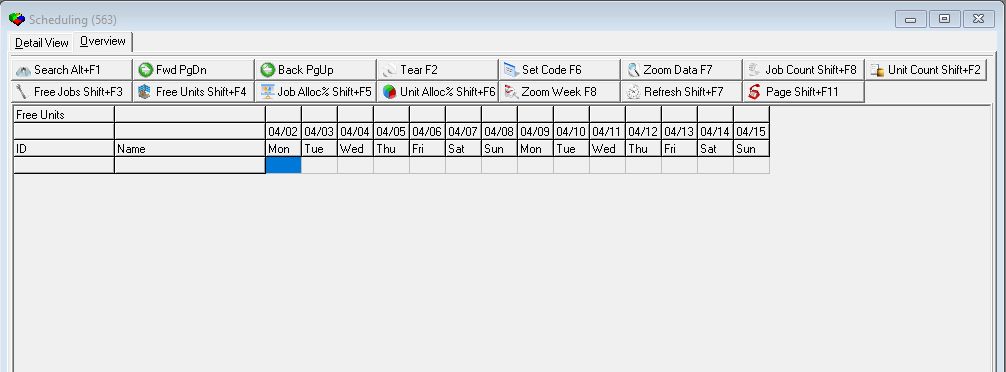
The Schedule Board contains two main tabs:
The Overview tab, in which you can search for and view available resources
The Details tab, which contains two panes:
The Request list on the left
The Scheduling Grid on the right
The following graphic shows the Scheduling Board as it opens.
Searching for Resources
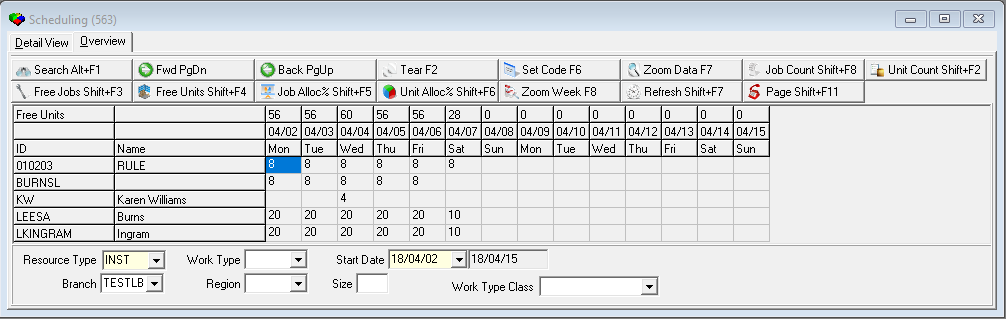
When Scheduling opens, the Overview tab appears blank. In order to view resources you must perform a search. The search results display all available personnel for the type, branch, and date selected. The search results also display the number of available and allocated jobs or units (depending on the display type chosen).
1. In Scheduling, enter the following information:
In Resource Type – select the type of personnel to view and schedule.
In Work Type – select the type of work orders, if needed.
In Start Date – select a starting date for the schedule. Date defaults to the current date.
In Branch – select the branch you want to view and schedule.
In Region – select a subdivision of the branch, if needed.
In Size – type a number of available units, if needed.
Note: The Overview tab displays global resources (those with no branch assigned in Schedule Capacity, Program #575) in search results regardless of which branch a user enters in the search parameters. Global resources can be scheduled for jobs on any branch.
2. Choose Search. The overview tab of the Scheduling window displays the search results.
Changing the Display of Resource Counters
Use the search parameters and function buttons to change the display mode of the job and unit counters. When you select these buttons, SBN changes the numbers displayed inside the Resource Grid. The search results display the free units available to allocate. You may view the total number of jobs and units for each resource, as well as the percent of the jobs or units free or allocated.
Setting Resource Codes
You can set specific resource codes to block out time from the Schedule Board for employee activities. You can specify resource codes for entire days or specific times.
1. In Scheduling, select the box in the grid that corresponds with the day and employee for whom you want to set the code.
2. Choose Set Code for Resource [F6]. The Set Schedule Code dialog box appears.
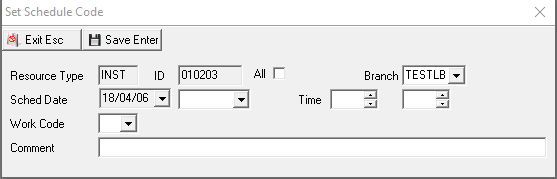
3. Enter the following information:
In All – enter a check mark to set the code for all resources of the displayed type for the selected branch.
In Branch – select the branch to which you want the code to apply.
In Schedule Date End Date – if you want the code to apply to multiple days, select an end date.
In Start Time – select the beginning time for the code.
In End Time – select the end time for the code.
Note: If you do not select a date or time, the code applies to the entire day of the start date.
In Work Code – select the appropriate code.
In Comment – type a reason for code, if needed.
4. Choose Save. The Overview tab displays the changes to the Schedule Board for the selected date.
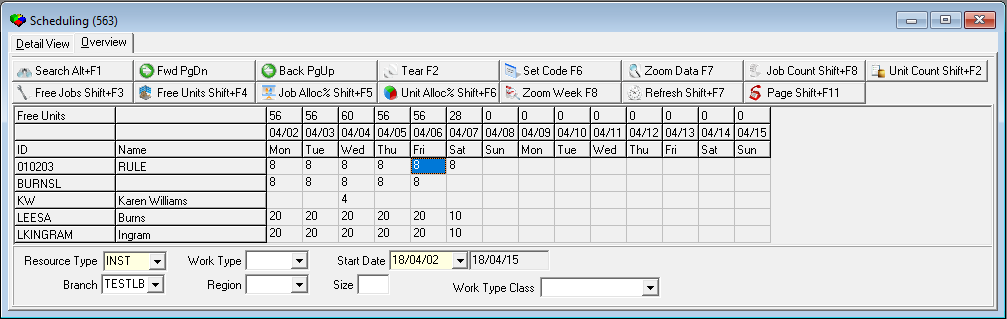
Note: For the selected date, the left of the column displays different unit numbers depending on the mode. The right of the column displays the selected work code.
1. In Scheduling, select the box in the grid that displays the code you want to remove or update.
2. Choose Set Code for Resource [F6].
3. Update fields, as needed, or leave all fields blank to remove code completely.
4. Choose Save [ENTER]. SBN asks if you want to update.
5. Choose Yes to remove or change code.
Schedule Detail / Week View
Once you have completed the initial search in the Overview tab, you must choose a display option for the Detail tab. For the Daily Resource View, double-click on the day you want to display or choose Zoom to One Day for All Resources. The results display in the Detail View tab.
For the Weekly resource view, double-click the resource name, or position the focus to the row of the resource you want to view and choose Zoom to One Week for Resource. The results display in the Detail View tab.
Narrowing the List of Service Requests
You can use the search parameters in the Detail View tab to narrow the list of requests.
1. Choose any of the following:
Work code
Date range
Branch
2. Choose SQL Refresh to re-display the list.
Note: If you select a branch that is different from the branch initially selected in the Overview tab, you can schedule requests from one branch to resources from a different branch. To disable this function, remove the Branch selection from the search parameters.
Working with Resources
Use the Schedule Board to schedule, view, and change the status of resources and their scheduled requests. The following sections cover the basic procedures of working with resources in Scheduling.
Allocating Resources to Requests
In Scheduling you may allocate resources by:
Highlighting slots and choosing an allocate function
Using the Drag/Drop mode to drag requests from the list to the slots with a pre-selected allocate function.
You can allocate resources for specific days and times. You can also overlap or split service requests between multiple people or multiple times and days.
1. In Scheduling, perform an initial search in the Overview tab to display resources for the resource type and branch.
2. Choose a display mode for determining free or allocated jobs/units.
3. Choose the Weekly Resource or Daily Resource view. The Detail View tab appears.
4. In the Detail View tab, from the left pane select the request you want to schedule.
The upper section of the right pane changes to display details for the selected request.

5. In the lower section of the right pane of the Schedule Grid, select the first time slot for the resource you want to allocate to the request.
Note: You can either continue to highlight slots until you have selected the number you need, or you can choose Allocate Requested Number of Slots to automatically select the number of slots (unit count) entered in the Service Request.
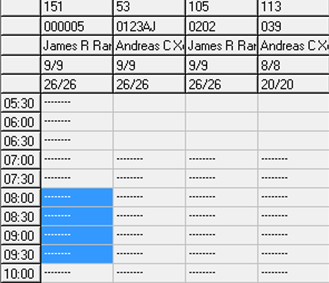
6. Choose one of the following Allocate buttons:
Allocate Selected Slots to Job – allocate the same job to multiple resources or days. If you are not finished with the allocation, choose No. if you are finished, choose Yes and SBN removes the job from the Schedule Grid on the left.
SBN asks if the allocation is complete.
Allocate + Finish – automatically allocates the job and indicates that it is complete.
Allocate + Finish + Page – automatically allocates the job, indicates that it is complete, and pages the installer, technician, or sales person.
SBN displays the Paging dialog box to complete the paging process.
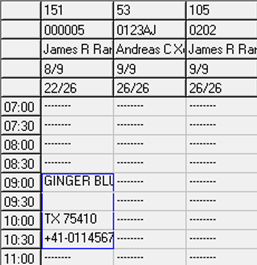
SBN allocates the slot and enters some basic customer information in the slots.
Viewing Slot Details
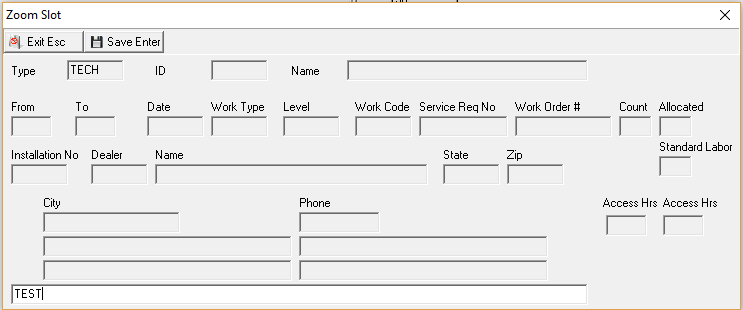
After you have allocated requests to the slots on the schedule board, you can view the details for each slot by choosing Zoom on Detail for Slot. The following graphic shows the Zoom Slot dialog box with information displayed.
Note: When action 563/20 is off, you can only schedule a resource for the number of jobs for which he or she is available in Scheduling (program #563). If you try to schedule the resource for additional jobs after this limit has been reached, SBN displays an error message. When action 563/20 is on, you can schedule a resource for additional jobs beyond the level of capacity indicated in Scheduling.
Auto-Allocate Check Box
SBN has an auto-allocate feature. When a work type with the Auto Allocate check box selected in Work Types (program #1526) is used in the Schedule Request window of Marketing (program #562), SBN automatically allocates the schedule request to the selected salesperson in Scheduling (program #563).
When a work type that does not have the Auto Allocate check box selected is used in the Schedule Request window of Marketing, SBN creates a schedule request in Scheduling, but does not allocate it to a salesperson.
Changing the Status of a Resource
After you have scheduled the resources in the schedule board, you can view and change the “real time” status of the resources. The Scheduling program works in conjunction with the Service Queue to track where resources are in the job process. When you update the status of the resource, both the Scheduling program and the Service Queue reflect the new status.
1. In the schedule board, select the slot of the resource you want to update.
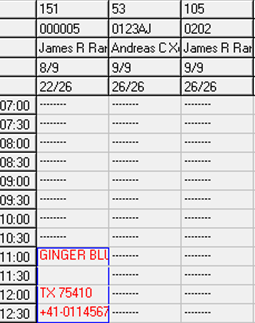
2. Choose the correct status for the selected resource. To designate the resource as En Route, choose Mark En Route. The slot detail text changes to red.
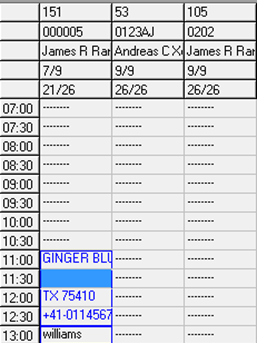
To designate the resource as On Site, choose Mark On Site. The slot detail text changes to blue.
Note: If you have outdated the service request without marking the resource as off site, then SBN automatically changes the slot detail text to green.
To designate the resource as Off Site, choose Mark Off Site. The slot detail text changes to green.
To remove a status from a resource, choose Set Job Status Back to Unknown.
The slot detail text changes back to black.
Unallocating Jobs
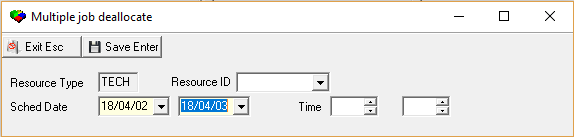
Use unallocated jobs to take any open request and unassign it from one resource and add the request back into the open request list. You can also unallocate multiple jobs for a specific resource for a range of dates and times.
1. Select the slot you want to unallocated.
2. Choose Unallocated Selected Job.
To unallocated multiple jobs for a single resource:
1. Choose Unallocate Group of Jobs.
2. Select the Resource ID.
3. Select the date / time range to unallocated all jobs from the range selected.
Note: To unallocate a job marked as en route or on-site, you must first select Set Job Status Back to Unknown.
Note: When option tm012 is active and a sales schedule request is unallocated or reassigned in Scheduling (program #563), SBN sends a paging message to the salesperson and records event “APP CAN” (appointment cancelled) in the Event Log tab of Marketing (program #562).
Dragging Information in the Schedule Grid
Choose Drag to toggle your cursor into Drag mode. While in Drag mode, you can:
Drag a service request into the Schedule Grid – except for jobs that contain more units than are available for a day – for example, a job that requires more than one day to complete.
Move a job within the Schedule Grid
Remove a job from the Schedule Grid
Note: When in Drag mode, you cannot select a specific slot or use the Zoom on Detail for Slot function.
If you click inside a job while in Drag mode, SBN moves the job down the number of slots below the slot in which you have clicked, because SBN interprets this as a request to move and completes the move.
Where your cursor is in Drag mode a series of boxes appears in which you can select the action you want SBN to take when you release your cursor from the drag:
Allocate – allocate the same job to multiple resources or days. SBN asks if the allocation is complete. If you are not finished with the allocation, choose No. if you are finished, choose Yes and SBN removes the job from the List of Service Requests on the left.
Allocate + Finish – automatically allocate the job and indicate that it is complete.
Allocate + Finish + Page – automatically allocate the job, indicate that it is complete, and page the installer, technician, or sales person.
SBN displays the paging window to complete the paging process.
Allocate + Page – allocate the job and page the resource. You may leave the job open for future allocation.
1. In Scheduling, in the Overview tab, perform a search for resources.
2. From the search results, select the resource you want to schedule and then choose either zoom to one day for all resources or zoom to one week for resource.
3. Choose Drag.
4. Select the allocation action you want SBN to take when you release your cursor from a drag.
Note: The allocation action defaults to the action you selected the last time you used the Drag mode.
5. In Count – you may override the number of slots needed for a scheduled job by typing the number in this field.
6. In the List of Service Requests, place your cursor on the job you want to schedule.
7. Click and hold your mouse button and drag the job onto the Schedule grid.
SBN highlights the number of slots typed in the Count field or, if the Count field is empty, in the service request. Then SBN enters job information into the slots and performs the allocation action you selected.
To move a job within the schedule board, follow the steps below:
1. In the Schedule Grid, choose Drag.
2. Select the allocation action you want SBN to take when you release your cursor from a drag.
3. Place your cursor on the job you want to move.
4. Click and hold your mouse button and drag the job to a new location on the Schedule Grid.
SBN frames the job in its starting position in red and highlights the number of slots entered in the Count fields, if the Count field is empty, in the service request. Then, SBN enters job information into the slots and performs the allocation action you selected and clears the slots of the starting position.
Note: If you try to drag the job to an area without enough slots, or to a day that is not available for allocation, your cursor becomes a Not Allowed symbol and the drag fails.
To remove a job from the Schedule Grid, follow the steps below:
1. In the Schedule Grid, choose Drag.
2. Place your cursor on the job you want to move.
3. Click and hold your mouse button and drag the job out of the Schedule Grid and back into the List of Service Requests.
SBN unallocates the slots and returns the job to the List of Service Requests. In the List of Service Requests, the Scheduled Date and Scheduled Time columns for the selected job are blank.
Branch Inventory
Module topics
This module includes the following topics:
The Branch Inventory Window
Searching for Items
Zooming into the Sub-level
Getting the Purchase Order
Creating a New Return to Manufacturer Order
Viewing a List of Return to Manufacturer Orders
The Branch Inventory Window
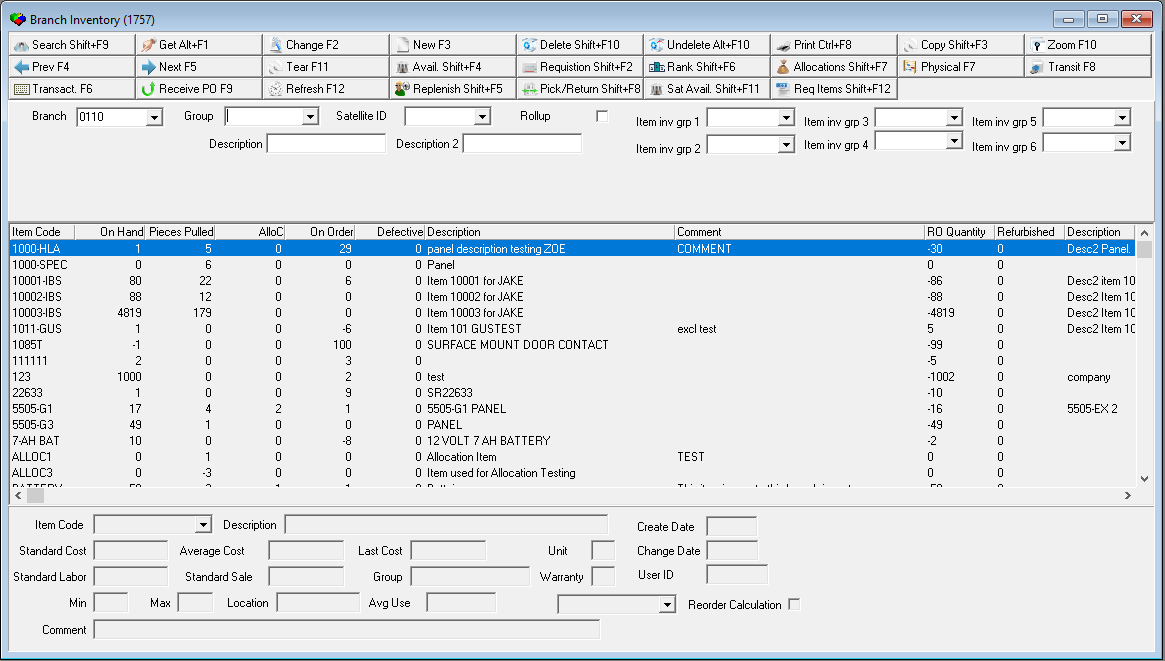
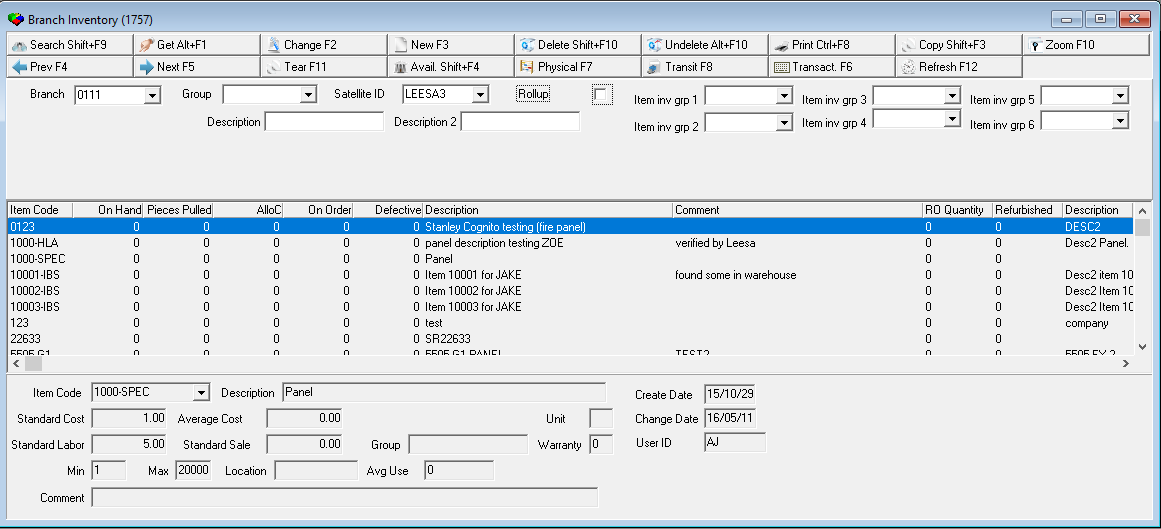
The Branch Inventory window contains three panes:
The upper pane contains search parameters
The middle pane displays search results
The lower pane displays item details
The following graphic shows the Branch Inventory window with information displayed after a search by branch.
The following graphic shows the Branch Inventory window with information displayed after a search by satellite ID. After you perform a search by satellite ID, SBN limits the function buttons.
Searching for Items
To display items in the Branch Inventory window, you must first complete a search with a branch and one of all of the other search parameters selected.
To search for items, follow the steps below:
1. In Branch Inventory, select your search parameters in the upper pane.
Note: You can choose the Rollup flag if you want to combine the satellite inventory and the branch inventory together without specifying the specific satellite.
2. Choose Search to complete the search. SBN displays the results in the middle pane of the window.
Zooming into the Sub-level
The Branch Inventory window contains a sublevel that has three tabs for additional information for each inventory item:
The Log tab
The Open Order tab
The Purchase History tab
The Log Tab
The Log tab displays detailed information of transactions made for the selected inventory item. The following graphic shows the Log tab with information displayed.

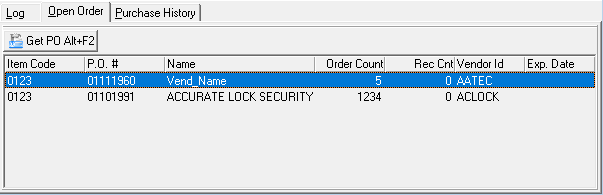
The Open Order Tab
Use the Open Order tab to view any outstanding purchase orders for the selected branch that contain quantities of the item currently selected.
Getting the Purchase Order
You can open and view any of the purchase orders in the Open Order tab by highlighting the PO you want and choosing Get Purchase Order (Alt +F2). The purchase order opens in a separate window in read-only mode.
The Purchase History Tab
Use the Purchase History tab to view all purchase orders for the Vendor in a selected branch that contain quantities of the item currently selected.
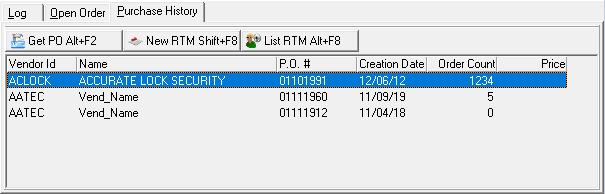
You can open and view any of the purchase orders in the Purchase History tab by choosing Get Purchase Order. The purchase order opens in a separate window in read-only mode.
Creating a New Return to Manufacturer Order
Choose New RTM to create a Return to Manufacturer order to return received items on a purchase order to the manufacturer or vendor.
Use the following steps to create a Return to Manufacturer order:
1. Select the purchase order with items you want to return from the Purchase History tab. Note: You can only create RTM's for purchase orders with items you have received.
2. Choose New RTM. (The Return to Manufacturer window opens.)
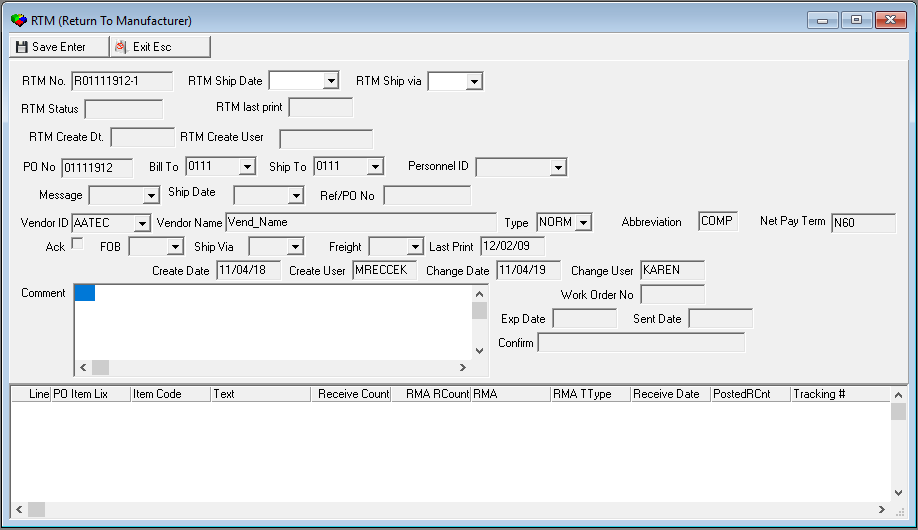
3. Enter the details for the items you are returning.
4. Choose Save.
Viewing a List of Return to Manufacturer Orders
To view a list of open Return to Manufacturer orders, choose List RTM. You may enter an RTM or RMA number in the search parameters or select an RTM from the displayed list. Choose Get RTM to open the Return to Manufacturer window and make changes to an existing RTM.
Note: When the Open RTM's window opens, completed RTM's do not appear in the list. Select the Completed check box and choose Search to include completed RTM's in the list.
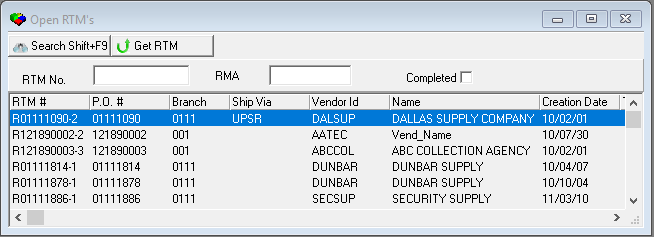
Choose Get RTM to open the Return to Manufacturer window for the selected RTM.
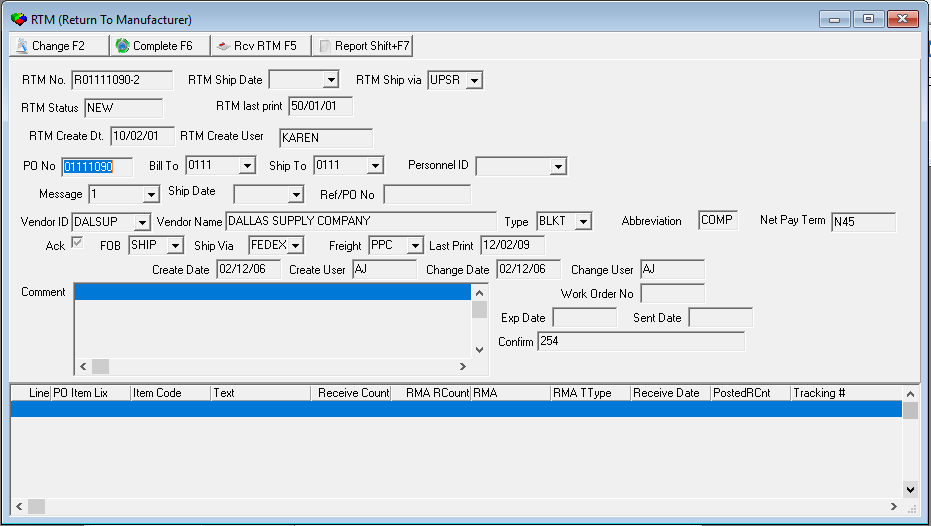
In this window you can choose Change to edit the selected RTM, Complete to close the RTM and prevent further editing, or Receive RTM to enter details on the RTM to prepare items for return to the manufacturer. In Receive RTM mode, you can select RMA types in the RMA Transaction Type column that appear on the Return to Manufacturer forms when you print report #2175.
Notices
Trademark Notice
All products and services mentioned in this publication may be trademarks or service marks of their respective companies or organizations. Instead of listing all the names and companies that own these trademarks or inserting a trademark symbol with each occurrence of the trademarked name, Innovative affirms that they are using the names only for editorial purposes, with no intent to infringe upon that trademark.
Feedback
Innovative welcomes your comments and reserves the right to use any information you supply in any way it believes appropriate without incurring any obligations whatsoever. Please address your comments to documentation@innovative247.com
Support
For technical support, please contact Innovative on +1 (972) 518-2250 or via support.innovative247.com
Citations
This publication was prepared by Innovative. The information in this publication has been carefully checked and is considered reliable. No responsibility is assumed for inaccuracies. Innovative does not assume any liability arising from the application or use of any product described herein.
All data displayed in SBN documentation is fictional test data. Any names, addresses, phone numbers or other personal information that relate to any real person are strictly coincidental.
Publication date: June 2020
| About innovative. | Corporate Office | |
|---|---|---|
We are innovating for a safer world. Through simple, flexible, integrated and scalable software our clients keep over 4.5 million people, homes, businesses, and public facilities safe. Our diverse suite of products provides the full range of software to manage an alarm company. We operate globally from offices in Europe and USA. |
1320 Greenway Dr, Suite 850 Irving, TX 75038, USA +1 800 839 2424 |
|
| innovative247.com | ||
This document has been prepared by Innovative. The contents of this document do not constitute any form of commitment or recommendation on the part of Innovative at the date of their preparation © Innovative Business Software, Inc 2020. All rights reserved. No part of this documentation may be reproduced, stored in a retrieval system, or transmitted in any form or by any means, electronic, mechanical, photocopying or otherwise without the written permission of Innovative. |
F1 Help
| Delphi Forms | bascheddlg, baschedform, baschworktpform, rsvinqtform, svrequeststatuscodesform, ubinventoryform, ubinventorytranform |
| Program Numbers | 575, 1525, 1526, 1757, 2008 |