
Scheduling
Program #: 563
Module: Account Generation
Overview
Scheduling (program #563) provides resource management for:
Installers
Technicians
Sales Persons
Use the Overview tab to search for and view a complete list of all available resources by type. You can change the view to display all available resources in SBN.
Use the Details tab to view the list of outstanding service requests, work orders, or sales visit requests and a schedule board with slots for assigning personnel to the requests in the list.
You can create schedules by resource type and assign specific requests to each resource. You can then track each resource during the day by marking the resources on the schedule board as en route, on site, or off site.
Use work type and job size to schedule resources efficiently by assigning only qualified resources to more involved or costly jobs.
This document covers the following topics:
Getting Information into the Schedule Detail/Week View
Tracking Job Statuses with Cognito
Dragging Information in the Schedule Grid
Navigating to Scheduling
Use the following steps to access the Schedule Board:
1. From the main SBN toolbar, select Menu.
2. From the drop-down menu, select Go To.
3. In the Go To Program dialog box, type in "563" and press Enter.
w Scheduling opens.
Scheduling Options
Options control many of the functions in the Scheduling program. The following list describes the options related to the Scheduling program. For detailed information on each option and its default settings, see SBN Options.
Option ba129 - When on, this option creates an entry in the Alarm Log when you mark a resource en route, on site, or off site.
Option ba159 - When on, this option opens the Insert Test window when you mark a resource on site or off site.
Option ba236 - Defines which default display mode of Scheduling as it opens.
Option ba281 - When on, scheduling a technician creates a default in the Satellite Warehouse field in the related work order.
Option ba282 - When on, SBN removes allocated work orders from the schedule board when you cancel a technician without removing the job from the schedule.
Option ba283 - When off, you may view past schedules but may neither create schedules for past dates nor remove jobs from the schedule for past dates.
Option ba284 - When on, this option prevents you from scheduling technicians across branches or regions on the same day.
Option ba326 - When on and you choose Set Code in Scheduling, the right of the column for the selected date (in the Overview tab of Scheduling) displays the work code when all units are used.
Option ba362 - When on, SBN creates an entry in the Data Entry Change Log whenever you schedule a work order (allocated) or remove a work order from the schedule (unallocated).
Option ba383 - When on, detail tab displays user name and timestamp when code was created in addition to any other information in that cell.
Option ba413 - Controls customer-defined text that appears in the Message field when paging.
Option ba415 - Controls alternate customer-defined text that appears in the Message field when paging.
Option fe019 - When on, SBN enables Cognito web service interface.
Option ibs02 - When on, several fields for SBN debug data appear in the Detail View tab when a user double-clicks in the space between the Date, ID, Resource Name, and Cognito Status fields of the Schedule Grid pane.
Option ivr030 - Defines the time range in minutes that is used as buffer to the actual scheduled IVR service request start time. The time range is currently set to 120.
Option ivr031 - Defines the IVR Schedule start range minimum in hours. Currently set to 480 (8:00 a.m.).
Option ivr032 - Defines the IVR Schedule start range maximum in hours. Currently set to 1020 (1700 or 5:00 p.m.).
Option screta - Defines how many days of schedule history SBN retains.
Option scsize - Defines the number of minutes in each unit (time slot) on the Schedule Board.
Option scstar - Defines the beginning time offset (in minutes) for the Schedule Board.
Option sv003 - When on, the schedule date fields interact with the Schedule Board.
Option sv006 - When on, does not suppress the request number and schedule date from displaying on each line of the service request log. When off, the request number and schedule date display only on the first line for the request.
Option sv009 - When on, defaults the schedule date to today’s date in the New Service Request dialog box.
Option sv022 - When on, SBN retains scheduling information in the Schedule Board (program #563) after you close a service ticket.
Option sv061 - When on, SBN creates a work order when a user creates a service request. A work order must exist for SBN to store all Cognito data.
Option sv064 - When on, if a user attempts to schedule the same service request twice in the Detail View tab, SBN displays an error message and prevents the user from allocating more than one resource to the service request. When off, a user may allocate more than one resource to a service request.
Option sys004 - When on, gives access to the Schedule Board.
Option temp156 - When on, the Work Type search parameter in the Overview tab does not accept the % wildcard character.
Option tm007 - When on, displays Set Code comment in addition to code word.
Option tm012 - When on and a sales schedule request is unallocated or reassigned in Scheduling (program #563), SBN sends a paging message to the salesperson and records event "APP CAN" in the Event Log tab of Marketing (program #562).
Option wopauto - When off, SBN turns off the work order auto generation for Maintenance Ticket Generation (program 701), so customers don't have to put a work order on the scheduling board (program 563). This option defines the default On => turn on work order auto generation
The Schedule Board
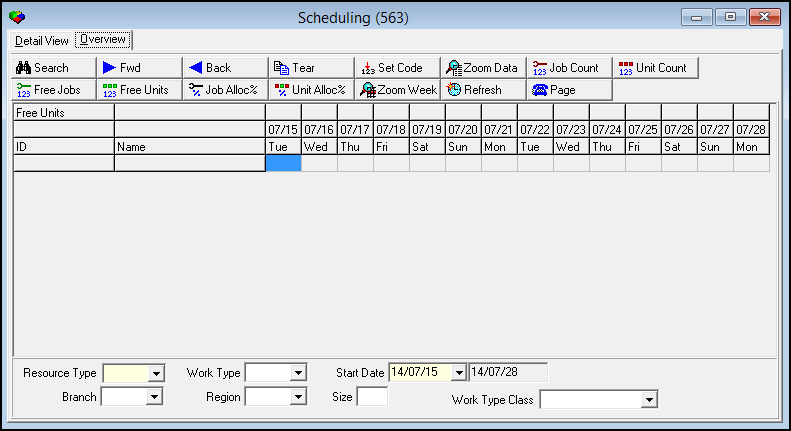
The Schedule Board contains the Overview tab and the Details tab. In the Overview tab, you can search for and view available resources.
The Details tab contains two panes:
The Request List on the left
The Scheduling Grid on the right
The following graphic shows the Schedule Board as it opens.
Tearing Away a Tab
You may find it easier to work in Scheduling if you split the tabs into separate windows. Choose Tear Away Selected Tab in the Overview tab, and each tab appears as a separate window.
The Overview Tab
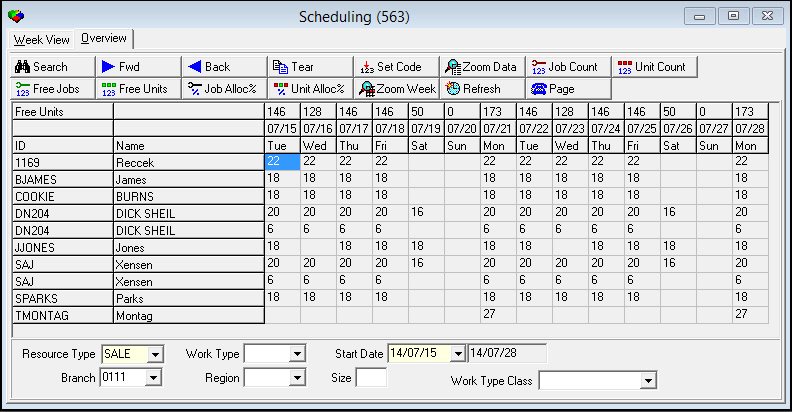
The Overview tab contains search parameters and displays available resources. Use the search parameters to locate the available resources. You can search by:
Resource Type
Branch
Work Type
Region
The following graphic shows the Overview tab with information displayed.
Field Descriptions - Overview Tab
The following table describes the fields in the Overview tab. You may leave some fields blank when performing a search, but this may produce a long list of results.
Field |
Description |
Available Resources |
|
Total Available |
First row. Numbers to the right display total available jobs or units, used jobs or units, or percentage of jobs or units free or used (depending on the current display mode) that can be scheduled for the selected resource and branch. Note: This number changes when schedule requests are entered for the resource type, branch, and date shown. |
Date |
Second row. Dates to the right display the date for that column starting with the start date specified and continuing for 14 days. |
Day (No label) |
Third row. Days to the right display the day of the week for the column. |
ID |
Personnel identifier. (This menu originates from program #1811.) |
Name |
Last name of the resource. |
Search Parameters |
|
Resource Type |
Menu of resources. (Installer, Sales Persons, or Technicians.) |
Work Type |
Menu of work types specified in the service request. (This menu originates from program #1526.) Note: Actions 1526/10-19 control the default work type. The default appears if at least one work type has an action. The default is the first action with a non-zero number that you can access. When option temp156 is on, this field does not accept the % wildcard character. |
Start Date |
Calendar for choosing the start date for the display. |
End Date |
This field defaults to 14 days after start date when search is complete. |
Branch |
Menu of branch identifiers. (This menu originates from program #1530.) Note: Leave this field blank to search for resources for all branches and those not assigned to a branch. Resources with no branch assigned are global resources that can be scheduled for jobs on any branch. SBN displays global resources no matter which branch you choose in the search parameters. |
Region |
Menu of regions within branch. (This menu originates from program #1530.) You can search with a % wildcard and part of a region ID. |
Size |
Number of units needed to perform the work. |
Work Type Class |
You may select a work type class to limit the Work Type menu to those types associated with the selected class and those types associated with no work type class in program #1526. Leave this field blank to display all work types in the Work Type menu. (This menu originates from program #1590/71.) |
Mode |
Current display mode of the schedule board. The default mode is Free Units. |
The Detail View Tab
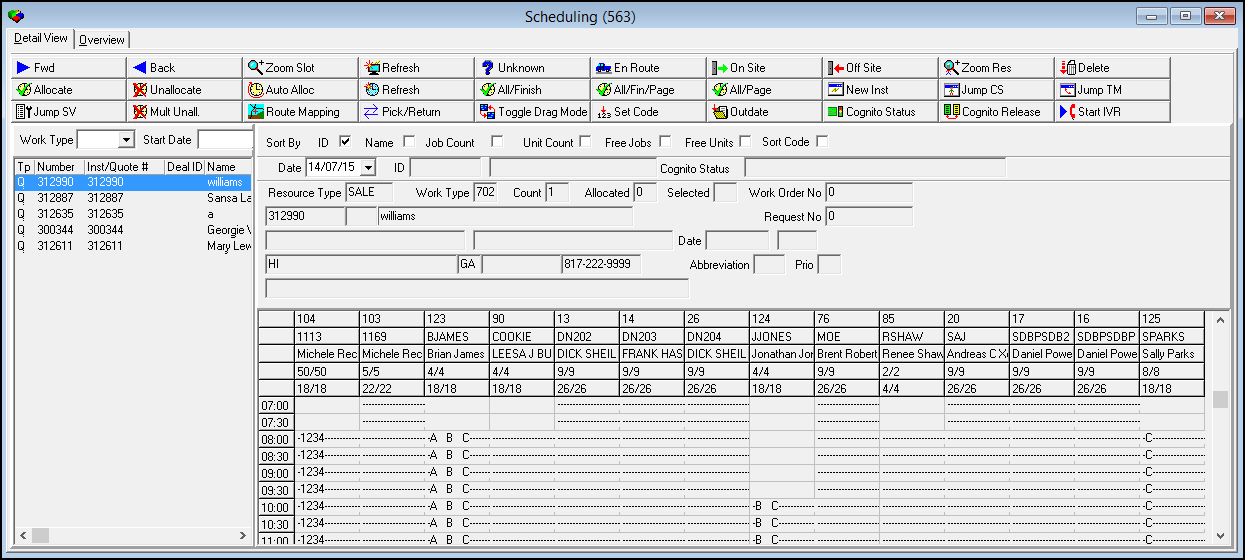
The Detail View tab displays two panes: the Service Request List and the Scheduling Grid.
Information displayed in the Detail View tab varies depending on which view you choose from the Overview tab:
Zoom to one day for all resources
Zoom to one week for resource
The following graphic shows the Detail View tab.
Note: The Set Code for Resource button in the Detail View tab uses default date and resource data from the Detail View tab. See the Setting Resource Codes section of this document.
The Service Request List
The Service Request List displays customer requests (work orders, service requests, or sales visits) to schedule.
Note: SBN removes service requests from this list when the associated work orders are closed or deleted.
The following graphic shows the Service Request List:
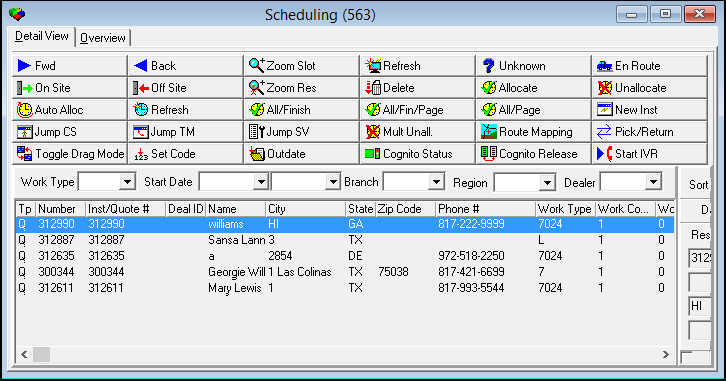
Note: Service requests that appear in red text contain a requested date that is in the past.
Field/Column Descriptions - Service Request List
The following table describes the fields and columns used in the Service Request List in the Detail View tab.
Field/Column |
Description |
Work Type |
You may select the work type to limit the results to requests with the selected work type. (This menu originates from program #1526.) |
Date Range |
|
Start Date - From |
You may select a range of dates to limit the results to requests within the range; select the beginning date of the range. |
End
Date - To |
You may select a range of dates to limit the results to requests within the range; select the ending date of the range. |
Branch |
You may select a branch from the drop-down menu in order to narrow your search. (This menu originates from program #1530.) This field allows wildcard searches using the percent symbol (%). |
Region |
You may select a region within a branch from the drop-down menu in order to narrow your search. (This menu originates from program #1530.) This field allows wildcard searches using the percent symbol (%). |
Dealer |
You may select a dealer from the drop-down menu in order to narrow your search. (This menu originates from program #1537.) This field allows wildcard searches using the percent symbol (%). |
Type |
Character that identifies the type of request. Note: Message 2177 controls the characters available. You can configure Message 2177 differently for each type of personnel. |
Number |
Job identifier. (Installer - Work Order number; Technicians - Service Request number; and Sales Persons - Inquiry number) |
Installation/Quote Number |
Installation or quote number for the account. |
Dealer ID |
Dealer ID attached to the installation. |
Name |
Customer name for the installation. |
City |
City name of the installation location. |
State |
State of the installation location. |
Zip Code |
Zip code of the installation location. |
Phone Number |
Installation phone number. |
Work Type |
Work type code assigned to the request. |
Work Count |
Number of units needed to complete the job. |
Work Allocated |
Number of units already allocated for the job. |
Comment |
Comment from the schedule request. |
Work Order Number |
Work order number associated with the job, if applicable. |
Request Number |
Service request number associated with the job, if applicable. |
Address |
First line of the installation address. |
Address |
Second line of the installation address. |
Work Order Type |
Work order type. |
Closed Flag |
If this column displays an X, the work order associated with the job is closed. |
Approved |
If this column displays an X, the work order associated with the job has been approved. |
Schedule Date |
Schedule date requested on the service request. Note: If this service request was scheduled but you have dragged this work order off of the Schedule Grid: l This column is blank. l If option ba366 is on, this column shows the date of the slots from which this service request was removed. |
Schedule Time |
Schedule time requested on the service request. Note: If this service request was scheduled but you have dragged this work order off of the Schedule Grid: l This column is blank. l If option ba366 is on, this column shows the time of the slots from which this service request was removed. |
Branch |
Branch number attached to the installation or inquiry. |
Map Grid |
Displays map grid from Data Entry. |
Status Code |
Displays the status code of the selected schedule. This code is also displayed in Request Status Codes (program #1525). |
Priority |
Displays the priority level attached to the selected schedule. |
Activity Type |
Displays the contents of the Activity Type field in the Service Log tab of the Service/Data Entry program (program #559). |
Click Status |
Displays the contents of the Activity Type field in the Service Log tab of the Service/Data Entry program (program #559). |
Schedule End Time |
Displays the time the service request was completed. |
Deleting a Schedule Request
Use the following steps to delete a schedule request from the Service Request List:
1. In the Service Request List, highlight the request you want to delete.
2. Choose Delete Record.
w SBN deletes the request and logs the change to the request in the Data Entry Change Log.
The Schedule Grid
Use the Schedule Grid to assign jobs and to view a representation of all jobs scheduled for the selected resource. The upper section of the pane displays detailed information about the job selected in the Service Request List. The lower section contains the actual schedule slots for assigning jobs.
You can display either all resources for a particular day or an entire week for one resource, depending on what you select from the search section of the Overview tab.
Note: When option ibs02 is on, several fields for SBN debug data appear in the Schedule Grid pane when a user double-clicks in the space between the Date, ID, Resource Name, and Cognito Status fields.
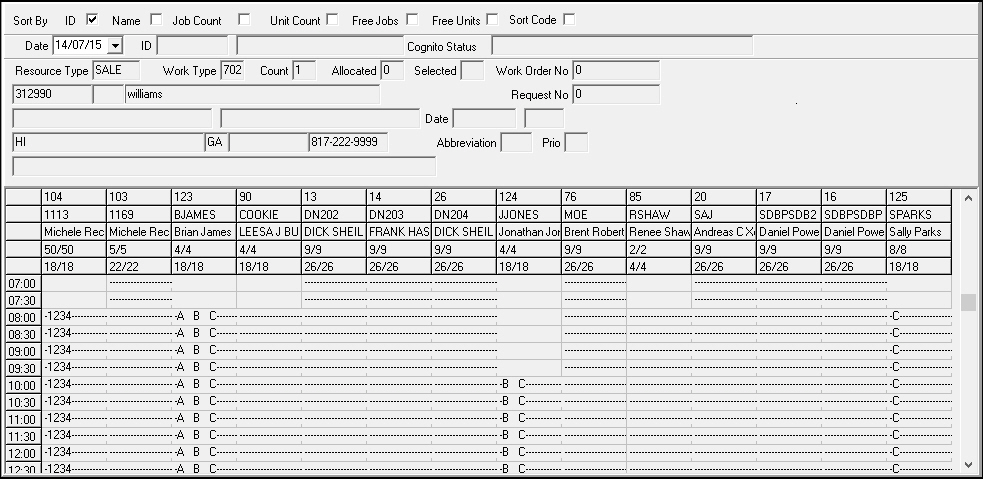
The Daily Resource View
Use the Daily Resource view to view all resources for the search selected for one day. From the Overview tab, you can double-click on the day you want to display or choose Zoom to One Day for All Resources. In the Detail tab, you can change the date displayed by selecting a date from the calendar in the Schedule Grid and choosing SQL Refresh.
The following graphic shows the Daily Resource View of the Schedule Grid with all resources for one day displayed.
The Weekly Resource View
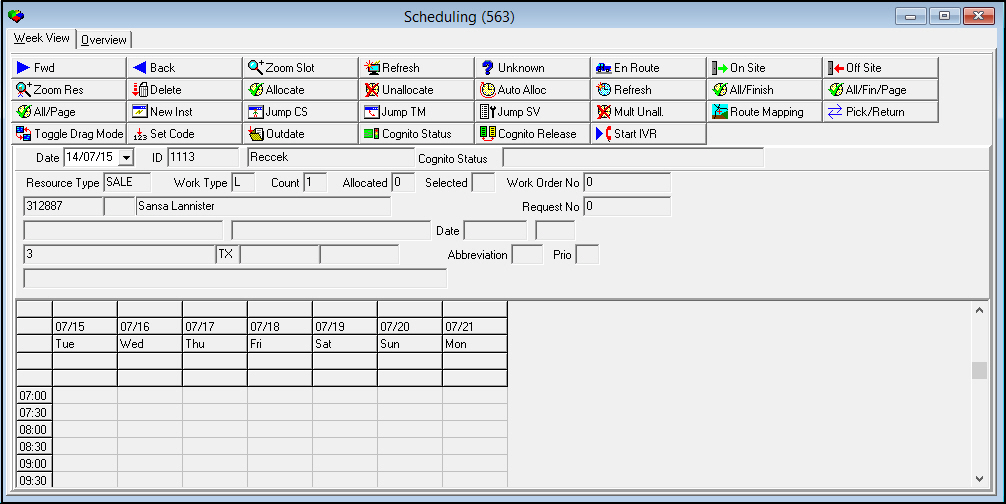
Use the Weekly Resource View to display one week of one resource. From the Overview tab, you can double-click the resource name or position the focus to the row of the resource you want to view and choose Zoom to One Week for Resource. To change the start date for the week displayed in the Detail Resource View, select a date from the calendar in the Schedule Grid and choose SQL Refresh.
The following graphic shows the weekly view of the Schedule Grid with one week of one resource displayed.
Field/Column Descriptions - Schedule Grid
The following table describes the fields and columns in the Schedule Grid.
Field/Column |
Description |
Sort By When you are in the Daily Resource View, the following sorting check boxes appear in the Schedule Grid in Detail View. Note: The value of option tm010 determines which Sort By check box SBN automatically selects. |
|
ID |
You may sort by resource ID. |
Name |
You may sort by resource name. |
Job Count |
You may sort by the total number of job counters for a resource. |
Unit Count |
You may sort by the total number of unit counters for a resource. |
Free Jobs |
You may sort by the number of jobs not allocated. |
Free Units |
You may sort by the number of units not allocated. |
Sort Code |
You may sort by the sort code (0-9) defined for a resource ID in Personnel (program #1811). |
Date |
Date to display. To display a different date in the grid, select the date and choose Refresh. |
ID |
Resource ID. Only populates when using the weekly view for one resource. |
Resource
Name |
Last name of the resource. Only displays when using the daily view for all resources. |
Cognito Status |
Displays the most recent job status received from Cognito. |
Resource Type |
Resource type selected. |
Work Type |
Work type from the work order, if specified. |
Count |
Number of units needed to complete request. |
Allocated |
Number of units already allocated for this request. |
Selected |
Number of units selected for allocation. |
Work Order No |
Work order number associated with the request. |
Installation Information (No label) |
Displays the Installation number, Dealer ID, Installation name, address, and phone number for the request. |
Request No |
Service request number associated with request. |
Date |
Requested schedule date. |
Time (No label) |
Requested schedule time. |
Status |
Service request status. |
Priority |
Service request priority. |
Schedule Comment |
Schedule comment from the schedule request window in Service Queue or from the schedule comment window in Work Order Queue. |
Date |
Date displayed. |
Day of the Week |
Day abbreviation for the day of the week. |
Resource ID |
ID assigned to technician, installer, or sales person. Note: Only appears in the Detail View. |
Resource Name |
Name attached to the resource ID. Note: Only appears in the Detail View. |
Job Count |
Available job count/ Total job count. |
Unit Count |
Available unit count / Total unit count. |
Working with Scheduling
Use Scheduling to view, allocate, and update all resources from the Schedule Board. Use the Overview tab of the Schedule Board to view resources. Use the Detail tab to schedule and modify resources in "real time." You can page any resource from the Overview tab.
Note: Scheduling performs some of the same functions as the Service Queue (program #547) and works in conjunction with the Service Queue to keep resource statuses updated.
Searching for Resources
When Scheduling opens, the Overview tab appears blank. In order to view resources, you must perform a search. The search results display all available personnel for the type, branch, and date selected. The search results also display each resource's number of available and allocated jobs or units (depending on the display type chosen).
Note: To make a resource available for scheduling, generate a schedule for the resource for the selected time period in Schedule Capacity (program #575).
Use the following steps to search for resources:
1. Enter the following information:
In Resource Type select the type of personnel to view and schedule.
In Work Type select the type of work orders, if needed.
In Start Date select a starting date for the schedule. (This date defaults to the current date.)
In Branch select the branch you want to view and schedule.
Note: Resources with no branch assigned are global resources that can be scheduled for jobs on any branch. SBN displays global resources no matter which branch you choose in the search parameters.
In Region select a subdivision of the branch, if needed.
In Size type a number of available units, if needed.
2. Choose Search.
w The Overview tab of the Scheduling window displays the search results.
Changing the Display of Resource Counters
Use the search parameters and function buttons to change the display mode of the job and unit counters. When you select these buttons, SBN changes the numbers displayed inside the Resource Grid. The search results display the free units available to assign to service requests. You may view the total number of jobs and units for each resource as well as the percentage of the jobs or units free or assigned.
Setting Resource Codes
You can set specific resource codes to block out time on the Schedule Board for employee activities. You can specify resource codes for entire days or specific times.
Use the following steps to set a resource code:
1. Select the box in the grid that corresponds with the day and employee for whom you want to set the code.
2. Choose Set Code for Resource.
Note: Action 563/55 allows you to set a blank code on a resource that has an existing code assigned.
w The Set Schedule Code dialog box appears.
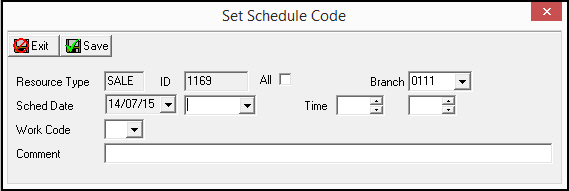
3. Enter the following information:
Select the All check box to set the code for all resources of the displayed type for the selected branch.
Note: Action 563/52 controls access to the All box.
In Branch select the branch to which you want the code to apply.
Note: Action 563/51 controls access the Branch field.
In Schedule Date End Date - if you want the code to apply to multiple days, select an end date.
In Start Time select the beginning time for the code.
In End Time select the end time for the code.
Note: If you do not select a date or time, the code applies to the entire day of the start date.
In Work Code select the appropriate code. (This menu originates from program #1782.)
In Comment type a reason for the code, if needed.
4. Choose Save.
w The Overview tab displays the changes to the Schedule Board for the selected date.
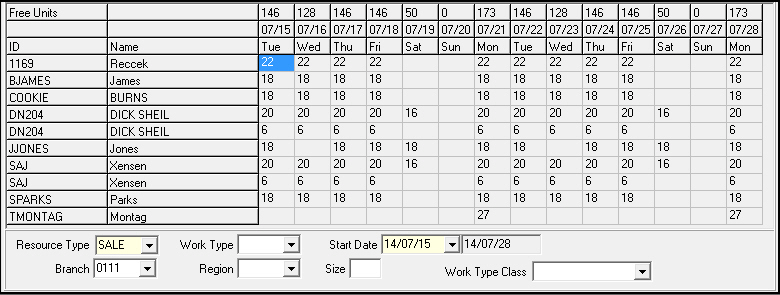
Note: For the selected date, the left of the column displays different unit numbers depending on the mode. The right of the column displays the selected work code. If option ba326 is on, the right of the column displays the work code only if all units are used.
w The Detail View tab also displays changes to the Schedule Board for the selected date.
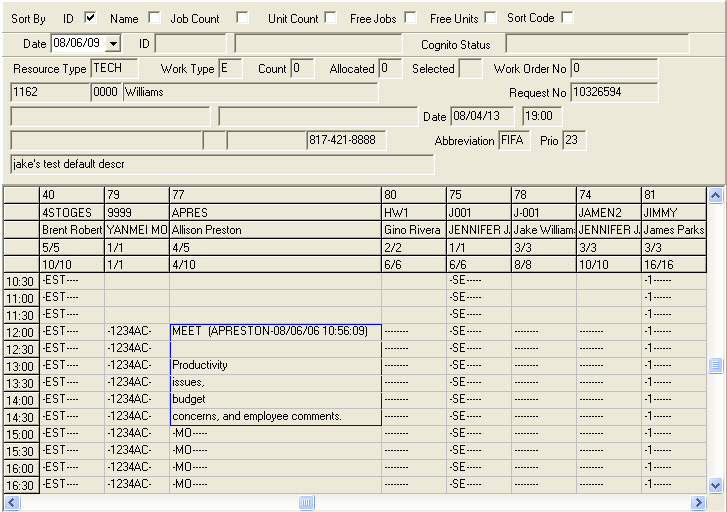
Note: If option tm009 is on and at least three Scheduling Grid slots are assigned to the event, the resource code comment carries over across a few of the assigned slots at a maximum of 10 characters per line. If all text does not fit in the assigned slots, the remaining text appears in the last line.
Use the following steps to remove a resource code:
1. Select the box in the grid that displays the code you want to remove or update.
2. Choose Set Code for Resource.
3. Update fields, as needed, or leave all fields blank to remove code completely.
4. Choose Save.
w SBN asks if you want to update.
5. Choose Yes to remove or change code.
Getting Information into the Schedule Detail / Week View
Once you have completed the initial search in the Overview tab, you must choose a display option for the Detail tab. For more information on the different display types, see The Daily Resource View or The Weekly Resource View.
For the Daily Resource View, double-click on the day you want to display or choose Zoom to One Day for All Resources. The results display in the Detail View tab.
For the Weekly Resource View, double-click the resource name or position the focus to the row of the resource you want to view and choose Zoom to One Week for Resource. The results display in the Detail View tab.
Narrowing the Service Request List
You can use the search parameters in the Detail View tab to narrow the list of requests.
Use the following steps to narrow the list:
1. Choose any of the following:
Work Type
Date Range
Branch
Region
Dealer
2. Choose SQL Refresh to re-display the list.
Note: If you select a branch in the Service Request List search parameters that is different from the branch initially selected in the Overview tab, you can schedule requests from one branch to resources from a different branch. To disable this function, remove the Branch selection from the Service Request List search parameters.
Working with Resources
Use the Schedule Board to schedule, view, and change the status of resources and their scheduled requests. The following sections cover the basic procedures of working with resources in Scheduling.
Allocating Resources to Requests
In Scheduling you may assign resources to service requests by:
Highlighting slots and choosing an allocate function
Using the Drag/Drop mode to drag requests from the list to the slots with a pre-selected allocate function. See Dragging Information in the Schedule Grid.
Note: If action 563/60 is not enabled in your action profile in program #1502, SBN does not allow you to schedule a job for a resource that is limited to work types other than the type for the selected job in program #575. (Resources that have no work types assigned in program #575 can be scheduled for any work types.)
Note: If option ba362 is on, SBN creates an entry in the Data Entry Change Log when a work order is scheduled (allocated) or removed from the schedule (unallocated).
You can allocate resources for specific days and times. You can also overlap or split service requests between multiple people or multiple times and days. You cannot schedule service requests that are associated with closed work orders; SBN displays an error message when you attempt to do so.
Note: If a resource has no available Schedule Grid slots and no jobs assigned, you can generate a schedule for the resource for the selected time period in Schedule Capacity (program #575). The Schedule Grid slots for the resource's work hours become available.
Note: When option sv064 is on, if a user attempts to schedule the same service request twice, SBN displays an error message: "Cannot schedule a duplicate service request." The error message prevents the user from allocating more than one resource to the service request. When option sv064 is off, a user may allocate more than one resource to a service request.
Note: When action 563/20 is off, you can only schedule a technician for the number of jobs for which he or she is available on the Scheduling tab in the Free Units column. If you try to schedule the technician for additional jobs after this limit has been reached, SBN sends an error message. If action 563/20 is turned on, you can schedule a technician for additional jobs beyond the level of capacity indicated in the Free Units column.
Use the following steps to allocate resources by highlighting slots:
1. Perform an initial search in the Overview tab to display resources for the resource type and branch.
2. Choose a display mode for determining free or allocated jobs/units.
3. Choose the Weekly Resource or Daily Resource View. (For more information on displaying resources see Getting Information into the Schedule Detail / Week View.)
w The Detail View tab appears.
4. In the Detail View tab, from the left pane select the request you want to schedule.
w The upper section of the right pane changes to display details for the selected request.
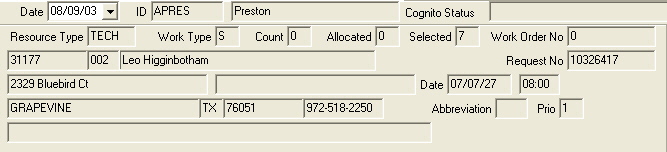
5. In the lower section of the right pane of the Schedule Grid, select the first time slot for the resource you want to allocate to the request.
Note: You can either continue to highlight slots until you have selected the number you need, or you can choose Allocate Requested Number of Slots to automatically select the number of slots (unit count) entered in the service request.
Note: Action 563/23 allows you to schedule service requests for time slots beyond a resource's regular schedule as defined in program #575. You must allocate the requests to start or end within a resource's scheduled hours. For example, you may allocate a two-hour job from 7 to 9 a.m. for a technician whose regular schedule begins at 8 a.m. (SBN does not allow you to allocate jobs outside a schedule in Drag/Drop mode.)
w SBN highlights the selected slots.
6. Choose one of the following Allocate buttons:
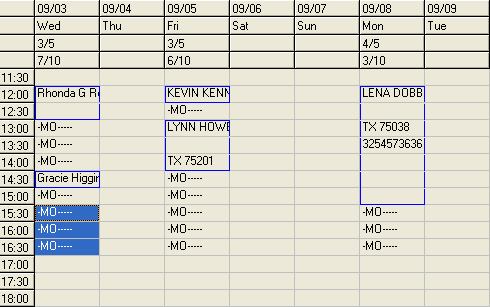
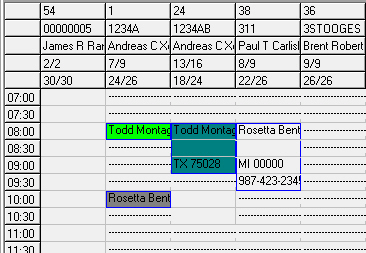
Note: You can color code allocated jobs by their work type by selecting a background color in the Sched Bg Color drop-down menu for each work type in Work Types (program #1526). The time slot for the allocated job is displayed with the selected background color. Be sure to select a color that contrasts sufficiently with black so that the text remains visible. If a work type does not have a background color assigned to it, the background color remains white.
Allocate Selected Slots to Job - allocates the same job to multiple resources or days.
w SBN asks if the allocation is complete.
Note: If you are not finished with the allocation, choose No. If you are finished, choose Yes and SBN removes the job from the Schedule Grid on the left.
Allocate + Finish - automatically allocates the job and indicates that allocation is complete.
Allocate + Finish + Page - automatically allocates the job, indicates that allocation is complete, and pages the installer, technician, or sales person.
w SBN displays the paging window to complete the paging process.
Allocate + Page - automatically allocates the job and pages the installer, technician, or sales person. You may leave the job open for future allocation.
w SBN displays the Paging dialog box to complete the paging process.
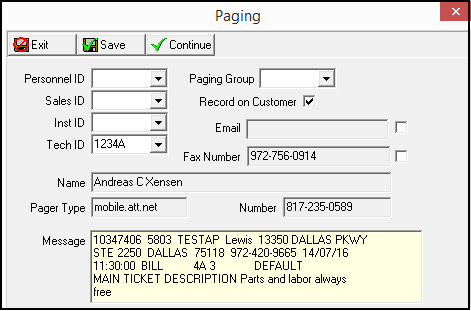
Note: For more information on the fields in this dialog box, see Field Descriptions - Paging Dialog Box.
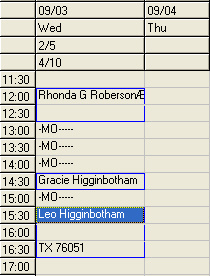
w SBN allocates the slots and enters some basic customer information in the slots.
Note: If the service request you attempt to schedule is associated with a closed work order, SBN displays an error message and does not allow you to schedule the request.
Viewing Slot Details
After you have allocated requests to the slots on the schedule board, you can view the details for each slot by choosing Zoom On Detail for Slot.
The following graphic shows the Zoom Slot dialog box with information displayed.
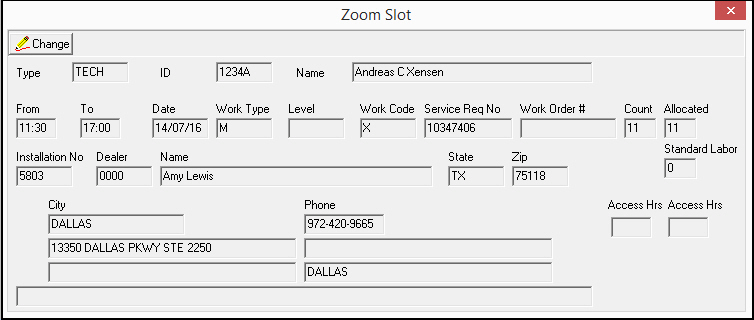
Note: If you zoom on a slot that is available for allocation but has not yet been allocated, the Zoom Slot dialog box opens in read-only mode, filled with information for the resource available for the job.
Note: You cannot zoom on a slot that is not available for allocation.
You can add or change a comment to the slot detail only on slots that have an allocated job or a code set for that slot. Choose Change Record to add or change a comment. This comment appears in the Event Log if an associated account exists in Marketing.
Field Descriptions - Zoom Slot
The following table describes the fields used in this dialog box.
Field/Column |
Description |
Type |
Identifies the type of resource associated with the selected slot. |
ID |
ID of the resource associated with the selected slot. |
Name |
Name of the resource associated with the selected slot. |
From |
Start time of the first slot of the job. |
To |
End time of the last slot of the job. |
Date |
Date the job is scheduled. |
Work Type |
Work type. |
Level |
Difficulty level. |
Work Code |
Work code, if applicable. |
Service Req No |
Number of the service request associated with the selected job. |
Work Order # |
Number of the work order associated with the selected job. |
Count |
Work count for the selected job. |
Allocated |
Number of slots assigned to the selected job. |
Installation No |
Installation number. |
Dealer |
ID of the dealer associated with the installation. |
Name |
Installation name. |
State |
State of the installation address. (This field holds a maximum of 60 characters.) |
Zip |
Zip code of the installation address. |
Standard Labor |
Standard labor for all items on the work order associated with the selected job. |
City |
City of the installation address. |
Phone |
Primary phone for the installation. |
(No label) |
Street address of the installation. |
(No label) |
Additional street address of the installation, if applicable. |
(No label) |
Nearest cross-street to the installation. |
(No label) |
County of the installation address. |
Comment (No label) |
Comment attached to the selected job. |
Access Hrs (Begin) |
First hour the resource is available for work. Standard access hours. You can now configure the system so access hours becomes a field in the slot (like name or phone). |
Access Hrs (End) |
Last hour the resource is available for work. Standard access hours. You can now configure the system so access hours becomes a field in the slot (like name or phone). |
Changing the Status of a Resource
After you have scheduled the resources in the schedule board, you can view and change the �real time� status of the resources. The Scheduling program works in conjunction with the Service Queue (program #547) to track where resources are in the job process. When you update the status of the resource, both the Scheduling program and the Service Queue reflect the new status.
Use the following steps to change a resource status:
1. In the Schedule Board, select the slot of the resource you want to update.
2. Choose the correct status for the selected resource.
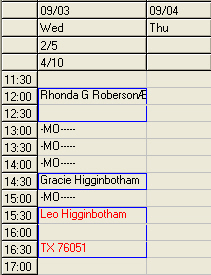
To designate the resource as En route, choose Mark En Route.
w The slot detail text changes to red.
To designate the resource as On Site, choose Mark On Site.
w The slot detail text changes to blue.
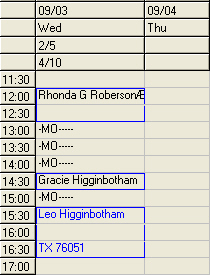
To designate the resource as Off Site, choose Mark Off Site.
Note: If you have outdated the service request without marking the resource as off site, then SBN automatically changes the slot detail text to green.
w The slot detail text changes to green.
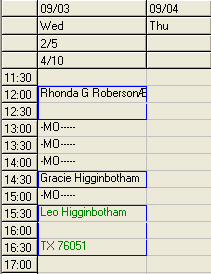
To remove a status from a resource, choose Set Job Status Back to Unknown.
w The slot detail text changes back to black.
Resource Status Color Codes
When you change the status of a resource, the color in the schedule slot changes to represent that status. Currently SBN uses six color codes. The following table defines each color.
Color |
Status |
Red |
Resource is En Route. |
Blue |
Resource is On Site. |
Green |
Resource is Off Site. |
Maroon |
Scheduled item has been sent to the wireless device. |
Purple |
Scheduled item was accepted by the resource on the wireless device. |
Lime Green |
Scheduled item was rejected by the resource on the wireless device. |
Removing Jobs From the Schedule
You can remove any job from the schedule and add the request back into the open request by selecting the slot you want to remove and choosing Unallocate Selected Job.
Note: If option ba362 is on, SBN creates an entry in the Data Entry Change Log when a work order is scheduled (allocated) or removed from the schedule (unallocated).
You can also remove multiple jobs from the schedule for a specific resource, range of dates, and times.
Note: Background task 69 removes from Scheduling any scheduled requests older than the date indicated in the Look Back field. The max rows field indicates the number of requests that will be removed per background job run. The Schedule Date field in Scheduling determines which jobs are old enough to be removed.
Use the following steps to remove multiple jobs from the schedule for a single resource:
1. Choose Unallocate Group of Jobs.
2. Select the Resource ID.
3. Select the date / time range to remove all jobs from the range selected.
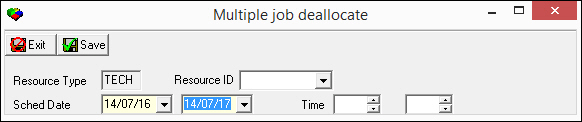
Note: To remove a job marked as en route or on-site, you must first select Set Job Status Back to Unknown.
Tracking Job Statuses with Cognito
Use the Cognito web service to track resources and their job statuses through Scheduling. To use Cognito interface, static option fe019 must be on.
After you configure Cognito, when you add a job to the Schedule Board, SBN also adds the job to the Cognito Queue. SBN sends the job out of the Queue and into the Cognito web service when you choose Cognito Release. Once a users releases a job, SBN automatically sends all job information and updates to Cognito. SBN does not send job information and updates to Cognito until you release the job; meanwhile, the messages are stored in the Cognito Queue.
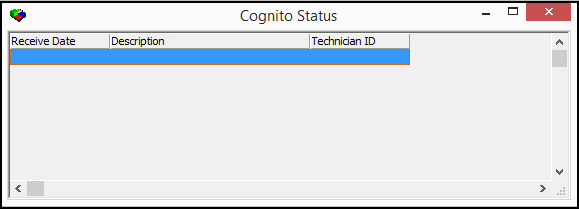
To view the most recent Cognito Status for a particular job, highlight the job in the Schedule Grid. To display all received statuses for the job, highlight the job and choose Cognito Status. The Cognito Status window appears and displays all Cognito statuses with the most recent status at the top of the grid.
The following graphic displays the Cognito Status window.
Cognito Status Descriptions
The following table describes both Message Statuses and Job Statuses displayed in the Cognito Status window.
Status Code |
Category |
Name |
Description |
Action Required |
1.1 |
Network |
Sent |
Message sent to PDA |
None |
1.2 |
Network |
Stored |
Message stored in Message Store |
None |
1.3 |
Network |
Delivered |
Message delivered to PDA |
None |
1.4 |
Network |
Failed |
Message failed to send to network |
Resend message |
2.6 |
PDA |
Failed |
Messaged failed to parse on PDA |
Contact Cognito |
2.12 |
PDA |
Complete |
Message processed by PDA |
None |
3.1 |
Gateway |
Faield |
Gateway failed to send message |
Contact Cognito |
3.2 |
Gateway |
Security Violation |
Message sent by invalid Gateway |
Contact Cognito |
6.3 |
Service |
User Invalid |
Message sent to invalid user |
Resend message to valid user |
6.5 |
Service |
Expired |
Message expired |
Resend message |
7.1 |
Service |
Internal Error |
Message failed to send due to internal error |
Contact Cognito |
Job Statuses |
||||
n/a |
Job Status |
Viewed |
Resource has viewed the job |
None |
n/a |
Job Status |
Start Travel |
Resource is in route to the job |
None |
n/a |
Job Status |
Arrived |
Resource has arrived at the job |
None |
n/a |
Job Status |
Closed |
Resource has closed the job |
None |
Route Mapping
The Route Mapping button in Program #563 and #547 utilizes the raw URL to route mapping through Google Maps. The user can use the mapping program to map the routes of service calls or installations for installers and technicians.
Use the following steps to route jobs:
1. In the Scheduling Detail View, from the left pane select a job to plot on the map.
2. Choose Route Mapping.
w Google Maps will plot the routing.
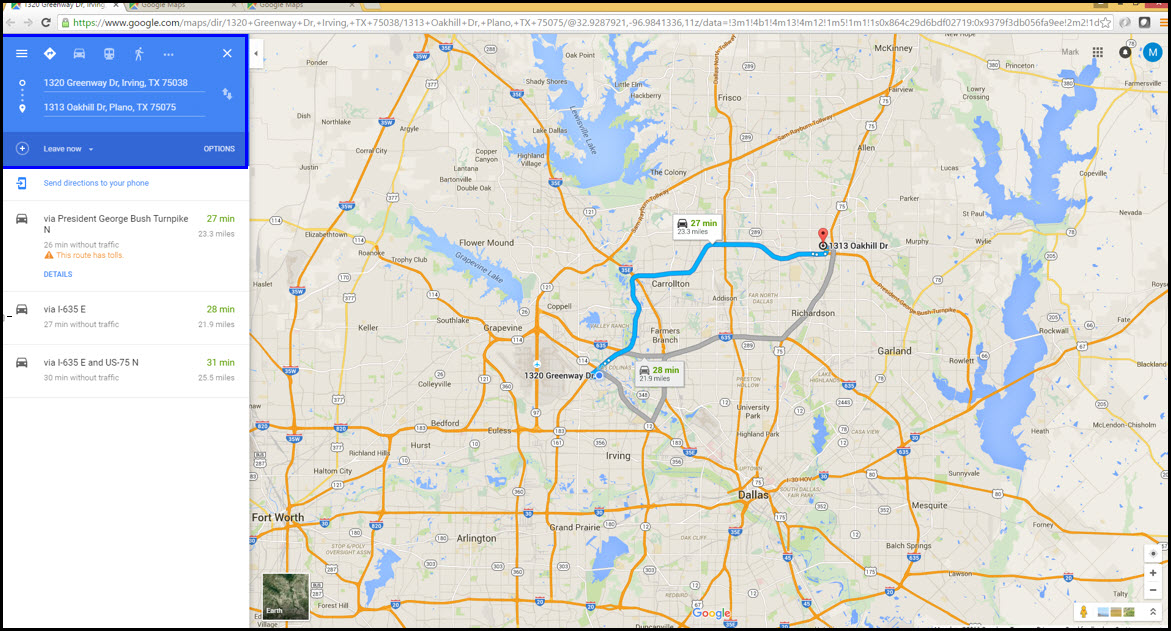
3. Toggle back to SBN. From the left pane, select another job to plot and choose Route Mapping.
w Google Maps plots the next address on the map and displays directions from job 1 to job 2. You may have to toggle back to the Google Map window.

4. Repeat Steps 2-3 until you have plotted all jobs. After you have plotted at least four jobs.
5. Schedule the stops on your route to slots in the Schedule Board.
Picking Work Orders
Choose Pick or Return WO to open the Pick/Return window in Branch Inventory from inside the Schedule Board. SBN opens the Pick/Return window and defaults the work order number into the Work Order field.
Note: To use the Pick or Return WO button, you must make a selection in the Branch field at the top of the Service Request List pane or enter the percent (%) wildcard character.
Jumping to Other Programs
From the Details tab you may jump to other programs based on the job or slot you have selected. Actions 563/30-36 control access to the jump buttons:
Open Work Order - opens the work order attached to the Service Request for the job currently selected in the request list in the left pane or for the slot selected in the right pane. Before you choose this button, you must select either the job or the slot and make sure the correct pane of the window has focus.
Jump to Data Entry - opens the Service Request in Data Entry for the job currently selected in the request list in the left pane or for the slot selected in the right pane. Before you choose this button, you must select either the job or the slot and make sure the correct pane of the window has focus.
Jump to Marketing Basics - opens the Marketing Basics tab for the job currently selected in the request list in the left pane or for the slot selected in the right pane. Before you choose this button, you must select either the job or the slot and make sure the correct pane of the window has focus.
Jump to Service Queue - opens the Service Queue (program #547).
Dragging Information in the Schedule Grid
Choose Toggle Drag Mode to put your cursor in Drag mode. While in Drag mode, you can:
Drag a service request into the Schedule Grid (except for jobs that contain more units than are available for a day - for example, a job that requires more than one day to complete)
Move a job within the Schedule Grid
Remove a job from the Schedule Grid
Note: When in Drag mode, you cannot select a specific slot or use the Zoom On Detail for Slot function. To select a slot, toggle out of Drag mode.
You cannot schedule service requests that are associated with closed work orders; SBN displays an error message when you attempt to do so.
If you click inside a job while in Drag mode, SBN moves the job down the number of slots below the slot in which you have clicked, because SBN interprets this as a request to move and completes the move. For example, if you have a four-slot job and you click inside the second slot, the job moves down two slots.
While your cursor is in Drag mode, a series of check boxes appears that allow you to select the action you want SBN to take when you release your cursor from the drag:
Allocate - assign the same job to multiple resources or days.
w SBN asks if the allocation is complete.
If you are not finished with the allocation, choose No. If you are finished, choose Yes and SBN removes the job from the Service Request List on the left.
Allocate + Finish - automatically assign the job and indicate that allocation is complete.
Allocate + Finish + Page - automatically allocate the job, indicate that allocation is complete, and page the installer, technician, or sales person.
w SBN displays the paging window to complete the paging process.
Allocate + Page - allocate the job and page the installer, technician, or sales person. You may leave the job open for future allocation.
w SBN displays the paging window to complete the paging process.
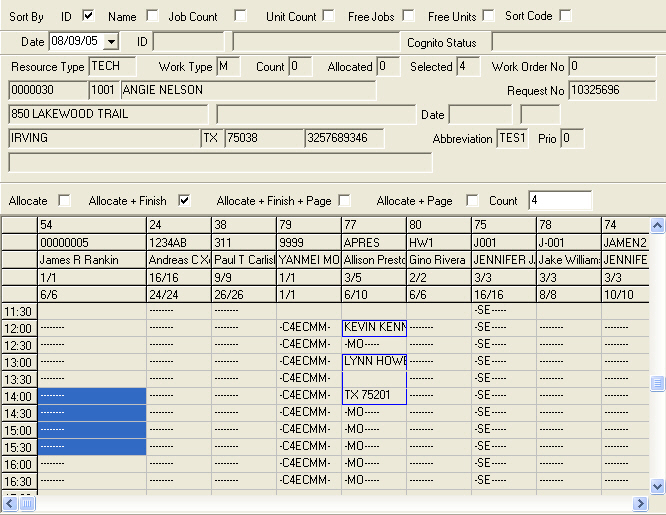
Use the following steps to drag information into the Schedule Grid:
1. In the Overview tab, perform a search for resources.
2. From the search results, select the resource you want to schedule and then choose either Zoom to one day for all resources or Zoom to one week for resource.
w The Detail View tab opens.
3. Choose Toggle Drag Mode.
4. Select the check box for the allocation action you want SBN to take when you release your cursor from a drag.
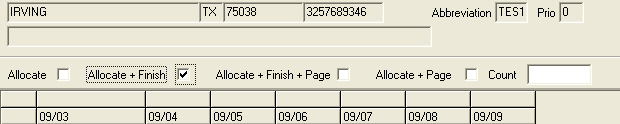
Note: The allocation action defaults to the action you selected the last time you used the Drag mode. You may override the default.
5. In Count you may override the number of slots needed for a scheduled job by typing the number in this field.
Note: If the job shows 0 as the count, and you do not type a number in this field, the Drag function does not work.
6. In the Service Request List, place your cursor on the job you want to schedule.
7. Click and hold your mouse button and drag the job onto the Schedule Grid.
w SBN highlights the number of slots typed in the Count field or, if the Count field is empty, in the service request. Then SBN enters job information into the slots and performs the allocation action you selected.
Note: If the service request you attempt to schedule is associated with a closed work order, SBN displays an error message and does not allow you to schedule the request.
Use the following steps to move a job within the schedule board:
1. In the Schedule Grid, choose Toggle Drag Mode.
2. Select the check box of the allocation action you want SBN to take when you release your cursor from a drag.
3. Place your cursor on the job you want to move.
4. Click and hold your mouse button and drag the job to a new location on the Schedule Grid.
w SBN frames the job in its starting position in red and highlights the number of slots entered in the service request wherever you move the mouse. Then, SBN enters job information into the new schedule position, performs the allocation action you selected, and clears the starting position slots.
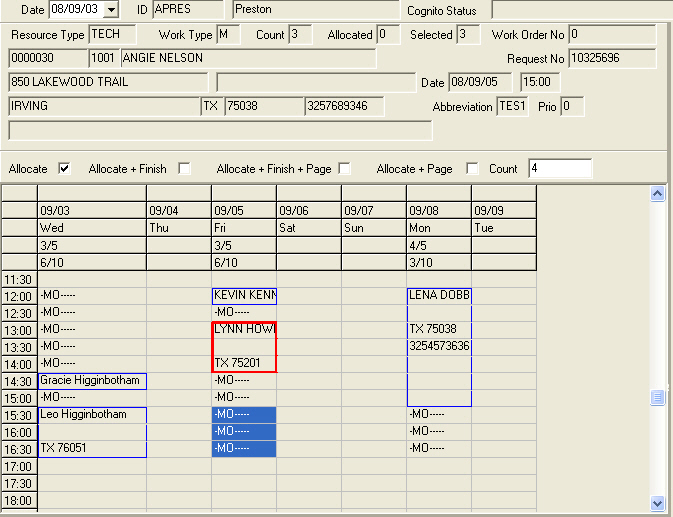
Note: If you try to drag the job to an area without enough slots or to a day that is not available for allocation, your cursor becomes a Not Allowed symbol and the drag fails.
Use the following steps to remove a job from the Schedule Grid:
1. In the Schedule Grid, choose Toggle Drag Mode.
2. Place your cursor on the job you want to move.
3. Click and hold your mouse button and drag the job out of the Schedule Grid and back into the Service Request List.
w SBN removes the job from the slots and returns it to the Service Request List. In the Service Request List, the Scheduled Date and Scheduled Time columns for the selected job are blank.
w If option ba366 is on, SBN removes the job from the slots and returns it to the Service Request List. In the Service Request List, SBN enters the date and time of the slots from which you just dragged the job into the Scheduled Date and Scheduled Time columns for the selected job.
Related Programs
The following table lists programs related to Scheduling.
Program |
Number |
Document Link |
Description |
Marketing |
562 |
Access the marketing details of a service request or scheduled job. |
|
Personnel |
1811 |
Define personnel profiles of resources that can be scheduled for service request jobs. |
|
Schedule Capacity |
575 |
Set up, maintain, and assign default schedules for all resources. |
|
Work Orders |
N/A |
Access work order details attached to a service request or scheduled job. |
|
Service Log Tab |
N/A |
Cognito data is stored in service requests. |
|
Data Entry Master and Basics |
559 |
Access the Data Entry record associated with a service request or scheduled job. |
|
Service Queue |
547 |
Track and update the status of open service tickets. |
Button Functions
The following table displays the buttons, describes the shortcut keys, actions, and functionality.
Button |
Name |
Shortcut Key |
Action |
Description |
Overview Tab |
||||
|
Search |
alt+f1 |
563 |
Search for resources. |
|
Scroll Forward 1 Page |
PgDn |
563 |
Scroll forward 1 page. |
|
Scroll Backward 1 Page |
Pgup |
563 |
Scroll backward 1 page. |
|
Tear Away Selected Tab |
f2 |
563/39 |
Split Detail View and Overview tabs into separate windows. |
|
Set Code for resource |
f6 |
563/ 1 |
Set specific resource codes to block out time on the Schedule Board for employee activities; specify resource codes for entire days or specific times. |
|
Zoom to one day for all resources |
f7 |
563/ 3 |
Display info for one day in the Detail View tab. |
|
Show Job Counters |
shift+f8 |
563/ 5 |
Show the total number of job counters for a resource. |
|
Show Unit Counters |
shift+f2 |
563/ 6 |
Show the total number of unit counters for a resource. |
|
Show Free Job Counters |
shift+f3 |
563/ 7 |
Show the number of jobs not assigned. |
|
Show Free Unit Counters |
shift+f4 |
563/10 |
Show the number of units not assigned. |
|
Show Job Allocation % |
shift+f5 |
563/ 8 |
Show the percentage of jobs assigned for a resource. |
|
Show Unit Allocation % |
shift+f6 |
563/ 9 |
Show the percentage of units assigned for a resource. |
|
Zoom to one Week for resource |
f8 |
563/ 4 |
Display the selected resource's schedule for one week in the Detail View tab. |
|
Refresh Interval |
shift+f7 |
563/ 2 |
Set the interval at which the current screen will automatically refresh. |
|
Paging |
shift+f11 |
563/41 |
Send a message detailing a scheduled job to a resource. |
Detail View Tab |
||||
|
Zoom on detail for slot |
shift+f6 |
563/21 |
View details of the selected slot. |
|
SQL Refresh |
shift+f2 |
563 |
Refresh the current screen. |
|
Set job status back to unknown |
shift+f8 |
563/11 |
Set the status of the selected resource to unknown. |
|
Mark En Route |
shift+f3 |
563/12 |
Designate the selected resource as En Route. |
|
Mark On Site |
shift+f4 |
563/13 |
Designate the selected resource as On Site. |
|
Mark Off Site |
shift+f5 |
563/14 |
Designate the selected resource as Off Site. |
|
Zoom to detail for resource |
shift+f9 |
563/22 |
View details of the selected resource. |
|
Delete Record |
shift+f10 |
563/15 |
Delete the selected record. |
|
Allocate selected slots to job |
f3 |
563/16 |
Assign the selected job to multiple resources or days. |
|
Unallocate selected job |
f4 |
563/17 |
Remove the selected job from the schedule for one resource and add it back into the open request list. |
|
Allocate requested number of slots |
f5 |
563/18 |
Automatically assign a job in the number of slots (unit count) entered in the Service Request. |
|
Refresh Interval |
shift+f7 |
563/19 |
Set the interval at which the current screen will automatically refresh. |
|
Allocate + Finish |
f6 |
563/30 |
Automatically assigns a job and indicates allocation is complete. |
|
Allocate + Finish + Page |
f7 |
563/31 |
Assigns a job, indicates allocation is complete, and pages the resource. |
|
Allocate + Page |
f8 |
563/32 |
Assigns a job and pages the resource. Leaves the job open for future allocation. |
|
New Inst |
f9 |
563/33 |
Open the work order attached to the Service Request for the selected job. |
|
Jump to Data Entry |
alt+f9 |
563/34 |
Open the Service Request in Data Entry for the selected job. |
|
Jump to Marketing Basics |
alt+f8 |
563/35 |
Open the Marketing Basics tab for the selected job. |
|
Jump to Service Queue |
alt+f10 |
563/36 |
Open the Service Queue. |
|
Unallocate Group of Jobs |
alt+f6 |
563/37 |
Remove jobs from the schedule for several resources and add them back into the open request list. |
|
Route Mapping |
alt+f11 |
563/38 |
Choose multiple jobs, plot them on a map, and get directions from one job to another. |
|
Pick or Return WO |
shift+f11 |
563 |
Open the Pick/Return window in Branch Inventory from inside the Schedule Board. |
|
Toggle Drag Mode |
alt+f3 |
563/42 |
Move a job within the Schedule Board. |
|
Set code for resource |
f10 |
563/56 |
Set specific resource codes to block out time on the Schedule Board for employee activities; specify resource codes for entire days or specific times. |
|
Outdate/Close Request |
shift+f12 |
563/57 |
Jump to the Service Log in program #559. If the Service Request is not already outdated, change mode is entered and the request is outdated. |
|
Cognito Status |
ctrl+f9 |
563/58 |
View the Cognito Status window. |
|
Cognito Release |
cTRl+f10 |
563/59 |
Send job to Cognito; release all job updates from the Cognito Queue. |
|
Start IVR |
CTRL+F11 |
563/61 |
Starts Interactive Voice Response (IVR). Note: The Auto Answer button in Service/Data Entry (program #559) must be engaged for this button to be functional. |
|
Exit without saving |
esc |
563 |
Exit without saving changes to the selected record. |
|
Save Existing Record |
enter |
563 |
Save changes to the selected record. |












































Work Orders in the Week View
Work orders appear in the program 563 week-view schedule.
Modifications and Updates to Scheduling
The following table lists modifications and updates to the Scheduling document.
Mod Number |
Date |
Description |
n/a |
09/02/08 |
document rewritten |
07.02.18152, 08.03.06549 07.02.18267 |
04/08/09 |
Added Cognito Status button and field. Added Cognito Release button. |
07.02.18828 |
07/29/09 |
Added option sv064 to prevent scheduling the same service request twice. |
07.02.19749, 08.03.07564 |
06/14/10 |
Added option ibs02 to bring up several fields for SBN debug data in the Schedule Grid. |
07.02.19972, 08.03.07716 |
07/29/10 |
Added option tm010 to define which Sort By check box SBN automatically selects. |
07.02.20701 |
03/09/11 |
Global resources appear in a search regardless of the branch selected. |
07.02.21928 |
09/28/12 |
Added Work Type Class field to Overview tab. |
07.78.22344, 07.78.22342 08.78.09089, 07.78.09081 |
3/6/2013 |
Added option tm012 to send a paging message to the salesperson who was unassigned from a schedule request. |
07.78.22306, 07.78.22304 |
3/6/2013 |
Added action 563/20 to assign additional jobs to a technician beyond the maximum number of jobs specified for that technician. |
07.79.22960, 08.79.09408 07.79.22929, 08.79.09394 |
9/20/13 |
Added color coding by work type for allocated jobs on the Scheduling board. |
08.79.09470, 07.79.23063, 08.79.09453, 07.79.23028 |
04/03/14 |
Added Activity Type, Click Status, and Schedule End Time columns. |
08.80.09526, 07.80.23168, 08.80.09525, 07.80.23161 |
04/09/14 |
Added Start IVR button. |
n/a |
07/15/14 |
Images updated. |
|
|
|