
Alarm Log
Module: Account Management
Overview
Use the Alarm Log to view recorded incidents for the selected installation. There are several Alarm Log views, including the Basic, Shared, Compressed, Zone, Composite, Incident, Member Shared, and Single CID views. You can also perform many functions in the Alarm Log, such as inserting log comments, viewing attached images and video, and entering Call In events.
Any incidents operators are currently handling in the Dispatch tab flash in the Alarm Log. In most Alarm Log views, the event for the incident flashes; however in the Compressed view, the incident number flashes.
Any service tickets that you generate for an installation from Maintenance Ticket Generation (program #701) appear as log entries in the installation’s Alarm Log.
This document covers the following topics:
Identifying Event Display Colors
Scrolling through the Alarm Log
Navigating to the Alarm Log
Use the following steps to navigate to the Alarm Log:
1. From the main SBN toolbar, select Menu.
2. From the drop-down menu, select Go To.
3. In the Go To Program dialog box, type in "559" and press Enter.
w Data Entry Master and Basics opens.
4. Choose the Alarm Log tab in the lower pane of Data Entry.
The Alarm Log Tab
The following graphic shows the Alarm Log with events displayed.
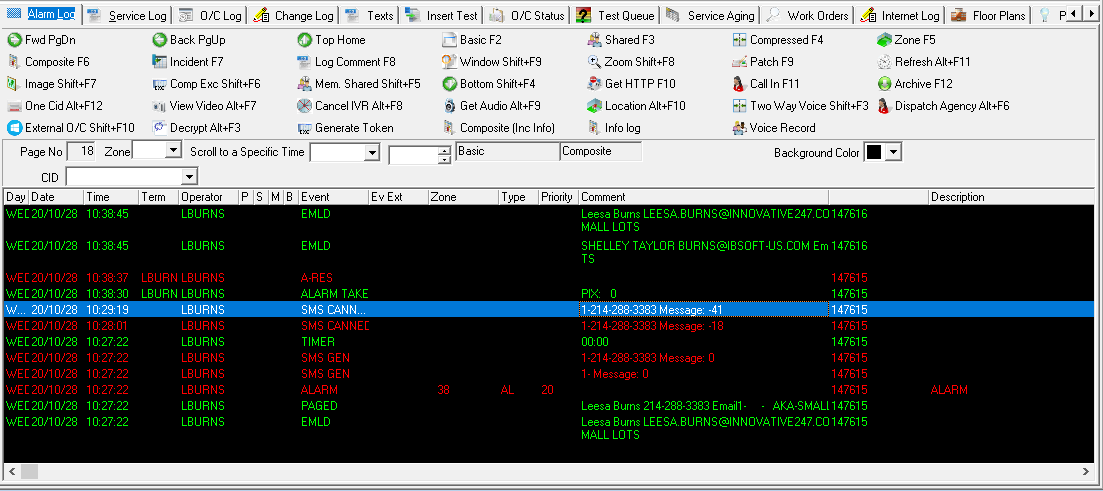
Field Descriptions - Alarm Log
The following table describes the fields in the upper pane of the Alarm Log.
Field |
Description |
Page Number |
Page number currently displayed. |
Zone |
List of zones, including template zones, attached to this installation. Note: Use this field in conjunction with Get One Zone to limit the view of the Alarm Log. |
Scroll to a Specific Time (Date) |
Limits the view of the Alarm Log by displaying only those records on or prior to the date selected. Note: Use this field in conjunction with Scroll to a Specific Time. |
Scroll to a Specific Time (No label) |
Limits the view of the Alarm Log by displaying only those records on or prior to the time selected. |
Alarm Log Type (No label) |
Type of log that you are currently viewing.
|
CID |
Select one of the CIDs associated with this installation from the drop-down menu. |
Background Color |
Select a background color for the Alarm Log grid. Note: Background color also applies to the Alarm Log list that appears on the Dispatch tab when option mo160 is on. When you select a background color, SBN saves that color in the Windows registry of the workstation for your user ID. The background color then appears each time you open SBN. When the version of SBN.exe changes, the background color reverts to the default color (light gray). |
Column Descriptions - Alarm Log
The following table describes the columns used in the lower pane of the Alarm Log.
Column |
Description |
Day |
Day of the week that the event occurred. |
Date |
Date the event entered the Alarm Log. This field is based on either the customer's or operator's time zone. Note: Use Toggle Operator/Premises Time in Data Entry Master to switch between time zones. |
Time |
Time the event entered the Alarm Log. This field is based on either the customer's or operator's time zone. Note: Use Toggle Operator/Premises Time in Data Entry Master to switch between time zones. |
Terminal ID |
Terminal number of the operator who performed the action. |
Operator |
Name of the operator who performed the action. |
If this column displays an X, the event does not print when you generate a report. |
|
Supervisor Override |
If this column displays an X, a supervisor marked the incident so it does not print when you generate a report. |
Manual |
If this column displays an X, the date and time for this event were manually entered. |
Backup CID |
CID number from which the signal was received. This field only displays a CID if the signal was received from an installation with multiple CIDs.
Note: When option ba219 is on, SBN uses a base number of zero (0) for the CID index in the log; thus when a signal is received from the primary CID, this column is blank. If a signal is received from the second CID, this column displays a 1. If a signal is received from the third CID, this column displays a 2, and so on. When option ba219 is off, the first CID is index 1. |
Event |
Type of event for this incident. For example, alarm, false, or missing. Note: When you call a High Security contact from Dispatch in association with an event, this column displays H.Sec.Co. |
Event Extension |
Code for the action taken for this incident. |
Zone |
Zone from which the incident was received, if applicable. |
Type |
Type of alarm that was received. |
Priority |
Priority (1-99) of the signal that was received. |
Comment |
Additional comments about the incident. Action 537/132 is required to display passcard and VRU code numbers. Note: Use messages 9865 and 9866 in GUI Messages (program #1606), group MISC, to enter alternate text for this field depending on the passcard type that is validated for the monitoring event. Message 9865 identifies an installer, and 9866 identifies a technician. When option ma013 is on, the word 'Emailed' appears in the Comment column of the Alarm Log for Email monitoring events. Double-click on the event or choose Zoom to read the Email comment text. SBN distinguishes different timeouts by adding a comment in the Alarm Log. The Patrol dispatch timeout displays the comment "PATRTIME," and guard timeout generates comment "GUATIME." |
Description |
Text description for the incident. Note: For Release 61 and later, the Alarm Log reads the description from the Text field of the zone from which the alarm originated. Alarms received prior to Release 61 do not display this information. This data originates from the Zones tab for certain monitoring events including events 123 through 131. |
Area |
This field populates from the Protected Area field in the Zones tab. Note: For Release 61 and later, the Alarm Log reads the area from the zone from which the alarm originated. Alarms received prior to Release 61 do not display this information. This data originates from the Zones tab for certain monitoring events including events 123 through 131. |
Alarm ID |
Alarm ID attached to the event. Note: If blank, the event refers to the alarm ID currently displayed in the top pane of the Data Entry Master window. |
Alog M1 - Alog M20 |
Customer-defined subsection that displays alarm log messages customized by the Monitoring company. |
Misc 1 |
Customer-defined data from the Misc 1 field of the zone from which the incident was received, if applicable. |
Note: Option mapurl defaults to http://maps.google.com/. If option mapurl value is blank, then latitude/longitude from the Alarm Log entry is used for input to launch http://www.topozone.com.
Identifying Event Display Colors
The Alarm Log displays lines in different colors to indicate status so that an operator can quickly identify the status of each incident. To change the color of specific events, such as a false alarm, contact the IBS Project Manager.
Red - New alarms appear red.
Green - Operator actions appear green.
Yellow - Alarms received while the zone is in test appear yellow.
Olive - Log-only and trouble signals appear olive.
Note: If you select the Important check box in the Log Comment dialog box for the selected event, SBN designates the event as High Priority, and the event appears in olive text.
White - The event you select with your cursor appears white.
Dark Red - Alarms in test appear dark red.
Blue - Event abbreviations for high priority comments appear blue.
Scrolling Through the Alarm Log
To move backward and forward through the multiple pages in the Alarm Log, use the blue arrow buttons.
Fwd - Scroll forward one page
Back - Scroll to the previous page
Top - Scroll to the top of the log
Bottom - Scroll to the bottom of the log
Note: When you choose Bottom, the auto-refresh timer does not return the Alarm Log to the page you were previously viewing.
[ctrl+home] - Jump to the top of the page you are currently viewing.
Viewing the Alarm Log
There are several different views in the Alarm Log. These views allow you to either view the Alarm Log in its entirety or concentrate on specific types of signals and information. To determine which view of the Alarm Log you are currently viewing, look at the Alarm Log Type field.
The Basic View
Choose Basic to view only the alarm incidents that entered the Alarm Queue for this installation. This view displays as Basic in Alarm Log Type.
The Shared View
Choose Shared to view the Alarm Log for those installations that have the same Master CID defined in the Data Entry Basics tab. This view displays as Shared in Alarm Log Type. In this view, the Alarm ID column displays the installation in which the alarm is occurring.
The Compressed View
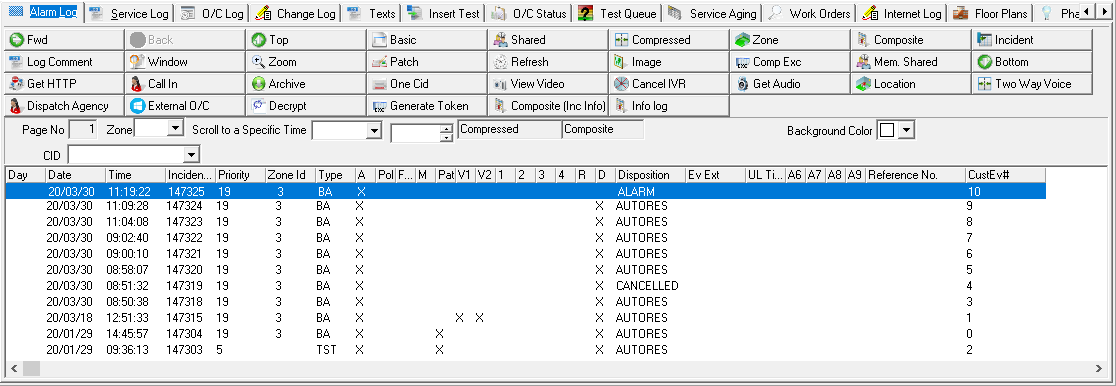
Choose Compressed to condense each incident into a one-line format for easier viewing. This view displays as Compressed in Alarm Log Type.
The following graphic displays the Alarm Log in Compressed view.
An X appears in the Police, Fire, Medical, Patrol, or Agency 6-9 columns when a user places a phone call to an agency in the Call List pane of Dispatch (program #537). You may enter an Agency Reference Number for an incident that displays in the Reference No. column of this window using the Dispatch Agency button.
Note: If an agency displays the => icon in the Special Info column of the Dispatch Call List, an Agency Details window opens when you click on the agency phone number in the Call List. When you call the agency from the Agency Details window, an X appears in the corresponding agency column in the Compressed Alarm Log.
The Zone View
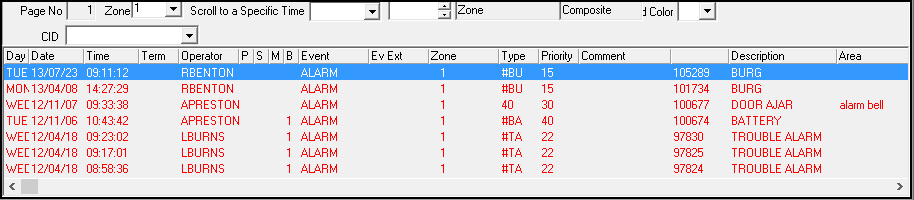
Use the Zone button in conjunction with the Zone field to search for all incidents for a specific zone in the Alarm Log. This view displays as Zone in Alarm Log Type.
Use the following steps to locate events for a specific zone:
1. Select the appropriate zone from the Zone drop-down menu.
2. Choose Get one Zone.
w All incidents for the specified zone appear in the Alarm Log pane.
The Composite View
Choose Composite to view all events for one account, including all Alarm Log and Open/Close incidents. This view displays as Composite in Alarm Log Type.
The Incident View
Choose Incident to view a condensed version of the Alarm Log that displays events for only one incident. Before you can access the Incident view, you must be in the Compressed view. From there, you can view a specific incident and see the actions taken for that incident; for example, the time the alarm was taken, the time the alarm was acknowledged, etc. This view displays as Incident in Alarm Log Type.
Use the following steps to view all events for a specific incident:
1. Choose Compressed.
2. Select the appropriate incident in the Alarm Log pane.
3. Choose Incident.
w All events for the selected incident appear in the Alarm Log pane.
Scrolling to a Specific Time
Use Window in conjunction with the Scroll to a Specific Time fields to search for all incidents occurring on and prior to the specified date and time. If you have set the Refresh Timer and are using this function, the Alarm Log returns to the incidents on the specified date and time every time the timer refreshes.
If you enter an invalid date in the Scroll to a Specific Time field, the Refresh Timer stops and an error message appears. To restart the Refresh Timer, you must clear the invalid date or enter a valid date and select any button in the Alarm Log.
Note: The refresh rate only changes if you reset the Refresh Timer manually. (See Setting the Refresh Timer.)
Use the following steps to search for a specific date and time:
1. Complete the Scroll to a Specific Time fields.
2. Choose Window.
w The Alarm Log tab displays all incidents on or prior to the selected date and time.
The Event Detail View
Choose Zoom to view the Event Details window, which displays additional information about the event.
Use the following steps to zoom in on an event:
1. Select the incident for which you want to view details.
2. Choose Zoom.
w The Event Details window opens, displaying incident information.
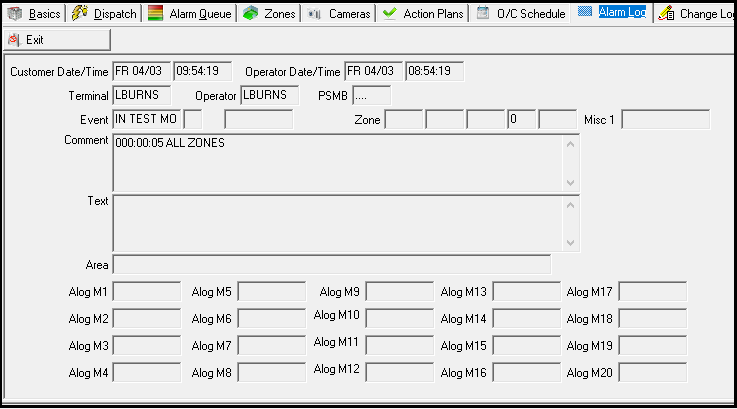
3. After you view the incident information, choose Exit.
w SBN returns you to the Alarm Log tab.
Field Descriptions - Event Details
The following table describes the fields used in the Event Details window.
Field |
Description |
Customer Date |
Date the alarm occurred. This field is based on the customer’s time zone. |
Customer Time |
Time the alarm occurred. This field is based on the customer’s time zone. |
Operator Date |
Date the alarm occurred. This field is based on the operator’s time zone. |
Operator Time |
Time the alarm occurred. This field is based on the operator’s time zone. |
Terminal |
Terminal ID code where the event occurred. |
Operator |
Operator creating the event. |
PSMB |
This field indicates the following Print Flags: l P — the event does not print when you generate a report l S — a supervisor marked the incident so it does not print when you generate a consumer report l M — the date and time for the event are manually typed l B — the CID number from which the signal was received from an account with multiple CIDs |
Event |
Displays the type of event for this incident. |
Event
Abbreviation |
This field displays the following event abbreviation codes: l A — Alarm l R — Restore l B — Battery l C — Cancel l S — Supervisor l P — Passed l T — Trouble l M — Missing l U — Unexpected l L — Logging |
Event Extension (No label) |
Event extension, if the Monitoring operator selects one. |
Zone |
Zone where the alarm occurred. |
Zone Area (No label) |
Zone area where the alarm occurred. |
Code Zone (No label) |
Code of the zone for the alarm. |
Zone Priority (No label) |
Priority of the zone where the alarm occurred. |
Zone Type (No label) |
Type of signal received from the alarm. |
Misc 1 |
Customer-defined data from the Misc 1 field of the zone from which the alarm was received, if applicable. |
Comment |
Displays comments regarding the alarm. |
Text |
This field populates from the Text field in the Zones tab. |
Area |
This field populates from the Protected Area field in the Zones tab. |
Alog M1 - Alog M20 |
Customer-defined fields; display alarm log messages customized by the Monitoring company. |
The Comp Exception View
Choose Comp Exc to view all events for one account, including alarm exceptions and any Open/Close Log events. This view does not display Log Only or non incident events. This view displays as Comp Exc in Alarm Log Type.
The Member Shared View
Choose Mem Shared to view all events for multiple CIDs that share the same Member Number in Data Entry Master (program #559). When the Alarm ID for an event appears blank, this event refers to the CID currently displayed in the Data Entry Master window.
The Archive View
For any table in the Alarm Log, choose Archive to toggle the view between active data and archived data. Alarm IDs display in this mode.
w When you toggle to the archive view, the Alarm Log Type field displays Archive next to the title of the table of data you are viewing.

The Single CID View
You may choose to view alarm activity for one CID that is associated with an account that has multiple CIDs. This view displays as One CID in Alarm Log Type.
Use the following steps to view alarm activity for one CID:
1. Select the CID for which you want to view information from the CID drop-down menu.
2. Choose One CID.
w The view changes to display information for that CID only.
Working in the Alarm Log
There are several buttons in the Alarm Log that allow you to add comments to an event, customize the refresh timer, and view attached images and URLs.
Inserting Log Comments
You can enter additional comments about a specific incident into the Alarm Log. When you enter comments using this function, SBN creates a new line in the Alarm Log. You cannot add a comment to an existing line.
Note: The Comment column displays a maximum of 4 lines with 63 characters per line. Any text you type above this maximum does not appear in the Alarm Log.
Use the following steps to insert log comments:
1. Select the incident to which you want to add comments.
2. Choose Log Comment.
w The Comment dialog box opens.
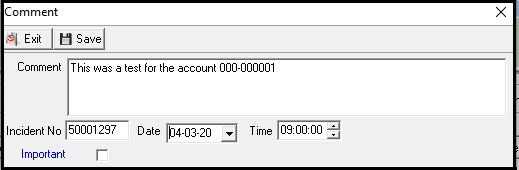
3. Complete the fields, as needed.
Note: When typing a comment, press CTRL+ENTER to enter a line break.
w If you complete the Date and Time fields, the Manual column displays an X.
w If there is only one open incident, the incident number attaches to the comment. If there are no open incidents or more than one open incident, the incident number for the comment remains blank.
w If you select Important check box, SBN assigns the event a high priority. This event displays in olive text and "H. Comm" (high priority comment) displays in the Event column.
4. Choose Save.
Patching an Alarm Log Incident
Choose Patch to change the Alarm Resolution or the Supervisor Override flag for an incident. The Supervisor Override flag determines if an incident prints when you generate a consumer report. Patching is only available on standard alarm resolution codes (events 50-59).You can only make changes to incidents that have occurred within the last 7 days; if the incident is older than 7 days and you attempt to patch, an error message appears.
Changing the Alarm Resolution Code
Use the following steps to change the Alarm Resolution:
1. Select the incident you want to change.
2. Choose Patch.
w SBN asks if you want to change the Alarm Resolution.
3. Choose Yes.
w A menu of Alarm Resolutions appears.
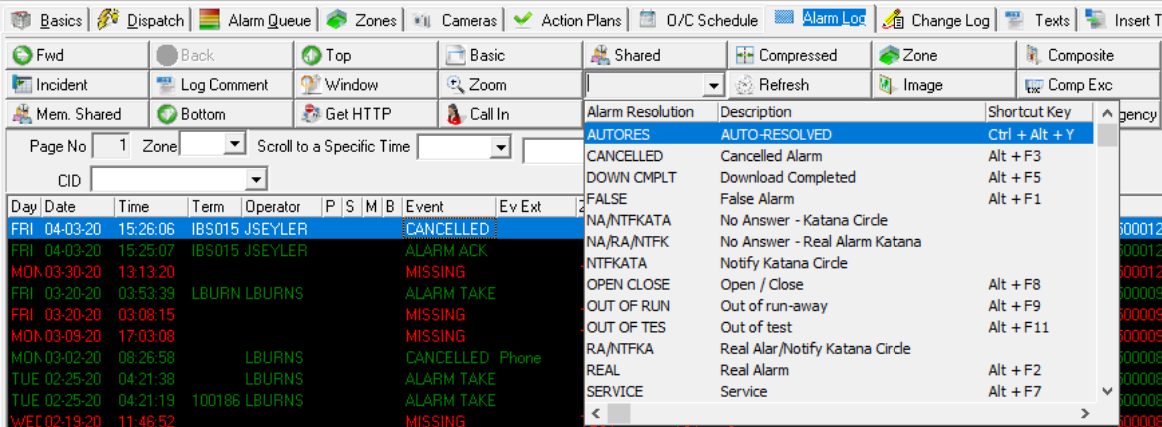
4. Choose the correct Alarm Resolution code.
w SBN asks you to confirm the code.
5. Press the appropriate function key to confirm the Alarm Resolution code.
w The Event Extension dialog box appears.

6. Select an event extension and type a comment, if needed.
7. Choose Save.
Changing the Supervisor Override Flag
Use the following steps to change the Supervisor Override Flag:
1. Select the incident you want to change.
2. Choose Patch.
w If the line displays an Alarm Resolution code, SBN asks if you want to change the Alarm Resolution. Choose No.
w SBN asks if you want to change the Supervisor Flag.
3. Choose Yes.
w An X appears in the Supervisor Override column for this incident.
Setting the Refresh Timer
You can define how often, in seconds, the Alarm Log tab refreshes. The tab refreshes every 0 to 300 seconds, based on the rate you choose from the Timer Value drop-down menu.
Note: If you have used the Scroll to a Specific Time function and you set the Refresh Timer, the Alarm Log navigates back to the incidents on or prior to the selected date and time.
Use the following steps to set the timer value:
1. Choose Refresh.
w The Timer Value menu appears.
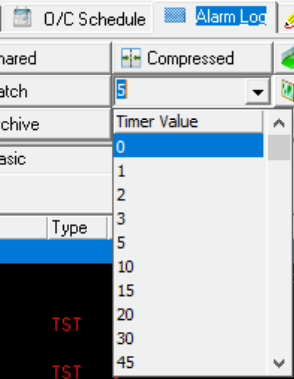
2. Select a refresh rate from the Timer Value drop-down menu.
w SBN sets the refresh rate to the new timer value.
Displaying Attached Images
Choose Display Image to view video files attached to specific incidents in the Alarm Log.
Note: Action 537/15 controls access to the video events you may view:
If your user profile includes this action you may view video from any incident.
If your user profile does not include this action you may only view test and log events with an incident number that matches the Dispatch incident number.
Viewing Attached URLs
When you choose Get HTTP, the website attached to the selected installation (in the Misc 40 field of the Data Entry Basics tab) opens in your default browser.
Entering a Call In Event
Choose Call In to designate that a customer called in and spoke with an operator. When you choose Call In, SBN adds a Call In entry to the Alarm Log for the selected account. When you create a Call In entry after performing a search for passcards in Data Entry Master (program #559), the customer's passcard number and passcard extension appear in the Comment column of the Alarm Log.
Viewing Camera Video
Choose View Camera to open an external video application. You must install the executable SDEBROVIDON.exe in order to access this feature.
Note: SBN records each use of the View Camera button in the Alarm Log as the event "Video Live."
Note: SBN uses the Zone ID, Zone Area, and Zone Type recorded in the Alarm Log to locate the camera number and video file.
Entering Agency Reference Numbers
Choose Dispatch Agency to enter an Agency Reference Number, Comment, and Event Extension in the Alarm Log for a selected incident. When you choose Dispatch Agency, SBN adds a POLICE DIS entry to the Alarm Log. The Agency Reference Number appears in the Compressed Alarm Log view.
You may search for installations in the SBN Basic Search window by Agency Reference Number.
Sending an Email
You may send an email that displays the lines currently showing in the Alarm Log. The lines may include all events for one alarm or they may include multiple incidents.
Use the following steps to send an email:
1. Right-click the entry for which you want to send an email.
w The right-click menu appears.
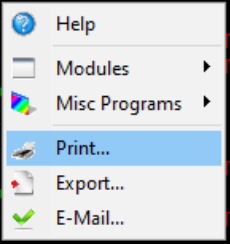
2. Select E-Mail.
w Send Email (program #706) opens and displays details of the selected entry in the Alarm Log.
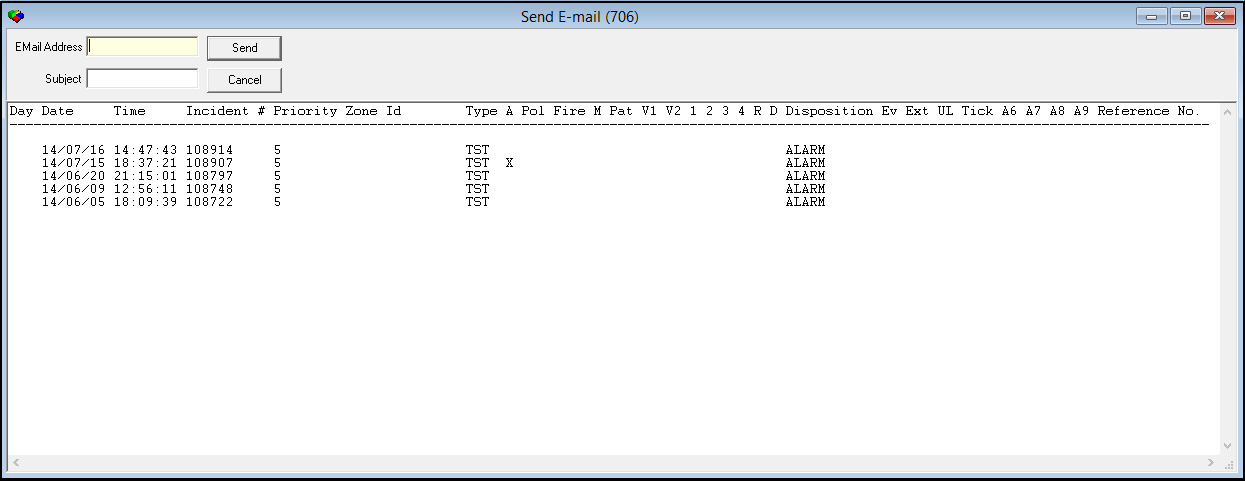
3. Type the email address of the person to whom you want to send this entry.
4. Type a subject, if needed.
5. Choose Send.
w SBN sends the email.
Two Way Voice
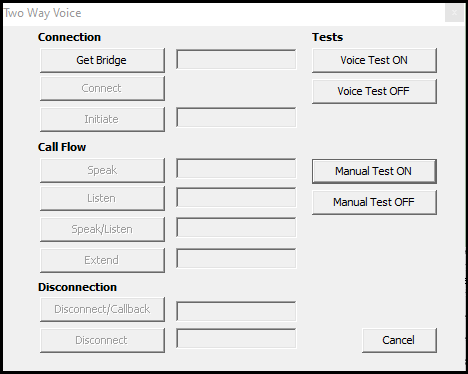
Choose the Two Way Voice button for two-way voice communication with installations that have two-way voice panels.
The following graphic shows the Two Way Voice window that opens when you choose the Two Way Voice button.
Button Descriptions - Two Way Voice Window
The following table describes the buttons in the Two Way Voice window.
Button |
Shortcut Key |
Description |
Speak |
ALT+S |
Uses the DTMF signaling string tone in the Send Str field of program #1742 for the panel type of the selected CID. |
Extend |
ALT+E |
Uses the DTMF signaling string tone in the Opt Str 2 field of program #1742 for the panel type of the selected CID. |
Cancel |
ESC |
Closes the window. |
Related Programs
The following table lists programs related to the Alarm Log.
Program |
Number |
Document Link |
Description |
Zones tab |
N/A |
The Protected Area and Text fields populate from the data in this tab. |
|
Maintenance Ticket Generation |
701 |
Any service tickets generated appear as log entries in the Alarm Log. |
|
Data Entry Master and Basics |
559 |
The program from which you can access the Alarm Log. |
|
Send Email |
706 |
The program from which you can send an email containing Alarm Log entries. |
|
Dispatch tab |
537 |
Incidents currently being handled in the Dispatch tab flash in the Alarm Log. The color in the Alarm Log appears in the Alarm Log list in this tab when option mo160 is on. |
Button Functions
The following table displays the buttons, describes the shortcut keys, actions, and functionality.
Button |
Name |
Shortcut Key |
Action |
Description |
|
Fwd |
Pgdn |
559/121 |
Scroll forward one page. |
|
Back |
PGUP |
559/122 |
Scroll to the previous page. |
|
Top |
home |
559/123 |
Go to the top of the Alarm Log to view the most recent entry. |
|
Bottom |
shift+f4 |
559/138 |
Go to the bottom of the Alarm Log to view the oldest entry. |
|
Basic |
f2 |
559/124 |
View only Alarm Log entries for the selected installation. |
|
Shared |
f3 |
559/125 |
View the Alarm Log for multiple accounts, those installations that are subzoned or part of a subzoned account. |
|
Compressed |
f4 |
559/126 |
Compressed view in the Alarm Log; condense each incident into a one-line format. |
|
Zone |
F5 |
559/127 |
Search for all incidents in a specific zone. |
|
Composite |
F6 |
559/128 |
View all events for one account, including all Alarm Log and Open/Close Log incidents. |
|
Incident |
F7 |
559/129 |
View all events for a specific incident. |
|
Log Comment |
F8 |
559/130 |
Type additional comments about a specific incident into the Alarm Log. |
|
Window |
shift+f9 |
559/131 |
Limit the view of the Alarm Log by scrolling to those records on or prior to the time selected. |
|
Zoom |
shift+f8 |
559/132 |
Zoom in on an event; view the Event Details window. |
|
Patch |
f9 |
559/133 |
Change the Supervisor Override flag and/or the Alarm Resolution for an incident. |
|
Refresh Interval |
ALt+f11 |
559/134 |
Define how often, in seconds, the Alarm Log tab refreshes. |
|
Display Image |
shift+f7 |
559/135 |
View video files attached to specific incidents in the Alarm Log. |
|
Comp Exc |
shift+f6 |
559/136 |
View alarm exceptions and Open/Close Log incidents. |
|
Mem Shared |
shift+f5 |
559/137 |
View all events for multiple CIDs that share the same Member Number. |
|
Get HTTP |
f10 |
559/139 |
View a website attached to the selected account. |
|
Call In |
f11 |
559/152 |
Add an entry to the Alarm Log if a customer called in for the selected account. |
|
Archive |
f12 |
559/151 |
Toggle the view between active data and archived data. |
|
One CID |
ALT+f12 |
559/153 |
View information for the selected CID only. |
|
View Camera |
ALT+f7 |
559/154 |
Opens a new external video application. Note: The executable SDEBROVIDON.exe must be installed in order to access this feature. |
|
Get Audio |
ALT+F9 |
559/156 |
When options ba449 and ba450 are set, you can select the Get Audio button to access an audio file associated with an alarm. |
|
Location |
ALT+f10 |
559/157 |
Opens an external GPS application. Note: To use this feature, the value of option ba467 must contain the name of the application and a list of the parameters for SBN to pass from the alarm event to the application. SBN only launches the application if the ALog Misc6 field of the selected event has the value 'GPS'. |
|
Two Way Voice |
SHIFT+F3 |
559/724 |
Open the Two Way Voice window for communication with installations that have two-way voice panels. |
|
Dispatch Agency |
ALT+F6 |
559/999 |
Enter an Agency Reference Number, Comment, and Event Extension in the Alarm Log for the selected incident. |
|
External O/C |
Shift+F10 |
559/727 |
When option ma028 contains a value, choosing this button in the Alarm Log tab opens an external application defined by the option value and passes the dealer number, installation number and time zone to the external application. |
|
Exit |
Esc |
559/999 |
Exit without saving. |
|
Save |
Enter |
559/999 |
Save existing record. |
|
Voice Record |
|
559/0 |
When selected, a SecureVoice URL populates within the users default web browser and they can playback the selected voice recording. If no proper SecureVoice signal is highlighted when this button is selected, an error message will appear. |

Modifications and Updates to Alarm Log
The following table lists modifications and updates to the Alarm Log document.
Mod Number |
Date |
Description |
n/a |
12/17/08 |
document rewritten |
08.03.06435, 07.02.17927 |
02/20/09 |
You cannot patch an event that is older than 7 days. |
07.02.18124, 08.03.06530 |
03/16/09 |
SBN now also uses Zone Type to located camera number and video file. |
08.03.06553 |
03/24/09 |
When you create a Call In entry after performing a search for passcards, the customer's passcard number and extension appear in the Alarm Log. |
07.02.20021, 08.03.07795 |
09/01/10 |
Added Misc 1 column to log and field to Event Details window. |
07.02.20324, 08.03.07964 |
12/02/10 |
Added a Location button and option ba467. |
07.02.20533, 08.03.08092 |
01/11/11 |
Added option ma013. |
07.02.21785, 08.03.08775 |
06/14/12 |
Added Dispatch Agency button and Reference No column to Compressed view. |
07.78.22294, 07.78.22293 |
04/29/13 |
Changed hot key combination for Two Way Voice button to SHIFT+F3. |
07.78.22384, 08.78.09115 |
04/30/13 |
Added option ivr026 and updated function of Voice Test On and Voice Test Off buttons in Two Way Voice window. |
08.79.09238, 07.79.22646 08.79.09205, 07.79.22547 |
06/27/13 |
Added option ma028 and External O/C button. |
n/a |
07/17/14 |
Images updated. |
08.86.10989, 08.87.11032, 07.87.25335, 07.87.25318 |
07/25/17 |
This upgrade is exclusively for the integration of Axis Camera's. When an operator views a clip, the clip they viewed is logged in the "Alarm Log." A User can then highlight that log and click on "Image." Operator can then see the same clip if the "Comment" section of the "Alarm log" says "AXIS2." |
n/a |
04/06/20 |
Images updated. |
07.93.26797, 08.93.12076, 07.93.26849, 08.93.12138 |
11/02/21 |
Added SecureVoice Voice Record button. Images updated. |