
Queue Routing
Queue Routing
Queue Routing
Module: System Administration
Overview
System administrators use Queue Routing to define which alarm types, at specified times, go to which alarm queues. This ultimately gives system administrators powerful options for managing alarm activity. After a signal reaches the IMMQ, it goes through queue routing.
SBN provides sixteen separate alarm queues, numbered 1 through 16. By default, alarms go to Queue 1. If system administrators define routing requests, alarms go to specific queues.
System administrators can use Queue Routing to relieve alarm overloads. If a specific area is suffering from excessive alarms, the system administrator may choose to route all calls from that area to a specific queue while directing the rest of the incoming alarms equally between the remaining queues.
System administrators can also use Queue Routing to reroute incoming alarms by geographic location or by dealer ID so that specific operators can respond to the calls.
To access this program, select Queue Routing (program #1738) from the main menu of SBN.
How SBN Routes Alarms
When an alarm is received, SBN first accesses the customer record to determine the monitoring location and zone type. Then, SBN uses the routing requests to determine in which queue to place an alarm from this location/zone type. If SBN cannot find a match in the routing requests for the location/zone type, SBN attempts to place the alarm using only the monitoring location. If this attempt fails, SBN places the alarm in Queue 1.
Each monitoring location (Branch) can be routed to a queue, but only to one queue at a time. (Access to queue number 16 may be restricted by Action 268 in a user’s action profile. For more information see Action Profiles.)
Note: Use caution when modifying routing tables as SBN updates the new information dynamically and this could impact alarm handling. To an operator processing alarms, it may appear as if the alarm disappeared, but it has only moved to another queue.
Alarms associated with a specific dealer ID can also be routed to a queue. However, SBN does not dynamically move alarms associated with a specific dealer ID. Any alarms associated with the specific dealer ID that are in the current queue remain in the current queue when the routing table changes. SBN changes the queue routing for alarms for a specific dealer ID that arrive after the change to the routing table.
System Administrators can use Action 265 to authorize qualified monitoring operators to view multiple queues. When this action is set, the operator can change the queue number displayed, and thus can scan different queues.
Note: A monitoring operator’s profile determines whether the operator has access to specific queues or to alarms from a specific branch. If the monitoring operator has no defined profile, or the queue number in the profile is blank, the operator sees alarms in Queue 1 only. If the monitoring operator has no profile, or the branch filed in the profile is blank, the operators sees all branches.
When the customer’s file does not specify a specific monitoring location, SBN defaults to the customer’s branch. An advantage of having a separate monitoring location is the ability to split up alarms for optimal handling.
Helpful Hint
Queue Routing is all about balance. Sending all video monitoring alarms to a specific queue is a good idea. However, do not inadvertently send alarms to Queue 3 if no one ever checks Queue 3. Make sure that operators are accessing all Queues in use. You could also run into trouble if you end up routing real live signals.
Specific alarm types or zone types can be sent to a specific queue. For example, you can temporarily take all signals from Monitoring Branch 0111 that are zone type FIRE and send them to Queue 16. However, it is easy to forget that you have routed specific zone types to a Queue. Be careful to document any temporary changes you make in case of emergencies.
How the Queue Routing Table Works
SBN controls the queue routing table in two ways. The first is through defined branch/queue/alarm type combinations. Any branch may be represented in any number of ways in any of the queues. See the following examples.
Queue Routing by Branch/Queue/Alarm Information
Monitoring Location Branch has no entry in the queue routing table.
In this case, SBN routes all alarms that originate from this branch through the default routing instruction, which sends them to Queue 1.
Monitoring Location Branch has a queue assignment, but no alarm type defined.
In this case, SBN routes all alarms (of any type) to the assigned queue.
Monitoring Location Branch has one queue assignment, and one specific defined alarm type.
In this case, SBN routes all alarms of a type exactly matching the defined type to the assigned queue. SBN sends all other alarm types to the default queue (Queue 1).
Monitoring Location Branch has one queue assignment with a specific defined alarm type, and a different queue assignment with no defined alarm type.
In this case, SBN routes all alarms of the defined type to the first assigned queue, while routing all other alarms to a second assigned queue.
Queue Routing by Individual User Profiles
SBN also controls the queue routing table through the user’s profile. The user’s profile defines both default monitoring location branches and default queues. If a user’s profile has specific definitions for these two settings, when the user logs into SBN, the profile determines which queue(s), from which branches the user can view. The user’s profile may also define which queue(s) from which dealers the user can view. If the user’s profile does not define settings, the user sees alarms from all branches and/or alarms from Queue 1.
The Queue Routing Window
The following graphic shows Queue Routing as the program opens. The upper pane displays the routing requests that the system administrator has already defined in the routing table. Use the fields in the lower pane to add or edit routing requests.
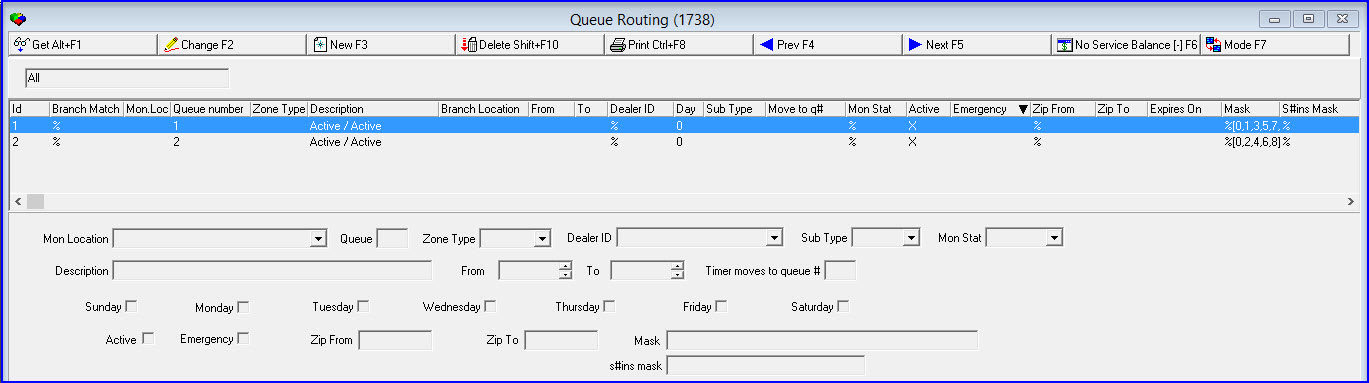
Column Descriptions
The following table describes the columns used in Queue Routing.
Column |
Description |
Branch Match |
Identifies the installation branch by ID number. |
Monitoring Location |
Identifies the monitoring location by ID number. |
Queue Number |
Number (1-16) of the assigned queue. |
Zone Type |
Code for the zone (alarm) type.
|
Description |
Description of the routing request. |
Branch Location |
Identifies the installation branch by text description. |
From/To |
Range of time for the selected routing request. Time tracked by server time.
|
Dealer ID |
ID of the dealer associated with alarms to reroute.
|
Day |
Number indicates on what day of the week the routing request occurs. (0= every day, 1= Sunday, 2= Monday, 3= Tuesday, and so on.) |
Sub Type |
Subscriber type associated with installation alarms to route. |
Mon Stat |
Monitoring status of the installation alarms to route. |
Timer move to queue # |
Number of the queue to which an incoming alarm is routed when a timer is placed on it. |
Active |
Indicates that a record in ma_queue_routing is active. |
Emergency |
This is an 'Emergency' record (previously called Storm Mode). |
Zip From |
Zip code From field |
Zip To |
Zip code To field |
Expires On |
Server time, in seconds, to automatically stop using this routing record. This is calculated from option ba517. If the option is left blank then the record never expires. Same option used to calculate expiration for all emergency records. |
Field Descriptions
The following table describes the fields used in Queue Routing.
Field |
Description |
Monitoring Location |
Identifies the monitoring location by branch ID number. (This menu originates from program #1530.) Note: This field accepts the "%" wildcard. |
Queue Number |
Number (1-16) of the assigned queue. |
Zone Type |
Code for the zone (alarm) type. (This menu originates from program #1733.)
|
Dealer ID |
ID of the dealer associated with alarms to reroute.
|
Sub Type |
Subscriber type associated with installation alarms to route. |
Mon Stat |
Monitoring status of the installation alarms to route. |
Description |
Description of the routing request. |
From/To |
Range of time for the selected routing request. Time tracked by server time.
|
Timer moves to queue number |
Number of the queue to which an incoming alarm is routed when a timer is placed on it. (This field has no function when option ma023 is off.) |
Sunday
- Saturday |
A checkmark on a day means the selected routing request occurs that day of the week.
|
Active |
Indicates that record in ma_queue_routing is active. This check box will display the active records in the Emergency Routing grid. |
Emergency |
This is an 'Emergency' record (previously called Storm Mode). This check box allows a subset of records to be displayed in the ‘Emergency Routing’ grid. |
Zip From |
Emergency Routing designated by the Zip code from field |
Zip To |
Emergency Routing designated by the Zip code to field. |
Adding a Routing Request
You can define a few requests, or you can specify an extensive list of routing instructions. Any requests that you create remain in effect until you delete them.
Warning: When you add or delete a routing request, related alarms that are already assigned to a queue are reassigned, and thus disappear from the monitoring operators’ screens.
A request to reroute alarms associated with a specific dealer ID does not dynamically move alarms already in the queue. The routing request affects only those alarms that arrive after the change to the routing table.
Use the following steps to add a routing request:
1. Choose New Record.
‰ Fields in the lower pane of the window open.
2. Complete the following fields:
l In Mon Location — select a branch name and number from the list.
l In Queue — type a number for the queue (1-16).
l In Zone Type — select a zone from the list.
l In Dealer ID — select the ID of the dealer whose associated alarms you want to reroute.
l In Description — type a descriptive name for the routing request, such as its purpose.
l In From — select a beginning time of a range of times during which the routing request is in effect.
l In To — select an ending time of range of times during which the routing request is in effect.
l In a Day of the Week box — check what day (or days) the routing request will take place. (If you do not check any boxes, the request will occur every day.)
l In Active — Select to display the Active records.
l In Emergency — Select to display the Active Emergency records.
l In Zip From — Enter a From zip code
l n Zip To — Enter a To zip code
3. Choose Save.
‰ Your routing request appears in the routing table.
Note: There is no warning message if an alarm is routed to multiple queues at the same time or on the same day. When rerouting an alarm, note to which queue the alarm is currently routed.
Note: Existing alarms with a dealer and branch that match a new routing request are not moved to different alarm queues. Only new alarms are routed to queues according to the new routing request setting.
Note: For more information on the operation of Emergency Mode, please refer to Alarm Queue.
Example
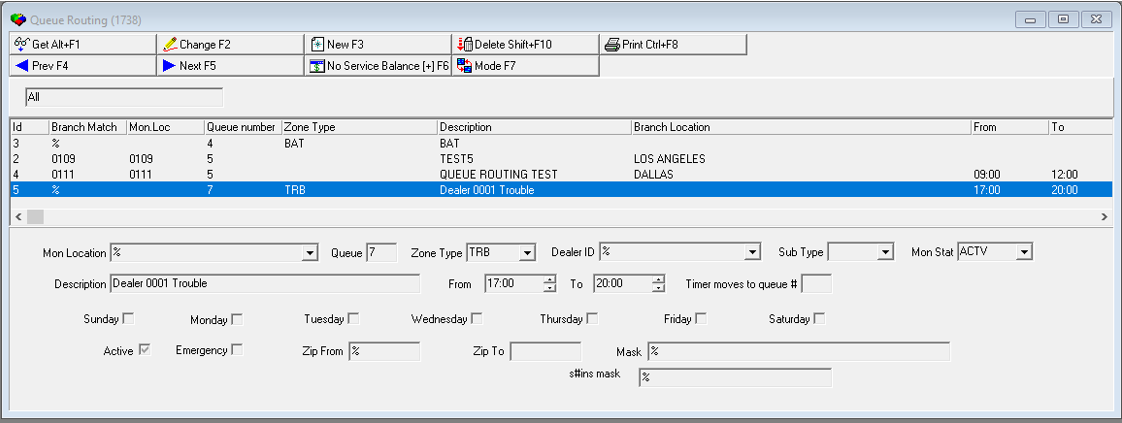
In the graphic below, the system administrator routes all signals for dealer 0001 to Queue 4. However, the system administrator defined an exception for signals for dealer 0001: system trouble signals that occur between 17:00 and 20:00 are to be routed to Queue 7.
Emergency Mode
The Mode button allows a user to toggle to three difference modes: Emergency, Non-Emergency, and ALL.
Emergency mode — Views only the emergency records
Non-Emergency — Views only the Non-Emergency records
ALL — Views all records
The Emergency Mode is replacing the previous Storm Mode. This feature will allow each individual Emergency Mode entry to be on or off independent of other emergency mode records.



Active and Emergency Check Boxes
Active and Emergency interact with each other. Emergency is a special routing record. This flag allows a subset of records to be displayed in the ‘Emergency Routing’ grid. It also allows the Background Task to only try and clean-up Emergency Records. The Active check box will turn on the active Emergency Routing records.
Emergency check box flags a special grouping of routing records. The active flag is turned on by default.

Emergency Routing Grid
The following image displays the Emergency Routing Grin in the Alarm Queue of Program #559.
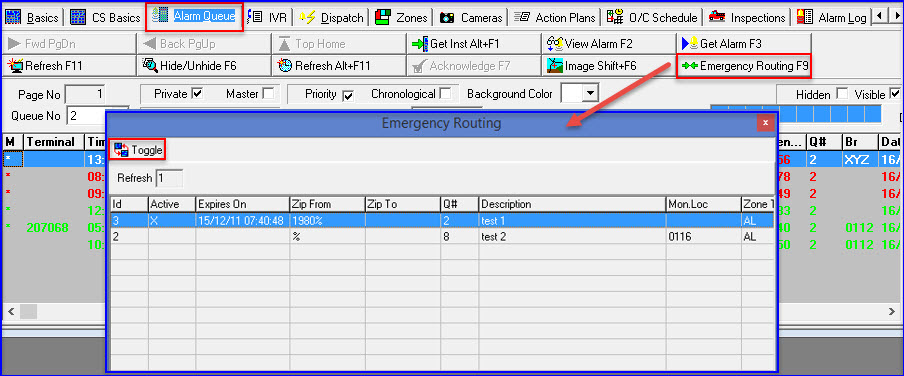
In program #559 the Alarm Queue has an Emergency Routing button that was previously named Storm Mode. The Emergency Routing button will allow each individual Emergency Routing entry to be on or off independent of other Emergency Routing records. When clicking the Emergency Routing button, users will be prompted to enter a password. Then the Emergency Routing Grid will open. The grid will display the active and inactive routing records. In this grid above ID 3 is Active and ID 2 is inactive.
The Toggle button allows the user to Activate or deactivate an Emergency Routing. The X in the Active column indicates a routing is active or inactive.
Expiring — The time that the Emergency Routing is active is determined by Option ba517. The default time setting is 60 minutes. Option ba517 is not a new option it was introduces when Storm Mode was coded.
Button Functions
The following table displays the buttons, describes the shortcut keys, actions, and functionality.
Button |
Name |
Shortcut Key |
Action |
Description |
|
Get |
ALT+F1 |
1738/ 1 |
Get record. |
|
Change |
F2 |
1738/ 2 |
Change selected record. |
|
New |
F3 |
1738/ 3 |
Create new record. |
|
Delete |
SHIFT+F10 |
1738/ 4 |
Delete selected record. |
|
CTRL+F8 |
1738/ 6 |
Print selected records. |
|
|
Previous |
F4 |
1738/ 999 |
Select previous record. |
|
Next |
F5 |
1738/ 999 |
Select next record. |
|
No Service Balance |
F6 |
1738/ 7 |
No Service Balance |
|
Mode |
F7 |
1738/ 999 |
Toggle three ways to filter grid |









Modifications and Updates to Queue Routing
The following table lists modifications and updates to the Queue Routing document.
Mod Number |
Date |
Description |
08.79.09263, 07.79.22704 |
06/26/13 |
Added Monitoring Status field. |
n/a |
8/22/14 |
Images updated. |
08.81.09855, 07.81.23700 |
10/24/14 |
Added Storm Mode column and checkbox. |
08.84.10345, 07.84.24482 |
12/04/15 |
Emergency field added, From/To Zip filed, added Algen logic added |
n/a |
01/11818 |
Images updated. |