
Purchasing
Program #: 571
Module: Account Generation
Overview
Purchasing (program #571) works with the Inventory and Accounts Payable modules to provide a smooth flow of information into the General Ledger by converting requisitions for materials, entered by personnel in the inventory department, into purchase orders. Purchasing picks up the inventory replenishment process that began in Branch Inventory (program #1757) by ordering materials from vendors and handling receipts for delivered materials. You may also view purchase history in this program.
This document covers the following topics:
Deleting Items from a Purchase Order
Returning Items to the Manufacturer
Closing/Reopening a Purchase Order
Accessing the Purchase Order Report
Navigating to Purchasing
Use the following steps to access the Purchasing program:
1. From the main SBN toolbar, select Menu.
2. From the drop-down menu, select Go To.
3. In the Go To Program dialog box, type in "571" and press Enter.
w Purchasing opens.
Purchasing Options
You can manipulate the Purchasing window and functionality by using a number of options. The settings of the following options control different aspects of Purchasing and how it relates to other programs. For detailed information on an option and its default setting, see SBN Options.
Option ba220 – When on, you can define a General Ledger number for each line of a purchase order. SBN then automatically sets and validates the numbers against the Chart of Accounts (program #1835) while converting the requisition.
Option ba221 – Defines what information SBN inserts for each line of a purchase order while converting a requisition. For example, if this option is set as <<�_� + rtrim(@br) + ;.� + “04�>> the General Ledger inserted is 1234.0111.04, where 1234 is the General Ledger number, 0111 is the branch number, and 04 is a constant. Option ba220 must be on to use this option.
Option ba274 – When on, the Vendor ID menu displays only those vendors defined in program #1535. When off, all vendors appear in the menu.
Option ba285 – When on, you can change the Vendor Item Code field. When off, you cannot change the vendor item code.
Option ba463 – When on, Delivery Branch, Delivery Dealer, and Delivery Personnel fields appear in the Purchasing window.
Option bl058 – When on, SBN does not validate General Ledger account numbers. When off, the GL Account Number field displays as a single field, and the menu originates from program #1835.
Option bl169 – When on, if you receive a purchase order for a satellite, SBN automatically transfers the items on the purchase order from the branch to the satellite inventory (using transaction type INTR). When off, if you receive a purchase order for a satellite, SBN adds the items on the purchase order to the branch inventory. You must transfer from the branch to the satellite manually in Branch Inventory (program #1757).
Option tax08 – Defines the default revenue type to use for tax calculation in Purchasing. To define this option, you must use a valid revenue type from program #1512.
Option ub002 – When on, the purchase order Create Date appears in the PO No drop-down menu of the Purchase Order Lookup window in program #571. When off, the purchase order Change Date appears in the PO No menu of the Purchase Order Lookup window.
Option ub021 – When On, users can update the expected date for all open line items for all open PO's for that item and the vendor. Please note, this option does not update on a new PO.
The Purchasing Window
The following graphic shows the Purchasing window as the program opens.
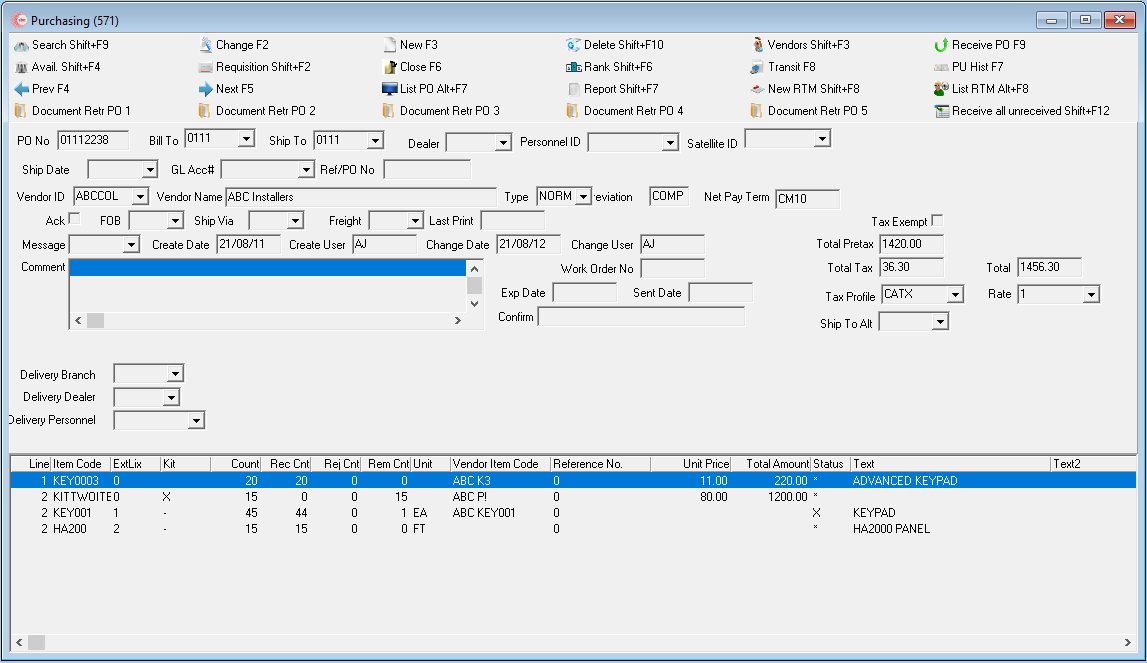
Field Descriptions — Purchasing
The following table describes the fields used in the upper pane of Purchasing.
Field |
Description |
PO Number |
Purchase order number. This field accepts up to 10 characters. Note: When SBN assigns the number, SBN inserts zeros before the number. |
Bill To |
Branch to charge for the purchase. (This menu originates from program #1530.) Note: When at least one branch in program #1530 has the Bill To check box selected, SBN only displays branches with that check box selected in the Bill To field of Purchasing. If no branches have the Bill To check box selected in program #1530, then SBN functions as usual; all branches appear in the Bill To field of Purchasing. |
Ship To |
Branch to which the purchase order is to be delivered. (This menu originates from program #1530.) |
Dealer |
Dealer to which the purchase order is to be delivered. (This menu originates from program #1537.) |
Personnel ID |
Personnel ID to which the purchase order is to be delivered. (This menu originates from program #1811.) |
Satellite ID |
Satellite of the branch to which the purchase order is to be delivered. (This menu originates from program #1605 and is restricted by your selection in the Ship To field. Only satellites for the selected branch appear in the menu.) |
Ship Date |
Scheduled ship date from vendor. |
GL Account Number |
General ledger account number for the purchase. If option bl058 is off, this menu originates from program #1835. The items contained in the menu are limited to only those entries flagged as used by Purchasing. When option ba220 is on, you can assign GL account numbers to individual lines on the PO. |
Ref/PO No |
SBN-assigned reference number of a transfer or a purchase order number. This field accepts up to 10 characters. |
Vendor ID |
Vendor ID. (This menu originates from program #1758.) Note: When option ba274 is on, the vendor menu displays only those vendors defined in program #1535. |
Vendor Name |
Vendor name, which defaults from the Vendor ID field. Note: When option ba274 is on, the vendor menu displays only those vendors defined in program #1535. |
Type |
Type of purchase order. (This menu originates from program #1764, abbreviation 02.) |
Abbreviation |
The status of the purchase order. |
Net Pay Term |
This read-only field defaults with the pay term associated in Vendor Masters (program #1758) with the vendor ID selected in the purchase order. |
Acknowledge |
If you select this check box, the vendor must acknowledge receipt of the purchase order. |
FOB |
Indicates when ownership of the merchandise changes. (This menu originates from program #1764, abbreviation 04.) |
Ship Via |
Shipping carrier for this purchase. (This menu originates from program #1764, abbreviation 01.) |
Freight |
Identifies how to handle freight. This field fills with a default when you choose Get Default Values. (This menu originates from program #1764, abbreviation 05.) |
Last Print |
Date the purchase order last printed. This field is read-only. |
Message |
Report message. Only entries flagged as used in Purchasing in program #1766 appear in this list. |
Create Date |
Date on which you created the purchase order. This field is read-only. |
Create User |
ID of the user who created the purchase order. This field is read-only. |
Change Date |
Date on which you changed the purchase order. This field is read-only. |
Change User |
ID of the user who made the last change to the purchase order. This field is read-only. |
Comment |
Text for the purchase order. Note: If the field before the text displays an X, the comment prints on this purchase order. |
Work Order Number |
Number that identifies special purchases by work order on a voucher, and automatically transfers to job costing for the appropriate work order. |
Exp Date |
Date on which you expect the vendor to ship the purchase. |
Sent Date |
Date the vendor actually ships the purchase. |
Confirm |
Reference number. This is either a requisition number, installation number, or work order number. |
Total Pretax |
Displays the total of all items on the purchase order with no tax added. |
Total Tax |
Displays the total amount of tax calculated for all items on the purchase order. |
Total |
Displays the total of all items on the purchase order with the total tax added. |
Rate |
The rate a specific purchase order receives. |
Tax Profile |
This field defaults to the tax profile associated with the vendor in Vendor Masters (program #1758). You may override the default and select an alternate tax profile from the drop-down menu. (This menu originates from program #1514.) Note: If you leave this field blank, SBN does not calculate or apply any taxes for the purchase order. |
Tax Exempt |
Select this check box if the vendor is tax exempt. |
Delivery Branch |
You may select a branch to which the items on the selected purchase order should be delivered. The address entered for the selected branch in program #1530 appears in the Comment field with an X before each line, indicating the lines will appear on the purchase order when printed. (This menu originates from program #1530.) Note: This field only appears if option ba463 is on. You may use only one of the three Delivery fields. |
Delivery Dealer |
You may select a dealer to which the items on the selected purchase order should be delivered. The address entered for the selected dealer in program #1537 appears in the Comment field with an X before each line, indicating the lines will appear on the purchase order when printed. (This menu originates from program #1537.) Note: This field only appears if option ba463 is on. You may use only one of the three Delivery fields. |
Delivery Personnel |
You may select an employee to which the items on the selected purchase order should be delivered. The address entered for the selected user ID in program #1811 appears in the Comment field with an X before each line, indicating the lines will appear on the purchase order when printed. (This menu originates from program #1811.) Note: This field only appears if option ba463 is on. You may use only one of the three Delivery fields. |
Note: Define option tax08 with a valid revenue type from Revenue Types (program #1512) to use tax calculation on purchase orders.
Column Descriptions — Purchasing
The following table describes the columns used in the lower pane of Purchasing.
Column |
Description |
Line Index |
Line number associated with this item. |
Item Code |
Code that identifies the item. (This menu originates from program #1535.) |
Count |
Quantity to order. Note: To delete an item from a saved purchase order, change the count of the item to 0 (zero). |
Rec Count |
Total quantity of items already received. |
Rej Count |
Total quantity of items already rejected. |
Rem Count |
Quantity of items not yet received. |
Unit |
Unit of measure for the quantity ordered. (This menu originates from program #1764, abbreviation 09.) |
Vendor Item Code |
Vendor’s item number. You can override this number. Note: When action 571/11 is on, this feature works as before. If off, you cannot alter this field. |
Reference Number |
Reference number; generally a requisition number, but can also be an installation number or work order number. Note: If you include multiple requisitions on the same PO, SBN displays only the first requisition number and rolls up the total from all requisitions for this item and branch into a single line. |
Unit Price |
Last price paid to this vendor for this item. You can override this field. |
Total Amount |
Extended cost of the item. (Count * Unit Price) |
Status |
Status of the line: l X — lines with partial receipts l * — lines that have been fully received or force closed. |
Text |
Description attached to the item. |
Text 2 |
Additional text regarding the item or the description for a non-stock item. |
Invoice Date |
Invoice date for the item. |
Invoice Count |
Number of items contained on the invoice. |
Invoice Amount |
Total amount for the items on the invoice. |
Expected Date |
Expected delivery date of the items. |
Receive Date |
Displays the date the items were received. |
Tax |
Displays the calculated tax for each item. |
Ext Line Ix |
External Line Item |
Kit |
This field will display an 'X' if that line item is a kit. A kit is made up of various components - all with their own Item Code. The first line item of a Kit is the kit itself, followed by any line items which make up that specific kit. Kits and their line items are also displayed in AP Open Vouchers (#1837) within the "Batches Included in Voucher" and "Items for Selected Batches" windows. |
Searching for Purchase Orders
Use the following steps to search for purchase orders:
1. Choose Search.
w The Purchase Order Lookup dialog box opens.
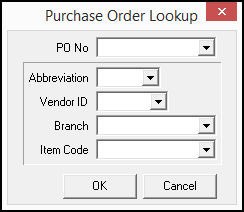
2. Select your search parameters:
In PO No you may select a specific purchase order
Note: Action 571/60 limits user access to purchase orders. When on, users can access all purchase orders. When off, users can only access purchase orders they create, and the PO No menu displays only those purchase orders. When option ub002 is on, the purchase order Create Date appears in the PO No drop-down menu. When the option is off, the Change Date appears in the menu.
In Abbreviation you may select the status of a purchase order
New — the default status for new purchase orders
Close — the status for orders placed with the vendor
Partial — the status from initial receipt of items on the order until you receive all items
Complete — the status after you fully receive all lines of the order
In Vendor ID you may select a specific vendor number to include in the search. (This menu originates from program #1758.)
In Branch you may select a specific branch ID to include in the search. (This menu originates from program #1530.)
In Item Code you may select a specific item code to include in the search. (This menu originates from program #1535.)
3. Choose OK.
w The details of the purchase order that matches your search parameters appear in the main window of Purchasing.
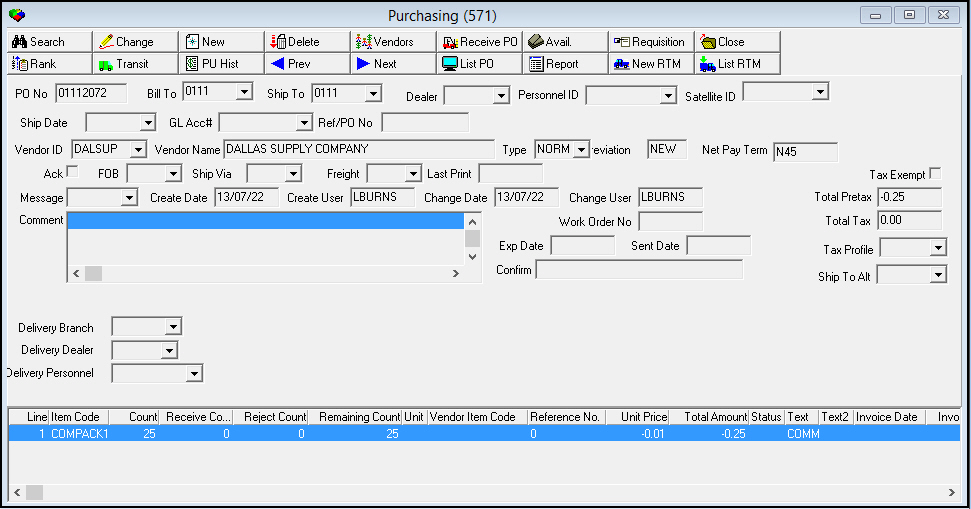
Note: When you choose OK, the PO Number field validates only against the selected purchase order instead of all possible purchase orders.
Creating a Purchase Order
When creating a new purchase order, you may use default values for various fields in the window. For more information, see Getting Default Values.
Use the following steps to create a purchase order:
1. Choose New.
w Most fields in the upper pane open to create a new purchase order.
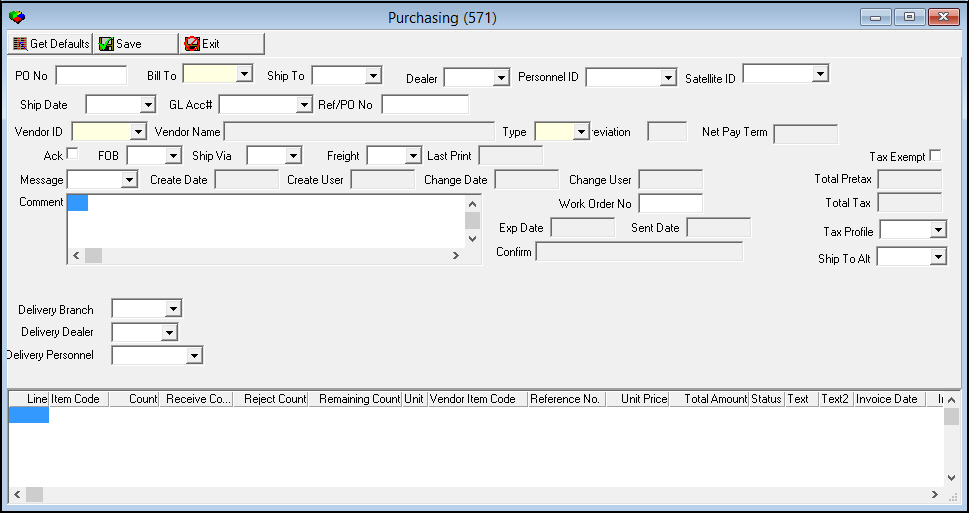
2. Enter the following information in the upper pane:
In Bill To select the branch to bill for the purchase.
In Vendor ID select the vendor to purchase from.
In Type select the type of the purchase order you are creating.
In Ship To, Dealer, or Personnel ID, select a destination for order shipping.
Note: You may select a satellite to ship the order to. The menu of the Satellite ID field is restricted by your selection in the Ship To field; only satellites for the selected branch appear in the menu.
3. Enter other information in the upper pane, as needed.
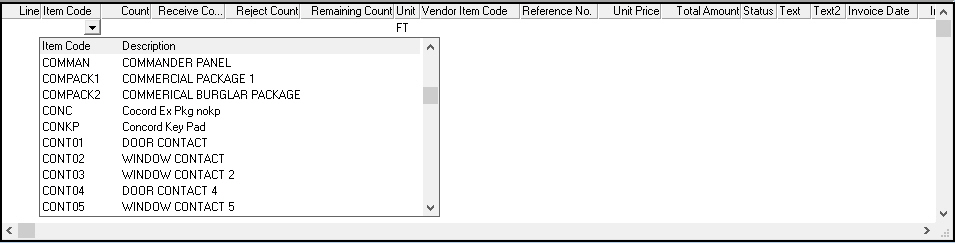
4. In the lower pane, select items to purchase.
w The items are added to the purchase order grid.
5. Choose Save.
Changing a Purchase Order
While changing the details of a purchase order, you may use default values for various fields in the window. For more information, see Getting Default Values.
Note: You may only change a Vendor Item Code if option ba285 is on.
Use the following steps to change the details of a purchase order:
1. Search for the purchase order you want to change.
2. Choose Change.
w Some fields in the upper pane open for changes.
Note: After you create and save a purchase order, you cannot change the Item Code field. To delete an item from a saved purchase order, see Deleting Items From a Purchase Order.
3. Change details as needed.
4. Choose Save.
Deleting Items from a Purchase Order
Use the following steps to delete an purchase order item:
1. With the purchase order you want to change displayed, highlight the item you want to delete.
2. Choose Delete.
w A Confirm dialog box opens: "Delete PO Line Item? 1" (The dialog box displays the line number you chose.)
3. Choose Yes.
w The item is removed from the purchase order.
Getting Default Values
When you change or create a new record, choose Getting Default Values to get default values for various fields in the window, based on the Vendor ID.
Use the following steps to get default values:
1. Choose Change or New.
w Fields in the Purchasing window open for changes or additions.
2. Choose Get Default Values.
w A Confirm dialog box opens: "Are you sure?"
3. Choose Yes.
w Various fields fill with defaults based on the selected Vendor ID.
4. Complete all other fields, as needed.
5. Choose Save.
Jumping to Vendor Master
Choose Jump to Vendor Master to jump to Vendor Masters (program #1758).
Receiving a Purchase Order
Choose Receive PO to enter receipts for the selected purchase order. The PO Receipts Detail pane in the lower part of the window displays a list of all items for the purchase order that you have not completely received or have not flagged as complete.
Note: If option bl169 is on when you receive a purchase order for a satellite, SBN automatically transfers the items on the purchase order from the branch to the satellite inventory. If option bl169 is off when you receive a purchase order for a satellite, SBN adds the items on the purchase order to the branch inventory. You must transfer from the branch to the satellite manually in Branch Inventory (program #1757).
Use the following steps to receive purchase orders:
1. Search for the purchase order you want to receive.
2. Choose Receive PO.
w The Receive PO window appears.
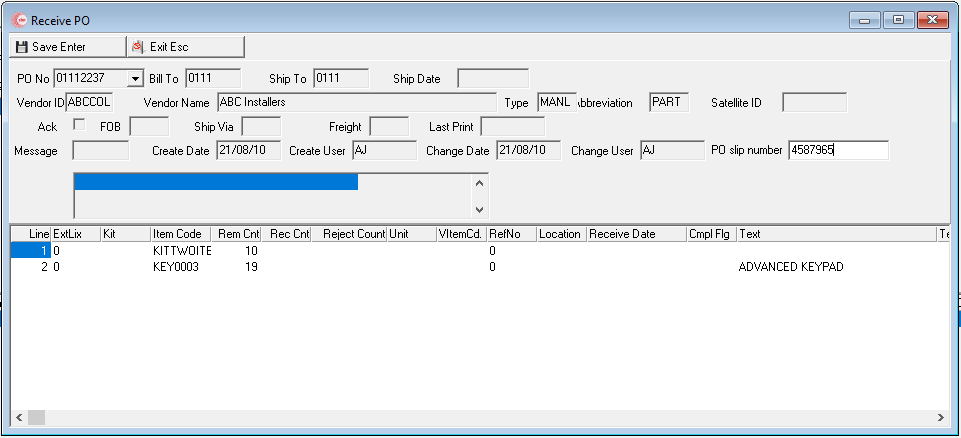
3. In the Rec Cnt column, type the received count for each item listed.
4. Choose Save.
w SBN displays the Inventory batch number.
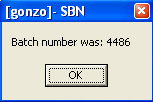
5. Choose OK.
w SBN clears all fields and returns the cursor to the PO No field so that you may enter another purchase order to receive.
Column Descriptions — PO Receipts Details
The following table describes the columns used in the PO Receipts Detail pane.
Column |
Description |
Line |
Index number of the line. |
Item Code |
SBN-defined item code. (This menu originates from program #1535.) |
Remaining Count |
Remaining amount of items to receive. |
Receive Count |
Total quantity to receive at this time. |
Reject Count |
Any quantity rejected on this receipt of this item. |
Unit |
Determines how to measure the item quantity. (This menu originates from program #1764, abbreviation 09.) |
Vendor Item Code |
Dropdown with specific vendor code for the item. Users can now select a Vendor Item Code from the existing list, or create their own item code not in the list. Note: When action 571/11 is on, this feature works as before. If off, you cannot alter this field. If off and the vendor Item Code field is not blank, you cannot access it. (If blank, you can access it because it is not legal to create a purchase order without a vendor item code.) |
Reference No |
Any reference number that refers to the item. |
Location |
Physical location where the inventory is stored; from the brand inventory record. |
Receive Date |
This field defaults to today’s date. Note: Each time a partial pick occurs on the selected item in Branch Inventory (program #1757), SBN overwrites the receive date with the current date until the item is completely picked. |
Complete Flag |
Enter a check mark to complete a line even though the quantity received is less than the quantity ordered. Note: SBN automatically completes the line if the quantity received equals or exceeds the quantity ordered. |
Text |
Text description of item. |
Text2 |
Secondary or additional description of item. |
Order Count |
Original order count for the item. Note: This number does not change, even if more items are received than were originally ordered. |
Receive Count |
Number of items you have previously received. |
Reject Count |
Number of items you have previously rejected. |
Rec/Ord |
Percentage of items you have previously received out of total items you ordered on the selected purchase order. |
Returning Items to the Manufacturer
After receiving items on a purchase order, you may find items that you need to return to the manufacturer or vendor. Choose New RTM to create a Return to Manufacturer order.
Creating a Return to Manufacturer Order
Use the following steps to create a Return to Manufacturer order:
1. Select the purchase order with items you want to return.
Note: You can only create RTM's for purchase orders with items you have received. (See Receiving a Purchase Order above.)
2. Choose New RTM.
w The Return to Manufacturer window opens.
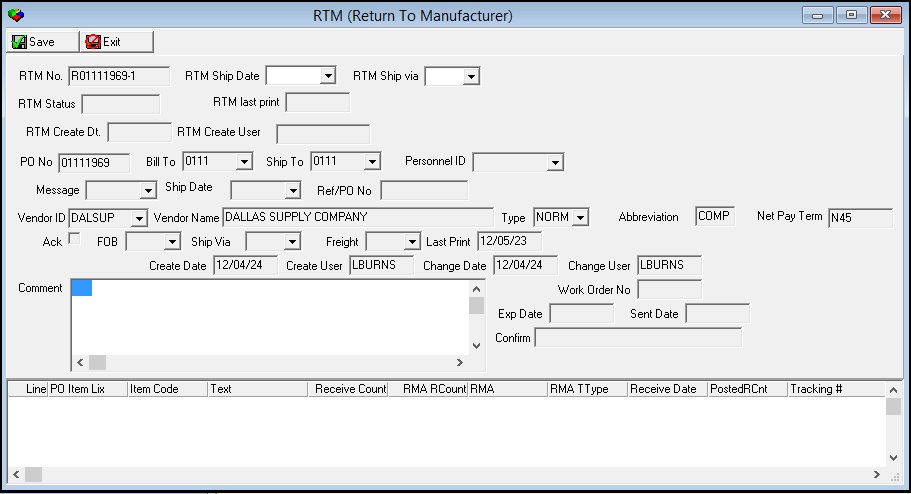
3. Enter details for the items you are returning.
4. Choose Save.
Viewing the Open RTM List
To view a list of open Return to Manufacturer orders, choose List RTM. You may enter an RTM or RMA number in the search parameters or select an RTM from the displayed list. Choose Get RTM to open the Return to Manufacturer window and make changes to an existing RTM.
Note: When the Open RTM's window opens, completed RTM's do not appear in the list. Select the Completed check box and choose Search to include completed RTM's in the list.
The following graphic shows the Open RTM's window.
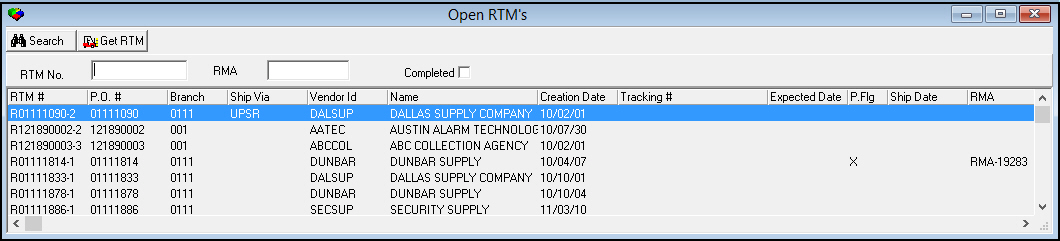
Choose Get RTM to open the Return to Manufacturer window for the selected RTM.
w The Return to Manufacturer window opens for the existing RTM.
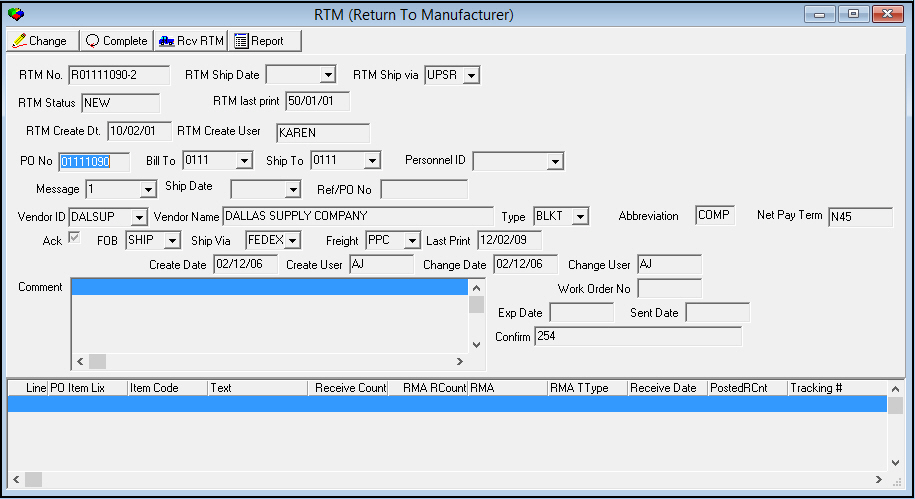
In this window you can choose Change to edit the selected RTM, Complete to close the RTM and prevent further editing, or Receive RTM to enter details on the RTM to prepare items for return to the manufacturer. In Receive RTM mode, you can select RMA types in the RMA Transaction Type column that appear on the Return to Manufacturer forms when you print report #2175.
RMA Transaction Types
The following table describes the available RMA Transaction Types.
Transaction Type |
Description |
RMAR |
Repair |
NEWA |
New Advance Replacement |
FURB |
Refurbish Advance Replacement |
CRED |
Credit Note: This is the only RMA Transaction Type that affects inventory counts. When you enter this type and receive the selected RTM, SBN decreases inventory for the selected items for the branch. |
Printing the Return to Manufacturer Report
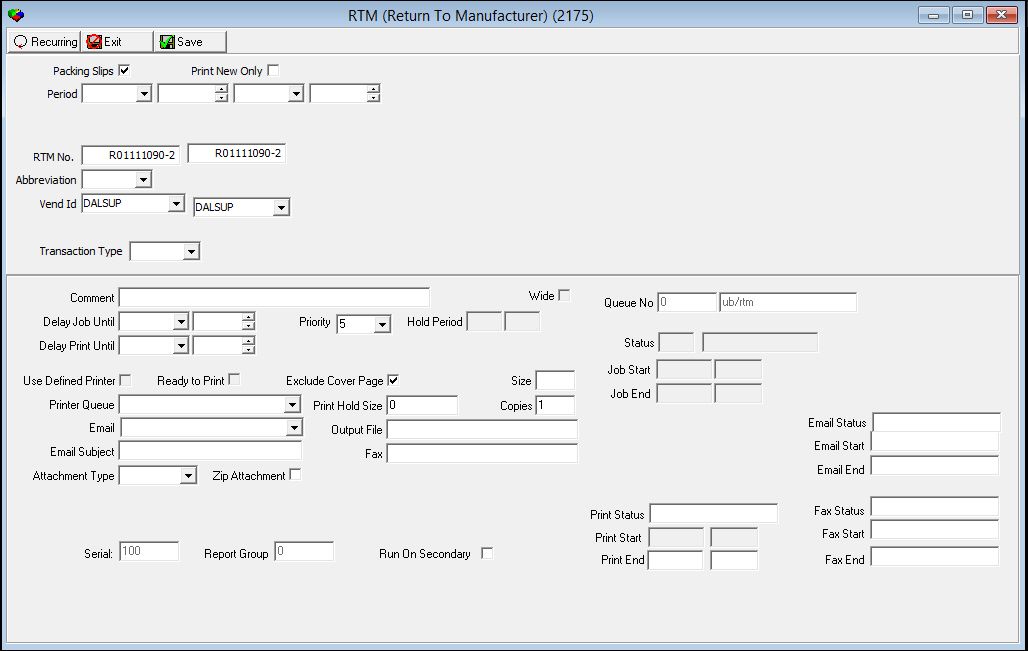
Report #2175 produces individual Return to Manufacturer forms to send to the manufacturer or vendor with defective items. If you choose the Run Report button in the Return to Manufacturer window, report #2175 opens with the select RTM number and Vendor ID automatically referenced.
For more information about this report, see Return to Manufacturer Report.
The following graphic shows the Return to Manufacturer report as it appears when you access it from the Return to Manufacturer window.
Viewing Availability
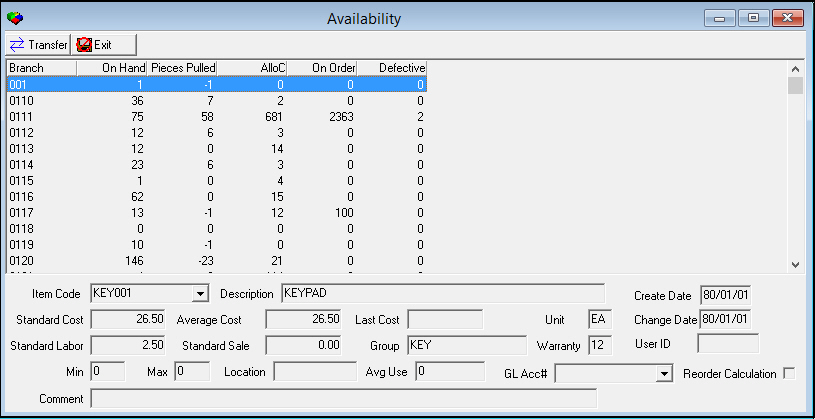
Choose Availability to open a window that displays quantities by branch for the item selected on the displayed purchase order. In the Availability window, you can transfer between branches, which creates a transit requisition that the destination branch must receive.
Use the following steps to access the Availability window:
1. Select the purchase order line item for which you want to view availability.
2. Choose Availability.
w The Availability window opens.
Column Descriptions — Availability
The following table describes the columns used in the Availability window.
Column |
Description |
Branch |
Inventory branch ID. |
On Hand |
Quantity on hand for selected item and branch shown. |
Pieces Pulled |
Any quantity that has been pulled but not invoiced for the selected item and branch shown. |
Pieces Allocated |
Open work orders within the number of days defined by background job #15 in Background Tasks (program #1712) for the selected item and branch shown. |
On Order |
Any quantity on order for the selected item and branch shown. |
Defective |
Any quantity flagged as defective, which removes it from available inventory for the selected item and branch shown. |
Field Descriptions — Availability
The following table describes the fields used in the Availability window.
Column |
Description |
Item Code |
Item code number. |
Description |
Text description of the item. (This description comes from the item master in program #1535.) |
Create Date |
Date the item inventory record was created for the selected branch. |
Standard Cost |
The standard cost of the item from the item master in program #1535. |
Average Cost |
The average cost of the item from the item master in program #1535. |
Last Cost |
Last price paid for the item. The Purchasing program automatically updates the last cost when you receive purchase orders. |
Unit |
Type of unit used for purchase and issue of the item. |
Change Date |
Date the last change was made on this item for this branch. |
Standard Labor |
Standard installation units for this item. (This information comes from the item master in program #1535.) |
Standard Sale |
Standard overhead units for the item. (This information comes from the item master in program #1535.) |
Group |
The inventory group for the item. (This information comes from the item master in program #1535.) |
Warranty |
Number of months for the vendor warranty for this item. (This information comes from the item master in program #1535.) |
User ID |
ID of the user who made the last change to this item for this branch. |
Min |
Minimum inventory quantity to have on hand for this branch. (This information comes from the item record for the branch in Branch Inventory, program #1757.) |
Max |
Maximum inventory quantity to have on hand for this branch. (This information comes from the item record for the branch in Branch Inventory, program #1757.) |
Location |
Physical warehouse location or shelf designation for the item. (This information comes from the item record for the branch in Branch Inventory, program #1757.) |
Avg Use |
SBN-calculated average monthly usage. Inventory Close (program #703) updates this average. |
GL Acc# |
Account number for the general ledger that is used when creating a new purchase order for this item. |
Reorder Calculation |
If this box displays a check mark, SBN includes the item in the reorder calculation. |
Comment |
Free-form text comment for this item for the selected branch. |
Transferring Inventory
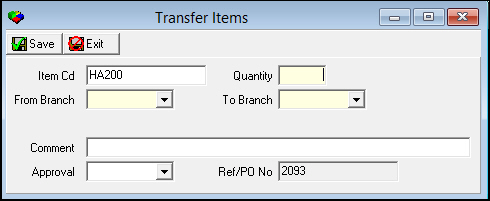
Use Transfer Items between Branches to transfer inventory between branches. You must receive records in the Transit Log before SBN adds them to on-hand inventory. When you transfer inventory, a Transfer Item dialog box opens with fields for defining transfer information between warehouses.
Use the following steps to transfer inventory:
1. Select the purchase order line item for which you want to view availability.
2. Choose Availability.
w The Availability window opens.
3. Choose Transfer.
w The Transfer Items dialog box opens.
4. Complete the fields, as needed.
5. Choose Save.
Field Descriptions — Transfer Items
The following table describes the fields in the Transfer Items dialog box.
Field |
Description |
Item Code |
Item code on which the cursor rested when this window opened. |
Quantity |
Quantity to transfer. |
From Branch |
Branch ID from which the transfer occurs. (This menu originates from program #1530.) |
To Branch |
Branch ID to which the transfer occurs. (This menu originates from program #1530.) |
Comment |
Optional text field. |
Approval |
Optional field for ID of the user approving the transfer. (This menu originates from program #1501.) |
Reference/PO Number |
SBN-assigned index number for the transfer. |
Converting Requisitions
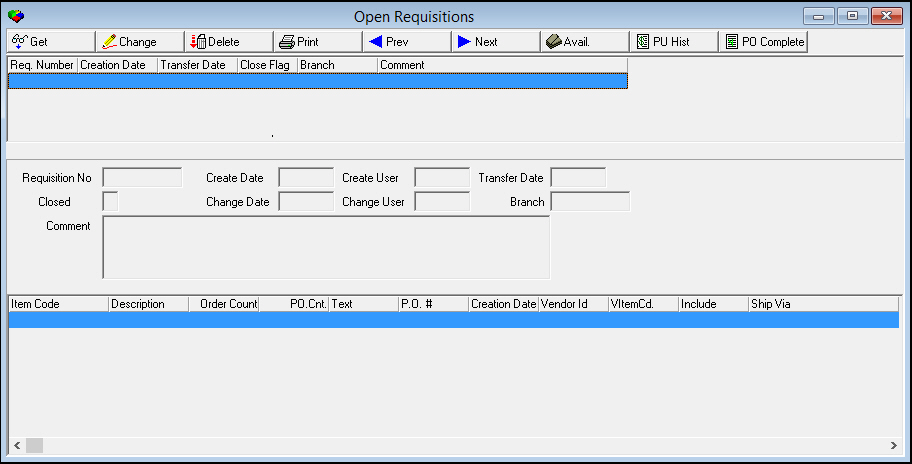
Choose Convert Requisitions to open a window that lists open requisitions. SBN displays the list by requisition number within branches. Requisitions are created in Branch Inventory (program #1757) and sent from the branches to Purchasing. You can convert these requisitions into purchase orders.
Note: If you convert multiple requisitions from the same branch to purchase orders within a 30-minute time period, SBN automatically assigns the same purchase order number to all items for the same vendor. Double-click on a requisition number to fill the details in the Requisition Detail pane and Requisition Item List. You can only access these fields for editing when the window is in Change mode.
Field/Column Descriptions — Open Requisitions
The following table describes the fields and columns in the Open Requisitions window.
Field/Column |
Description |
Requisition Number |
Identification number SBN assigned to the requisition when it was created in Branch Inventory (program #1757). |
Creation Date |
Date user created the requisition. |
Transfer Date |
Date the branch closed the requisition and transferred it to Purchasing. Note: A requisition must be closed in Branch Inventory (program #1757) before it appears in the requisitions list in Purchasing. |
Close Flag |
If this field displays: l X — no lines have been converted to purchase orders. l * — at least some of the lines have been converted into purchase orders. l # — the requisition has been completely converted to purchase orders; SBN removes the requisition from the display. |
Branch |
Branch that entered the requisition. |
Comment |
Free-form text a user enters about the requisition. |
Requisition Number |
Identification number SBN assigned to the requisition when it was created in Branch Inventory (program #1757). |
Create Date |
Date user created the requisition. |
Create User |
User name of person who entered requisition. |
Transfer Date |
Date user transferred the requisition to Purchasing. |
Closed |
Indicates the close status. If this field displays: l X — the requisition has been transferred to purchasing, but not converted into a purchase order. l * — the requisition has been transferred and some of the items have been converted into a purchase order. |
Change Date |
Date user last changed the requisition. |
Change User |
User who last changed the requisition. |
Branch |
Branch where user entered the requisition. |
Comment |
Free-form text about the requisition. |
Item Code |
Item code you are ordering. (This menu originates from program #1535.) |
Description |
Text description of the item attached to the item code. |
Order Count |
Number of units ordered in the requisition. |
Purchase Order Count |
Number of units included in the purchase order. This field defaults to the same quantity as in the Order Count field, but you may enter a new quantity when in Change mode. |
Text |
Free-form text that shows up in the Text 2 field of the purchase order. |
PO # |
Assigned purchase order number. Note: You can type a purchase order number or allow SBN to select the next consecutive number. |
Creation Date |
Date user created the requisition. |
Vendor ID |
ID of the vendor from whom you order the item. |
Vendor Item Code |
Vendor item code of the item being ordered. Note: When action 571/11 is on, this feature works as before. If off, you cannot alter this field. If off and the vendor Item Code field is not blank, you cannot access it. (If blank, you can access it because it is not legal to create a purchase order without a vendor item code.) |
Include |
An X indicates that the item will be included in a purchase order when you convert it. Note: To exclude an item from the purchase order, remove the X from the Include column. |
Ship Via |
Preferred shipping carrier for this order. (This menu originates from program #1764, abbreviation 01.) |
Converting a Requisition into a Purchase Order
Use the following steps to convert a requisition:
1. Choose Convert Requisition.
w The Open Requisitions window opens.
Note: A requisition must be closed in Branch Inventory (program #1757) before it appears in the requisitions list in Purchasing.
2. Select the requisition you want to convert from the list by double-clicking it, or highlight it and choose Get.
w The requisition details appear in the detail and item panes.
3. Choose Change.
w The Branch and Comment fields in the details pane open for changes, along with several fields in the items pane.
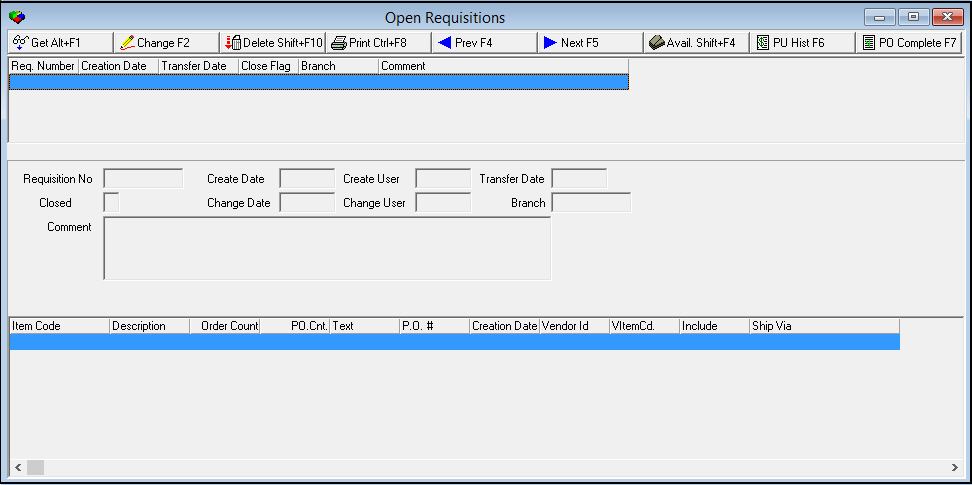
4. In the items pane:
change the PO count if necessary,
select a vendor ID for each item, and
be sure the Include field displays an X next to each item you want to include in a purchase order.
Note: PO count, vendor ID, and include flag are required to convert a requisition into a purchase order. If any of these fields are blank, the item will not be included in a purchase order.
5. Complete other fields as needed.
6. Choose Save.
w A Confirm dialog box opens: "Are you sure?"
7. Choose Yes.
w SBN creates purchase orders for the items with PO count, vendor ID, and Include flag set.
Note: SBN creates a purchase order for each vendor contained on the requisition. If all items on the requisition are converted to purchase orders, SBN changes the close flag to # and removes the requisition from the Open Requisitions list in the upper pane.
Purchase Order Options
Option ba220: The default for this option is off. When on, you can define a GL number for each line of a PO and SBN automatically sets and validates the GL number when you convert the requisition.
Option ba221: Used in conjunction with option ba220. The default for this option is blank. If the option is off, it does not function. When on, this option defines what SBN inserts for each line of the PO when you convert the requisition.
Note: For example, if this option is set as <<�.� + rtrim(@br) + �.� + �04�>>. SBN inserts the GL number from the Item Master, followed by a period, the branch number, a period, then 04. Please note that if the conversion produces a GL number that is not in the Chart of Accounts, SBN stops the conversion until it validates the GL number.
Note: When you attempt to save, SBN asks if you are sure. If you have not attached the item to an existing purchase order and the include flag is set, SBN creates one purchase order for each vendor contained on the requisition. If you convert all items on the requisition to purchase orders, SBN changes the close flag to # and removes the requisition from the list in the upper pane.
Completing a Purchase Order
When you receive all items on a purchase order, SBN considers the purchase order complete.
Use the following steps to complete a purchase order:
1. Select the purchase order you want to complete.
2. Choose Complete PO.
w The purchase order window opens.
3. In the Rec Cnt column, type the received count for each item listed.
4. Enter a check mark in the Complete Flag column for any items that have a Received Count that is less than the quantity ordered.
Note: To fill header information from the vendor master fill, you can choose Get Defaults.
5. Choose Save.
Closing/Reopening a Purchase Order
Choose Close/Reopen to flag purchase orders as closed or to remove the closed flag from a previously closed purchase order. After you flag the purchase order as closed, the following fields remain editable:
Ship Date
GL Acct#
Ack
Comment
Confirm Number
Vendor Item Code
Unit Price
Invoice Date
Invoice Count
Invoice Amount
Expected Date
Ranking Inventory
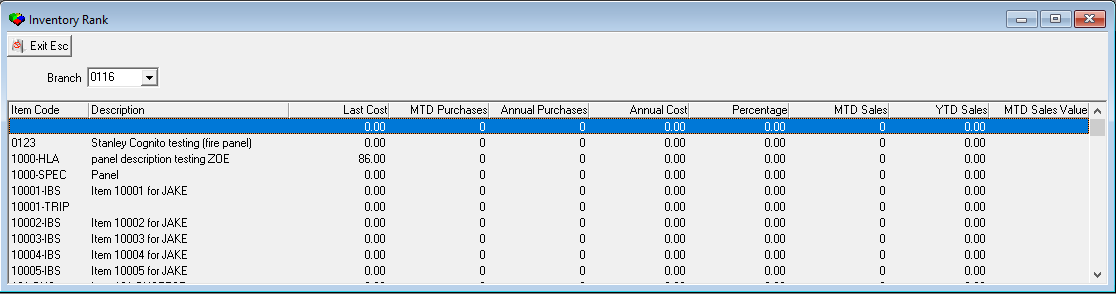
Choose Rank Inventory to rank the inventory by branch. Select the branch in the Branch field to rank its inventory. You may sort data in ascending order by double-clicking on a column heading; click again to reverse the sort to descending order. Generally you can use this to sort by month-to-date purchases, annual purchases, or annual purchase price. SBN bases all sorts on the date you created a purchase order.
Field/Column Descriptions — Inventory Rank
The following table describes the fields and columns used in the Inventory Rank window.
Field/Column |
Description |
Branch |
Branch with inventory currently displayed. |
Item Code |
SBN-defined item code, created in program #1535. |
Description |
Description of the item. |
Last Cost |
Last cost for this item for the primary vendor assigned in program #1535. |
MTD Purchases |
Quantity of this item purchased in the current month. |
Annual Purchases |
Quantity of this item purchased in the previous 12 months. |
Annual Cost |
Value of the annual purchases (Annual * Last Cost) |
Percentage |
Percentage of annual purchases that apply to this item. (Annual Cost of this item/Sum of annual cost for all items.) |
MDT Sales |
Quantity of this item sold in the current month. |
YTD Sales |
Quantity of this item sold in the previous 12 months. |
MTD Sales Value |
Sale value of item item sold in the current month. |
Viewing the Transit Log
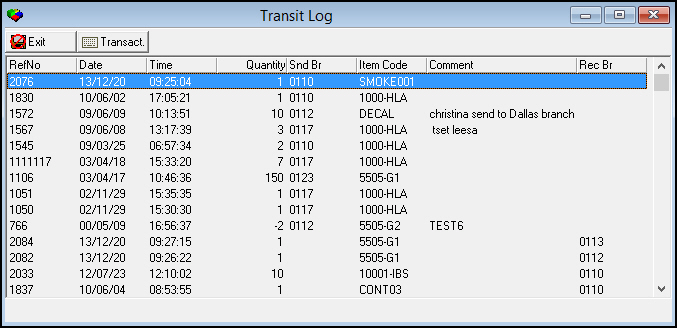
Choose Transit Log to view transfers in transit to the receiving branch on the selected purchase order.
Column Descriptions — Transit Log
The following table describes the columns used in the Transit Log window.
Column |
Description |
Reference Number |
SBN-assigned reference number for the transfer. |
Date |
Date on which the transfer was sent. |
Time |
Time at which the transfer was sent. |
Quantity |
Quantity being transferred. |
Sending Branch |
Code for the branch sending the transfer. |
Item Code |
Item number being transferred. |
Comment |
Method of shipment or other comment entered for the transfer. |
Viewing Purchase History
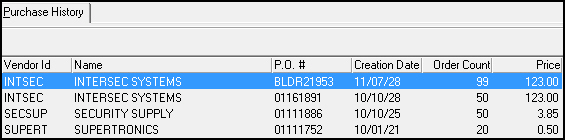
Choose Purchase History to view the purchase history for a selected item. The Purchase History tab opens below the lower pane of the main window of Purchasing.
Column Descriptions — Purchase History
The following table describes the columns used in the Purchase History tab.
Column |
Description |
Vendor ID |
Vendor identification. |
Name |
Vendor name. |
PO Number |
Purchase order number. |
Creation Date |
Purchase order creation date. |
Order Count |
Quantity ordered on the purchase order. |
Price |
Unit price paid for this item on the purchase order. |
Listing Purchase Orders
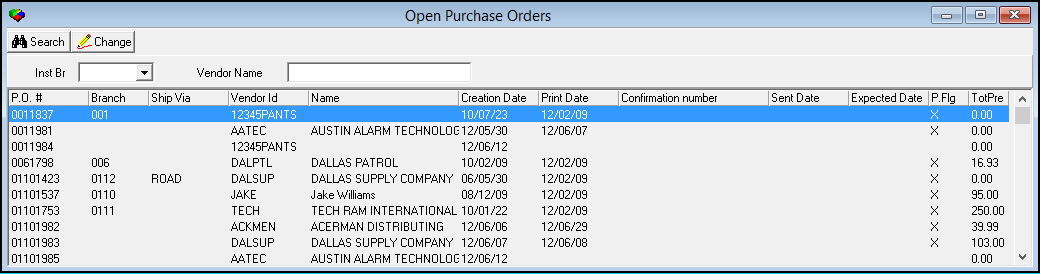
Choose List PO to list all open purchase orders. The Open Purchase Orders window appears.
Searching for Open Purchase Orders
Use the following steps to search for open purchase orders by Installation Branch or Vendor name:
1. In Open Purchase Orders, select your search parameters.
Note: In Vendor name, you can use a partial name and % wildcard. For more information about using wildcards, see Searches.
2. Choose Search.
w SBN displays those open purchase orders that match your search parameters.
Adding Information to Open Purchase Orders
Choose Change to edit Open Purchase Orders. Add the Confirmation Number, Sent Date, and Expected Date to a selected purchase order.
Accessing the Purchase Order Report
You may access the Purchase Order Report (report #2135) from Purchasing by choosing Run Report. When you access the Purchase Order Report from Purchasing, the fields in the report fill with defaults based on the currently selected purchase order. In the Purchase Order Report screen, you may print purchase orders and e-mail and/or fax them to vendors.
For more information on the Purchase Order Report, see Purchase Order Report (Generic).
Related Programs
The following table lists programs related to Purchasing.
Program |
Number |
Document Link |
Description |
Branch Inventory |
1757 |
View branch inventories to determine purchasing needs and create requisitions. |
|
Branch Profiles |
1530 |
Define and maintain branch profiles to which purchases are shipped and billed. |
|
Chart of Accounts |
1835 |
N/A |
Define the menu of General Ledger account numbers to use when creating purchase orders. |
Vendor Masters |
1758 |
Define the menu of vendors to use when creating purchase orders. |
|
Miscellaneous Inventory Fields |
1764 |
Define various drop-down menus in Purchasing. (Go to Index #2 PO Type in Miscellaneous Inventory Fields to define the purchase order types menu. Index #4 defines the menu of the FOB field.) |
|
Report Messages |
1766 |
Select messages to appear in the Message drop-down menu of Purchasing. |
|
Items |
1535 |
Define, change, and delete any items to use in Purchasing. |
|
Purchasing Reports |
|||
Purchase Order Report |
2135 |
Print purchase orders, e-mail and/or fax them to vendors. |
|
Return to Manufacturer Report |
Generate individual Return Merchandise Authorization request forms to send items back to manufacturers or vendors. |
||
Open RTM List Report |
View a list of open Return to Manufacturer orders. |
||
Button Functions
The following table displays the buttons, describes the shortcut keys, actions, and functionality.
Button |
Name |
Shortcut Key |
Action |
Description |
|
Search |
shift+f9 |
571/ 1 |
Search for purchase orders. |
|
Change Record |
f2 |
571/ 2 |
Change details of selected purchase order. |
|
New Record |
f3 |
571/ 3 |
Create new purchase order. |
|
Delete Record |
shift+f10 |
571/ 4 |
Delete selected purchase order. |
|
Jump to Vendor Master |
shift+f3 |
571/11 |
Jump to Vendor Master program. |
|
Receive PO |
f9 |
571/ 7 |
Enter receipts for selected purchase order. |
|
Availability |
shift+f4 |
571/ 8 |
View number of items in each branch or satellite. |
|
Convert Requisition |
shift+f2 |
571/ 9 |
Convert requisitions into purchase orders. |
|
Close/Reopen |
f6 |
571/10 |
Flag purchase orders as closed or remove closed flag from previously closed purchase order. |
|
Rank Inventory |
shift+f6 |
571/40 |
View inventory for a branch and sort columns to rank. |
|
Transit Log |
f8 |
571/30 |
View list of transfers in transit from other branches. |
|
Purchase History |
f7 |
571/20 |
View purchase history for selected record. |
|
Previous Record |
f4 |
|
Go to previous record. |
|
Next Record |
f5 |
|
Go to next record. |
|
List PO |
alt+f7 |
571/50 |
List all open purchase orders. |
|
Run Report |
shift+f7 |
|
Access Purchase Order Report. |
|
New RTM |
shift+f8 |
571/54 |
Create a new Return to Manufacturer order on a purchase order with items that have been received. |
|
List RTM |
alt+f8 |
571/56 |
Display a list of all open Return to Manufacturer orders. |
|
Document Retrieval |
|
|
Opens the URL set within each specific Option "docom1-10" as well displays the Work Order number, the Installation Number, and the Marketing Number associated with corresponding Work Order. (Note: Buttons are not visible unless account has access to appropriate Actions.) |
|
Receive All Unreceived |
Shift +F12 |
571/61 |
When selected, this button completes all pending item quantities as being received. |
|
Exit without saving |
esc |
|
Exit without saving changes to selected record. |
|
Save Existing Record |
enter |
|
Save changes to selected record. |


















Text Field Lengths and Tax Calculation
Purchase-order and billing text fields hold longer entries, and tax calculation in purchase orders is correct.
Modifications and Updates to Purchasing
The following table lists modifications and updates to the Purchasing document.
Mod Number |
Date |
Description |
n/a |
07/16/08 |
document rewritten |
08.03.06322, 07.02.17754 07.02.17778 |
01/13/09 |
Added Total Pretax, Total Tax, Tax Profile, Tax Exempt fields; Tax Exempt column |
07.02.18865, 08.03.07012 |
09/01/09 |
Added a Satellite ID field to the main Purchasing window. Added option bl169 to automatically transfer items from branch to satellite when receiving a purchase order for a satellite. |
07.02.19286 |
08/02/10 |
Added ability to track return of defective items to the manufacturer with New RTM and List RTM buttons. |
07.02.20129, 08.03.07830 |
09/30/10 |
Added option ba463 with Delivery Branch, Delivery Dealer, and Delivery Personnel fields. |
07.02.21129, 08.03.08428 |
11/07/11 |
Added Completed check box to Open RTMs window. |
n/a |
07/14/14 |
Images updated. |
07.88.25808 |
06/12/18 |
Added following columns to Ranking Inventory: MTD Sales, YTD Sales, and MTD Sales Value. Image Updated. |
07.90.26098, 08.90.11614, 07.90.26099, 08.90.11615 |
02/20/19 |
5 new Document Retrieval PO buttons added. Image updated. |
07.93.26698, 47522, 47522, 47522
|
10/08/21 |
New Receive all Unreceived button. Images updated. |
07.93.26690, 08.93.12006 |
12/03/21 |
New Total and Rate fields added in main screen of Purchasing. New free-form 'PO Slip Number" field. This field can hold up to 20 characters. Images updated. |
07.93.26739, 08.93.12043, 07.93.26744, 08.93.12045 |
12/06/21 |
New Ext Line Lx and Kit fields columns added to the bottom pane of the Purchasing window. Images updated. |
08.93.12007, 07.93.26691, 07.93.26701, 08.93.12011 |
12/06/21 |
Vendor Item Code is now a dropdown. Users can now select a Vendor Item Code from the existing list, or create their own item code not in the list. |