
Panel Types
Panel Types
Panel Types
Module: System Administration
Overview
Use Panel Types (program #1742) to maintain a menu of panel types in SBN. This menu appears in various programs in SBN, such as Data Entry Master (program #559), so users can select a panel from a predefined list.
Navigating to Panel Types
Use the following steps to navigate to Panel Types:
1. From the main SBN toolbar, select Menu.
2. From the drop-down menu, select Go To.
3. In the Go To Program dialog box, type in "1742" and press Enter.
w Panel Types opens.
The Panel Types Window
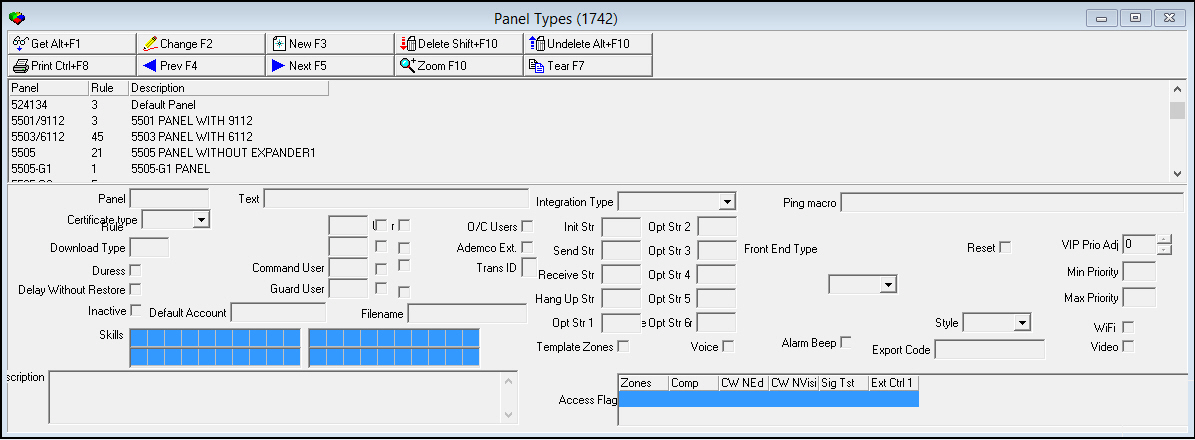
The following graphic shows Panel Types as the program opens.
Field/Column Descriptions
The following table describes the fields and columns used in the main window of Panel Types.
Field/Column |
Description |
Columns |
|
Panel |
Code that identifies the panel type. |
Rule |
Rule number associated with the panel type, used to determine installation passcard generation requirements. (This menu originates from program #1603.) |
Description |
Text description of the panel. |
Fields |
|
Panel |
Code that identifies the panel type. |
Rule |
Rule number for the selected panel type. |
Download Type |
Internal identifier for download purposes. This field only applies to panels that have had their downloader software integrated with SBN. |
Duress |
Indicates the panel can support duress signals. |
Delay Without Restore |
Holds the alarm for the delay period (in seconds) indicated in the zone program. If this field is selected and an alarm arrives, SBN holds it. If an Open signal arrives within the delay period window, SBN logs the alarm and removes it from the queue. |
Inactive |
When this box is checked, the system prevents users from creating new records with this panel. Note: The panel remains in the panel list, but cannot be saved into a new panel record. This allows the panel to remain valid for existing installations. |
Skills |
Set of up to 20 skills a user should have to handle alarms on installations with this panel, such as fluency in a specific language. (These menus originate from program #1862.) Define user skill sets in program #1501, program #531, or in the Users tab of program #1811. |
Terminal Skills (No label) |
Set of up to 20 skills a terminal should have to handle alarms on installations with this panel, such as access to two-way voice equipment. (These menus originate from program #1862.) Define terminal skill sets in program #1861. |
Description |
Text field for additional information about the panel. This text description is available to users in Data Entry (program #559) when they right-click on the Panel field and choose Panel from the context menu. |
Text |
Text description of the panel. |
Service User |
Enter the number that SBN tries to match with the special user code embedded in an incoming open/close signal. For more information, see Defining Special Users. Note: SBN does not validate the user number. |
Active (No label) |
Enter a check mark in this box to have SBN log a signal that matches this special user into the Open/Close Log with the default text defined by option ocseus. |
Invalid User Exception (No label) |
Enter a check mark in both the Active box and this box to have SBN generate an ALARM for a signal that matches the Service User. |
Remote Arm User |
Enter the number that SBN tries to match with the special user code embedded in an incoming open/close signal. Note: SBN does not validate the user number. |
Active |
Enter a check mark in this box to SBN log a signal that matches this special user. Note: into the Open / Close Log with the default text defined by option ocreus. |
Invalid User Exception (No label) |
Enter a check mark in both the Active box and this box to have SBN generate an ALARM for a signal that matches the Remote Arm User. l For more information, see Defining Special Users. |
Command User |
Enter the number that SBN tries to match with the special user code embedded in an incoming open/close signal. Note: SBN does not validate the user number. |
Active |
Enter a check mark in this box to have SBN log a signal that matches this special user into the Open/Close Log with the default text defined by option occous. |
Invalid User Exception (No label) |
Enter a check mark in both the Active box and this box to have SBN generate an ALARM for a signal that matches the Command User. |
Guard User |
Enter the number that SBN tries to match with the special user code embedded in an incoming open/close signal. Note: For more information, see Defining Special Users. Note: SBN does not validate the user number. |
Active (No label) |
Enter a check mark in this box to have SBN log a signal that matches this special user in the Open/Close Log with the default text defined by option ocguus. |
Invalid User Exception (No label) |
Enter a check mark in both the Active box and this box to have SBN generate an ALARM for a signal that matches the Guard User. |
Default Account CID |
Panel CID of the template account for the zones copy. If used, new installations use the zones from the template account. |
O/C Users |
Indicates whether the panel supports Open/Close signals with valid user codes. |
Ademco Ext. |
Indicates the panel uses the Ademco extended format. |
Trans ID |
One-digit translation identifier for the panel record. SBN uses this to determine the correct translation table in the Alarm Translation Tables (program #1876). |
Filename |
The file name of a graphic file linked to the selected panel type. |
Integration Type |
Type of integration configured for the selected panel. Note: If you leave this field blank, the integration type defaults to 0 (No Integration Type). |
Init Str |
Used for panels that support two-way voice communication using DTMF signaling. Initial string tone to send to the panel. |
Send Str |
Used for panels that support two-way voice communication using DTMF signaling. Send string tone to send to panel. |
Receive Str |
Used for panels that support two-way voice communication using DTMF signaling. Receive string tone to send to panel. |
Hang Up Str |
Used for panels that support two-way voice communication using DTMF signaling. Disconnect string tone to send to panel. |
Opt Str 1 |
Used for panels that support two-way voice communication using DTMF signaling; optional string for panel use. |
Template Zones |
If this box displays a check mark, the selected panel type inherits zones from the default template account. You can only change template zones in the default template account. Note: If this box displays a check mark, the selected panel type does not copy zones into new installations. Note: You must leave this box blank to copy zones into new installations. |
Opt Str 2 |
Used for panels that support two-way voice communication using DTMF signaling; optional string for panel use. |
Opt Str 3 |
Used for panels that support two-way voice communication using DTMF signaling; optional string for panel use. |
Opt Str 4 |
Used for panels that support two-way voice communication using DTMF signaling; optional string for panel use. |
Opt Str 5 |
Used for panels that support two-way voice communication using DTMF signaling; optional string for panel use. |
Opt Str 6 |
Used for panels that support two-way voice communication using DTMF signaling; optional string for panel use. |
Voice |
If this box displays a check mark, the selected panel is intended for two-way voice. |
Front End Type |
Front End type associated with the selected panel. |
Certificate Type |
You may select a certificate type to associate with the selected panel. This type appears by default when you create a certificate for a CID with the selected panel in the Certificates tab of program #559. (This menu originates from program #1653.) Note: Define certificate types for specific dealers in the Dealers tab in the sublevel of this program. |
Style |
You may select a certificate style to associate with the selected panel. This style appears by default when you create a certificate for a CID with the selected panel in the Certificates tab of program #559. (This menu originates from the Styles tab of program #1653 for the selected certificate type.) Note: Define certificate styles for specific dealers in the Dealers tab in the sublevel of this program. |
Alarm Beep |
If no panel types have this check box selected, then the system will function as usual; any alarm in the Alarm Queue produces an audible beep in Dispatch (program #537). The beep continues until the alarm is acknowledged or taken by an operator in Dispatch. If at least one panel type has this check box selected, SBN will only produce a beep when an alarm from an installation with the selected panel type enters the Alarm Queue. In addition, the user will not be allowed to turn the Alarm Beep in Dispatch off or on. |
Export Code |
You may enter an export code that will appear on exported certificates attached to CIDs with the selected panel in the Certificates tab of program #559. Note: Define export codes for specific dealers in the Dealers tab in the sublevel of this program. |
WiFi |
Select this check box if the panel connects to the installation via WiFi. This feature is exclusive to Company 162. |
Access Flag Grid |
Select the check boxes in this grid to set restrictions on installations with the selected panel type. Note: These restrictions apply regardless of the user's action profile from program #1502. |
Zones |
If this column displays an X, SBN places zone restrictions in the Zones tab of Data Entry (program #559) according to:
|
Component |
If this column displays an X, the Change, New, and Delete buttons in the Installed Components tab of Data Entry (program #559) are not available on installations with the selected panel type. |
Codeword Not Editable |
If this column displays an X, users cannot change the greyed-out Codeword column in the Action Plan Details window or the Codeword field in the Contact Details window of the Action Plans tab in Data Entry (program #559). |
Codeword Not Visible |
If this column displays an X, the code word is not visible in the Codeword field in the Contact Details window of the Action Plans tab in Data Entry (program #559). |
Signal Test |
If this column displays an X, installations with the selected panel type use the zone test template of the installation defined by options sdi017 and sdi023 for alarm signal testing. (See Viewing the Test Templates Window in the Zones document.) |
VIP Prio Adj |
Amount by which to increase or decrease the priority of alarm incidents on installations with the selected panel. (This field accepts values between -10 and 10.) |
Min Priority |
Enter a range of alarm incident priorities that SBN adjusts on installations with the selected panel. Enter the minimum priority to adjust. (This field accepts values between 0 and 99.) For example, if you enter a priority range of 5 to 10 and a VIP Priority Adjustment of 2, if an alarm comes in with a priority of 6 on an installation with the selected panel, SBN adjusts the alarm priority to 8 in the Alarm Queue. |
Max Priority |
Enter a range of alarm incident priorities that SBN adjusts on installations with the selected panel. Enter the maximum priority to adjust. (This field accepts values between 0 and 99.) For example, if you enter a priority range of 5 to 10 and a VIP Priority Adjustment of 2, if an alarm comes in with a priority of 6 on an installation with the selected panel, SBN adjusts the alarm priority to 8 in the Alarm Queue. |
3XL Integration
Integration Type ‘5’ (3XL Integration) was added to the drop-down menu. 3XL Integration allows the same 3xlogic to be used on multiple SBN accounts. This works around the SBN requirement that CIDs be unique.
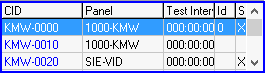
In Panel Type Program #1742, if the CID panel type is assigned the integration type ‘5’ and the CID is hyphenated, any characters following the hyphen will be stripped from the CID text including the hyphen, if the CID text is required in the 3XL video integration.
The following image shows an example of the hyphenated CIDs.
In Options Program #1887, there are two existing value options, 3xlvid2 and 3xlurl, that use the place holder &cid&. In Dispatch, the &cid& string is substituted for the alarm CID text using only the characters that proceed the ‘–’, if embedded in the CID text. If the 3xlurl is defined and the CMS presses the Video View button in Dispatch, the Video Live event will be logged in the Alarm Log with the 3xlurl text. This is done after the string value is substituted. The 3xlvid2 text is passed as a parameter to a Windows video application if it is assigned in option 3xlvid1.
When an alarm signal is received and the Integration Type ‘5’ (3XL Integration) is selected, the CMS can take the alarm and click the View Video button.
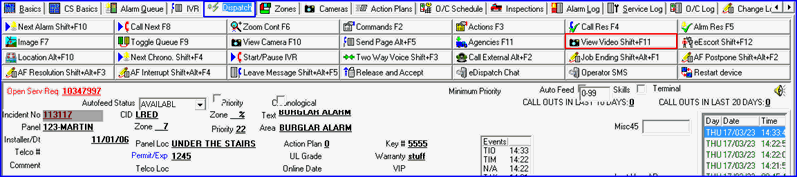
This will activate the 3XL Integration and log event 161 in the Alarm log. The string value defined in option 3xlurl will be displayed in the comment column.
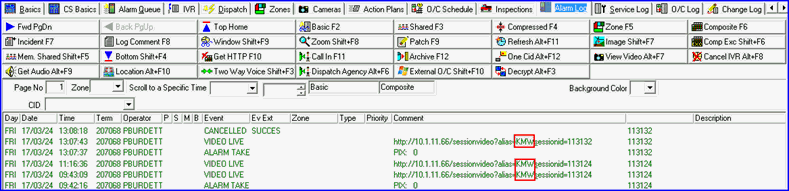
When in Dispatch, pressing the View Video button presents you with a form of available CIDs as seen below.. This form lists all CIDs that are tied to this incident and tied to Panel Type with Integration Type 3XL.
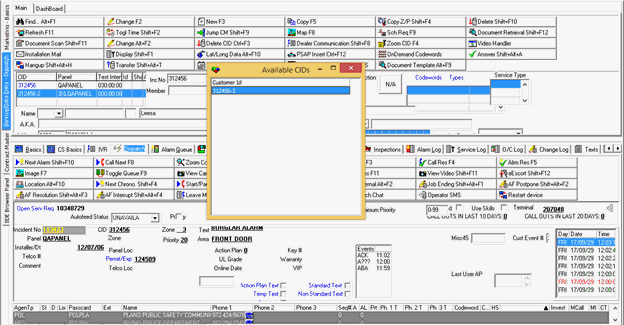
If user presses ENTER or double-clicks on the grid row then that CID is returned and the 3XL logic continues with the CID the user selects.
If user presses ESC, or closes this form in any other manner, then the 3XL logic continues with the first CID in the 559 CID grid.
Known Issue for Ademco Extended Format Panel
There is a known issue with the Ademco Extended Format panel. This was discovered when a concentrator received an Ademco extended format signal (such as the example below) and then received another signal with a triple digit suffix which was the same as an existing system account. The panel format was defined as extended and the result was that the second signal and all subsequent signals were sent into a looping process. The looping occurred because SBN was unsure if the second signal belonged to a separate, existing account or to the initial extended format signal, as the second part of the extended format signal.
Example
The problem can occur when the first extended format signal received is 1230123, and then another signal is received, such as 1230XXX, where 1230XXX is an existing CID in the system with a defined panel as extended format.
SBN cannot be sure if 1230XXX is the second part of the extended format signal or a signal on the existing CID 1230XXX.
Manual Solutions
Two manual solutions are:
Change the CID number to remove the triple digits for the CID.
Change the panel format to anything other than extended format.
Using Common Functions
See the reference document Common Functions in SBN for more information.
Note: When entering a new panel, if you enter a duplicate Panel Type, an error message appears: "Panel already exists!"
Linking a Graphic File to the Panel Type
Use the Filename field to link a graphic file to a panel type that you can view in the Panel Description window in Data Entry Master (program #559). Use option sv030 to define the default directory location for storing graphic files.
Use the following steps to link a graphic file to the panel type:
1. Choose Change Record.
w Fields in the lower pane open for changes.
2. Choose Select Image File.
w The Open File window opens mapped to the folder defined in option sv030.
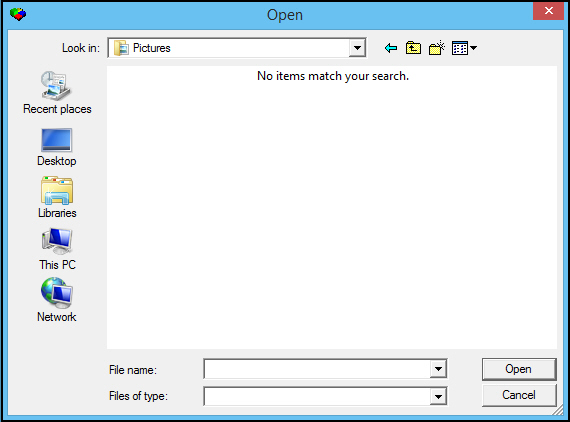
3. Select the filename.
4. Choose Open.
w The filename appears in Filename in the lower pane.
Defining Special Users
Use the following special user fields in Panel Types to define special user codes to match special user codes embedded in incoming open/close signals:
Service User
Remote Arm User
Command User
Guard User
You may further define the special user fields by entering check marks in the Active and/or Invalid User Exception boxes.
When an open/close signal arrives, SBN checks the signal against the line index of contacts in the associated action plan for a match of the special user code. If SBN finds a match between the special user code embedded in the signal and the line index of a contact in the action plan, SBN logs the signal in the Open / Close Log with the contact name in the Name column. When SBN does not find a match in the action plan, SBN then looks in program #1742 at the definition of the panel that is generating the signal for a matching special user code.
Specifically, SBN looks at:
Service User
Remote Arm User
Command User
Guard User
If any of these special users fields contain a number that matches the special user code embedded in the signal and the associated Active box contains a check mark, SBN logs the signal in the Open /Close Log with the default text (defined by the option for that special user) in the Name column.
If any of these special users fields contain a number that matches the special user code embedded in the signal and both the associated Active and Invalid User Exception boxes contain check marks, SBN generates an ALARM and logs the signal in the Alarm Log and in the Open /Close Log with the default text (defined by the option for that special user) in the Name column.
Note: See the field descriptions for the options that define the default text for each special user field.
If SBN does not find a match for the special user code in the panel definition
or...
If SBN finds a match for the special user code in the panel definition, but the associated Active box is blank, it logs the signal in the Open / Close Log, but leaves the Name column blank
Zooming into the Sublevel
Price Lists contains a sublevel with five tabs:
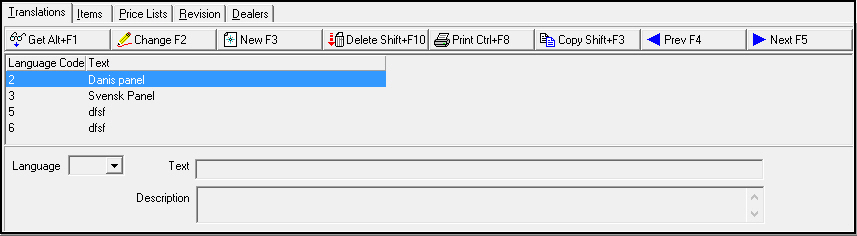
The Translations tab - in which you may attach multiple translations to a selected panel type. Panel types then appear in SBN in the user’s language.
Note: Actions 1742/20-24 control access to the Translations tab and functions.
The Items Tab - in which you may attach items to a selected panel type.
Note: Actions 1742/30-32 control access to the Items tab and functions.
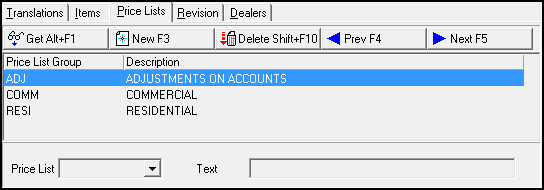
The Price List Tab - in which you may attach price lists to a selected panel type.
Note: Actions 1742/40-42 control access to the Price List tab and functions.
The Revision Tab - in which you make revisions.
Note: Actions 1742/50-54 control access to the Revision tab and functions.
The Dealers Tab - in which you may attach a Dealer ID to a selected panel type.
Note: Actions 1742/60-65 control access to the Dealers tab and functions.
The Translations Tab
The following graphic shows the Translations tab.
Field/Column Descriptions
The following table describes the fields and columns used in the Translations tab.
Field/Column |
Description |
Language Code |
Code that identifies the language of the associated translation. O Contact IBS before using language codes 11-17. |
Text |
Text description of the panel that appears in both the main level of the panel types window and in the drop-down menu in Data Entry (program #559). |
Description |
Description that appears in the Panel dialog box in Data Entry (program #559). |
The Price Lists Tab
The following graphic shows the Price Lists Tab.
Field/Column Descriptions
The following table describes the fields and columns used in the Price Lists tab.
Field/Column |
Description |
Price List |
Price List to attach to the panel. (This list originates in program #1771). O If option ba334 is on, the Price List menu in a work order displays only the price lists associated with the panel type used in the selected installation. See Work Orders. |
Text |
Price list description. |
The Revision Tab
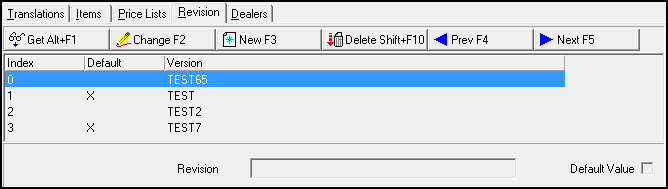
The following graphic shows the Revision tab. This tab displays the valid versions available for this panel. The version flagged as the Default version automatically fills the Version field in the CID grid on the Data Entry (program #559) screen, if the field is empty when the panel is selected.
Field/Column Descriptions
The following table describes the fields and columns used in the Price Lists tab.
Field/Column |
Description |
Revision |
Revision number of the panel. Gives a history of each revision. |
Default Value |
Must have one revision selected as a default. Only the default value appears when selecting the panel in Data Entry (#559). |
The Dealers Tab
The following graphic shows the Dealers tab. The tab allows the association of a specific Dealer ID to a panel. Once associated with a dealer, that panel will only be valid for that specific dealer.
Actions 1742/60-65 control access to this sublevel and the available buttons.
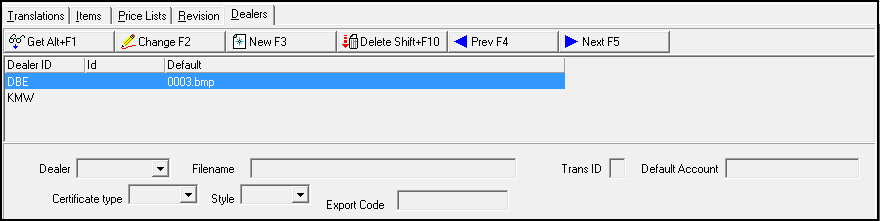
Note: This entry then limits the panel drop-down list in Data Entry (#559) only when selecting a Dealer ID with the Installation number before selecting a panel.
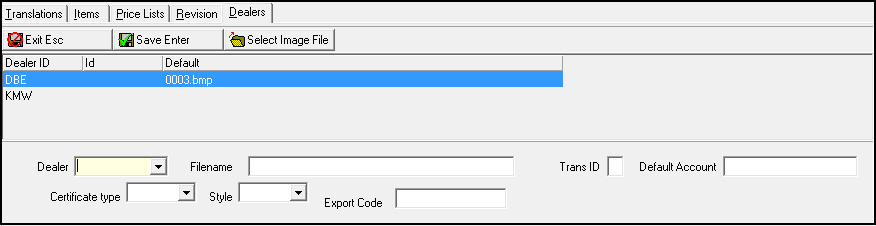
Note: The Select Image File button is available in the Dealers tab when in New or Change mode.
The following graphic shows the Dealers tab in New mode.
Field/Column Descriptions
The following table describes the fields and columns used in the Dealers tab.
Field/Column |
Description |
Dealer |
Identifies the dealer associated with the selected panel. |
Filename |
The file name of a graphic file linked to the selected panel type for the associated dealer. |
Trans ID |
One-digit translation identifier. Used to determine the correct translation table in Alarm Translation Tables (program #1876). Note: The Trans ID field accepts alphanumeric entries in formats 0-9 and A-Z (uppercase only). |
Default Account |
Default customer ID, used as a template account for zones in new installations. |
Certificate Type |
You may select a certificate type to associate with the selected dealer. This type appears by default when you create a certificate for a CID with the selected panel and dealer in the Certificates tab of program #559. (This menu originates from program #1653, and includes certificate types defined for the selected dealer and types with no dealer.) |
Style |
You may select a certificate style to associate with the selected dealer. This style appears by default when you create a certificate for a CID with the selected panel and dealer in the Certificates tab of program #559. (This menu originates from the Styles tab of program #1653 for the selected certificate type.) |
Export Code |
You may enter an export code that will appear on exported certificates attached to CIDs with the selected panel and dealer. |
Button Functions
The following table displays the buttons, describes the shortcut keys, actions, and functionality.
Button |
Name |
Shortcut Key |
Action |
Description |
|
Get |
ALT+F1 |
1742/ 1 |
Get record. |
|
Change |
F2 |
1742/ 2 |
Change selected record. |
|
New |
F3 |
1742/ 3 |
Create new record. |
|
Delete |
SHIFT+F10 |
1742/ 4 |
Delete selected record. |
|
Undelete |
ALT+F10 |
1742/ 5 |
Restore deleted record. |
|
CTRL+F8 |
1742/ 6 |
Print selected records. |
|
|
Zoom |
F10 |
1742/ 1 |
Zoom in/out of sublevel. |
|
Tear |
F7 |
1742/ 1 |
Lists details of selected field. |
|
Select File |
F10 |
1742/ 11 |
Select the image file. |
|
Previous |
F4 |
1742/ 1 |
Select last record. |
|
Next |
F5 |
1742/ 1 |
Select next record. |









Modifications and Updates to Panel Types
The following table lists modifications and updates to the Panel Types document.
Mod Number |
Date |
Description |
08.79.09411, 07.79.22964 |
11/06/13 |
Updated Rule field to include drop-down menu |
n/a |
08/20/14 |
Images updated. |
08.82.09877, 07.82.23748, 08.82.09858, 07.82.23707 |
03/04/15 |
Added WiFi check box. |
n/a |
01/11/18 |
Images updated. |
08.87.11157, 07.87.25497, 08.87.11161, 07.87.25502 |
01/11/18 |
Updated 3xl for multiple 3xlogic panel types on a CID. |