
Alarm Queue
Module: Account Management
Overview
Use the Alarm Queue tab to view all alarms that are currently unresolved and determine which ones to treat. You can change or narrow the list of alarms that you view by using the display parameters. All grid lines in the Alarm Queue tab are color-coded so that you can quickly identify the status of each alarm. There are up to 16 alarm queues available.
If the Use Skills check box is selected both in this tab and the Dispatch tab, new users only see alarms that match their skills. This prevents operators from handling alarms that they are not qualified to handle. When new users navigate to the Dispatch tab, all alarms currently assigned to the terminal that do not match their skills are unassigned and sent back to the general alarm pool.
Alarms in the Alarm Queue flash if the operator assigned to that alarm has logged out of SBN. This enables other operators to see alarms that are no longer assigned to an operator.
This document covers the following topics:
Identifying Alarm Queue Colors
Managing Multiple Alarm Queues
Navigating to the Alarm Queue
You can access the Alarm Queue from Data Entry
Master and Basics (program #559), from Alarm Queues (program #538), or
by double-clicking the flashing bell symbol  or the
flashing Test symbol
or the
flashing Test symbol  when they appear
in the SBN Status
Bar.
when they appear
in the SBN Status
Bar.
Use the following steps to access the Alarm Queue from Data Entry:
1. From the main SBN toolbar, select Menu.
2. From the drop-down menu, select Go To.
3. In the Go To Program dialog box, type in "559" and press Enter.
w Data Entry Master and Basics opens.
4. Choose the Alarm Queue tab in the lower pane of Data Entry.
Use the following steps to access the Alarm Queue from the main menu:
1. From the main SBN toolbar, select Menu.
2. From the drop-down menu, select Go To.
3. In the Go To Program dialog box, type in "538" and press Enter.
w Alarm Queues opens.
4. Choose New.
w The Alarm Queue tab opens.
Alarm Queue Options
You can manipulate the Alarm Queue window and functionality through the use of a number of options. The settings of the following options control different aspects of the Alarm Queue tab and how it relates to other tabs and programs. For detailed information on an option and its default setting, see SBN Options.
Option a2prio – Use to set an alarm priority cutoff used in Alarm Queue Colors (program #1649). SBN applies the Standard Color to an incident in the Alarm Queue as defined in program #1649 if the incident priority is a lower number than the value of this option. SBN applies the Priority Color to an incident in the Alarm Queue as defined in program #1649 if the incident priority is a higher number than the value of this option.
Option addrcom - Use to define the format of the Address column of the Alarm Queue.
Option ba470 – When on, SBN enforces dealer restriction in the Alarm Queue.
Option ba517 – When on, a time limit on Storm Mode is set (in minutes). The default is 15. Leave the option blank for no time limit.
Option citycom - Use to define the format of the City column in the Alarm Queue.
Option ma027 – When option ma027 is on, SBN attaches a timer to the selected alarm when you select Guard Auto Dispatch. The alarm turns bright green and SBN displays the text TM2 in the Operator Action column. When the timer expires, the alarm turns back to red, and SBN displays T2O in the Operator Action column. When option ma027 is off, SBN displays GAD (Guard Auto Dispatch) in the Operator Action column of the Alarm Queue tab when you select the Guard Auto Dispatch action on the Dispatch tab. SBN does not attach a timer when the option is off.
Option mo012 – When on, SBN positions a new alarm on a CID with a timer in effect into the Alarm Queue as if no timer was set. When this option is on and a timer expires, the signal displays in dark red below new signals.
Option mo108 – When on and the Alarm Queue receives two signals for the same alarm, SBN changes the time displayed in the Alarm Queue to the time of the second signal.
Option mo166 – This option is on for Protectron and is off for all other companies. This option modifies the behavior of option mo012, which should be on if this option is on. When both of these options are on, SBN positions a new alarm with a timer into the Alarm Queue as if it does not have a timer.
Option mo174 – When on and the Customer check box is selected, the Alarm Queue displays all alarms from all queues for the selected customer.
Option mo176 – When you acknowledge an alarm in the Alarm Queue, the value entered for this option determines the event that SBN records in the Alarm Log as ACK; all other events are logged as ACX.
Option mo177 – Use to control Monitoring restrictions. When this option is on, alarm queues are restricted by branch.
Option mo202 – When on, the Toggle IVR button and IVR Toggle field appear. The button allows you to toggle between hiding and displaying alarms generated from the IVR terminal. (This option is customer specific for company 156.)
Option mo203 – When on, the Sort By field appears in the Alarm Queue tab of Data Entry (program #559). Use this field to select an Alarm Queue column by which to sort the displayed alarm incidents.
Option mo206 – When on, SBN applies the priority settings in Queue Priorities (program #1725) to the Alarm Queue. When a user selects the Visible check box in the Alarm Queue, SBN displays only those alarms in the queue with a priority that has an X in the Visible column of program #1725. When a user selects the Hidden check box in the Alarm Queue, SBN displays only those alarms in the queue with a priority that does not have an X in the Visible column of program #1725.
Option namecom – Use to format the Name column of the Alarm Queue.
Option mo249 – When mo249 is on, it allows users to define how many seconds are between calls to the terminal ID. This option is used in conjunction with option mo241.
The Alarm Queue Tab
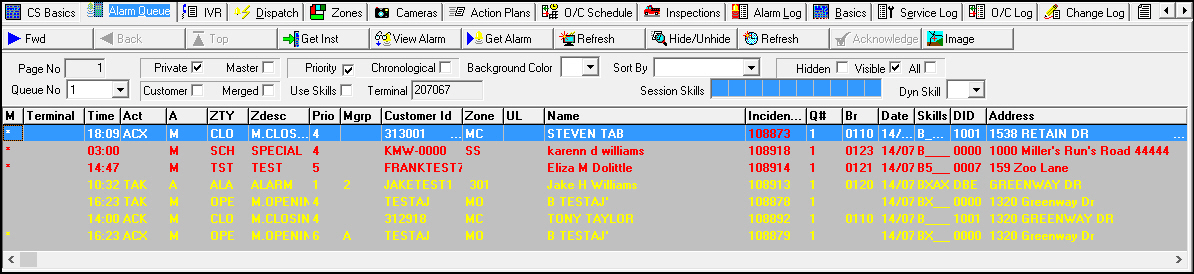
The following graphic shows the updated Alarm Queue tab with alarms displayed.
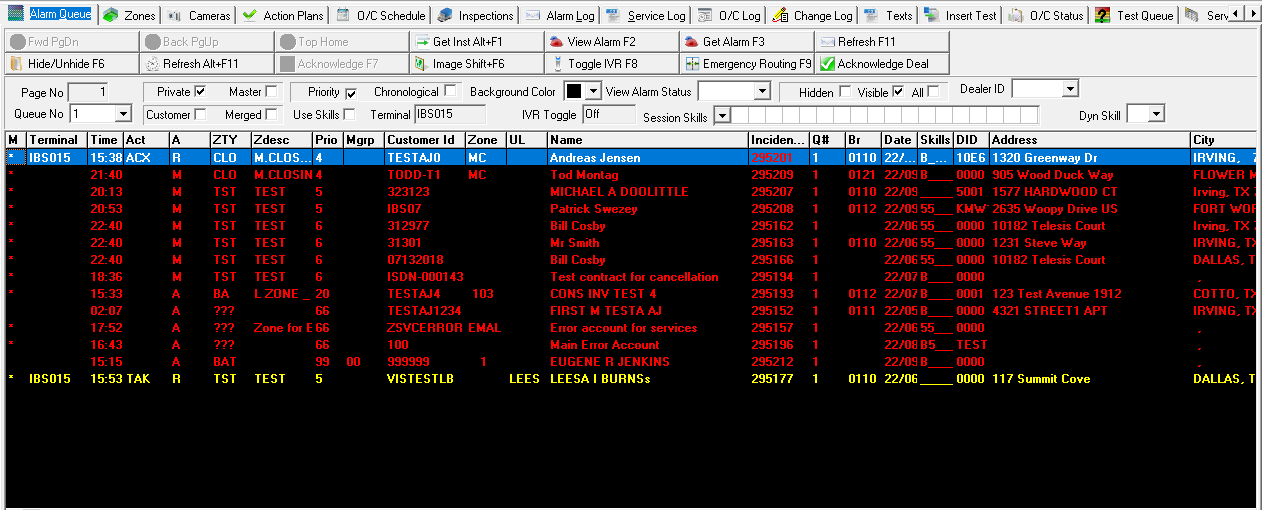
Note: The alarm priority range you enter for the Set Priority monitoring command in Dispatch (program #537) also applies to the Private and Master modes of the Alarm Queue. For example, if you set the priority range to minimum 10 and maximum 50, you will only see alarms in the Alarm Queue that have priorities 11-50. (The priority setting has no effect on Customer or Merged modes.)
Field Descriptions
The following table describes the fields in the Alarm Queue tab.
Field |
Description |
Page Number |
Page number of the Alarm Queue currently displayed. |
Queue Number |
Select a queue number to view from the drop-down menu. |
Private |
If you select this check box, the Alarm Queue tab displays all signals in the operator’s queue. This includes all unassigned alarms that the operator can handle (based on terminal number and skills) and alarms the operator has previously handled. SBN remembers which terminal has treated the alarms. Note: When an operator logs out before handling all alarms in his/her private queue, the alarms stay in the private queue and continue to appear in the master queue. If a new alarm signal is received on any of those alarms, SBN places the new alarm in the master queue and the new alarm can be reassigned. Note: The colored counter in the SBN Status Bar displays the number of the following types of private alarms: new alarms, acknowledged alarms, and acknowledged alarms on which monitoring actions have been taken. |
Customer |
If you select this check box, the Alarm Queue displays alarms for the selected CID. Note: Use option mo174 to view all alarms from all queues for the selected customer when the Customer check box is selected. This option may impede SBN performance if there are alarms in several queues for the selected customer. |
Master |
If you select this check box, the Alarm Queue displays all signals in the selected queue. |
Merged |
If you select this check box, the Alarm Queue displays all signals the operator is currently handling, regardless of which queue they are in. |
Priority |
If you select this check box, the tab displays signals in descending priority order. |
Use Skills |
If you select this check box, users only see alarms that match their skills. (See Using Skills.) |
Chronological |
If you select this check box, the Alarm Queue displays the signals sorted in descending order by the date and time they were received. |
Terminal |
Displays the terminal ID number. |
IVR Toggle |
Indicates whether the Alarm Queue displays signals from the IVR terminal. When on, no IVR signals appear in the queue. When off, IVR signals are displayed. Select the Toggle IVR button to turn off and on. Note: This field and the Toggle IVR button only appear if option mo202 is on. |
Background Color |
Select a background color for the Alarm Queue screen from the drop-down menu. Note: When you select a background color, SBN saves that color in the Windows registry of the workstation for your user ID. The background color then appears each time you open SBN. When the version of SBN.exe changes, the background color reverts to the default color (light gray). |
View Alarm Status |
When viewing alarms on the 559 alarm queue tab, SBN should allow the user to view alarms associated with a specific alarm status type. The specific alarm status is represented by color as defined in program 1649. |
Sort By |
Select an Alarm Queue column by which to sort the displayed alarm incidents. When this field is blank, SBN sorts alarm incidents in Priority or Chronological order, depending on which check box is selected. All visible columns appear in the drop-down menu. Note: This field does not appear unless option mo203 is on. |
Storm Mode |
This field displays whether Storm Mode is on or off. |
Priority View Selection Note: SBN only applies the priority settings in Queue Priorities (program #1725) when option mo206 is on. When this option is off, SBN displays all alarms in the Alarm Queue regardless of whether the Hidden, Visible, or All check box is selected. If action 537/130 is inactive, these check boxes are protected. |
|
Hidden |
Select this check box to display only those alarms with priorities that are not flagged as visible in Queue Priorities (program #1725). |
Visible |
Select this check box to display only those alarms with priorities that are flagged as visible in Queue Priorities (program #1725). |
All |
Select this check box to display alarms of all priorities. |
Session Skills |
You may select a dynamic skill in one of these 10 fields. When you make a selection, only those alarms matching the selected skill display and are available for treatment. (These menus originate from program #1862.) Note: Action 559/705 must be enabled in your action profile in order to access these fields. When option mo238 is on, SBN automatically assigns dynamic skill level 1 to new alarms in the Alarm Queue tab that do not have dynamic skills defined for their zone type in program #1733. |
Dealer ID |
Filter signals in the Alarm Queue by Dealer/Sub-dealer ID. |
Column Descriptions
The following table describes the columns used in the Alarm Queue tab.
Column |
Description |
Multi Alarm |
An asterisk (*) in this column indicates that more than one alarm has come in for this group of signals. Note: This field can display different company-specific symbols, depending on the type of alarm. |
Terminal |
Displays the terminal ID number of the operator to whom the alarm is assigned. |
Time |
Time the original signal arrived in the Alarm Queue. Note: If option mo108 is on, receipt of a second signal for the same alarm changes the time displayed to the time of the second alarm signal. |
Operator Action |
Abbreviation for the last action the operator took for the alarm. |
Alarm Type |
Alarm type generated for the signal. |
Zone Type |
Type of zone from which the signal arrived. |
Zone Description |
Description of the zone. |
Zone |
Zone ID from which the signal arrived. |
Priority |
Priority of the zone from which the signal was generated. |
Monitoring Group |
Monitoring group attached to this zone. |
Customer ID |
CID to which the zone is assigned. |
UL Grade |
UL Security Grade. |
Name |
Displays the name of the customer, based on option namecom. |
Incident # |
Unique number created by SBN to represent each alarm. |
Queue Number |
If the Merged check box is selected, this column displays the queue number of the signals. If the Merged check box is not selected, this column is blank. |
Branch |
Branch associated with the CID associated with the signal. |
Date |
Date alarm signal arrived in the Alarm Queue. |
Skills |
Displays the skills specified for handling the selected alarm signal. |
Dealer ID |
ID of the dealer associated with the CID from which the signal generated. |
Address |
Address of the selected installation, based on option addrcom. |
City |
City, state, and zip code of the selected installation, based on option citycom. |
Alog Misc 6 |
The information in this column originates from the Dispatch tab. Customer defined field; no function in SBN. |
Sub_type |
CID subscriber type defined in Data Entry Master and Basics (program #559), based on option mo175. |
Panel |
Panel type of the first CID on the installation from which the alarm generated. |
Monitoring Branch |
Monitoring branch of the installation from which the alarm generated. |
Test Interval |
Test interval of the CID from which the alarm generated. |
Skills |
Skills assigned to the alarm incident. Only operators with matching skills can view and select alarms with skills defined. Note: Set skills for alarms using the Set Skill Requirements monitoring command [CTRL+U] in Dispatch (program #537). |
VIP Prio Type |
Displays the VIP Priority Type assigned to the installation in the Basics tab of Data Entry (program #559). |
User ID |
User ID will display in the Alarm Queue, to indicate which user accesses the alarm queue. |
Identifying Alarm Queue Colors
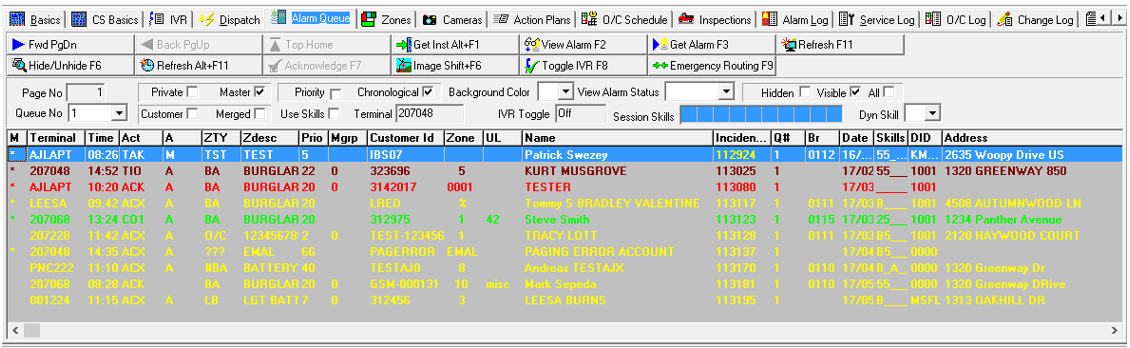
The Alarm Queue relies heavily on color-coding to display the status of alarms. The different colors indicate alarm statuses, so that an operator can quickly identify each incident.
Alarm Queue colors are defined in program #1649. Program #1649 replaced options alqcol0-15 and a2qcol0-15, which are now retired. You may define alternate text colors to change the color of text for various situations in program #1649, although IBS strongly recommends that you do not change the text colors of the Alarm Queue.
Note: When option mo168 is on, SBN changes the status and color of Alarm Queue time-outs. Only applies when option mo166 is also on.
The following graphic shows an Alarm Queue with several colors displayed.
Color Statuses
The following table lists the default colors used in the Alarm Queue and the status each color indicates.
Color |
Status of Alarm |
Yellow |
Acknowledged alarm. |
Green |
Acknowledged alarm on which a monitoring action has been performed. |
Dark Green |
Alarm on which a timer is currently running. |
Dark Red |
Alarm on which a timer has expired. |
Ice Blue |
Alarm that has been parked. |
Purple |
Alarm that has been parked and a new signal has arrived from the same installation. |
Red |
New alarm. |
Dark Purple |
Alarm on which a timer has expired, that has been parked. |
Dark Ice Blue |
Alarm on which a timer is currently running, that has been parked. |
Managing Multiple Alarm Queues
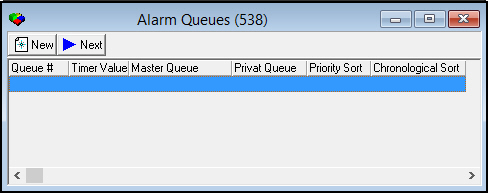
Use Alarm Queues (program #538) to manage multiple alarm queues simultaneously. The Alarm Queues program can display multiple queue numbers in one window. After operators choose which queue numbers they need to manage, they can scroll through the queues by choosing Next.
The following graphic displays Alarm Queues as the program opens.
Using the Alarm Queues Grid
Use the following steps to add and view alarm queues in the line item list:
1. In Alarm Queues (program #538), choose New.
w The Alarm Queue tab opens.
2. Select the appropriate queue number from the Queue No drop-down menu.
w SBN adds the queue number to the Alarm Queues line item list.
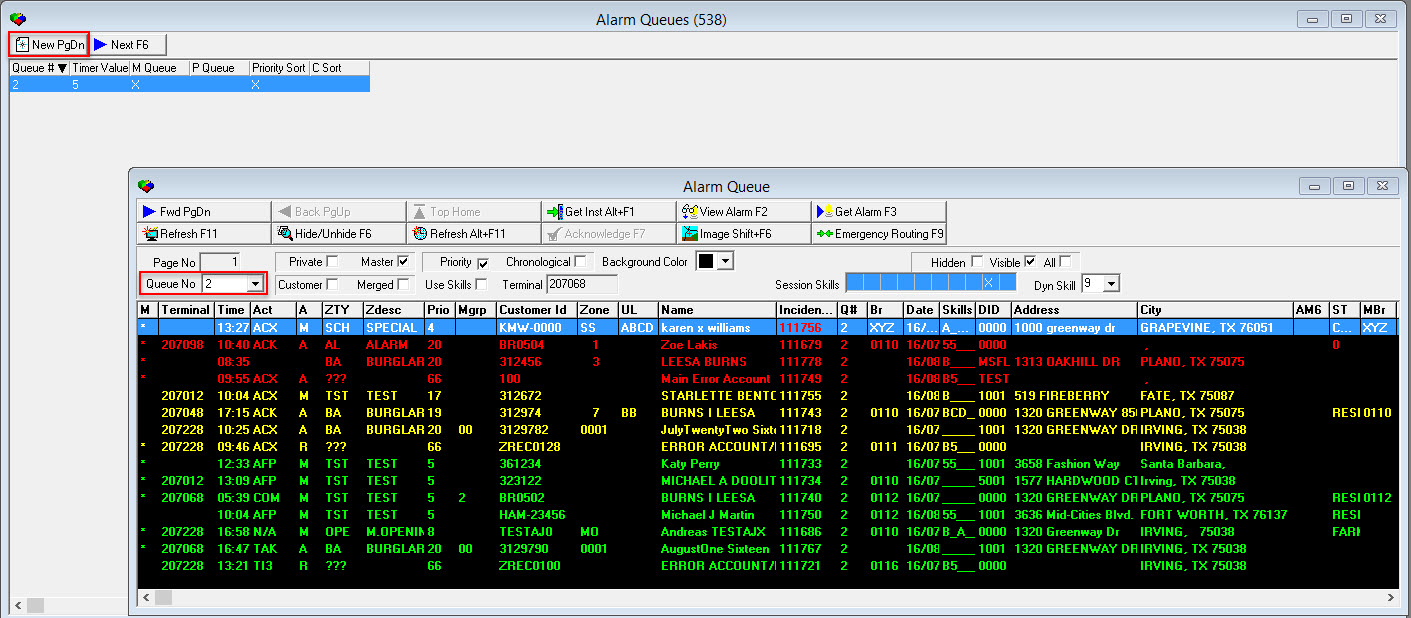
3. To add additional queues to the Alarm Queues list, choose New again.
w The Alarm Queue tab opens in a new window.
4. Select the appropriate queue number from the Queue No drop-down menu.
w SBN adds the queue number to the Alarm Queues list.
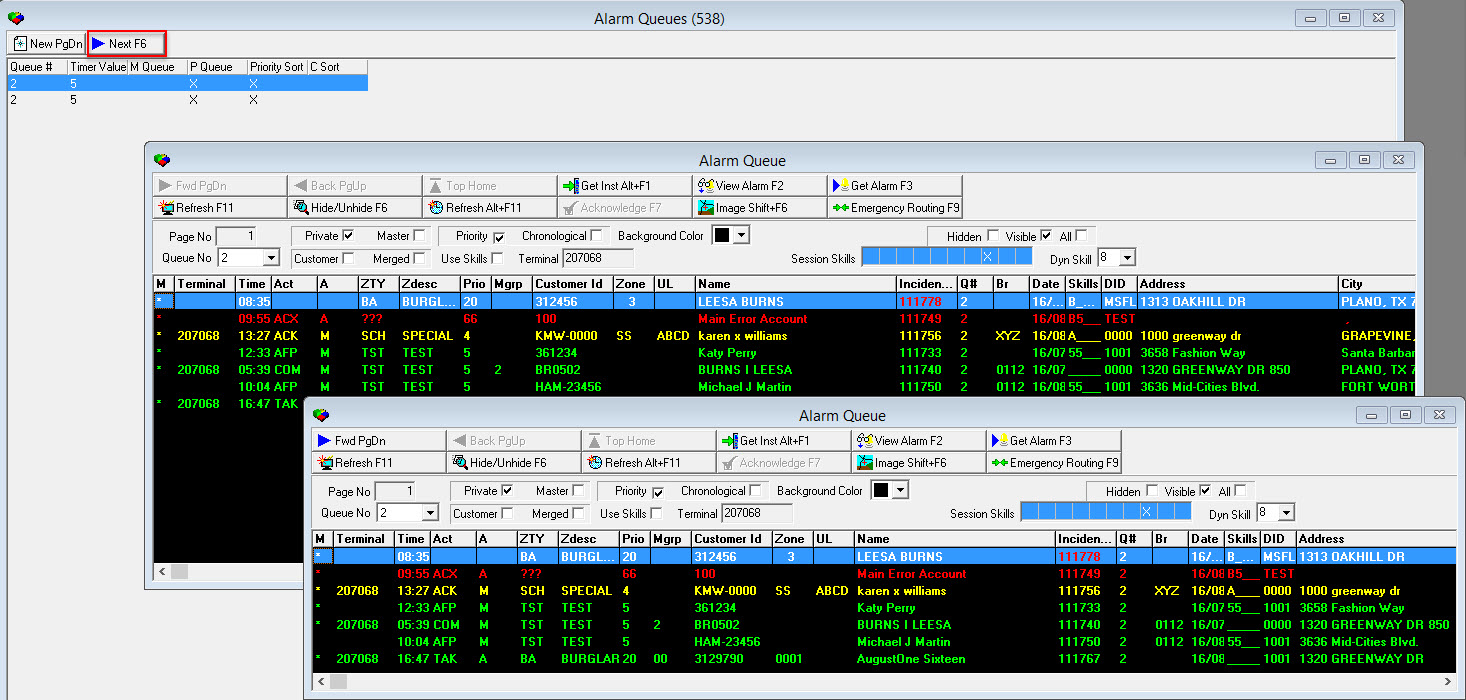
You can continue adding multiple alarm queues to the Alarm Queues list. Scroll through the open alarm queues by choosing Next in Alarm Queues (program #538). The selected queue displays in the front of all other windows. When you reach the end of the queues, choosing Next returns you to the first line in the list.
Working in the Alarm Queue
There are several ways to change the view of the Alarm Queue by using the parameters in the upper pane. You can use operator skill filtering, view different queue numbers, page numbers for each queue, alarms, orders of alarms, and background colors. From the Alarm Queue you can also get installation information, set the refresh interval, and acknowledge alarms.
Note: If option mo012 is on, SBN positions a new alarm with a timer as if the alarm did not have a timer. When the time expires, the alarm appears in dark red below new signals. Option mo166 modifies the behavior of option mo012. If both options are on, SBN positions a new alarm with a timer as if it did not have a timer.
Note: Use option mo177 to control Monitoring restrictions. When this option is on, alarm queues are restricted by branch.
Changing the Queue and Page Numbers
In the Alarm Queue, you can change the queue number and page number to view different queues and pages in the queues. The Forward, Backwards, and Go To Top of Log buttons are only available if the queue contains more than one page of alarms.
Use Alarm Queue Transfer (program #1696) to set up automatic transfers of alarms from one queue to another when an operator performs a particular action in Dispatch (program #537) on a particular zone type. Use Background Job #68 in Background Tasks (program #1712) to initiate the transfer when the designated amount of time has passed after an operator performs the designated action. When SBN transfers the alarm, it removes the current operator's name so that the alarm is unassigned.
Use the following steps to change the queue and page numbers:
1. Choose a queue number from the Queue No drop-down menu.
w All alarms in that queue display.
2. If the chosen queue displays more than one page of alarms, choose Forward to scroll forward through the pages.
3. Choose Backwards to scroll backward through the pages.
4. Choose Go To Top of Log to jump to the beginning of the Alarm Queue.
Note: The blue arrow scroll buttons are not available if the queue contains only one page of alarms.
Changing the Alarm Queue Display
Once you have chosen an Alarm Queue, you can choose which alarms to view and how to display them.
Use the following steps to change the Alarm Queue display:
1. Select the Private, Master, Customer, or Merged check box.
w Each check box allows you to view the queue according to its specifications.
2. Select the Priority check box to list the alarms in descending order beginning with the highest priority.
3. Select the Chronological check box to list the alarms in chronological order beginning with the most recent alarm.
4. Select the Use Skills check box to activate user skill filtering.
w If you leave this box blank, the user skills are inactive and all signals in the queue are active. For more information about skills, see the Using Skills section below.
5. Choose a color from the Background Color drop-down menu to change the color of the Alarm Queue grid.
Using Skills
An operator's skill set determines which alarms the operator sees in the Alarm Queue when the Use Skills check box is selected, and which alarms the operator can handle in Dispatch (program #537) when the Use Skills check box is selected. Users define the skills necessary to handle an alarm for an installation in the Basics tab of program #559, for a panel type in program #1742, and for a zone type in program #1733.
An operator's skill set is determined by the skills defined for his/her user ID in program #1501 (or in the Users tab of program #1811), and the skills defined for his/her action profile in program #1502. Users may define temporary skill sets for users and action profiles in Temporary User Skills (program #531). If a temporary skill set is defined for a user or action profile, SBN uses that skill set rather than the regular user skills or regular action profile skills.
The hierarchy of skill sets that SBN uses for an operator is:
1) Temporary user skills - defined in program #531
2) Temporary action profile skills - defined in program #531
3) Regular user skills - defined in program #1501, the Users tab of program #1811, or in program #531
4) Regular action profile skills - defined in program #1502
The SBN status bar at the bottom of the SBN window displays the currently active skill set for the user when option ba491 is defined. Option ba491 defines the interval in seconds that SBN refreshes the status bar User Skills display. If the value of this option is 0 (zero), SBN does not display user skills in the status bar. The status bar displays skills in red text if a temporary skill set is in place; it displays skills in black text if no temporary skill set is defined.
The following graphic shows the SBN status bar with the user's active skills outlined in red.

VIP Priority Adjustment
The priority of an alarm signal can be adjusted in several different programs.
In the Basics tab of program #559, you may select a VIP Priority Type that adjusts the priority of alarms on the installation with priorities that fall within the range defined for the selected priority type in program #1657.
In Dealer Profiles (Program #1537), you may enter a VIP Priority Adjustment for alarms on installations with particular dealers.
In Panel Types (Program #1742), you may enter a VIP Priority Adjustment for alarms on installations with particular panels.
In Subscriber Types (Program #1534), you may enter a VIP Priority Adjustment for alarms on installations with particular subscriber types.
VIP Priority Adjustments for the installation, dealer, panel type, and subscriber type all apply to an alarm signal simultaneously. For example, if a zone is defined as priority 20 in the Zones tab of program #559, and there are VIP Priority Adjustments of -1 for a priority range that includes 20 defined for the installation, dealer, panel type, and subscriber type, an alarm on that zone would appear in the Alarm Queue as priority 16.
A new action was added to identify VIP customers, with the restriction that alarms would only go to operators who had the skills matching the customer’s requirement. When 559/701 is off, the skills check box will be selected. When 559/701 is on the skills check box will be unchecked. The action should default to on for profile ALL, and default to off for all other profiles.
Viewing an Installation
You can view the account information for an installation from which an alarm generated. You can view specific information such as panel type, code words, classes, etc.
Use the following steps to get an installation:
1. Select the alarm for which you want to view the installation information.
2. Choose Get Installation.
w The installation information appears in the upper pane of Data Entry.
Viewing an Alarm
You can view any alarm in the Alarm Queue in the Dispatch tab. However, you cannot treat an alarm by just viewing it in Dispatch; you must get an alarm before you can take any action on it.
Note: Action 559/324 is required to view an alarm. If your action profile does not include 559/324, double-clicking an alarm in the queue does not display alarm details.
Use the following steps to view a selected alarm in the queue:
1. Select the alarm that you want to view.
2. Choose View Alarm or double-click the selected alarm.
w The Dispatch tab opens with the selected alarm displayed.
Getting an Alarm
If you want to treat any alarm in the Alarm Queue, you must get the alarm to appear in Dispatch.
Use the following steps to get a selected alarm in the queue:
1. Select the alarm that you want to get.
2. Choose Get Alarm.
w The Dispatch tab opens with the selected alarm displayed.
3. Treat the alarm if another user has not already treated the alarm.
w If another operator has already treated the alarm, you can take the alarm from the operator and then treat it by choosing the Take Alarm monitoring action in Dispatch.
w If no one has acknowledged the alarm prior to this action, SBN creates an acknowledge event.
Hiding/Unhiding Parameters
You can use the Hide/Unhide Parameters function to toggle your view of the parameters, which affects the display of the Alarm Queue.
Use the following steps to hide/display parameters:
1. Choose Hide/Unhide Parameters.
w The parameters pane of the Alarm Queue disappears so that the tab displays more lines of the Alarm Queue.
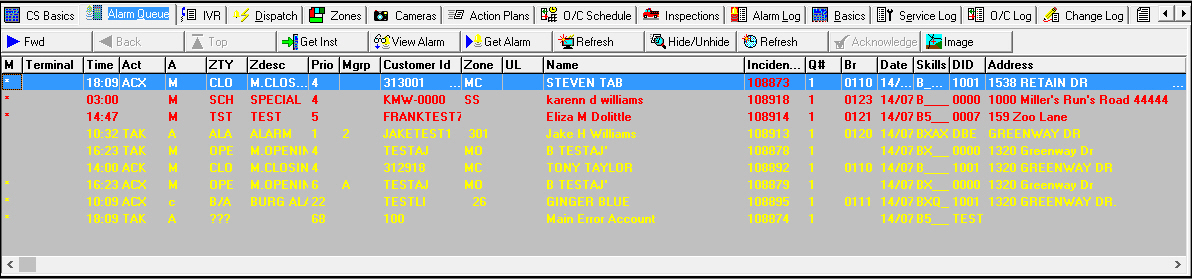
2. Choose Hide/Unhide Parameters again to display the parameters.
w The Alarm Queue returns to its original view.
Setting the Refresh Interval
Use the Refresh Interval to set how often, in seconds, the Alarm Queue tab refreshes. The tab refreshes every 0 to 300 seconds, based on the number you choose from the Timer Value menu.
Use the following steps to set the timer value:
1. Choose Refresh Interval.
w The Timer Value menu appears.
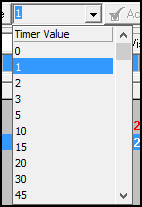
2. Choose a refresh interval from the Timer Value menu.
w The Alarm Queue is set with the new Refresh Interval.
Acknowledging Alarms
When operators acknowledge an alarm, they recognize all signals for a particular account. This function is only active when the Customer check box is selected.
Use the following steps to acknowledge all alarms for a customer:
1. Select the Customer check box.
2. Choose Acknowledge.
w All alarms for the selected customer turn yellow.
Note: After an operator acknowledges the alarms, SBN displays ACX in the Operator Action column in the Alarm Queue. ACX indicates that an operator acknowledged the alarm. SBN also displays the acknowledged alarms in the Dispatch tab. The Event List displays ACX and the time the operator acknowledged the alarm.
Note: When you acknowledge an alarm, the value entered for option mo176 determines the event that SBN records in the Alarm Log as ACK; all other events are logged as ACX. Event numbers are defined in Monitoring Events (program #1621).
Note: When option mo184 is on, if an account has a balance at an aging level that does not allow service and you acknowledge an alarm on the account with a priority greater than the value of option mo185, SBN displays the message from program #1766 defined by option mo186.
Interfacing with MapPoint
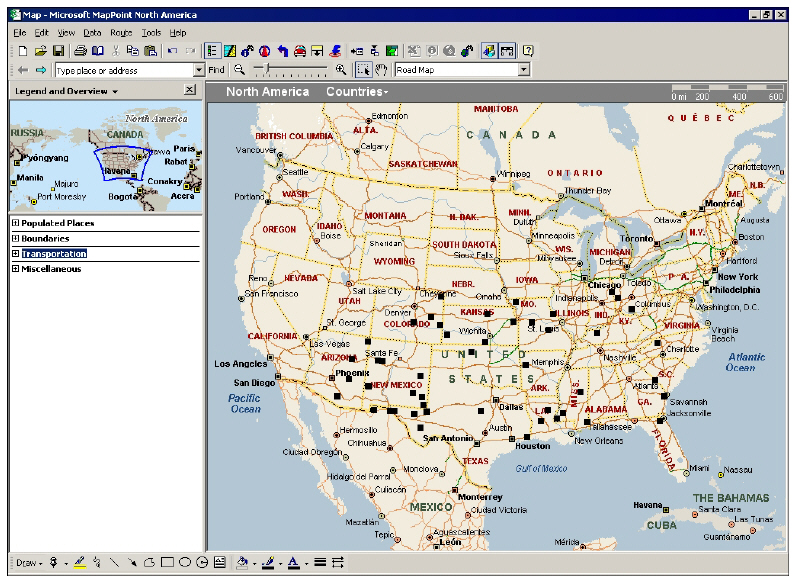
If your company interfaces with Microsoft MapPoint you may view specific types of alarms plotted on a map by choosing Display Image. This function provides a quick geographic overview of the occurrence of all signals of a specific type.
Note: You may also view alarms plotted on a map from Data Entry Master (program #559). See Viewing Alarms from Data Entry Master.
Example
Company A suddenly receives many signals defined as a failure of network communication. An operator chooses Display Image and selects the zone type that corresponds with a failure of network communication. The generated map identifies signals originating from the same geographic area. This may indicate a power outage in that area.
Viewing Alarms Plotted on a Map
Use the following steps to view specific types of alarms plotted on a map:
1. Outside of SBN, open MapPoint to display your monitoring area.
2. In the Alarm Queue tab, choose Display Image.
w The Mapping of Alarms dialog box opens.
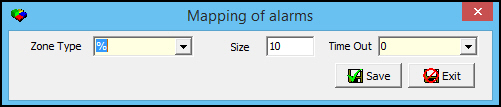
3. Complete the following fields:
In Zone Type select the type of signals you want to plot on a map. You may use the % wildcard to view all types.
In Size type the size of square for MapPoint to use to identify the results.
In Time Out select the refresh interval, in seconds, at which MapPoint refreshes the map.
4. Choose Save.
w MapPoint displays the results that match the selected zone type.
Viewing Alarms from Data Entry Master
Use the following steps to view alarms plotted on a map:
1. In Data Entry Master (program #559), choose Display Image.
w MapPoint displays the address of the account currently open in Data Entry.
2. In the Alarm Queue tab, choose Display Image.
3. In MapPoint, select File.
4. Select the file map of your monitoring area.
5. To change the display data, choose Display Image again.
w The Mapping of Alarms dialog box opens.
6. Complete the fields.
7. Choose Save.
w MapPoint displays the results that match the selected zone type.
Emergency Mode
The Mode button allows a user to toggle to three difference modes: Emergency, Non-Emergency, and ALL.
Emergency mode — Views only the emergency records
Non-Emergency — Views only the Non-Emergency records
ALL — Views all records
The Emergency Mode is replacing the previous Storm Mode. This feature will allow each individual Emergency Mode entry to be on or off independent of other emergency mode records.



Active and Emergency Check Boxes
Active and Emergency interact with each other. Emergency is a special routing record. This flag allows a subset of records to be displayed in the ‘Emergency Routing’ grid. It also allows the Background Task to only try and clean-up Emergency Records. The Active check box will turn on the active Emergency Routing records.
Emergency check box flags a special grouping of routing records. The active flag is turned on by default.

Emergency Routing Grid
The following image displays the Emergency Routing Grid in the Alarm Queue of Program #559.
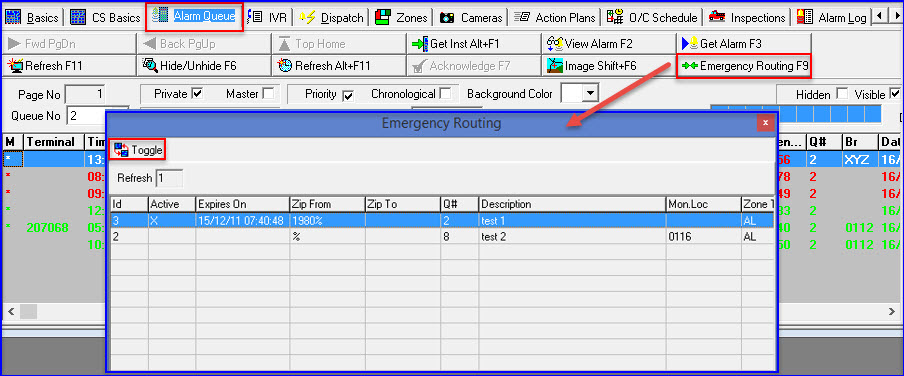
In program #559 the Alarm Queue has an Emergency Routing button that was previously named Storm Mode. Clicking this button will prompt the user to enter a password. Then the Emergency Routing Grid will open. The grid will display the active and inactive routing's. In this grid ID 3 is Active and 2 is inactive.
The Toggle button allows the user to click Toggle and activate or deactivate an Emergency Routing. The X in the Active column indicates a routing is active or inactive.
Expiring — The time that the Emergency Mode is active is determined by Option ba517. The default time setting is 60 minutes. Option ba517 is not a new option it was introduces when Storm Mode was coded.
Related Programs
The following table lists programs related to the Alarm Queue tab.
Program |
Number |
Document Link |
Description |
Alarm Log Tab |
N/A |
SBN records alarms as events in the Alarm Log. |
|
Personnel |
1811 |
Set up skills for users and operators in this program. |
|
Data Entry Master and Basics |
559 |
A program from which you can access the Alarm Queue. Set up skills and view installations from which alarms generate. |
|
Monitoring Events |
1621 |
Define monitoring event numbers that display in the Alarm Queue and the Alarm Log tab. |
|
Dispatch Tab |
537 |
Handle all alarm signals in this tab that appear in the Alarm Queue. Select the Use Skills check box in this tab to enable skills filtering. Define Alog Misc 6 field. |
|
Alarm Queue Transfer |
1696 |
Set up automatic transfers of alarms from one queue to another when an operator performs a particular action in Dispatch (program #537) on a particular zone type. |
|
Queue Priorities |
1725 |
Flag priorities as visible to determine which priorities appear in the Alarm Queue when the Visible check box is selected. |
Button Functions
The following table displays the buttons, describes the shortcut keys, actions, and functionality.
Button |
Name |
Shortcut Key |
Action |
Description |
Alarm Queues |
||||
|
New |
PGDN |
538/1 |
View the Alarm Queue tab. Add alarm queues to line item grid. |
|
Next |
F6 |
538/2 |
Scroll to the next queue in the line item grid and display the alarm queue selected. |
Alarm Queue tab |
||||
|
Forward |
Pgdn |
559 |
Scroll forward one page. |
|
Backward |
PGUP |
559 |
Scroll backward one page. |
|
Go to top of log |
home |
559 |
Jump back to the most recent entry. |
|
Get Installation |
Alt+f1 |
559/321 |
View the installation from which an alarm generated. |
|
View Alarm |
f2 |
559/324 |
View the selected alarm in queue. |
|
Get Alarm |
f3 |
559/323 |
Get the selected alarm from queue. Note: When enabled, this action also allows a user to take alarms from the IVR terminal. |
|
SQL Refresh |
f11 |
559/326 |
Refresh SQL to display recent signals. |
|
Hide/Unhide |
F6 |
559/325 |
Toggle between hiding and displaying parameters. |
|
Refresh Interval |
ALt+f11 |
559/327 |
Define how often, in seconds, the Alarm Queue tab refreshes. |
|
Acknowledge |
f7 |
559/328 |
Acknowledge all signals for a particular account. |
|
Display Image |
shift+f6 |
559/331 |
View specific types of alarms plotted on a map. |
|
Toggle IVR |
f8 |
559/332 |
Toggle between hiding and displaying alarms from the IVR terminal. Note: This button only appears when option mo202 is on. |
|
Toggle Storm Mode |
F9 |
559/333 |
Engage and disengage Storm Mode. |
|
Acknowledge Dealer |
N/A |
559/328 |
Acknowledge up to 10 signals from the same dealer all at once. (Note: You must first use the Dealer ID dropdown to filter to an individual dealer before you can acknowledge multiple signals from the same dealer at once. |
|
Exit |
Esc |
559 |
Exit without saving. |
|
Save |
Enter |
559 |
Save existing record. |















Queue Clearing in Multi-Session Use
When multiple operator sessions are active, alarms are cleared from the queue after they are resolved, and auto-handled alarms receive the correct zone type and alarm text.
Alarm Queue Comment Field
A comment field was added to the alarm queue, with an option for comments to update the queue.
Multi-Clear by Related Incident
Alarms sharing a related-incident code can be cleared together (multi-clear).
Priority-Based Audible Alerts
Audible alerts sound according to alarm priority.
Modifications and Updates to Alarm Queue
The following table lists modifications and updates to the Alarm Queue document.
Mod Number |
Date |
Description |
n/a |
12/22/08 |
document rewritten |
07.02.17682, 08.03.06290 |
12/24/08 |
Multiple Alarm symbols; Double Knock feature |
08.03.07759 |
08/23/10 |
Double-clicking an alarm in the queue is the same as choosing View Alarm |
07.02.20115, 08.03.07820 |
09/20/10 |
Added Toggle IVR button and option mo202 |
07.02.20212, 08.03.07868 |
10/15/10 |
Added Sort By field and option mo203 |
07.02.20315 |
12/23/10 |
Added Panel column to the Alarm Queue grid |
07.02.20439, 08.03.08031, 07.02.20484, 08.03.08052, 07.02.20486, 08.03.08054 |
01/12/11 |
Added option mo206 and Hidden, Visible, and All check boxes |
08.03.08118, 07.02.20571 |
02/10/11 |
Added IVR Toggle field. |
07.02.21694 |
04/20/12 |
Added Monitoring Branch, Test Interval, and Skills columns. |
08.03.08731 |
05/31/12 |
Retired options alqcol0-15 and a2qcol0-15 and replaced them with program #1649 to define alarm queue incident colors. |
07.02.22079, 07.02.22076, 08.03.08906, 07.02.22054, 07.02.22090, 08.03.08938 |
11/12/12 |
Enhanced Use Skills feature. Added option ba491. Added VIP Priority Adjustment feature. |
08.78.09124, 08.78.09123 08.78.09119, 08.78.09118 07.78.22389, 08.78.09107 07.78.22361, 08.78.09095 07.78.22348, 08.78.09093 07.78.22347, 08.78.09092 07.78.22346 |
04/02/13 |
Added new VIP Priority Type column. |
07.79.23020, 08.79.09449 |
11/08/13 |
Added Session Skills fields. |
n/a |
07/17/14 |
Images updated. |
08.81.09855, 07.81.23700 |
10/24/14 |
Added Storm Mode button and procedures. |
08.84.10345, 07.84.24482 |
12/04/15 |
Emergency fields added to form, From/To/Zip fields add, Algen logic added. |
07.87.25424, 08.87.11074 |
07/17/17 |
New "View Alarm Status" dropdown box added to allow user to view specific alarm associated with given color. |
N/a |
07/17/17 |
Updated Pictures to reflect new "View Alarm Status" type dropdown box. |
07.93.26932, 08.93.12178 |
09/19/22 |
Dealer ID filtering dropdown added. Images updated. |
08.93.12235, 07.93.27007 |
09/19/22 |
Acknowledge Dealer button added. Note: This button works in conjunction with the Dealer ID filtering dropdown. Images updated. |