
Zones
Module: Account Management
Overview
A zone is a specific protected location or device on a customer’s premises. Use the Zones tab to create zone numbers for these protected locations and devices. Creating zones simplifies the identification of each area when operators receive alarms or users do testing. The Zones tab displays:
- Information about all zones for this installation
- Status information about each zone, which comes from Monitoring
From the Zone Details window, you can view additional information about each zone. Each account may have up to 1,000 zones. Once an operator takes an alarm on an installation in the Dispatch tab, the zone from which the alarm generated turns red.
This document covers the following topics:
Changing the Zones Tab Display
Viewing the Zone Status Change Window
Creating Subzoned Installations
Creating Linked Multi-Signal Zones
Viewing the Test Templates Window
Navigating to Zones
Use the following steps to navigate to the Zones tab:
1. From the main SBN toolbar, select Menu.
2. From the drop-down menu, select Go To.
3. In the Go To Program dialog box, type in "559" and press Enter.
w Data Entry Master and Basics opens.
4. Choose the Zones tab in the lower pane of Data Entry.
Zones Options
The settings of the following options control different aspects of the Zones tab and how it relates to other tabs and programs. For detailed information on an option and its default setting, see SBN Options.
- Option ba140 - When on, SBN activates Detector functionality for zones and adds the Supplemental 1, Supplemental 2, and Special Attribute 1-10 fields to the Zones Details window.
- Option ba237 - When on, the Text field defaults from the select you make in the Zone Type field.
- Option ba291 - When on, SBN fills the Item Number field based on the selected Detector type if an item number is attached in Detector Types (program #1827). When this option is on, option ba340 should be off.
- Option ba334 - When on, SBN restricts the Item drop-down menu in the Zones tab based on the installation's panel type. For Company 120, when this option is off, option ba367 controls the Item drop-down menu restrictions.
- Option ba340 - When on and a user selects an item in the Zones tab, SBN fills the Zone Type and Detector Type fields with the associated data in Items (program #1535) and the Priority and Text fields with the associated data in Zone Types (program #1733). When tabbing through the Item Code field, SBN does not validate this field unless the Item code is changed. When this option is on, option ba291 should be off.
- Option ba351 - When on and a user adds a zone to an installation, the information from the following fields defaults into the Installed Components tab: Serial Number, Zone Type, and Item Code.
- Option ba367 - When on, the Item drop-down menu displays all available items from program #1535. When off, the menu displays only those items listed on work orders associated with the selected installation.
- Option ba401 - When on and a user selects a restore zone (or cancel zone), SBN automatically selects the Restore Required check box. When this option is off, SBN displays the current value.
- Option ba417 - When on, the Item Code menu in the Zones tab is restricted to items defined for the zone in the Installed Components tab. Any free-form text items defined for the zone do not appear in the menu. Option ba351 must be on to use this option.
- Option ba438 - When on, the Zones tab displays only active zones when a user initially accesses the tab. When off, the Zones tab displays both active and inactive zones when a user initially accesses the tab.
- Option ma016 - When an alarm signal comes in on a zone with an Open/Close schedule, if an Open with the same schedule within the number of seconds defined by this option, SBN removes the signal from the Alarm Queue. (This option isr Close signal comes in on a zone dealer-based.)
- Option mo004 - When on, delay is only active during Open/Close screen. Multiple signals received during the delay are canceled by a restore. The sequence must end with a restore and the open must have occurred somewhere in the sequence. When off, the delay is always active. If option mo005 is on, either an open or close must be within the sequence.
- Option mo005 - When on, SBN sends closed signals through the delay handler defined in option mo004. When off, closed signals are not affected by delay.
- Option mo006 - When on, SBN logs signals before disposing of them during the delay processing.
- Option mo103 - When on, SBN removes alarm/cancel pairs as long as no operator has taken action on the signal. This option is dealer-based.
- Option mo104 - When on, SBN removes alarm/restore pairs as long as no operator has taken action on the signal. This option is dealer-based.
- Option mo126 - When on and an operator is handling an alarm associated with a specific Monitoring Group in Zones, a new alarm associated with the same Monitoring Group (with a higher priority and different action plan) appears in the same line in the Alarm Queue, but the new alarm removes the operator's ownership of the alarm. Operator must start over and handle the alarm from the beginning.
- Option mo181 - This option controls the Double Knock feature. When on, you can create Double Knock zones in the Zones tab.
- Option mo182 - Use to set the signal interval, in seconds, for Double Knock zones.
The Zones Tab
The following graphic shows the Zones tab with various zones listed. Fields in the upper pane of the tab identify the current view of the window.
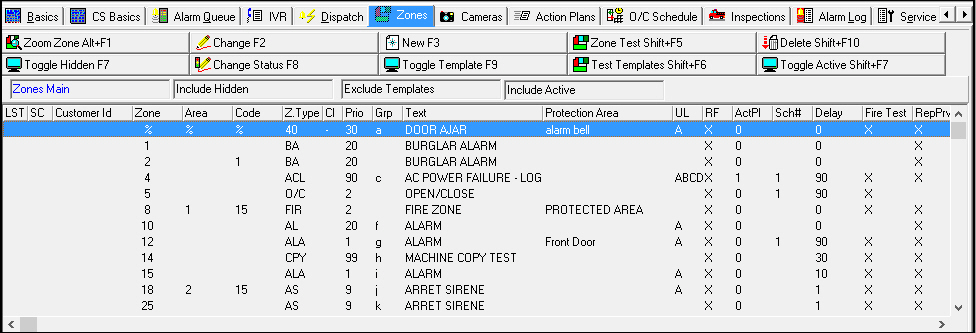
Field/Column Descriptions - Zones Tab
The following table describes the fields and columns used in the Zones tab.
Field/Column | Description |
Current View Fields | |
Zone Screen Name (No label) | Name of the zone window you are viewing. |
Include/Exclude Hidden Zones (No label) | This field indicates whether the displayed list of zones includes or excludes hidden fields. Note: See Changing the View of the Zones Tab of this document for details. |
Include/Exclude Template Zones (No label) | This field indicates whether the displayed list of zones includes or excludes template zones. |
Include/Exclude Active Zones (No label) | This field indicates whether the displayed list of zones includes only active zones, excludes active zones, or includes both active and inactive zones ("All"). Note: Option ba438 determines the default of this display. When the option is on, the Zones tab displays only active zones. When off, the tab displays both active and inactive zones. |
Columns | |
Last Signal Type | Last type of signal received on this zone. This column displays information only after an operator has received an alarm on a zone from this installation. |
Signal Count | Number of signals received on this zone. Information only displays in this column after an operator has received an alarm on a zone from this installation. |
Template | If this column displays an X, the selected zone is a template zone. Note: Use Panel Types (program #1742) to assign a panel to an installation that has template zones defined. Note: You may define system zones (from the systemzones table) as a template zone. |
CID | Identifies the CID to which the selected zone is attached. This column appears if the selected account has more than one CID or if the first CID has global zones. Note: If this column displays a %, the selected zone is a global zone, attached to all CIDs. Note: You may define system zones (from the systemzones table) as global zones. |
Zone | Unique number that identifies this zone. Note: While an operator handles an alarm for an installation, SBN does not display template zones in the list of zones for that installation. Note: This field may also use the wildcard variables % and _. |
Area | Abbreviation for a designated area within a zone. |
Code | Code that identifies the type of signal that this zone generates. |
Zone Type | Alarm type generated for this zone. (This menu originates from program #1733.) |
Class | Symbol that identifies the way SBN handles signals from this zone.
Note: Alarm signals on zones with a "-" in the Class field refresh the test interval for the CID. |
Priority | Priority for alarms received from this zone. |
Group | Monitoring group code attached to this zone. Note: The monitoring group defines how signals are handled for the associated zones. If additional signals are received from a zone with the same monitoring group, SBN adds them to the same incident. A monitoring group can contain more than one zone, but those zones must follow the same action plan if option mo126 is off. |
Text | SBN-generated description of the zone, based on its zone type. |
Protection Area | Location of the premises protected under this zone. |
UL Grade | Code for this zone’s UL security grade. (This menu originates from program #1732.) |
Report Flag | If this column displays an X, SBN includes this zone’s activity on reports. |
Action Plan | Identifies the action plan that this zone follows when an operator handles a signal in Dispatch (program #537). |
Schedule Number | Open/Close Schedule number this zone follows. (This menu originates from the Open/Close Schedule tab for this installation.) Note: When an alarm signal comes in on a zone with an Open/Close schedule, if an Open or Close signal comes in on a zone with the same schedule within the number of seconds defined by option ma016, SBN removes the signal from the Alarm Queue. (This option is dealer-based.) |
Delay | Time (in seconds) that SBN holds an alarm before displaying it in the Alarm Queue. SBN checks zones without schedules for the largest delay defined and adjusts them to match the maximum defined delay. Delay period can be entered in the zoom zone screen or the main zone list by clicking change. Note: Use options mo005 and mo006 to define the delay. |
Fire Test | If this column displays an X, fire testing is defined on this zone. Note: Set up fire testing in the Zone Test window for this installation. |
Report Previous | If this column displays an X, previously reported events create an exception in this zone. Note: When the background cleaner removes an entry from the test queue and the restore required and previously reported fields are checked SBN generates an event for all zones that are not considered restored. |
Fire Signal | If this column displays an X, SBN sends a signal on this zone directly to the fire department. Note: Your company must be set up to use this functionality. |
Bypass | If this column displays an X, bypass signals create an exception in this zone. |
Detector | Type of detector in this zone. (This menu originates from program #1827.) Note: Some companies, rather than use the inspection program, use the Detector field to test and inspect equipment. |
Count | Number of signals expected from the detector on this zone. This column may display negative numbers. |
Hidden | Determines whether this zone is hidden. SBN does not typically display hidden zones to the operator handling the alarm. |
Restore Columns | |
Restore Required | If this column displays an X, an incoming alarm on this zone requires a restore before an operator can clear the alarm from the Alarm Queue. Note: When option ba401 is on and a user selects a restore zone (or cancel zone), SBN automatically selects this check box. When this option is off, SBN displays the current value. |
Restore Exc | If this column displays an X, SBN always sends an incoming restore signal on this zone to the Alarm Queue. Note: If option mo104 is on, SBN removes alarm/restore pairs from the queue and enters them in the Alarm Log, as long as an operator has not taken them. |
Restore Zone | Type of zone that can provide the restore signal on an alarm. |
Restore Area | Area on which the restore signal is received, based on the zone. Note: This column defaults from the Zone field if an area has been set up under zones. |
Restore Code | Code received on the restore signal, based on the zone. Note: This column defaults from the Zone field if a code has been set up under zones. |
Restore Del. | Amount of time, in seconds, that SBN holds an alarm in this zone out of the Alarm Queue while awaiting a restore signal. Note: Even though the alarm does not appear in the Alarm Queue, it appears in the Alarm Log as soon as the signal is sent. If the Restore does not come through in the specified time, a signal with the event MRC - No Res/Can appears in the Alarm Queue and Alarm Log. If SBN receives multiple alarms on the zone before the Delay timer expires, the timer restarts; if a Restore does not come through in the specified time after the last alarm, a No Res/Can alarm appears in the Alarm Queue and Alarm Log. |
Cancel Columns | |
Cancel Exc. | If this column displays an X, SBN always sends an incoming cancel signal on this zone to the Alarm Queue. Note: If option mo103 is on, SBN removes alarm/cancel pairs from the queue and enters them in the Alarm Log, as long as an operator has not taken them. |
Cancel Zone | Zone on which the cancel signal can be received. |
Cancel Area | Area on which the cancel signal can be received, based on the zone. This information defaults from the Zone field if an area has been set up under zones. |
Cancel Code | Code received on the cancel signal, based on the zone. This information defaults from the Zone field if a code has been set up under zones. |
Cancel Del | Amount of time, in seconds, that SBN holds an alarm in this zone out of the Alarm Queue while awaiting a cancellation signal. |
Supplemental 1 | Detector abbreviation for the detector on this zone. Note: Use option ba140 to define this optional column. |
Supplemental 2 | Floor number on which this zone is located. Note: Use option ba140 to define this optional column. |
Item Code | Code that defines items installed on this customer’s premises. Use this column to track installed equipment for this installation. |
Special Attribute 1-10 | Company-defined free-form text. Note: Use option ba140 to define these optional columns. |
Date | You can select date information in this field. SBN does not automatically insert or update this date. |
Item Description | The text description of the item associated with the zone. (Item descriptions originate from program #1535.) |
Reference Zone | Displays the zone associated with the selected zone. When the selected zone generates a signal, the reference zone also appears in the Dispatch tab. (Associate zones in the Zone Details window.) |
Reference Area | Displays the zone area associated with the selected zone. When the selected zone generates a signal, an operator may easily determine if it has an associated zone area. (Associate zones in the Zone Details window.) |
Reference Code | Displays the zone code associated with the selected zone. When the selected zone generates a signal, an operator may easily determine if it has an associated zone code. (Associate zones in the Zone Details window.) |
Sub Group | Sub Group the zone belongs to. When SBN receives signals from the number of zones in the Count column that are part of the same Group and Sub Group within the number of seconds in the Restore Delay column, SBN generates an alarm incident in the Alarm Queue. Otherwise, SBN records signals from zones in the Sub Group in the Alarm Log only. All three Sub Group columns (Sub Group, Restore Delay, and Count) and the main Group column must be defined to use this feature. Note: The last zone a signal comes from determines whether SBN generates an alarm incident. For example, Zones 1 and 2 are part of the same Group and Sub Group. Zone 1 has in the Count field and Zone 2 has in the Count field. An alarm comes in from Zone 1, then Zone 2, and SBN creates an alarm incident since Zone 2 requires two zones in the subgroup to create an alarm incident. |
Restore Delay | Number of seconds in which signals from zones in the selected zone's Sub Group must be received for SBN to generate an alarm incident in the Alarm Queue. When SBN receives signals from the number of zones in the Count column that are part of the same Group and Sub Group within the number of seconds in the Restore Delay column, SBN generates an alarm incident in the Alarm Queue. Otherwise, SBN records signals from zones in the Sub Group in the Alarm Log only. All three Sub Group columns (Sub Group, Restore Delay, and Count) and the main Group column must be defined to use this feature. Note: The last zone a signal comes from determines whether SBN generates an alarm incident. For example, Zones 1 and 2 are part of the same Group and Sub Group. Zone 1 has in the Count field and Zone 2 has in the Count field. An alarm comes in from Zone 1, then Zone 2, and SBN creates an alarm incident since Zone 2 requires two zones in the subgroup to create an alarm incident. |
Count | Number of zones that are part of the same Group and Sub Group that SBN must receive signals from within the number of seconds in the Restore Delay column before SBN generates an alarm incident in the Alarm Queue. All three Sub Group columns (Sub Group, Restore Delay, and Count) and the main Group column must be defined to use this feature. Note: The last zone a signal comes from determines whether SBN generates an alarm incident. For example, Zones 1 and 2 are part of the same Group and Sub Group. Zone 1 has in the Count field and Zone 2 has in the Count field. An alarm comes in from Zone 1, then Zone 2, and SBN creates an alarm incident since Zone 2 requires two zones in the subgroup to create an alarm incident. |
Changing the Zones Tab Display
You may change the view of Zones tab to:
- Include/Exclude Hidden zones
- Include/Exclude Template zones
- Include/Exclude Active zones
Note: Active zones are attached to CIDs with an active monitoring status assigned in the CID grid of program #559. Monitoring statuses are defined in program #1540. A blank monitoring type in program #1540 indicates a status is active, and any value in the Type field indicates a status is inactive.
When you make changes to zones, all zones appear regardless of whether you have selected Exclude Hidden Zones. When you complete changes, the display mode returns to Exclude Hidden Zones if you have selected it.
Use the following steps to change the view of the Zones tab:
1. Choose Toggle Hidden Zones, Toggle Template or Toggle Active.
w The display mode of the Zones window changes.
2. Repeat the procedure to return to the default view of the Zones tab.
Viewing Zone Details
Use the following steps to view zone details:
1. From the Zones tab, select the zone for which you want to view details.
2. Double-click your selection or choose Get One Zone.
w The Zone Details window fills with details of the selected zone.
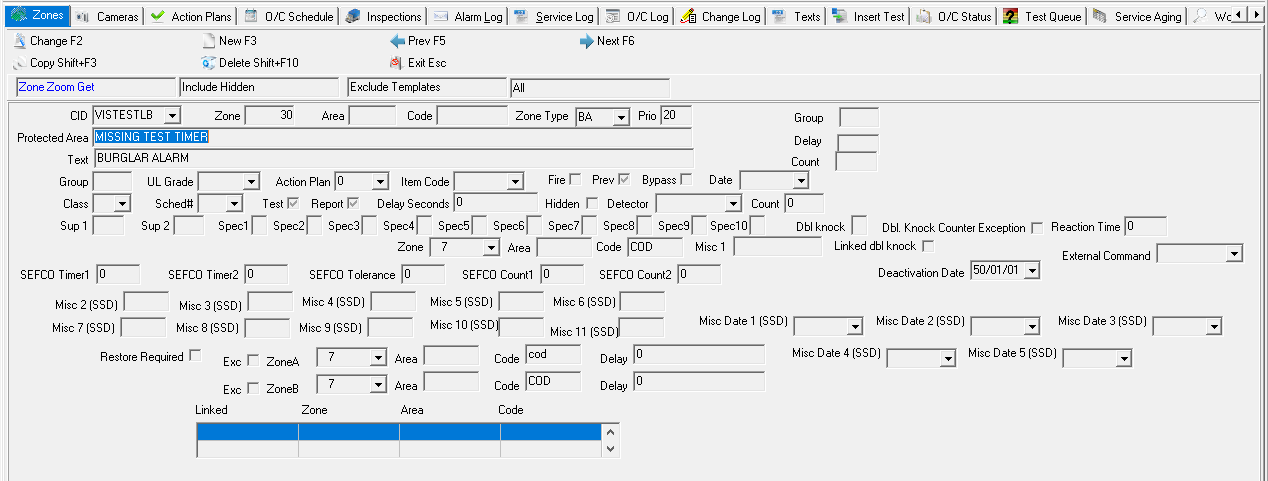
Note: If the selected zone is a template zone, the toolbar does not display Change Record. When you use the Previous Record and Next Record buttons the buttons available on the toolbar may change.
Field Descriptions - Zones Details
The following table describes the fields used in the Zones Details window.
Field | Description |
CID | CID number to which the selected zone is assigned. Note: If the zone is a template zone, this field displays the default template account. Note: If this field displays a %, the selected zone is a global zone, attached to all CIDs. |
Zone | Unique number that identifies this zone. |
Area | Abbreviation for a designated area within a zone. |
Code | Code that identifies the type of signal that the zone generates. |
Zone Type | Alarm type generated for this zone. (This menu originates from program #1733.) Note: If option ba340 is on, SBN fills this field with the zone type associated with the selected item. (Associate zone types with items in program #1535.) Note: Do not have both option ba340 and option ba291 on at the same time. |
Prio | Priority for alarms in this zone. SBN generates this priority based on zone type; you can override the priority. Note: If option ba340 is on, SBN fills this field with the priority defined for the zone type that is associated with the selected item. Define the priority of a zone type in Zone Types (program #1733). |
(Sub) Group | Sub Group to which the selected zone belongs. When SBN receives signals from the number of zones in the Count field that are part of the same Group and Sub Group within the number of seconds in the Delay field, SBN generates an alarm incident in the Alarm Queue. Otherwise, SBN records signals from zones in the Sub Group in the Alarm Log only. All three Sub Group fields (Group, Delay, and Count) and the main Group field must be defined to use this feature. Note: The last zone a signal comes from determines whether SBN generates an alarm incident. For example, Zones 1 and 2 are part of the same Group and Sub Group. Zone 1 has in the Count field and Zone 2 has in the Count field. An alarm comes in from Zone 1, then Zone 2, and SBN creates an alarm incident since Zone 2 requires two zones in the subgroup to create an alarm incident. |
Protected Area | Physical description of the location on the premises protected at this zone. |
Delay (Sub Group) | Number of seconds in which signals from zones in the selected zone's Sub Group must be received for SBN to generate an alarm incident in the Alarm Queue. When SBN receives signals from the number of zones in the Count field that are part of the same Group and Sub Group within the number of seconds in the Delay field, SBN generates an alarm incident in the Alarm Queue. Otherwise, SBN records signals from zones in the Sub Group in the Alarm Log only. All three Sub Group fields (Group, Delay, and Count) and the main Group field must be defined to use this feature. Note: The last zone a signal comes from determines whether SBN generates an alarm incident. For example, Zones 1 and 2 are part of the same Group and Sub Group. Zone 1 has in the Count field and Zone 2 has in the Count field. An alarm comes in from Zone 1, then Zone 2, and SBN creates an alarm incident since Zone 2 requires two zones in the subgroup to create an alarm incident. |
Count (Sub Group) | Number of zones that are part of the same Group and Sub Group that SBN must receive signals from within the number of seconds in the Delay field before SBN generates an alarm incident in the Alarm Queue. All three Sub Group fields (Group, Delay, and Count) and the main Group field must be defined to use this feature. Note: The last zone a signal comes from determines whether SBN generates an alarm incident. For example, Zones 1 and 2 are part of the same Group and Sub Group. Zone 1 has in the Count field and Zone 2 has in the Count field. An alarm comes in from Zone 1, then Zone 2, and SBN creates an alarm incident since Zone 2 requires two zones in the subgroup to create an alarm incident. |
Text | SBN-generated description of the zone, based on its zone type. Note: If option ba237 is on, SBN overwrites the Text field when you change the Zone Type. Note: If option ba340 is on, SBN fills this field with the description of the zone type that is associated with the selected item. Define the description of a zone type in Zone Types (program #1733). |
Double Knock Counter Exception | Select this check box for a zone that is part of a Sub Group to make the zone contribute a maximum signal count of one to the Sub Group Count no matter how many times the zone sends a signal to SBN within the Sub Group Delay time period. (For example, if the zone sends three signals to SBN within the number of seconds in the Delay field, SBN only counts one signal toward the Sub Group Count if this check box is selected.) All three Sub Group fields (Group, Delay, and Count) and the main Group field for a zone must be defined to use this feature. |
Reaction Time | Enter a time, in seconds, after which this zone would create a new alarm signal. This may produce a multiple signal flag in the Alarm Queue. Note: This field accepts integers in seconds. For instance, one hour would be "3600," and two days would be "172,800". |
Group | Type a monitoring group code to attach to this zone. Note: The monitoring group defines how SBN handles signals when they come in. If additional signals are received from a zone with the same monitoring group, SBN adds them to the same incident. A monitoring group can contain more than one zone, but if option mo126 is off, those zones must follow the same action plan. |
UL Grade | Select the UL security grade for this zone. (This menu originates from program #1732.) |
Action Plan | Select the action plan to attach to this zone. Note: Choices in the list are restricted to action plan numbers available for this installation. |
Item Code | Type a code to define items installed on this customer’s premises. You can use this code to track installed equipment and to create work orders for this installation. Note: When option ba291 is on, SBN fills this field based on the item attached to the selected detector type. (Attach items to detector types in program #1827.) Note: If option ba340 is on, when you select an item code in the Zones tab SBN fills q The Zone Type and Detector Type fields with the zone type and detector type associated with that item in program #1535. q The Priority and Text fields based on the zone type associated with the selected item. Define zone types in program #1733. Note: Do not have both option ba340 and option ba291 on at the same time. Note: If option ba351 is on and you enter information in all of the following fields, when you save the zone, this information defaults into the Installed Components tab for the selected installation. q Ser No q Type q Item code If option ba367 is on, this menu displays all available items from program #1535. When this option is off, this menu displays only those items listed on work orders associated with the selected installation. If option ba334 is on, this menu is restricted based on Panel Types. (For Company 120, when this option is off, option ba367 controls this menu restriction.) If option ba417 is on, this menu is restricted to items defined for the selected zone in the Installed Components tab. Any free-form text items defined for the zone will not appear in this menu. (Option ba351 must be on to use option ba417.) |
Fire | Select this check box to have SBN send a signal on this zone directly to the fire department. Note: Your company must be set up to use this functionality. |
Prev | Select this check box to have previously reported zones that have not been restored create an exception in this zone. Note: When the background cleaner removes an entry from the Test Queue and the Restore Required and Previously Reported check boxes are selected, SBN generates an event for all zones that are not considered restored. |
Bypass | Select this check box to have bypass signals create an exception in this zone. |
Date | You can select date information in this field. SBN does not automatically insert or update this date. |
Class | Symbol that identifies the way SBN handles signals from this zone.
|
Sched# | Select the schedule number that applies to this zone. (This menu originates from the Open/Close Schedule tab for this installation.) Note: When an alarm signal comes in on a zone with an Open/Close schedule, if an Open or Close signal comes in on a zone with the same schedule within the number of seconds defined by option ma016, SBN removes the signal from the Alarm Queue. (This option is dealer-based.) |
Test | Select this check box if this zone requires scheduled fire testing. |
Report | Select this check box to include activity on this zone in reports. Note: This field defaults with a check mark. You can delete the check mark to exclude this zone activity from reports. |
Delay Seconds | SBN-generated delay, in seconds, used in handling Open/Close Schedules. Define this field with options mo005 and mo006. Note: SBN checks zones without schedules for the largest delay defined and adjusts them to match the maximum defined delay. |
Hidden | Select this check box to define this zone as Hidden. SBN does not usually display Hidden zones in the Operator Queue. For more details on Hidden Zones see Changing the View of the Zones Tab of this document. |
Detector | Select the type of detector attached to this zone. (This menu originates from program #1827.) Note: Some companies use this field in place of the inspection program. Note: If option ba291 is on and you select a detector type, SBN fills the Item No. field based on the item attached to that detector type. Note: The Data Entry Change Log tracks changes to the information in this field. Note: If option ba340 is on, SBN fills this field with the detector type associated with the selected item code. (Associate detector types with item codes in program #1535.) Note: Do not have both option ba340 and option ba291 on at the same time. |
Count | Type the number of signals expected on the detector on this zone. You may use negative numbers. |
Sup 1 | Type the detector abbreviation for the detector on this zone. (Use option ba140 to configure this field.) |
Sup 2 | Type the floor number on which this zone is located. (Use option ba140 to configure this field.) |
Spec 1-10 | Company-defined fields; no functionality in SBN. (Use option ba140 to configure these fields.) |
Ser No | This field appears only in New mode. See Creating a New Zone. You may type a serial number for the item installed on this zone. Note: If option ba351 is on and you enter information in all of the following fields, when you save the zone, this information defaults into the Installed Components tab for the selected installation. l Ser No l Type l Item code |
Type | This field appears only in New mode. See Creating a New Zone. You may select a type of serial number for the item installed on this zone. Note: If option ba351 is on and you enter information in all of the following fields, when you save the zone, this information defaults into the Installed Components tab for the selected installation. l Ser No l Type l Item code |
Dbl Knock | Type an X in this field to indicate that the selected zone is a Double Knock zone. See Creating Double Knock Zones. |
Zone | Reference zone. This menu displays the zones available for the selected installation. You may select a zone to associate with the selected zone. Note: This associated zone appears l In the Reference Zone column in the main tab of Zones l In the Dispatch tab when the selected zone generates a signal |
Area | This field defaults to the zone area defined for the reference zone. Note: This zone area appears in the Reference Area column in the Zones tab. |
Code | This field defaults to the zone code defined for the reference zone. Note: This associated zone code appears in the Reference Code column in the Zones tab. |
Misc 1 | Customer-defined field; no functionality in SBN. |
Misc 2-11 | Customer-defined field; no functionality in SBN |
Misc Date 1-5 | Customer-defined date field; no functionality in SBN. |
Linked Dbl Knock | Select this check box to indicate that an alarm event from the selected zone and the linked zone (in the Linked Zone grid) will generate an alarm incident in the Alarm Queue. An event from only one of these zones will be recorded in the Alarm Log. Note: Only an alarm event type with the Trip Link Double Knock check box selected in program #1621 will activate this feature. All other alarm event types create alarm incidents in the Alarm Queue as usual. |
SEFCO Timer 1 | Signal counter timer 1 (value in days). |
SEFCO Timer 2 | Signal counter timer 2 (value in days). |
SEFCO Count 1 | Counter. Number of signals acceptable within timer 1 |
SEFCO Count 2 | Counter. Number of signals acceptable within timer 2. |
SEFCO Tolerance | Signal counter time tolerance (Value in minutes). |
Restore Fields | |
Restore Required | If this check box is selected, an incoming alarm on this zone requires a restore before the alarm can be cleared. |
Exc | If this check box is selected, SBN always sends an incoming restore signal on this zone to the Alarm Queue. Note: If option mo104 is on, SBN removes alarm/restore pairs from the Alarm Queue and places them in the Alarm Log, as long as an operator has not taken them. |
Zone | Select the zone that can provide the restore signal on an alarm from this zone. Note: When adding a new restore zone to an existing zone, SBN sets the status date and time for the restore zone to the current date and time. |
Area | Area the restore signal is received on, based on the zone. Note: This field defaults from the Zone field if an area has been set up under zones. |
Code | Code received on the restore signal, based on the zone. Note: This field defaults from the Zone field if a code has been set up under zones. |
Delay | Type the amount of time, in seconds, that SBN holds an alarm in this zone out of the Alarm Queue while awaiting a restore. You can enter a delay period in the zoom zone screen or the main zone list by choosing Change. Note: Even though the alarm does not appear in the Alarm Queue, it appears in the Alarm Log as soon as the signal is sent. If the Restore does not come through in the specified time, a signal with the event MRC - No Res/Can appears in the Alarm Queue and Alarm Log. If SBN receives multiple alarms on the zone before the Delay timer expires, the timer restarts; if a Restore does not come through in the specified time after the last alarm, a No Res/Can alarm appears in the Alarm Queue and Alarm Log. |
Cancel Fields | |
Exc | If this box displays a check mark, SBN always sends an incoming cancel signal on this zone to the alarm queue. Note: If option mo103 is on, SBN removes alarm/cancel pairs from the Alarm Queue and places them in the Alarm Log, as long as an operator has not taken them. |
Zone | Select the zone on which a cancel signal can be received. Note: If option mo103 is on, you may associate multiple zones with a cancel zone. If a cancel signal arrives on the cancel zone within the delay time, it clears all alarms on all zones associated with the cancel zone. |
Area | Area on which the cancel signal can be received, based on the zone. This field defaults from the Zone field if an area has been set up for the selected zone. |
Code | Code received on the cancel signal, based on the zone. This field defaults from the Zone field if a code has been set up for the selected zone. |
Delay | Type an amount of time, in seconds, that SBN holds an alarm in this zone out of the Alarm Queue while awaiting a cancellation signal. Note: Even though the alarm does not appear in the Alarm Queue, it appears in the Alarm Log as soon as the signal is sent. If the Cancel does not come through in the specified time, a signal with the event MRC - No Res/Can appears in the Alarm Queue and Alarm Log. |
Linked Zones | |
Linked | Select the CID number of any linked installation that receives backup signals on this zone. |
Zone | Select another zone on this installation that receives backup signals for this zone. |
Area | Type an area on this installation that is linked to this zone that receives backup signals for this zone. |
Code | Type a code to identify the type of signal generated by the zone that receives backup signals for this zone. |
Creating a New Zone
You can create a new zone for this installation from either the Zones tab or the Zone Details window.
Use the following steps to create a new zone:
1. From either the Zones tab or the Zone Details window, choose New Record.
w The Zone Details window opens in New mode.
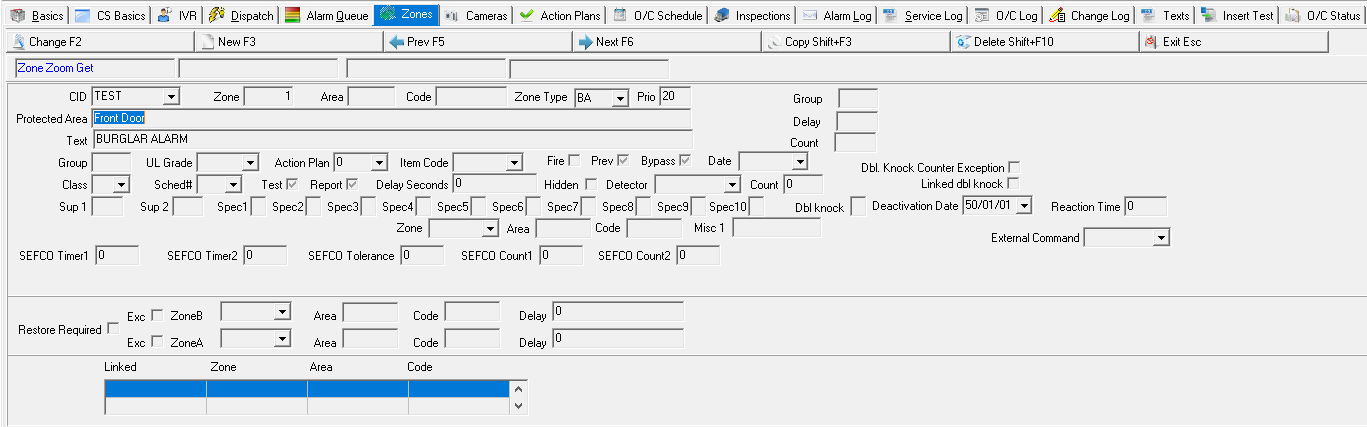
2. Complete the CID, Zone, Zone Type, and Action Plan fields.
Note: The CID field defaults to %. Zone types with the Mobile Agency check box selected in program #1733 allow SBN to insert GPS latitude and longitude coordinates received in an alarm signal on the selected zone type into the PSAP Queue automatically. The PSAP web service then updates the police agency information on the action plan for the zone.
3. Complete the remaining fields, as needed.
4. Choose Save.
Note: You may define a zone for a system-generated O/C exception — such as an MC or MO — with an area and then attach that zone/area combination to an action plan. Then, when those system-generated O/C exceptions occur, SBN routes the event depending on the zone/area combination.
Changing Zone Details
From the Zone Details window, you can change information on any existing zone that is not a template zone. You can also change zone information from the main Zones tab.
When specifying a replacement zone:
- You must replace a global zone with another global zone.
- You must replace a zone local to a CID with another zone specific to the same CID.
Use the following steps to change details of a zone:
1. From the Zone Details window, choose Change Record.
w Fields open for changes.
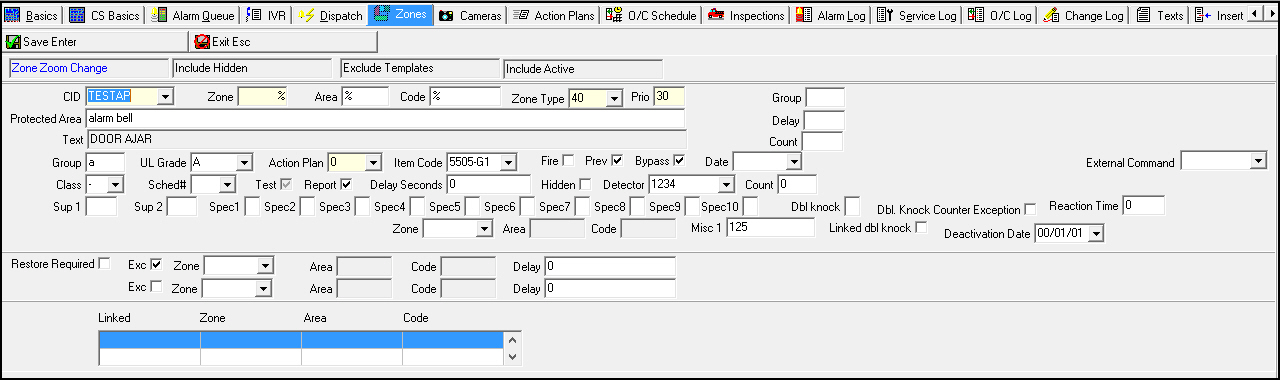
2. Enter changes, as needed.
3. Choose Save.
Copying a Zone
From the Zone Details window, you can copy one zone and make an identical zone for the same CID or for a different CID on the selected installation. SBN copies all information from the current zone, including the number of the action plan, to the new zone.
Use the following steps to copy a zone:
1. From the Zone Details window, choose Copy Current Record.
w The fields fill with the details of the selected zone, but remain open for changes.
2. In CID select the CID from which you want to copy zones.
3. Make any other necessary changes.
4. Choose Save.
Deleting a Zone
You can delete a zone from this installation from either the Zones tab or the Zone Details window. SBN will not allow you to delete a zone if it is linked to a camera in the Cameras tab of Data Entry (program #559). You must delete the camera entry in the Cameras tab before deleting the zone.
Use the following steps to delete a zone from an installation:
1. Select the zone you want to delete in either the Zones tab or the Zone Details window.
2. Double-click your selection or choose Get One Zone.
w The Zone Details window appears filled with details of the selected zone.
3. Choose Delete Record
w SBN deletes the zone from the selected installation.
Note: If you delete a zone that includes a serial number, type, and item code, SBN deletes the associated item from the list of Installed Components and enters the deletion in the Installed Components Log. For more information, see Installed Components.
Note: When you delete a zone, SBN deletes any delayed alarms for the zone as well. When you delete a zone that is in test, SBN removes the zone from the ma_zonetest table as well.
Using the Zone Test Window
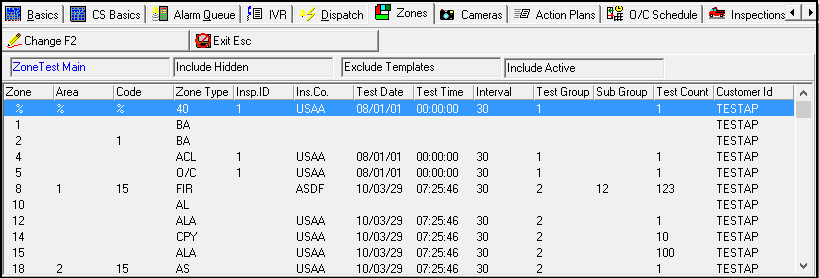
From the Zones tab, choose Zone Test to create and maintain test intervals for existing zones on the selected installation. When you go into the Zone Test window, all your listed zones appear. You cannot change the Zone, Area, Code, or Zone Type fields from the Zone Test window.
The following graphic shows the Zone Test window with zones displayed.
Column Descriptions - Zone Test
The following table describes the columns used in the Zones Test window.
Column | Description |
Zone | Zone number. Subzones do not display. |
Area | Area within a zone. |
Code | Code that identifies the type of signal that the zone generates. |
Zone Type | Zone type. |
Inspection ID | Inspector ID. |
Insurance Company | Insurance company code. (This menu originates from program #1541.) |
Test Date | Date of last test. This information is required when setting a Test Group. |
Test Time | Time of last test. This information is required when setting a Test Group. |
Interval | Number of days between tests. |
Test Group | Zones tested together. Groups must have the same test interval. |
Test Subgroup | Subgroup for testing. |
Test Count | Number of signals required to complete a test. |
CID | Customer ID of the installation. Note: If this field displays a %, the zone is a global zone. |
Setting Up Test Zones
Use the following steps to set up test zones:
1. From the Zones tab, choose Test Zone.
w The Zone Test window appears.
2. Choose Change Record.
w The grid in the window opens for changes.
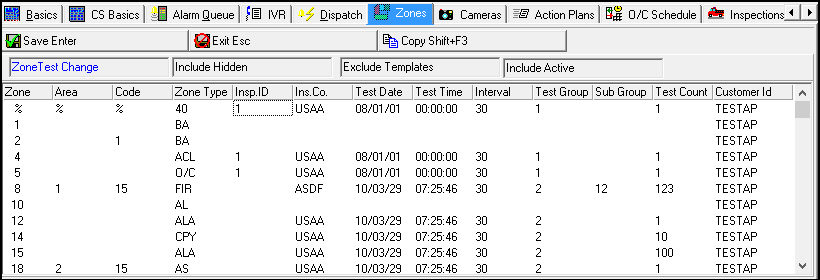
3. You must complete each column in the grid to set up zone testing.
4. After completing at least one line of zone data, choose Copy and then Paste to copy the zone data to another zone.
Note: Choose Paste All Same Zone Type to paste the data to all zones.
5. Choose Save.
Viewing the Zone Status Change Window
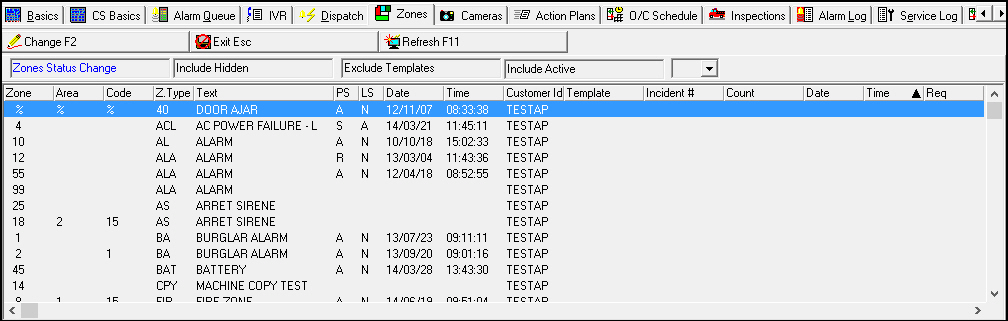
Use Change Zone Status to manually change the physical status of an existing zone for the selected installation. You can use this function to force a restore on a zone that requires one without receiving a restore signal.
The following graphic shows the Zone Status Change window with zones displayed.
Column Descriptions - Zones Status Change
The following table describes the columns used in the Zones Status Change window.
Column | Description |
Zone | Zone number. Subzones do not display. |
Area | Area within a zone. |
Code | Code that identifies the type of signal that the zone generates. |
Zone Type | Code that identifies the zone type. |
Text | Describes the zone type. |
Physical Status | This column displays one of five statuses: l A — Alarm l R — Restore l T — Trouble l O — Open l C — Close |
Logical Status | This column displays one of four statuses: l A — Alarm Queue l R — Restored l N — Normal l T — Test Queue |
Date | Date a user last inserted the selected zone into test. |
Test Time | Time a user last inserted the selected zone into test. |
CID | Identifies the CID to which the selected zone is attached. Note: If this column displays a %, the selected zone is a global zone. |
Template | If this column displays an X, the selected zone is a template zone. Note: If you change the status of a template zone, SBN applies the change only to the selected CID. |
Incident # | Refers to the corresponding incident number of the Test Queue. Note: A zone may appear in more than one test queue incident. |
Count | The number of times the selected zone has been inserted in test mode. |
Date | Date the test expires. |
Time | Time the test expires. |
Restore Req | Restore required for the selected zone. |
Changing a Zone Status
Use the following steps to change the status of a zone:
1. From the Zones tab, choose Change Zone Status.
w The Zone Status Change window appears.
2. Choose Change Record.
w The Zone Status Change dialog box appears.
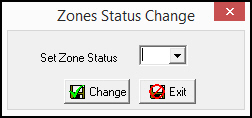
3. In Set Zone Status select the new status for this zone.
4. Choose Save.
Creating Subzoned Installations
Use the Subzone field in the Basics tab of Data Entry (program #559) to link multiple installations to a Master CID. The Master CID contains the active panel and zone data for all of the installations. Once you link the subzoned installation to the master installation, all alarm history appears in the Alarm Log for both the master account and the subaccount.
Before you can link these installations, you must create the master installation and all subzoned installations. (For more information on creating installation records, see Data Entry Master and Basics.)
Use the following steps to link a subzoned installation:
1. In the Data Entry Master and Basics (program #559), pull up the installation that contains the panel and zone information you want to use as the Master CID.
2. In Data Entry Master, choose Change Record.
w The fields in Data Entry Master and Basics open.
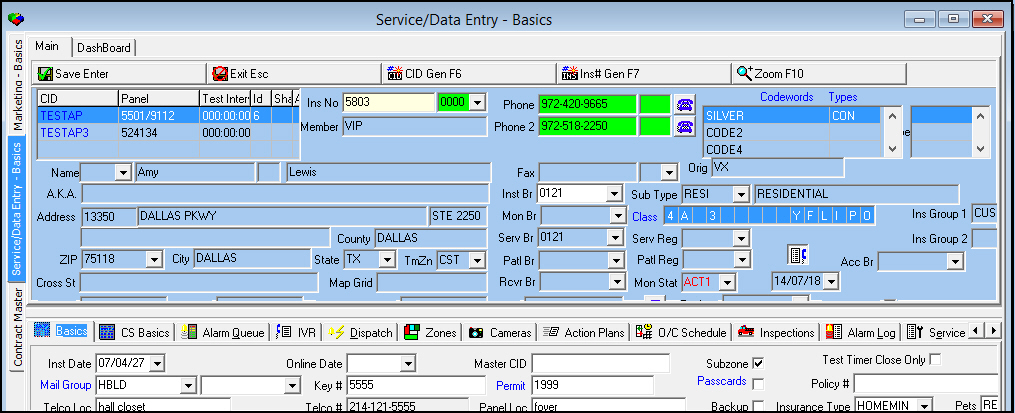
3. Select the Subzone check box to cause SBN to look for subzoned installations in the Zones tab. If you leave this check box blank, SBN does not recognize the subzones.
4. Choose Save.
5. Select the Zones tab.
6. Select the zone you want to use as the subzone.
7. Choose Zoom Get One Zone.
w The Zone Details window appears.
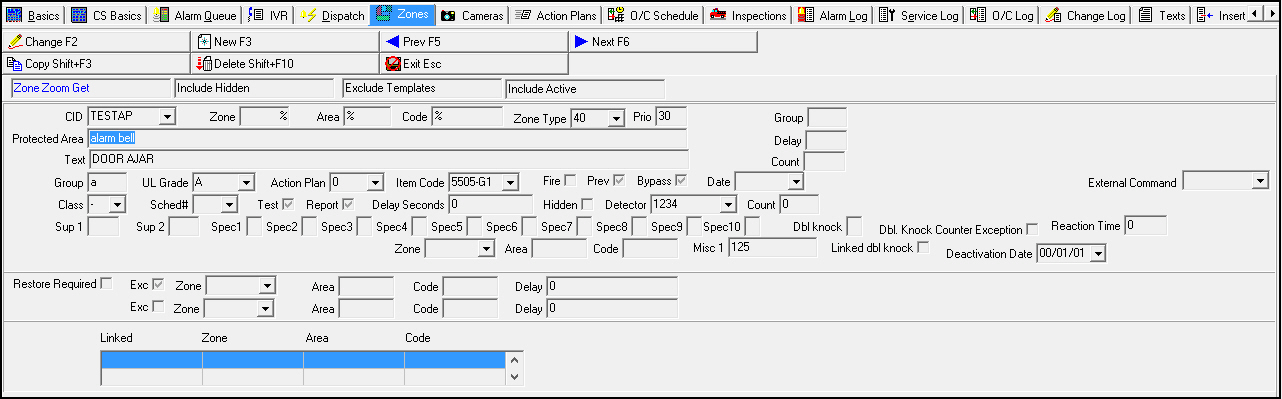
8. Choose Change Record.
w The fields open for changes.
9. In the Text field, type a # sign and the CID of the subaccount you want to attach to this zone.
w To link CID TESTGIGI to the selected installation you would type #TESTGIGI in Text.

Note: If the Text field is greyed-out, your Zone Type has a predefined text description. To be able to enter information in the Text field, you must select a different Zone Type.
10. Choose Save.
11. In Data Entry Master and Basics (program #559), open the CID from the installation that you typed into the Text field.
12. Choose Change Record.
w The fields in Data Entry Master and Basics open.
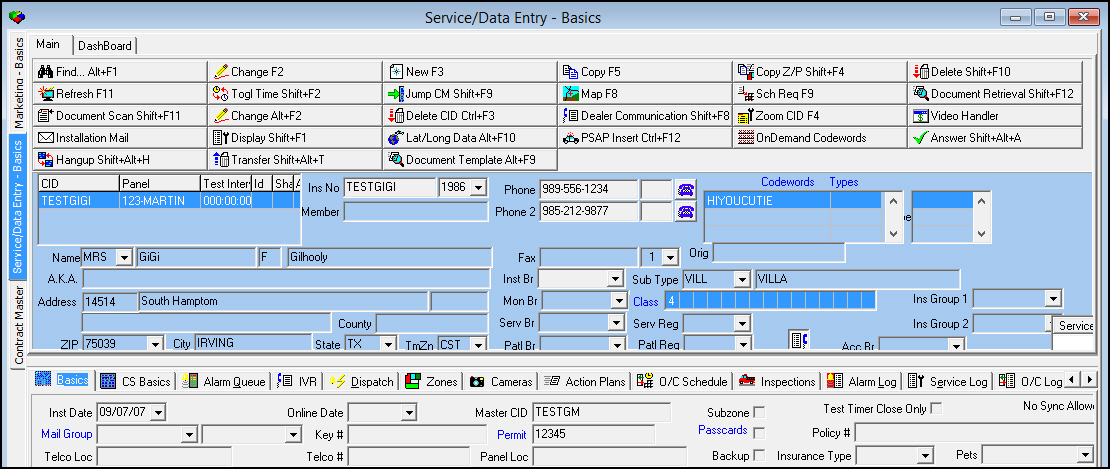
13. In the Data Entry Basics tab, type the CID that you designated as the Master CID in the Master CID field.
14. Choose Save.
w SBN now links the installations, and alarm data shows in both accounts. SBN records Alarm Log data from the subzoned installation in the Alarm Log for the Master CID.
Creating Double Knock Zones
Designate a zone as Double Knock for situations requiring at least two separate signals to trigger an alarm event. For an operator to take action on incoming signals from Double Knock zones, the zone must receive multiple signals within a specified period of time.
Note: Use option mo181 to enable the Double Knock feature. Use option mo182 to set the incoming signal interval in seconds for Double Knock zones.
You must enter an X in the Dbl Knock field in the Zone Details window to specify whether a zone is a Double Knock zone for your company. (Contact IBS to enable this field.) If a zone is specified as Double Knock, SBN receives the first incoming signal as a log-only event in the Alarm Log. If a second signal comes in for the same zone within the time you specify in option mo182, then the signal appears in the Alarm Queue, and an operator handles it as a normal incoming signal. If a third signal comes in for the same zone within the specified time, the event line in the Alarm Queue displays that there are multiple signals for the event.
Use the following steps to designate a Double Knock zone:
1. In the Zones tab, select the zone you want to designate as a Double Knock zone.
2. Double-click your selection or choose Get One Zone.
w The Zone Details window opens.
3. Choose Change.
w Fields open for changes.
4. Type an X in the Dbl Knock field.
5. Choose Save.
Note: You must configure options mo181 and mo182 for the feature to work properly.
Creating Linked Multi-Signal Zones
You may link zones for situations requiring a signal from each linked zone to trigger an alarm incident. For an operator to take action on incoming signals from linked multi-signal zones, each linked zone must receive a signal without being restored to normal status. Only an alarm event with the Trip Linked Double Knock check box selected in program #1621 will activate this feature. All other alarm event types on linked zones create alarm incidents in the Alarm Queue as usual according to the event settings in program #1621.
Use the following steps to designate linked multi-signal zones:
1. In the Zones tab, select a zone you want to designate as a linked multi-signal zone.
2. Double-click your selection or choose Get One Zone.
w The Zone Details window opens.
3. Choose Change.
w Fields open for changes.
4. Select the Linked Dbl Knock check box.
5. In the Linked Zones grid at the bottom of the Zone Details window, select a zone to link to the selected zone.
Note: You may only link zones from CIDs on the same installation.
6. Choose Save.
7. Go to the zone you just linked to the selected zone and choose Get One Zone.
w The Zone Details window opens.
8. Choose Change.
w Fields open for changes.
9. Select the Linked Dbl Knock check box for this zone as well. You will see the zone you linked to this zone in the Linked Zones grid.
10. Choose Save.
Defining System Zones
In SBN you can route system-generated events (such as Missed Open, Missed Test, etc.) to predefined zones. This allows you to attach these zones to specific action plans for treating these events. (Contact IBS to attach a defined zone to a system event. The support staff will update your systemzone table to reflect your zone choices.)
The System Zones functionality allows you to attach system-generated events to actual zones, template zones, or global zones. Once your system events are linked to your predefined zones, you can enter these zone IDs into your installation. You can further route system-generated events by area. If, for example, you have Open/Close signals arriving in several different areas within a zone, you can enter your defined zone for a Missed Close and specify the area, which allows you to tie these events to separate action plans.
Example
You receive Open/Close signals on perimeter and interior zones. The Missed Close event is tied to MCL in systemzone table.
Regular open/close signals report to Zone 1, Areas 1 and 2. When a missed close comes in for Area 2, the system uses the MCL zone tied to Area 2, and uses action plan 4.
Zone ID | Area | Zone Description | Action Plan | Schedule # |
1 | 1 | Perimeter | 1 | 1 |
1 | 2 | Interior | 2 | 2 |
You can define the MCL zone for each area.
Zone ID | Area | Action Plan |
MCL | 1 | 3 |
MCL | 2 | 4 |
Viewing the Test Templates Window
Use the Test Templates window to create masks for zones that define how SBN displays the results of a test in the Test Results window of the Insert Test tab. The functionality of these masks applies only to the display of Test Results.
You may create masks on a template account or individual CIDs. Template accounts use a panel type that has a check mark in the Template Zones field of Panel Types (program #1742) and have a check mark in the Read-Only box in the Basics tab of Data Entry (program #559).
Note: If you create masks on a template account, you will only see those masks on the Zones tab of the template account. Those CIDs created from the template account inherit the masks and, when tested, display results in Test Results window of Insert Test. You can, however, create additional masks on the individual CID even if it was created from a template account.
If you define masks for a zone, you must define the following masks for a selected zone:
- Allow Mask
- Disallow Mask
- Required Mask
You may apply zone masks from one installation to another by entering the installation number with the masks you want to use as the value of option sdi017 and the dealer ID for the installation as the value of option sdi023. In the Zones tab of this installation, associate at least one zone with a specific item, and use the Test Templates button to create masks for the zone to display alarm signal test results in the Test Results window of the Insert Test tab. In Panel Types (program #1742), select the Signal Test check box for any panel types attached to installations that you want to associate with the test template you created. Assign the same item code from your test template zone to any zones on other installations that should use the same test template masks. SBN does not display the masks in the Test Templates window of the installation you copied to, but after alarm tests, it displays the test results in the Insert Test tab according to the masks you applied to the zone.
The following graphic shows the Test Templates window with defined masks.

Column Descriptions
The following table describes the columns used in the Test Templates window.
Column | Description |
Zone | Unique number that identifies this zone. |
Area | Abbreviation for a designated area within a zone. |
Code | Code that identifies the type of signal that this zone generates. |
Allow Mask | This column displays the mask for test results. Each X represents a type of alarm signal that the technician can test. For more information, see Defining a Mask. |
Disallow Mask | This column displays the mask for test results. Each X represents a type of alarm signal that the technician cannot test. For more information, see Defining a Mask. |
Required Mask | This column displays the mask for test results. Each X represents a type of alarm signal that SBN should receive when a technician inserts this zone into test. For more information, see Defining a Mask. |
Customer ID | Identifies the CID to which the selected zone is attached. Note: If this column displays a %, the selected zone is a global zone. |
Defining a Mask
Each mask is composed of eight positions. Each position represents one of the following types of alarm signals that arrive on the selected zone:
- Position 1 = Alarm
- Position 2 = Restore
- Position 3 = Battery
- Position 4 = Cancel
- Position 5 = Supervisor
- Position 6 = Bypassed
- Position 7 = Trouble
- Position 8 = Logging
Allow Mask
Enter an X in the positions that represent the signal types for the selected zone that the technician can test.
Enter a . in the positions that represent the signal types that you do not specifically define.
Example
- You want to allow a technician to test all signal types for the selected zone. The Allow Mask would contain Xs in each position — XXXXXXXX
- You want to allow a technician to test Alarm, Restore, Cancel, and Trouble signals. The Allow Mask would contain Xs in the positions 1, 2, 4, and 7 — XX.X..X.
Note: Carefully review your masks. SBN does not check the masks against each other. Thus, you could define a zone with an X in the Restore position in both the Allow and Disallow masks.
Disallow Mask
Enter an X in the positions that represent the signal types for the selected zone that the technician cannot test.
Enter a . in the positions that represent the signal types that you do specifically define.
Example
- You want to allow a technician to test all signal types for the selected zone. The Disallow Mask would contain .s in each position — ........
- You want do not want to allow a technician to test Battery, Supervisor, Bypassed, or Logging signals. The Disallow mask would contain Xs in the positions 3, 5, 6, and 8 — ..X.XX.X
Note: Carefully review your masks. SBN does not check the masks against each other. Thus, you could define a zone with an X in the Restore position in both the Allow and Disallow masks.
Required Mask
Enter an X in the positions that represent the signal types for the selected zone that SBN should receive when that CID is put into test.
Enter a . in the positions that represent the signal types that you do not specifically define.
Example
You want to SBN to receive signals of all types except Supervisor and Bypassed for the selected zone. The Required Mask would contain Xs in positions 1-4 and 7-8 — XXXX..XX
Working with Masks
In the Test Templates pane, choose Change Record to open the grid to:
- Create a mask
- Copy a mask
- Change a mask
Creating a Mask
You can create a mask for each zone in the Test Templates window. SBN requires you to enter a mask in each column for the selected zone before it saves the data.
Use the following steps to create a mask:
1. In the Test Templates window, choose Change.
w SBN opens the grid of masks.

2. Select the cell in the Allow Mask column for the zone for which you want to create a mask.
3. Click in the cell to activate your cursor.
4. Enter the mask.
5. Repeat steps 2-4 in the Disallow Mask column and in the Allow Mask column.
6. When you have created a mask in each of the three columns for the selected zone or zones, choose Save.
Copying a Mask
If you want to use the same mask for multiple zones, you may choose Copy to easily copy a mask. SBN requires you to enter a mask in each column for the selected zone before it saves the data.
Use the following steps to copy a mask:
1. In the Test Templates window, choose Change Record.
w SBN opens the grid of masks.
2. Select the cell of the mask you want to copy.
3. Choose Copy Current Record.
w SBN displays the Paste button in place of the Copy Current Record button.
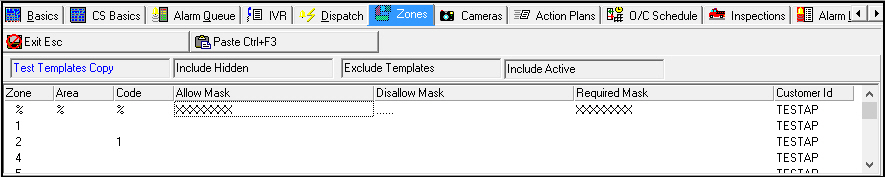
4. Click the cell into which you want to paste the copied mask.
5. Choose Paste.
w SBN pastes the mask into the cell and displays the Copy Current Record button again.

6. Repeat steps 2-5 for each copy/paste function that you want to perform.
7. Choose Save.
Changing a Mask
You can change any aspect of a mask by double-clicking in the mask cell. SBN requires you to enter a mask in each column for the selected zone before its saves the data.
Use the following steps to change a mask:
1. In the Test Templates window, choose Change Record.
w SBN opens the grid of masks.
2. Double-click the mask you want to change.
w SBN highlights the mask.

3. You may either delete the existing mask, enter a new mask, or highlight a specific position and change the character.
4. Choose Save.
Related Programs
The following table lists programs related to the Zones tab.
Program | Number | Document Link | Description |
Detector Types | 1827 | Define and maintain detector types to set up inspection information for zones. | |
Data Entry Master and Basics | 559 | A program from which you can access the Alarm Queue. Set up skills and view installations from which alarms generate. | |
Open/Close Schedule Tab | N/A | Define open/close schedules for the customer's premises and assign to open/close zones. | |
Items | 1535 | Define and maintain item codes to associate with work orders and zones on the installation. | |
Zone Types | 1733 | Define and maintain zone types to specify information on alarm processing. | |
Panel Types | 1742 | Define the different panel types used at installations. | |
UL Security Grades | 1732 | Define and maintain security grades that SBN uses for open/close schedules. | |
Insurance Companies | 1541 | Define and maintain a list of insurance companies to assign for inspection purposes. | |
Dispatch Tab | 537 | Handle alarms for incoming zones. Much of the information entered in the Zones tab appears in Dispatch. | |
Installed Components Tab | N/A | Track installed items and testing/inspection information for the installation. | |
Insert Test Tab | N/A | Place zones into the Test Queue for testing purposes. | |
Action Plans Tab | N/A | Create action plans to associate with zones. Action plans are customer-defined approaches to emergency situations. |
Button Functions
The following table displays the buttons, describes the shortcut keys, actions, and functionality.
Button | Name | Shortcut Key | Action | Description |
Zones Main | 559/20 | |||
| Get one Zone | Alt+F1 | 559/21 | View zone details. |
| Change Record | F2 | 559/28 | Change zone details. |
| New record | F3 | 559/32 | Create a new zone. |
| Test Zone | shift+F5 | 559/34 | Create and maintain test intervals for existing zones. |
| Delete Record | shift+F10 | 559/37 | Delete the selected zone. |
| Toggle viewing of hidden Zones | F7 | 559/33 | Change the view of Zones tab to include/exclude hidden zones. |
| Change Zone Status | F8 | 559/30 | Change the physical status of an existing zone. |
| Toggle Template | F9 | 559/39 | Change the view of the Zones tab to include/exclude template zones. |
| Test Templates | shift+F6 | 559/44 | Create masks for zones. |
| Toggle Active | shift+F7 | 559/38 | Change the view of the Zones tab to include/exclude active zones, or to show all active and inactive zones. |
Zones Main - Change Mode |
| |||
| Restore/Cancel Zoom | F4 | 559 | View restore/cancel zone pairs. |
| Detector Zoom | F5 | 559 | View detector information for the selected zone. |
| Copy Current Record | shift+f3 | 559/29 | Copy the selected zone record. |
| Delete Record | Shift+F10 | 559 | Delete the selected zone. |
Zone Details Window |
| |||
| Change Record | f2 | 559/22 | Change details for the selected zone. |
| New Record | f3 | 559/23 | Create a new zone. |
| Previous | f5 | 559/24 | Select the previous zone to view details. |
| Next | f6 | 559/25 | Select the next zone to view details. |
| Copy Current Record | shift+f3 | 559/26 | Copy the selected zone record. |
| Delete Record | Shift+f10 | 559/27 | Delete the selected zone. |
Zone Test Window |
| |||
| Change Record | f2 | 559/35 | Create and maintain test intervals. |
| Copy Current Record | shift+F3 | 559/36 | Copy the selected zone record. |
| Paste | ctrl+F3 | 559 | Paste a single zone item. |
| Paste All Same Zone Type | ctrl+F4 | 559 | Paste all items. |
Zone Status Change |
| |||
| Change Record | F2 | 559/31 | View the Zone Status Change dialog box. Change the physical status of the zone. |
| Refresh | f11 | 559 | Refresh the screen with the latest data. |
Test Template Window |
| |||
| Change Record | f2 | 559 | Enter test masks for the selected zone. |
| Copy Current Record | shift+F3 | 559 | Copy the selected zone record. |
| Paste | ctrl+F3 | 559 | Paste the selected zone record. |
| Exit | Esc | 559 | Exit without saving. |
| Save | Enter | 559 | Save existing record. |















Zone Include-Template Validation
Zone include-templates are validated so invalid template/CID-grid combinations cannot be created, with clear error messages. When an installation uses a zone template, bypass signals pick up the correct protected area.
Modifications and Updates to Zones
The following table lists modifications and updates to the Zones document.
Mod Number | Date | Description |
n/a | 07/22/09 | document rewritten |
07.02.18730, 08.03.06907 | 08/12/09 | Allow users to link zone test templates from one installation to others. |
07.02.18857 | 10/20/09 | SBN deletes delayed alarms on deleted zones. |
07.02.19221, 08.03.07198 | 12/03/09 | Option ba438 determines the default of the Active/Inactive Zones display. When the option is on, the Zones tab initially displays only active zones. |
07.02.19333, 08.03.07261 | 01/08/10 | SBN will not allow you to delete a zone if it is linked to a camera in the Cameras tab of program #559. |
07.02.19866, 08.03.07654 | 06/28/10 | Added Linked Dbl Knock check box to Zone Details window. |
07.02.20046 | 08/25/10 | SBN does not generate a No Res/Can alarm in the Alarm Queue until the Delay period passes for the last alarm received on a Restore Required zone. |
07.02.20114, 08.03.07817 | 09/22/10 | Added Sub Group, Sub Group Delay, and Sub Group Count fields and columns. |
07.02.21749 | 09/21/12 | Added option ma016. |
07.02.21968, 08.03.08862, 07.02.22001 | 10/01/12 | Added Double Knock Counter Exception check box to Zone Details window. |
07.79.22867, 07.79.22841 | 08/27/13 | When you delete a zone that is in test, SBN removes the zone from the ma_zonetest table. |
07.79.22848, 08.79.08332 | 08/28/13 | Added Mobile Agency check box to program #1733; (PSAP updates for zones) |
07.81.23414, 07.81.23413, 08.81.09678, 07.81.23386, 08.81.09648, 07.81.23357 | 06/13/14 | Added Reaction Time field. |
07.81.23439, 07.81.23367 | 06/17/14 | Added note that Alarm signals on zones with a "-" in the Class field refresh the test interval for the CID. |
n/a | 07/30/14 | Images updated. |
08.88.11302, 07.88.25730, 08.88.11277, 07.88.25679 | 03/22/18 | Added SEFCO fields Timer 1 and 2, Counter 1 and 2, and Tolerance as well as updated image to display new fields. |
07.92.26658, 08.93.11991, 07.93.26992 | 09/19/22 | 10 free form fields (Misc 2-11) and 5 date fields added. Images updated. |