
SBN PERS
SBN PERS
SBN PERS
Module: Utilities
This is a new procedure. This is a new page.
Overview
The SBN Personal Emergency Response Service (PERS) is an application for mobile device users to send and receive a personal emergency response through SBN. It converts any enabled mobile device, such as a phone or tablet, into a PERS device, if connected to an SBN network. SBN PERS provides end users the ability to send a duress signal at any time, or to initiate protection outside of an emergency situation, and view the status of that signal. The application enables a central station to provide personal safety monitoring for individuals in situations where their safety may be compromised. The central station can send customer notifications, track the end user's location during a duress situation, and contact the appropriate police department, if used with a PSAP Lookup service such as Intrado or Pitney Bowes.
Use of SBN PERS requires an app that has been previously installed on the mobile device. This app is available for iOS and Android devices, and may be downloaded from the appropriate app store. Your device's app manager will remind you when a new version is available.
This document covers the following topics:
Enabling an Installation for PERS Use
Activating the SBN PERS Application
SBN PERS
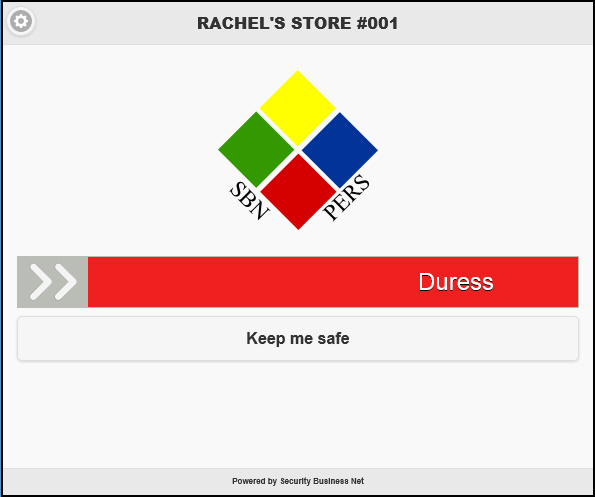
Heading/Function Descriptions - SBN PERS Window
The following table describes the fields and columns used in the SBN PERS window.
|
Heading/Function |
Description |
|
Title |
The name of the installation to whom the user belongs. |
|
Duress |
Slide this button to send a duress signal to the central station. |
|
Keep Me Safe |
Click this button to reach the Keep Me Safe page. |
Mobile Solutions Setup
Before SBN PERS can be used, it must be set up as part of a complete SBN solution. This involves setting up the server, creating new zone types so that SBN can recognize the incoming signals, enabling the installation for its use, and activating both the mobile app and SBN.
Server Setup
Use the following steps to set up a server:
1. Install and configure SBN Mobile Web Service via SBN Service Manager. For more information, please refer to the SBN Service Manager page.
New Zone Type Creation
Note: Use of the tracking options to allow police agencies to respond based on the end user's location requires a PSAP Lookup service. At this time, SBN offers functionality with Pitney Bowes and Intrado PSAP Lookup services, through the PSAP Interface Queue (program #1659). These must be enabled through the SBN Service Manager. For more information, please refer to the SBN Service Manager page.
The next step is to create a new zone type for the installation. This allows you to create different action plans for different mobile scenarios. This new zone type and these new zones must follow a specific format if SBN is to process incoming signals.
Use the following steps to create the new zone types:
1. In SBN, open the Zone Types program (program #1733).
Note: For more information on creating zones, please refer to the Zone Types document.
2. All of the new zones use a different Zone Type. When creating each one, enter the Zone Types as listed below:
-
Mobile Panic: ID1
-
Mobile Medical: ID2
-
Mobile Police: ID3
-
Mobile Fire: ID4
-
Mobile Keep Me Safe: ID5
3. The following four zones must have a Priority assigned to them for proper functionality. The priority numbering setup should be based on the following listing:
-
Mobile Panic: Medium Priority
-
Mobile Medical: High Priority
-
Mobile Police: High Priority
-
Mobile Fire: High Priority
4. Mobile Keep Me Safe utilizes delays as specified in the mobile app. The Delay field in Zone Types cannot have an entry in it if this app-driven delay is to be available.
5. Enter any other necessary information in the Zone Type fields, based on installation protocols.
6. When finished, click Save or press ENTER to save the new Zone Type and return to the main Zone Types window, or click Exit or press ESC to return to the main Zone Types window without saving any changes.
7. Verify that the new Zone Types are visible and accessible in the Zone Types program before closing.
New Panel Type Creation
Next, you will need to create a new panel type in order to receive mobile device signals.
Use the following steps to create a new mobile device panel type:
1. In SBN, open Panel Types (program #1742).
Note: For more information on entering a new panel type, please refer to the Panel Types document.
2. In the Panel field, enter "SBNPERS".
3. In the Download Type field, enter "0".
4. Click the Duress checkbox to enable duress functionality.
5. Enter the rest of the panel type information based on your installation's protocols. When finished, click Save or press ENTER to save your changes and return to the main Panel Types window, or click Exit or press ESC to return to the Panel Types window without saving changes.
Enabling an Installation for PERS Use
Before final use, the installation to be used must be enabled for PERS functionality
Use the following steps to enable an installation for PERS use:
1. In Data Entry Master and Basics (program #559), add a new CID to the installation that incorporates the new SBNPERS panel type.
2. In Data Entry's Zones tab, add a new SBN PERS zone, with the new mobile device zone type.
3. Within the SBN PERS zone, add a new Duress action plan.
Activating the SBN PERS Application
Before use, both the individual device must be activated and SBN enabled to allow, track, and respond to incoming PERS signals.
Note: Location Services must be enabled on the mobile devices using the SBN PERS app.
Use the following steps to activate the SBN PERS application:
1. When logging into SBN PERS on your device for the first time, visit the URL given to you by your central station and enter the activation code. If you do not have an activation number, contact your central station.
The following graphic shows SBN PERS in its first login.
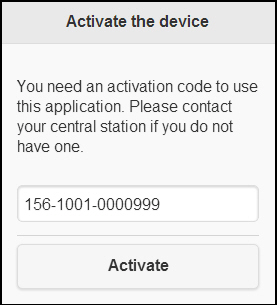
After entering the number, press the Activate button. The app's function page will open.
Sending Duress
To send a duress signal, open the SBN PERS app and slide the Duress button on the function page. When activated, SBN PERS sends a personal duress signal to the central station. When activated on a mobile device, an alarm is generated that transmits a GPS location of the device. An operator may view that location using Dispatch (program #537), via Google Maps, by selecting the Image button or pressing F7 in Dispatch.
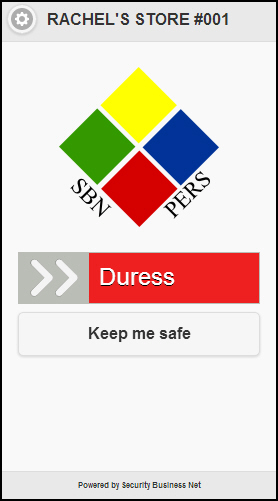
If a mobile agency is enabled in the action plan for the mobile zone, the emergency agency (police, fire, medical, patrol) will change based upon the GPS location. The monitoring operator would therefore continue to process the call list in the usual way.
End users may specify the type of help they need, by choosing from the Medical, Police, or Fire options in the mobile app. When a police, fire, or medical agency is selected, a new signal is sent to the central station, changing the action plan accordingly. If a mobile agency is enabled within the zone's action plan, the emergency agency will change based on the location of the GPS signal. The monitoring operator is then able to process the call list in the usual manner. The type of help may be changed by the user at any time during the duress situation: each time the agency is changed, a new signal is sent with higher priority, changing the action plan.
While the alarm is still in progress and has not yet been resolved, GPS coordinates for the device are transmitted to the Alarm Log each time the device moves more than 25 meters (82.02 feet) from the original duress signal location. The emergency agencies referenced in the action plan change based on the signal location.
Note: If you attempt to send a signal in an area where you cannot be located via GPS, the SBN PERS screen will read "Locating you..." until you are in a location where a GPS location can be established.
End users are updated on the duress signal's status with changing colors in the mobile app's status bar. If the app should be shut down and then reopened, the app will reopen to the current status. Once the duress signal has been initiated, the status bar will note that the signal has been sent but has not been acknowledged with a notice in red.
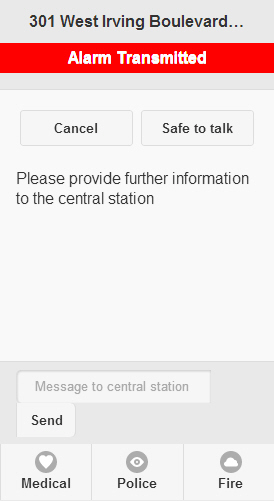
When the signal has been acknowledged by an SBN operator, the app's status bar changes color to yellow.
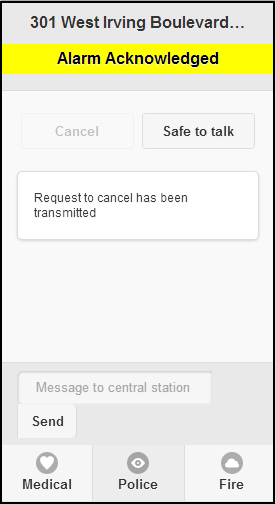
Once the operator has submitted an action based on the installation's action plan, the status bar changes color again to green to inform the end user that the appropriate agency has been dispatched.
The central station operator completes the duress signal and clears the event, both at the central station and on the mobile app. Only the operator can resolve the alarm. When this happens, the SBN PERS app returns to its function page and stops transmitting GPS coordinates.
Press the Safe to talk button to let the operator know if s/he can call the user. Press it again to turn off this feature.
The user may also include additional typed messages from the "Message to central station" field at the bottom of the page. Enter the message and press Send to submit the message to the operator.
Finally, the end user may cancel a duress alarm by selecting the Cancel tab and entering a Passcard or Codeword. The alarm may only be turned off by the operator, and the mobile app will read "Request to cancel has been transmitted" until the operator processes the signal.
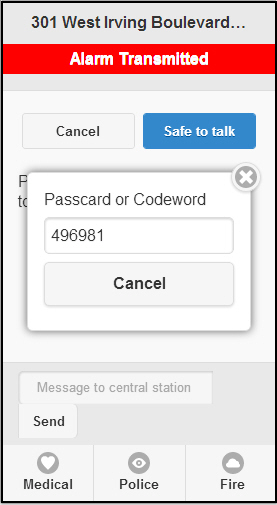
The app returns to the function page when the alarm is cancelled.
Note: if the app should shut down before the operator can process the signal, the user may have to resubmit a request to cancel the alarm.
Keep Me Safe
An end user may initiate the Keep Me Safe feature before entering a potentially dangerous situation. When initiated, the device's GPS location is sent to the SBN Alarm Log. The timer may be ended at any time using the Cancel button at the bottom of the window, and no duress signal will be sent to the Alarm Queue. If the timer expires, a duress signal will be sent to the SBN Alarm Queue.
Use the following steps to set up Keep Me Safe:
1. From the function page, click the Keep me safe button to open the Keep Me Safe page.
2. Start Keep Me Safe by placing your thumb or finger on the Keep me safe button. Do not release the button until you arrive safely at your destination. Alternately, a timer can be activated that will transmit a signal to the central station if it is not disarmed in the selected time. Select that time with the slide bar at the bottom of the page (the default is 60 minutes) and then press the Start safety timer button.
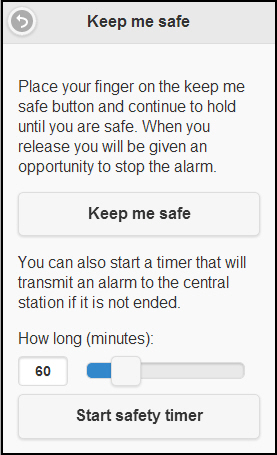
3. When you release the Keep Me Safe button, a short countdown starts, allowing you to stop the intended alarm. If you want to shut down the countdown, press the End button at the bottom of the page and enter your Passcard or Codeword.
4. If you press the I am safe button before the countdown ends, the countdown runs down and the app does not generate a duress signal. If you wish to extend the countdown, press the Extend button at the bottom of the window. Enter the number of minutes you wish to extend the countdown with the slide bar (the default is 15 minutes) and enter your Passcard or Codeword.
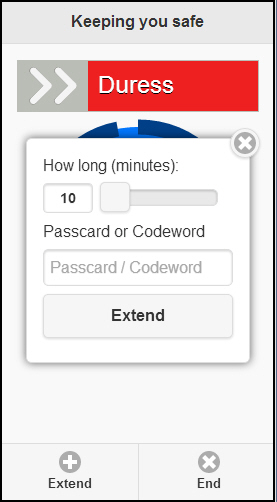
5. If you release the Keep Me Safe button, do not press the I am safe button, and let the countdown timer expire, the duress process begins.
6. To shut down a countdown, press the End button at the bottom of the page. Enter your Passcard or Codeword and press Cancel. If an alarm has not been transmitted, the countdown will stop and a note will not be made in the Alarm Log.
Changing the SBN PERS Logo
SBN PERS may be customized with company logos, banners, or other graphics to personalize the user experience.
Use the following steps to change the SBN PERS logo:
1. Create the new logo for SBN PERS, and save it as "logo.png". Make sure to save it in PNG format.
On the server where the SBN PERS web app is installed, locate the app directory.
2. In the app directory, locate the image directory. The path is c:\inetpub\wwwroot\sbnpers\img
3. Locate the file logo.png.
4. Replace the existing logo.png file in the directory with the newly created logo. Make sure not to change the file name.
5. Launch the mobile device app or launch a Web browser to view the new logo appearance and placement.
Modifications and Updates to SBN PERS
The following table lists modifications and updates to the SBN PERS document.
|
Mod Number |
Date |
Description |
|
07.81.23559, 07.81.23558 |
08/20/14 |
Created document. |