
Access Control
Access Control
Access Control
Module: Account Management
Overview
Access Control allows you to permit or deny specific resources to users. Use Access Control to manage physical resources (such as a pharmacy, where only verified employees are allowed to enter) or digital resources (such as private text documents on a computer). Item Control or Electronic Key Management are areas within an access control system that concern the management of equipment and locations by certain individuals. Use Access Control systems to:
Identify and authenticate users who can log on to a system and access software elements
Determine what physical locations of a company users are limited to
Track where a user is located or what they have recently accessed
Many of the fields in this document are specific to VertX HID integration. HID stands for Human Interface Device, a computer device that interacts with and takes input from humans, such as keyboard, mouse, access cards, etc.
Note: Currently used by Company 105. Contact IBS if you want to use this program.
The following topics comprise the Access Control system:
Common Access Control Functions
Navigating to Access Control
Use the following steps to navigate to the Access Control tabs:
1. From the main SBN toolbar, select Menu.
2. From the drop-down menu, select Go To.
3. In the Go To Program dialog box, type in "559" and press Enter.
w Data Entry Master and Basics opens.
4. Choose the Access Control tab in the lower pane of Data Entry.
Common Access Control Functions
You can perform the following functions in most of the Access Control tabs.
Access Control Options
Set Access Control downloading and uploading directory options in the SBN Client Options window [CTRL+O]. Each Access Control tab contains Update fields, which display the status of the files you are downloading or uploading from the specified directory.
Viewing the Details of an Entry
You can view the details of an Access Control entry in the fields in the bottom pane.
Use the following steps to view the details of an entry:
1. In the Access Control tab, select the entry for which you want to view details.
2. Double-click your selection or choose Get.
w The fields below the displayed list fill with the details of the selected entry.
Adding an Entry
Use the following steps to add a new entry:
1. In the Access Control tab, choose New.
w The fields in the window open.
2. Complete the fields.
3. Choose Save.
w SBN adds the entry to the list of defined entries for the tab.
Changing the Details of an Entry
Use the following steps to change the details of an entry:
1. In the Access Control tab, select the entry you want to change.
2. Choose Change.
w The fields that can be changed open for changes.
3. Enter changes, as needed.
4. Choose Save.
Deleting an Entry
Use the following steps to delete an entry:
1. In the Access Control tab, select the entry you want to delete.
2. Choose Delete.
w A Confirmation dialog box appears: "Are you sure?"
3. Choose Yes.
w SBN deletes the selected entry.
AC Readers
AC Readers are typically used to permit or deny access through doors at a location. Use the AC Readers tab to define the attributes of access control readers and attach readers to a CID. Reader IDs must be unique per CID.
You cannot work in AC Readers unless you have:
Zones defined for the CID you want to attach readers to
At least one AC Schedule # defined
To access this window, select the AC Readers tab under Access Control.
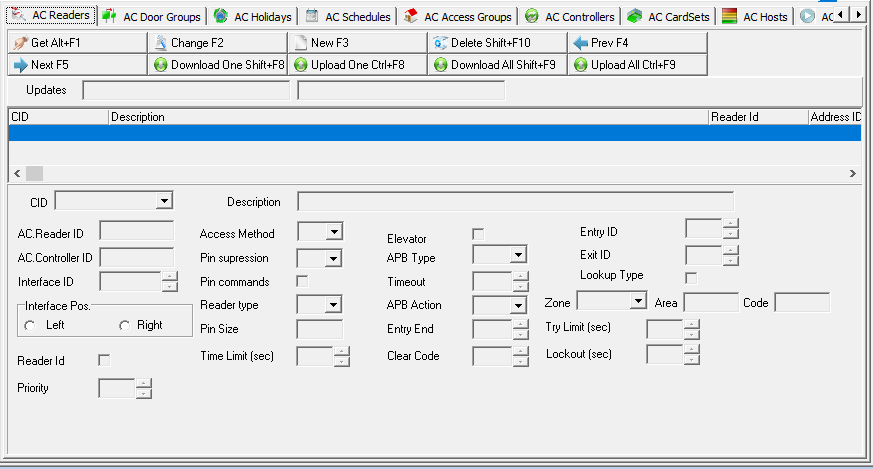
Note: See the AC Readers table for button descriptions.
Field and Column Descriptions
The following table describes the fields and columns used in the AC Readers tab.
Field/Column |
Description |
Updates |
Current status of information you are uploading. |
(No label) |
Current status of information you are downloading. |
CID |
Customer ID for the current installation attached to the group. |
Description |
Description of the reader. |
AC Reader ID |
Unique reader ID. |
AC Controller ID |
Internal ID of the controller. This field supports values 1 - 65535. |
Interface ID |
Address of panel connected to the reader. |
Interface Pos |
Define the Reader position on the interface panel by choosing the Left or Right radio buttons. |
Reader ID |
Select this check box to define the reader type. |
Priority |
Specifies the priority level for each door. |
Access Method |
Select a method for opening the door from the drop-down menu. (Define this menu in program #1590.) |
PIN Suppression |
AC Schedule Number used to suppress PIN entry in Card-and-PIN mode. Note: If the reader is a card-and-PIN reader, then this schedule determines when this reader becomes in effect a card-only reader. |
PIN commands |
Select this check box if the reader accepts PIN commands. |
Reader type |
Select an AC reader type from the drop-down menu. (Define this menu in program #1590.) |
PIN Size |
Maximum number of digits allowed for a PIN. This field accepts values from 8 - 15. |
Time Limit (sec) |
Choose a maximum time, in seconds, that users are allowed to enter their PIN. |
Elevator |
Select this check box if this reader is an elevator cab reader. |
APB Type |
Anti-passback type. Select an APB output type from the drop-down menu.
(Define this menu in program #1590.) |
Timeout |
Time, in seconds, anti-passback is in effect. This field accepts values 0 - 99. |
APB Action |
Action to take if an anti-passback or area violation is detected. Select an APB action from the drop-down menu.
(Define this menu in program #1590.) |
Entry End |
Code to signal end of PIN entry. |
Clear Code |
Code to clear the keypad internal buffer. This field accepts values 1 - 15. |
Entry ID |
Area into which the door leads. This field accepts values 0 - 255. |
Exit ID |
Area out of which the door leads. This field accepts values 0 -255. |
Lookup Type |
Select this check box if this reader performs host lookup. |
Zone |
Select the Zone ID that indicates where the reader is located. (This list originates from the Zones tab of this installation.) |
Area |
Abbreviation for a designated area within a zone. This field defaults to the data defined in the Zones tab when you select a Zone ID. |
Code |
Code that identifies the type of signal that this zone generates. |
Try Limit |
Define the number of consecutive attempts a user is allowed to enter correct PIN. This field accepts values 0 - 10. |
Lockout (sec) |
Choose a time, in seconds, during which no PIN entry is allowed after the Try Limit is reached. This field accepts values from 0 - 99. |
AC Door Groups
A door group is a group of doors (readers) that can be associated with a common schedule in the access privileged database. The AC Door Group tab allows you to group access control readers by location. You must define readers in the AC Readers tab before you can assign them to a door group.
To access this window, select the AC Door Groups tab under Access Control.
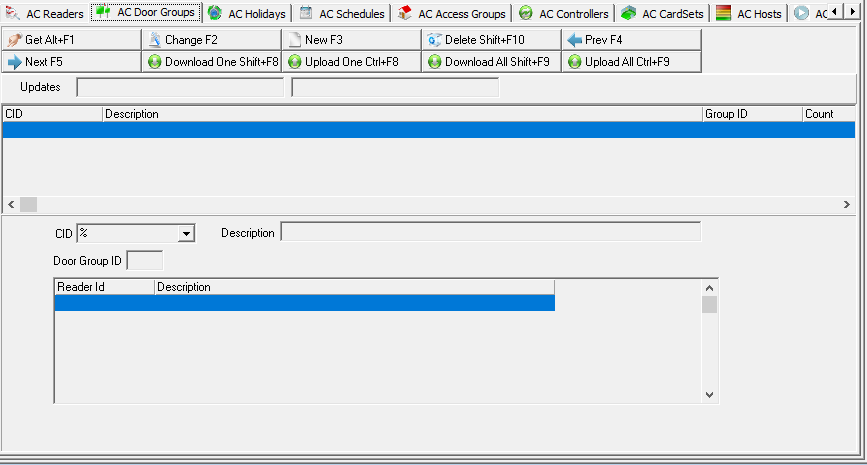
Note: See the AC Door Groups table for button descriptions.
Field and Column Descriptions
The following table describes the fields and columns used in the AC Door Groups tab.
Field/Column |
Description |
Updates |
Current status of information you are uploading. |
(No label) |
Current status of information you are downloading. |
CID |
Customer ID to which you want to attach this door group. |
Description |
Enter a description of the door group. |
Door Group ID |
Enter a unique ID for the door group. |
Count |
This column displays the number of readers attached to the selected group. |
Reader ID |
Drop-down menu of readers defined in the AC Readers tab for the specified CID. Note: You may not enter the same Reader ID more than once. |
Description |
Description of the readers defined in the AC Readers tab. Note: SBN automatically defines this field when you choose a Reader ID. |
AC Holidays
The AC Holidays tab allows you to set holidays for individual CIDs or CID groups. You can select a schedule that has been defined in the Open/Close Schedule tab, or you can create your own holidays from this tab. You can only select one O/C Schedule per CID. If you create your own holidays in this tab, you may assign multiple holidays per CID.
To access this window, select the AC Holidays tab under Access Control.
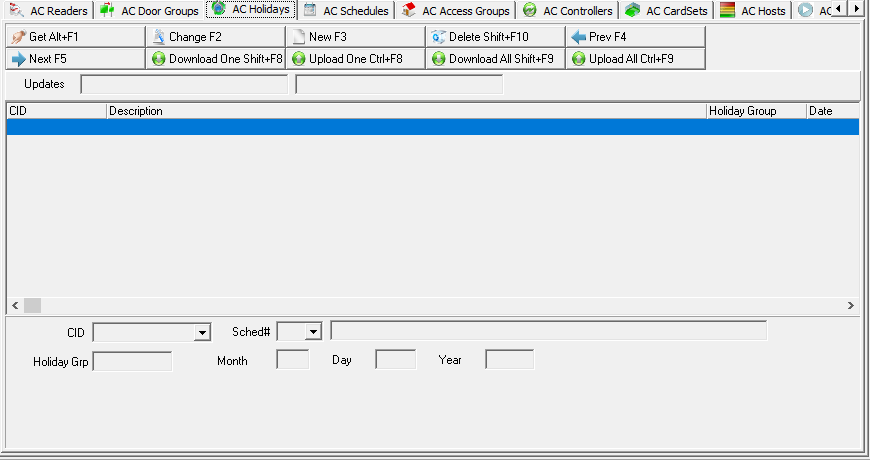
Note: See the AC Holidays table for button descriptions.
Field and Column Descriptions
The following table describes the fields used in the AC Holidays tab.
Field/Column |
Description |
Updates |
Current status of information you are uploading. |
(No label) |
Current status of information you are downloading. |
CID |
Customer ID to which you want to attach this Holiday. |
Sched # |
Schedule number defined in the Open/Close Schedule tab for this installation. (This field is not required.) |
Description (no label) |
Description of the schedule number assigned in the Open/Close Schedules tab. Note: SBN automatically defines this field when you choose a Sched#. |
Holiday Group |
Unique number, identifying a specific holiday. |
Month |
Month in which the holiday occurs. This field accepts up to 2 digits. |
Day |
Date on which the holiday occurs. This field accepts up to 2 digits. |
Year |
Four-digit date; year in which the holiday occurs. |
AC Schedules
The AC Schedules tab allows you to define the entire set of schedules used by the VertX controller. A schedule defines, on a weekly basis, a set of in-schedule intervals. You can test each interval against a particular schedule to determine whether it falls within the schedule. This tab also allows you to assign individual CIDs to preset schedules from the O/C Schedules tab.
To access this window, select the AC Schedules tab under Access Control.
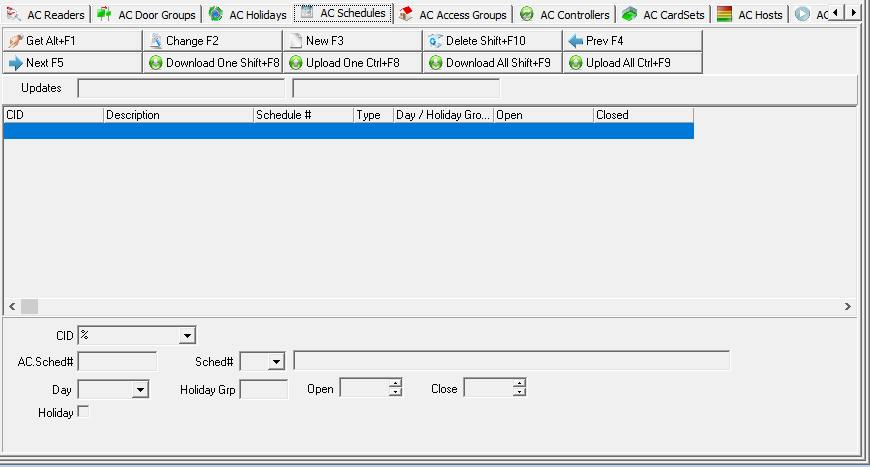
Note: See the AC Schedules table for button descriptions.
Field and Column Descriptions
The following table describes the field and column headings used in the AC Schedules tab.
Field/Column |
Description |
Fields |
|
Updates |
Current status of information you are uploading. |
(No label) |
Current status of information you are downloading. |
CID |
Customer ID to which you want to attach this schedule. |
AC Sched# |
Assign an ID number to this schedule that forms a group schedule for a week. Note: If you want to create a new daily schedule for the selected CID, assign the newly created schedule a number in this field. If you create a schedule in this tab, do not fill in the Sched# field. |
Sched# |
Select a schedule number from the drop-down menu. (This menu originates in the Open/Close Schedule tab in program #559.) Note: If you want to assign the selected CID a preset schedule from the Open/Close Schedule tab, select a schedule from the drop-down menu. When you select a preset Open/Close schedule, the Day, Open, and Close fields grey out. SBN applies the preset schedule from the Open/Close Schedule tab. |
Description (no label) |
Description of the schedule number assigned in the Open/Close Schedules tab. Note: SBN automatically fills this field when you choose a Sched#. |
Day |
If this is a normal (N) schedule, select a day from drop-down menu. |
Holiday Grp |
If this is a holiday (H) schedule, assign a Holiday Group ID to the selected CID. Note: Holiday Groups are defined in the AC Holidays tab. |
Open |
Indicate open time for the selected CID. |
Close |
Indicate close time for the selected CID. |
Holiday |
Select this check box if this schedule falls on a holiday. |
Columns |
|
Schedule # |
Displays the AC Schedule # defined. |
Type |
Displays (N) for normal schedule day and (H) for holiday. |
Day/Holiday Group |
If the schedule type is normal (N), this column displays the information entered in the Day field. If the schedule type is holiday (H), this column displays the Holiday Group ID. |
Open |
Open hours access for the selected CID. |
Close |
Close hours access for the selected CID. |
AC Access Groups
The AC Access Groups tab allows you to assign access groups to specific CIDs and allows you to set group IDs and schedules. This configuration file defines the door privileges of a cardholder. The system references this information to determine whether to grant or deny access to individual cardholders. You can assign multiple door group and schedule pairs to an access group.
To access this window, select the AC Access Groups tab under Access Control.
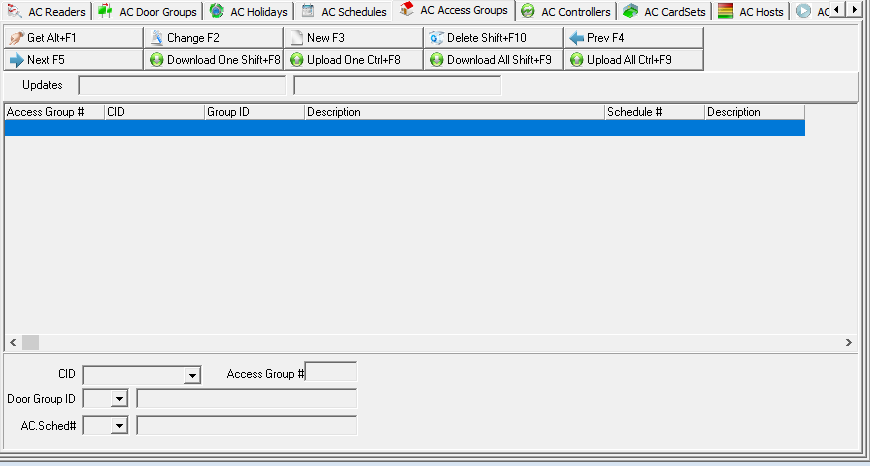
Note: See the AC Access Groups table for button descriptions.
Field and Column Descriptions
The following table describes the fields and columns used in the AC Access Groups tab.
Field/Column |
Description |
Updates |
Current status of information you are uploading. |
(No label) |
Current status of information you are downloading. |
CID |
Customer ID to which you want to attach this group. |
Access Group # |
Create a unique Access Group ID number. This field supports values 1 - 65535. |
Door Group ID |
Select a door group ID from the drop-down menu. (This menu originates from the AC Door Groups tab.) |
Description (no label) |
Description of the Door Group ID defined in the AC Door Groups tab. Note: SBN automatically defines this field when you choose a Door Group ID. |
AC Sched # |
Select a schedule number from the drop-down menu to assign to the selected Access Group. (This menu originates from the AC Schedules tab.) |
AC Controllers
The AC Controllers tab allows you to set up properties on your VertX controller. You can use it to set up communication with hosts, which pass messages and data to and from the VertX controller.
To access this window, select the AC Controllers tab under Access Control.
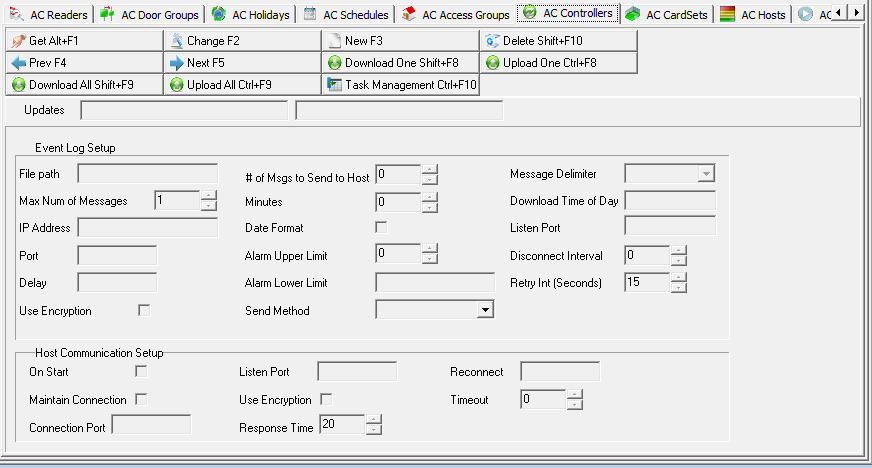
Note: See the AC Controllers table for button descriptions.
Field and Column Descriptions
The following table describes the fields and columns used in the AC Controllers tab.
Field/Column |
Description |
Updates |
Current status of information you are uploading. |
(No label) |
Current status of information you are downloading. |
CID |
Customer ID to which you want to attach this controller. |
Heart Beat |
Time, in seconds, between heartbeat messages.
|
Heart Beat Msg |
OEM definable message. |
Here I Am |
Time, in seconds, between Hear I Am messages.
|
Event Log Setup |
|
File path |
Enter the file path name for the Event Log. |
# of Msgs to Send to Host |
Indicates the total number of messages in your queue waiting to be sent to the host machine. |
Message Delimiter |
Select a message delimiter from the drop-down menu. |
Max Num of Messages |
Maximum number of messages in the event log. This value can be between 1 - 5000. |
Minutes |
Send a message to the host after the number of minutes you specify in this field. |
Download Time of Day |
Indicates the time at which messages are downloaded to the host. |
IP Address |
IP Address of the host. |
Date Format |
Select this check box to use U.S. date format. |
Listen Port |
Port number. |
Port |
Port number. |
Alarm Upper Limit |
Defines the upper alarm limit. This field accepts values 0 - 255. |
Disconnect Interval |
Indicates how long messages will attempt to connect to the host before disconnecting and ceasing connectivity.
|
Delay |
Time, in seconds, message is delayed before being sent. |
Alarm Lower Limit |
Defines the lower alarm limit. You can define lower limits for up to three communication channels. |
Retry Int (sec) |
Indicates, in seconds, the interval between connection attempts to the host. |
Use Encryption |
Select this check box if you want to encrypt messages for the Event Log. |
Send Method |
Select the method from the drop-down menu by which messages are sent to the host. |
Host Communication Setup |
|
On Start |
Select this check box if you want the Host to set up connectivity each time the host machine is started. |
Listen Port |
Port to listen for calls from the host. |
Reconnect |
Seconds to wait before attempting to reconnect to the host. |
Maintain Connection |
Select this check box if you want to maintain the connection when contacted by the host. |
Use Encryption |
Select this check box if you want to encrypt messages sent by the host. |
Timeout |
Minutes to wait before disconnecting if no messages are received from the host. |
Connection Port |
Port to connect to host. |
Response Time |
Seconds to wait before disconnecting if no response to host request is received. |
AC Card Sets
The AC Card Sets tab allows you to set the card format and the constant values used to encode the card number. A card set is the combination of a card format type and the contents of a set of fixed data fields defined in the appropriate card format configuration file.
To access this window, select the AC Card Sets tab under Access Control.
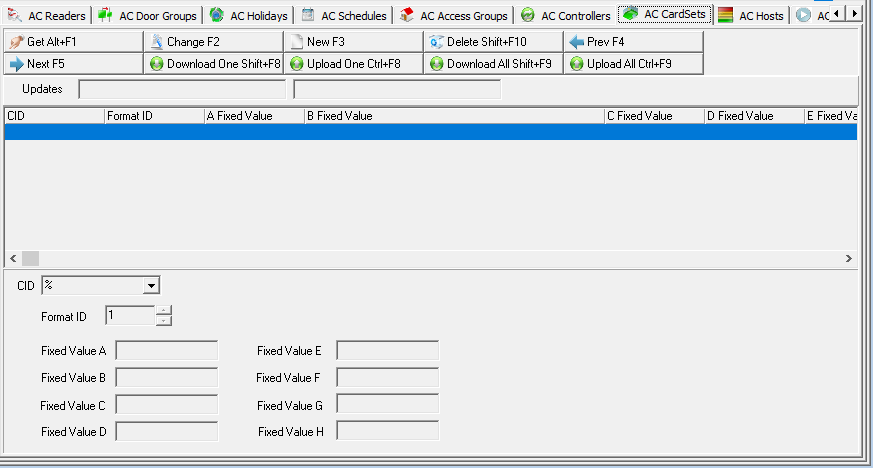
Note: See the AC Card Sets table for button descriptions.
Field/Column Descriptions
The following table describes the fields and columns used in the AC Card Sets tab.
Field/Column |
Description |
Updates |
Current status of information you are uploading. |
(No label) |
Current status of information you are downloading. |
CID |
Customer ID to which you want to attach this card set. |
Format ID |
Type of format ID for the card number. |
Fixed Value A |
Customer-defined field. |
Fixed Value B |
Customer-defined field. |
Fixed Value C |
Customer-defined field. |
Fixed Value D |
Customer-defined field. |
Fixed Value E |
Customer-defined field. |
Fixed Value F |
Customer-defined field. |
Fixed Value G |
Customer-defined field. |
Fixed Value H |
Customer-defined field. |
AC Hosts
The AC Hosts tab allows you to assign hosts to single or multiple CIDs.
To access this window, select the AC Hosts tab under Access Control.
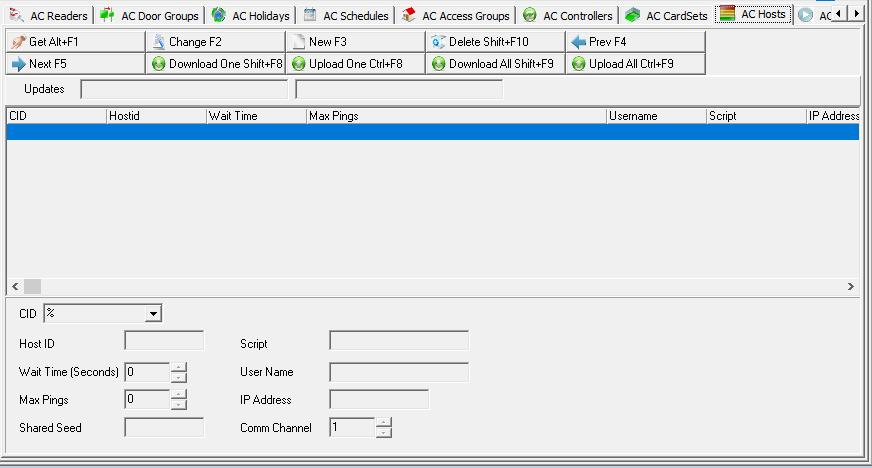
Note: See the AC Hosts table for button descriptions.
Field and Column Descriptions
The following table describes the fields and columns used in AC Hosts tab.
Field/Column |
Description |
Updates |
Current status of information you are uploading. |
(No label) |
Current status of information you are downloading. |
CID |
Customer ID to which you want to attach this host. |
Host ID |
System-generated ID number for the host. SBN generates the ID numbers in consecutive order based on CID. |
Script |
PPP script filename. ( * = Connection via LAN/WAN.) |
Wait Time (sec) |
Time, in seconds, between pings. |
User Name |
Enter the name of the user connecting with the modem using PPP. ( * = Connection via LAN/WAN.) |
Max Pings |
Maximum number of times to ping host to determine if connection has been made. This field accepts values from 0 - 99. |
IP Address |
Enter the IP Address of the host. |
Shared Seed |
Shared numeric string known to both controller and host. This field accepts values from 0 - 299. |
Comm Channel |
Communication channel associated with the IP address. This field accepts values from 1 - 3. |
AC Interface Panels
The AC Interface Panels tab allows you to assign interface panels to single or multiple CIDs. You can also define the type of interface panel connected to the controller at the specified address.
To access this window, select the AC Panels tab under Access Control.
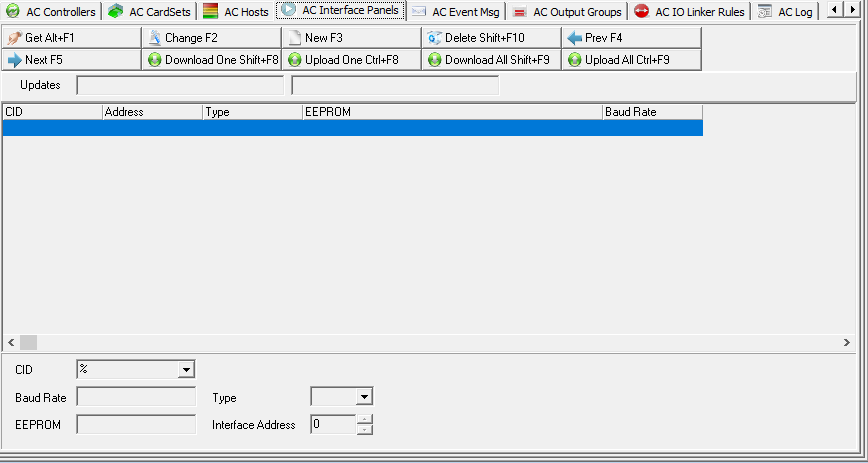
Note: See the AC Interface Panels table for button descriptions.
Field and Column Descriptions
The following table describes the fields and column headingss used in AC Interface Panels.
Field/Column |
Description |
Updates |
Current status of information you are uploading. |
(No label) |
Current status of information you are downloading. |
CID |
Customer ID to which you want to attach this panel. |
Baud Rate |
Target baud rate - 38400 |
Type |
Defines the name of the hex firmware file associated with each type of interface panel, as well as the name of a file containing common memory addresses. Define a panel type by selecting from the drop-down menu.
|
EEPROM |
EEPROM data filename. |
Interface Address |
Address of the interface panel. This field accepts values from 0 - 31. |
AC Event Msg
The AC Event Messages tab allows you to assign specific event messages to single or multiple CIDs.
To access this window, select the AC Event Msg tab under Access Control.
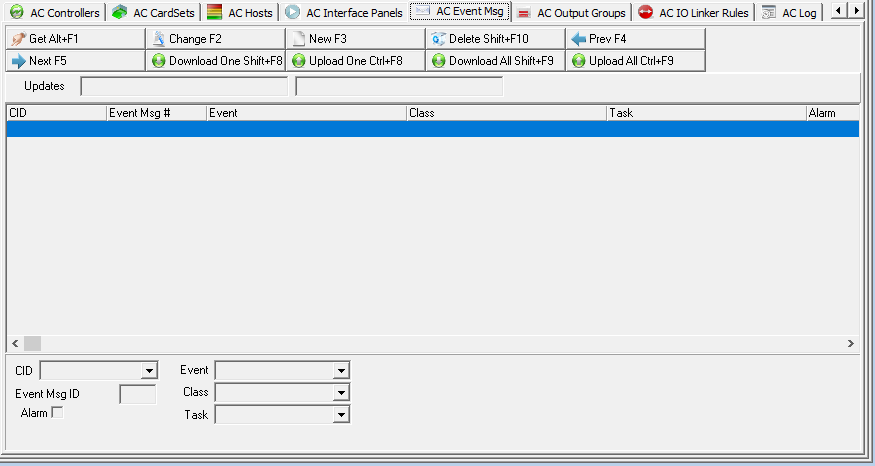
Note: See the AC Event Msg table for button descriptions.
Field and Column Descriptions
The following table describes the fields and columns used in the AC Event Msg tab.
Field/Column |
Description |
Updates |
Current status of information you are uploading. |
(No label) |
Current status of information you are downloading. |
CID |
Customer ID to which you want to attach this message. |
Event |
Choose an event code for the selected message from the drop-down menu. (Define this menu in program #1590.) |
Event Msg ID |
Enter a unique Event Message ID. |
Class |
Choose a class code for the selected message from the drop-down menu. Class codes are OEM-definable fields that group messages and allow you to retrieve them as a class. (Define this menu in program #1590.) |
Alarm |
Select this check box if you want this event to generate an alarm. |
Task |
Choose a task description for the selected message from the drop-down menu. (Define this menu in program #1590.) |
AC Output Groups
Output groups are commands linked to interface panels. Use the AC Output Groups tab to configure commands so that they are commanded with a single I/O Linker rule.
To access this window, select the AC Output Groups tab under Access Control.
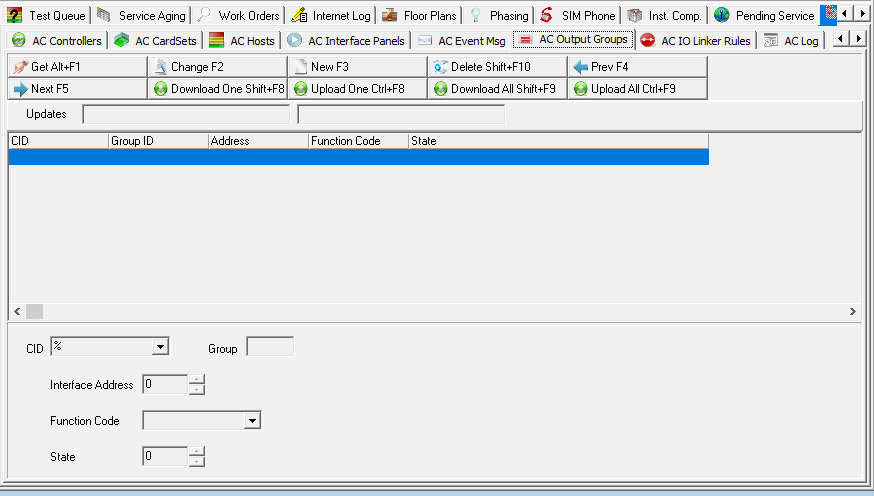
Note: See the AC Output Groups table for button descriptions.
Field and Column Descriptions
The following table describes the fields and columns used in the AC Output Groups tab.
Field/Column |
Description |
Updates |
Current status of information you are uploading. |
(No label) |
Current status of information you are downloading. |
CID |
Customer ID to which you want to attach this output group. |
Group |
System-generated ID for the output group. SBN generates the ID numbers in consecutive order based on CID. |
Interface Address |
Interface panel address. This field accepts values from 0 - 31. |
Function Code |
Choose a function code for the interface panel from the drop-down menu. (Define this menu in program #1590.) |
State |
State of function. |
AC IO Linker Rules
In the AC I/O Linker Rules tab, you can define rules that link output action or event messages to a Boolean expression composed of physical, schedule, or logical inputs. Each rule is composed of three parts: a Left side expression, a Boolean operator, and a Right side expression. For example, if a card holder attempts to open a door during unauthorized hours, the parameters defined in I/O Linker Rules determine whether the system grants access to the door. SBN records events in the AC Log.
Note: Unnecessary fields in the AC I/O Linker Rules tab automatically grey out based on the code selections in the Left Expression and Right Expression Panel fields. For example, if you choose code G (output group activated) in the Left Expression field, all left-panel function fields grey out except for the Left Output Group ID field because this field is needed.
To access this window, select the AC I/O Linker Rules tab under Access Control.
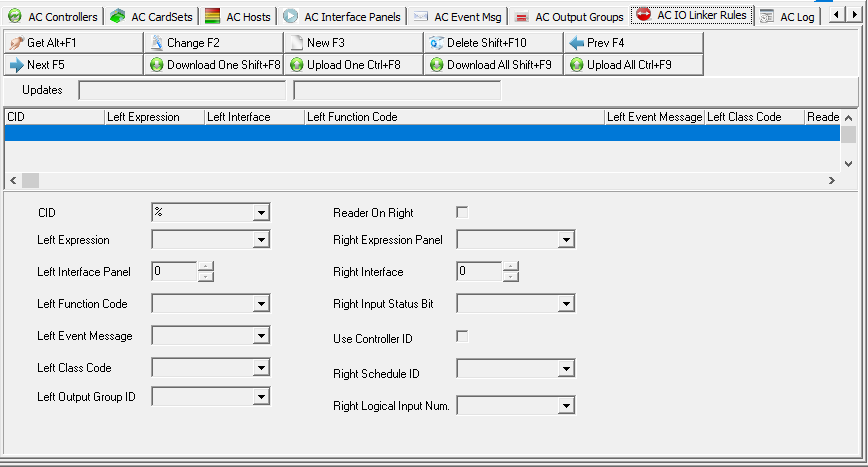
Note: See the AC I/O Linker Rules table for button descriptions.
Field and Column Descriptions
The following table describes the fields and columns used in the AC I/O Linker Rules tab.
Field/Column |
Description |
Updates |
Current status of information you are uploading. |
(No label) |
Current status of information you are downloading. |
CID |
Customer ID to which you want to attach the access rules. |
Reader on Right |
Select this check box if the right expression Reader is in use. |
Left Expression |
Select a left panel code from the drop-down menu. The selection in this field determines which left-panel function fields you need to complete. (Define this menu in program #1590.) |
Right Expression Panel |
Select a right panel code from the drop-down menu. The selection in this field determines which right-panel function fields you need to complete. (Define this menu in program #1590.) |
Left Interface Panel |
Choose a left interface panel address, if needed. |
Right Interface |
Choose a right interface panel address, if needed. |
Left Function Code |
Choose a left function code, if needed. (Define this menu in program #1590.) |
Right Input Status Bit |
Choose a right input status, if needed. (Define this menu in program #1590.) |
Left Event Message |
Choose a left event message, if needed. (Define this menu in program #1590.) |
Use Controller ID |
Select this check box if the controller is in use. |
Left Class Code |
Choose a left class code, if needed. (Define this menu in program #1590.) |
Right Schedule ID |
Choose a right schedule ID, if needed. (This menu originates from the AC Schedules tab for the selected installation.) |
Left Output Group ID |
Choose a left output group ID, if needed. (This menu originates from the AC Output Groups tab for the selected installation.) |
Right Logical Input Num. |
Choose a right logical input number, if needed. (Define this menu in program #1590.) |
AC Log
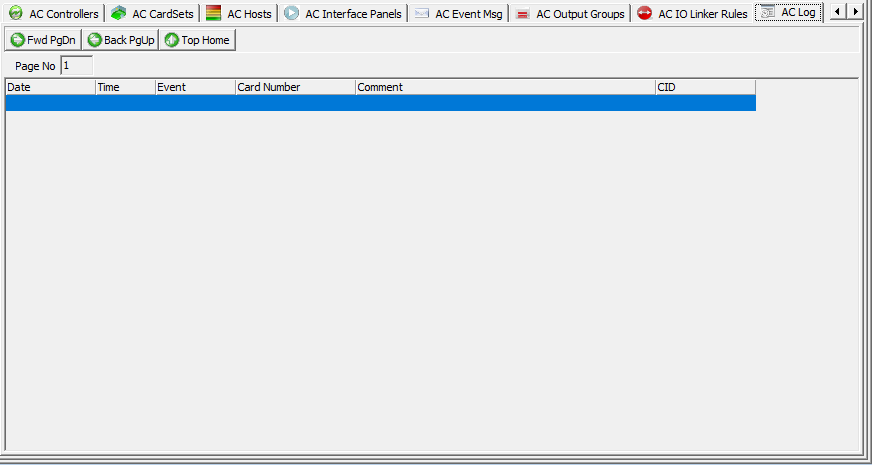
The AC Log keeps records of all Access Control events.
To access this window, select the AC Log tab under Access Control.
Note: See the AC Log table for button descriptions.
Column Descriptions
The following table describes the columns used in the AC Log.
Column |
Description |
Date |
Date on which the event occurred. |
Time |
Time at which the event occurred. |
Event |
Description of the AC event entry. |
Card Number |
Card number on which the event occurred. |
Comment |
Comment describing the AC event entry. |
CID |
Customer ID from which the events occurred. |
Related Programs
The following table lists programs related to Access Control.
Program |
Number |
Document Link |
Description |
Data Entry Master and Basics |
559 |
Program from which you can access the Access Control tabs. Access customer installations records associated with Access Control. |
|
Open/Close Schedule Tab |
N/A |
Choose Open/Close Schedules to apply to AC Schedule numbers. |
|
Zones tab |
N/A |
Define protected areas in the Zones tab to use in the AC Readers tab. |
|
Installation Miscellaneous Fields |
1590 |
Define several fields and menus in the AC Readers, AC Event Msg, AC Output Groups, and the AC IO Linker Rules tabs. |
|
AC Events |
1768 |
Define Access Control events that SBN records in the AC Log. |
Button Functions
The following tables display the buttons for each of the Access Control tabs. The tables describe the shortcut keys, actions, and functionality.
AC Readers
Button |
Name |
Shortcut Key |
Action |
Description |
|
Get Record |
Alt+f1 |
559/501 |
View reader details. |
|
Change Record |
f2 |
559/502 |
Make changes to reader details. |
|
New record |
f3 |
559/503 |
Create new reader record. |
|
Delete Record |
SHIFT+F10 |
559/504 |
Delete selected reader. |
|
Previous Record |
f4 |
559 |
View previous reader. |
|
Next Record |
f5 |
559 |
View next reader. |
|
Request Download of one Tab |
SHIFT+F8 |
559/505 |
Request to download one tab from the access control system. |
|
Request Upload of one Tab |
CTRL+F8 |
559/506 |
Request to upload one tab to the access control system |
|
Request Download of all Tabs |
SHIFT+F9 |
559/507 |
Request to download all tabs from the access control system. |
|
Request Upload of all Tabs |
CTRL+f9 |
559/508 |
Request to upload all tabs to the access control system. |
|
Exit |
Esc |
559 |
Exit without saving. |
|
Save |
Enter |
559 |
Save existing reader. |



AC Door Groups
Button |
Name |
Shortcut Key |
Action |
Description |
|
Get Record |
Alt+f1 |
559/511 |
View door group details. |
|
Change Record |
f2 |
559/512 |
Make changes to door group details. |
|
New record |
f3 |
559/513 |
Create new door group. |
|
Delete Record |
SHIFT+F10 |
559/514 |
Delete selected door group. |
|
Previous Record |
f4 |
559 |
View previous door group. |
|
Next Record |
f5 |
559 |
View next door group. |
|
Request Download of one Tab |
SHIFT+F8 |
559/515 |
Request to download one tab from the access control system. |
|
Request Upload of one Tab |
CTRL+F8 |
559/516 |
Request to upload one tab to the access control system |
|
Request Download of all Tabs |
SHIFT+F9 |
559/517 |
Request to download all tabs from the access control system. |
|
Request Upload of all Tabs |
CTRL+f9 |
559/518 |
Request to upload all tabs to the access control system. |
|
Exit |
Esc |
559 |
Exit without saving. |
|
Save |
Enter |
559 |
Save existing door group. |
AC Holidays
Button |
Name |
Shortcut Key |
Action |
Description |
|
Get Record |
Alt+f1 |
559/531 |
View holiday details. |
|
Change Record |
f2 |
559/532 |
Make changes to holiday details. |
|
New record |
f3 |
559/533 |
Create new holiday. |
|
Delete Record |
SHIFT+F10 |
559/534 |
Delete selected holiday. |
|
Previous Record |
f4 |
559 |
View previous holiday. |
|
Next Record |
f5 |
559 |
View next holiday. |
|
Request Download of one Tab |
SHIFT+F8 |
559/535 |
Request to download one tab from the access control system. |
|
Request Upload of one Tab |
CTRL+F8 |
559/536 |
Request to upload one tab to the access control system |
|
Request Download of all Tabs |
SHIFT+F9 |
559/537 |
Request to download all tabs from the access control system. |
|
Request Upload of all Tabs |
CTRL+f9 |
559/538 |
Request to upload all tabs to the access control system. |
|
Exit |
Esc |
559 |
Exit without saving. |
|
Save |
Enter |
559 |
Save existing holiday. |
AC Schedules
Button |
Name |
Shortcut Key |
Action |
Description |
|
Get Record |
Alt+f1 |
559/541 |
View schedule details. |
|
Change Record |
f2 |
559/542 |
Make changes to schedule details. |
|
New record |
f3 |
559/543 |
Create new schedule. |
|
Delete Record |
SHIFT+F10 |
559/544 |
Delete selected schedule. |
|
Previous Record |
f4 |
559 |
View previous schedule. |
|
Next Record |
f5 |
559 |
View next schedule. |
|
Request Download of one Tab |
SHIFT+F8 |
559/545 |
Request to download one tab from the access control system. |
|
Request Upload of one Tab |
CTRL+F8 |
559/546 |
Request to upload one tab to the access control system |
|
Request Download of all Tabs |
SHIFT+F9 |
559/547 |
Request to download all tabs from the access control system. |
|
Request Upload of all Tabs |
CTRL+f9 |
559/548 |
Request to upload all tabs to the access control system. |
|
Exit |
Esc |
559 |
Exit without saving. |
|
Save |
Enter |
559 |
Save existing schedule. |
AC Access Groups
Button |
Name |
Shortcut Key |
Action |
Description |
|
Get Record |
Alt+f1 |
559/550 |
View access group details. |
|
Change Record |
f2 |
559/551 |
Make changes to access group details. |
|
New record |
f3 |
559/552 |
Create new access group. |
|
Delete Record |
SHIFT+F10 |
559/553 |
Delete selected access group. |
|
Previous Record |
f4 |
559 |
View previous access group. |
|
Next Record |
f5 |
559 |
View next access group. |
|
Request Download of one Tab |
SHIFT+F8 |
559/554 |
Request to download one tab from the access control system. |
|
Request Upload of one Tab |
CTRL+F8 |
559/555 |
Request to upload one tab to the access control system |
|
Request Download of all Tabs |
SHIFT+F9 |
559/556 |
Request to download all tabs from the access control system. |
|
Request Upload of all Tabs |
CTRL+f9 |
559/557 |
Request to upload all tabs to the access control system. |
|
Exit |
Esc |
559 |
Exit without saving. |
|
Save |
Enter |
559 |
Save existing access group. |
AC Controllers
Button |
Name |
Shortcut Key |
Action |
Description |
|
Get Record |
Alt+f1 |
559/561 |
View controller details. |
|
Change Record |
f2 |
559/562 |
Make changes to controller details. |
|
New record |
f3 |
559/563 |
Create new controller. |
|
Delete Record |
SHIFT+F10 |
559/564 |
Delete selected controller. |
|
Previous Record |
f4 |
559 |
View previous controller. |
|
Next Record |
f5 |
559 |
View next controller. |
|
Request Download of one Tab |
SHIFT+F8 |
559/565 |
Request to download one tab from the access control system. |
|
Request Upload of one Tab |
CTRL+F8 |
559/566 |
Request to upload one tab to the access control system |
|
Request Download of all Tabs |
SHIFT+F9 |
559/567 |
Request to download all tabs from the access control system. |
|
Request Upload of all Tabs |
CTRL+f9 |
559/568 |
Request to upload all tabs to the access control system. |
|
Task Management |
CTRL+F10 |
559/569 |
Get the status of the VertX controller, lock/unlock doors, shunt alarm points, or perform other actions based on the integration. |
|
Exit |
Esc |
559 |
Exit without saving. |
|
Save |
Enter |
559 |
Save existing controller. |
AC CardSets
Button |
Name |
Shortcut Key |
Action |
Description |
|
Get Record |
Alt+f1 |
559/591 |
View card set details. |
|
Change Record |
f2 |
559/592 |
Make changes to card set details. |
|
New record |
f3 |
559/593 |
Create new card set. |
|
Delete Record |
SHIFT+F10 |
559/594 |
Delete selected card set. |
|
Previous Record |
f4 |
559 |
View previous card set. |
|
Next Record |
f5 |
559 |
View next card set. |
|
Request Download of one Tab |
SHIFT+F8 |
559/595 |
Request to download one tab from the access control system. |
|
Request Upload of one Tab |
CTRL+F8 |
559/596 |
Request to upload one tab to the access control system |
|
Request Download of all Tabs |
SHIFT+F9 |
559/597 |
Request to download all tabs from the access control system. |
|
Request Upload of all Tabs |
CTRL+f9 |
559/598 |
Request to upload all tabs to the access control system. |
|
Exit |
Esc |
559 |
Exit without saving. |
|
Save |
Enter |
559 |
Save existing record. |
AC Hosts
Button |
Name |
Shortcut Key |
Action |
Description |
|
Get Record |
Alt+f1 |
559/571 |
View host details. |
|
Change Record |
f2 |
559/572 |
Make changes to host details. |
|
New record |
f3 |
559/573 |
Create new host record. |
|
Delete Record |
SHIFT+F10 |
559/574 |
Delete selected host. |
|
Previous Record |
f4 |
559 |
View previous host. |
|
Next Record |
f5 |
559 |
View next host. |
|
Request Download of one Tab |
SHIFT+F8 |
559/575 |
Request to download one tab from the access control system. |
|
Request Upload of one Tab |
CTRL+F8 |
559/576 |
Request to upload one tab to the access control system |
|
Request Download of all Tabs |
SHIFT+F9 |
559/577 |
Request to download all tabs from the access control system. |
|
Request Upload of all Tabs |
CTRL+f9 |
559/578 |
Request to upload all tabs to the access control system. |
|
Exit |
Esc |
559 |
Exit without saving. |
|
Save |
Enter |
559 |
Save existing record. |
AC Interface Panels
Button |
Name |
Shortcut Key |
Action |
Description |
|
Get Record |
Alt+f1 |
559/581 |
View interface panel details. |
|
Change Record |
f2 |
559/582 |
Make changes to interface panel details. |
|
New record |
f3 |
559/583 |
Create new interface panel. |
|
Delete Record |
SHIFT+F10 |
559/584 |
Delete selected interface panel. |
|
Previous Record |
f4 |
559 |
View previous interface panel. |
|
Next Record |
f5 |
559 |
View next interface panel. |
|
Request Download of one Tab |
SHIFT+F8 |
559/585 |
Request to download one tab from the access control system. |
|
Request Upload of one Tab |
CTRL+F8 |
559/586 |
Request to upload one tab to the access control system |
|
Request Download of all Tabs |
SHIFT+F9 |
559/587 |
Request to download all tabs from the access control system. |
|
Request Upload of all Tabs |
CTRL+f9 |
559/588 |
Request to upload all tabs to the access control system. |
|
Exit |
Esc |
559 |
Exit without saving. |
|
Save |
Enter |
559 |
Save existing record. |
AC Event Msg
Button |
Name |
Shortcut Key |
Action |
Description |
|
Get Record |
Alt+f1 |
559/621 |
View event message details. |
|
Change Record |
f2 |
559/622 |
Make changes to event message details. |
|
New record |
f3 |
559/623 |
Create new event message. |
|
Delete Record |
SHIFT+F10 |
559/624 |
Delete selected event message. |
|
Previous Record |
f4 |
559 |
View previous event message. |
|
Next Record |
f5 |
559 |
View next event message. |
|
Request Download of one Tab |
SHIFT+F8 |
559/625 |
Request to download one tab from the access control system. |
|
Request Upload of one Tab |
CTRL+F8 |
559/626 |
Request to upload one tab to the access control system |
|
Request Download of all Tabs |
SHIFT+F9 |
559/627 |
Request to download all tabs from the access control system. |
|
Request Upload of all Tabs |
CTRL+f9 |
559/628 |
Request to upload all tabs to the access control system. |
|
Exit |
Esc |
559 |
Exit without saving. |
|
Save |
Enter |
559 |
Save existing record. |
AC Output Groups
Button |
Name |
Shortcut Key |
Action |
Description |
|
Get Record |
Alt+f1 |
559/611 |
View output group details. |
|
Change Record |
f2 |
559/612 |
Make changes to output group details. |
|
New record |
f3 |
559/613 |
Create new output group. |
|
Delete Record |
SHIFT+F10 |
559/614 |
Delete selected output group. |
|
Previous Record |
f4 |
559 |
View previous output group. |
|
Next Record |
f5 |
559 |
View next output group. |
|
Request Download of one Tab |
SHIFT+F8 |
559/615 |
Request to download one tab from the access control system. |
|
Request Upload of one Tab |
CTRL+F8 |
559/616 |
Request to upload one tab to the access control system |
|
Request Download of all Tabs |
SHIFT+F9 |
559/617 |
Request to download all tabs from the access control system. |
|
Request Upload of all Tabs |
CTRL+f9 |
559/618 |
Request to upload all tabs to the access control system. |
|
Exit |
Esc |
559 |
Exit without saving. |
|
Save |
Enter |
559 |
Save existing record. |
AC IO Linker Rules
Button |
Name |
Shortcut Key |
Action |
Description |
|
Get Record |
Alt+f1 |
559/601 |
View rule details. |
|
Change Record |
f2 |
559/602 |
Make changes to rule details. |
|
New record |
f3 |
559/603 |
Create new rule. |
|
Delete Record |
SHIFT+F10 |
559/604 |
Delete selected rule. |
|
Previous Record |
f4 |
559 |
View previous rule. |
|
Next Record |
f5 |
559 |
View next rule. |
|
Request Download of one Tab |
SHIFT+F8 |
559/605 |
Request to download one tab from the access control system. |
|
Request Upload of one Tab |
CTRL+F8 |
559/606 |
Request to upload one tab to the access control system |
|
Request Download of all Tabs |
SHIFT+F9 |
559/607 |
Request to download all tabs from the access control system. |
|
Request Upload of all Tabs |
CTRL+f9 |
559/608 |
Request to upload all tabs to the access control system. |
|
Exit |
Esc |
559 |
Exit without saving. |
|
Save |
Enter |
559 |
Save existing rule. |
AC Log
Button |
Name |
Shortcut Key |
Action |
Description |
|
Scroll Forward |
PG UP |
559/641 |
Scroll forward one page. |
|
Scroll Backward |
PG DN |
559/642 |
Scroll backward one page. |
|
Go to top of Log |
Home |
559/643 |
Go to first entry in log. |


Modifications and Updates to Access Control
The following table lists modifications and updates to the Access Control document.
Mod Number |
Date |
Description |
n/a |
11/25/08 |
Document rewritten |
n/a |
07/16/14 |
Images updated. |
n/a |
03/30/20 |
Images updated. |