
SBN Tunnel with BackupHostImport
This page describes how the SBN Tunnel is configured and used by BackupHostImport.
For an overview of what SBN Tunnel is, how it falls back to VPN, and how to retrieve your license, see SBN Tunnel.
Walkthrough
BackupHostImport is a batch job but presents the same Tunnel dialog as the other two products.
BackupHostImport stores its tunnel license at %LOCALAPPDATA%\IBS\BackupHost\tunnels.json (the folder is named BackupHost even though the executable is SBN_BackupHostImport.exe, because BackupHost and BackupHostImport share AppData).
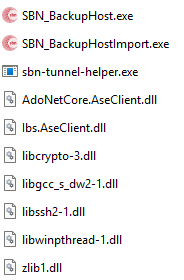
Every file shown above must be present in the BackupHost install folder for the tunnel to work. The install copies all of them automatically; if any one is missing, BackupHost cannot connect through the tunnel.
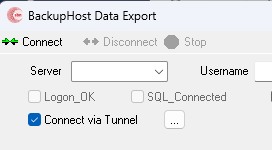
On the BackupHost Data Export dialog, the Connect via Tunnel checkbox controls whether this session goes through the tunnel. The ... button beside it opens the Tunnel Farm Configuration dialog so you can paste or update your license key and see which tunnels are available. Check the box and click Connect to import through the tunnel; leave it unchecked to use a direct or VPN connection. The checkbox is remembered between sessions.
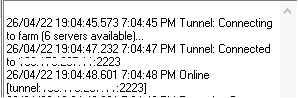
BackupHostImport writes its progress to the main log view. When the tunnel is working, expect three entries in sequence:
Tunnel: Connecting to farm (N servers available)...-- choosing a tunnel server from the ones your license allows.Tunnel: Connected to <host>:<port>-- the tunnel connection is established.Online [tunnel:<host>:<port>]-- the session is connected through the tunnel and ready to import.
If these three lines are missing from the log, BackupHostImport is connecting directly (or via VPN), not through the tunnel.