
Cameras
Module: Account Management
Overview
Use the Cameras tab to add cameras to and delete cameras from zones on an installation, as well as view video footage from zone cameras.
This document covers the following topics:
Viewing Details of a Zone Camera
Navigating to Cameras
Use the following steps to navigate to the Cameras tab:
1. From the main SBN toolbar, select Menu.
2. From the drop-down menu, select Go To.
3. In the Go To Program dialog box, type in "559" and press Enter.
w Data Entry Master and Basics opens.
4. Choose the Cameras tab in the lower pane of Data Entry.
The Cameras Tab
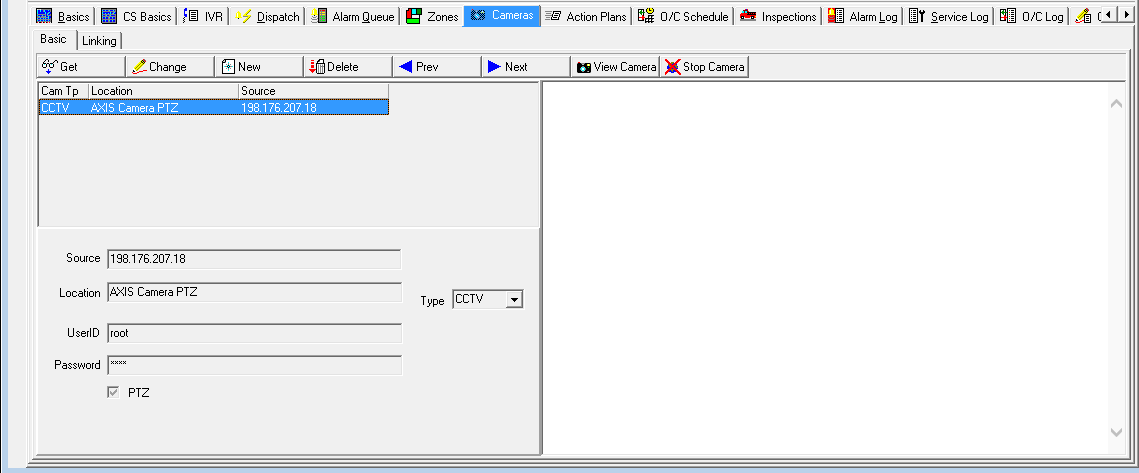
The following graphic shows the Cameras tab with zone camera entries displayed in the left pane under the Basic tab. The right pane of the tab displays footage from a selected camera when you choose View Camera.
Field/Column Descriptions
The following table describes the fields and columns in the Cameras>Basic tab.
Field/Column |
Description |
Camera Type |
Type of camera associated with the zone. Note: Only camera type CCTV is currently used. SBN automatically enters this type when a user creates a new camera entry. |
Location |
Location of the camera within the zone. |
Source |
IP or web address from which SBN accesses camera footage. |
User ID |
User ID for logging in to view camera footage. |
Password |
Password for logging in to view camera footage. |
PTZ |
Click this checkbox to enable cameras with pan/tilt/zoom capability. |
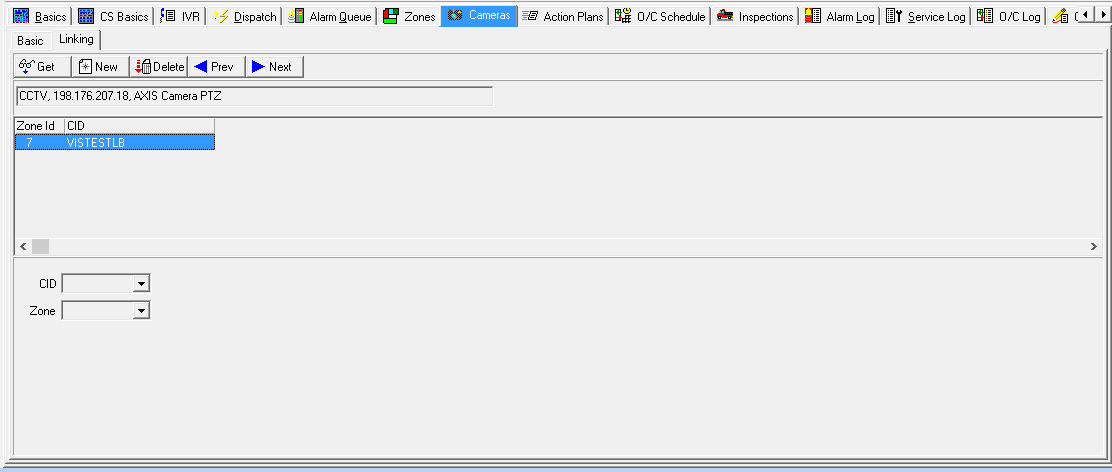
The following graphic shows the Cameras tab with the CID and Zone dropdowns within the Linking tab within the Camera tab.
Field/Column Descriptions
The following table describes the fields and columns in the Cameras>Linking tab.
Field/Column |
Description |
Zone ID |
Zone ID, Area, and Code associated with the camera. (This menu originates from the Zones tab of program #559.) |
CID |
Customer identification number; used throughout SBN as a unique identifier for this account. |
Viewing Details of a Zone Camera
Use the following steps to view camera details:
1. In the Cameras tab, select the camera entry you want to view.
2. Choose Get Record.
w The camera details appear in the fields in the lower pane of the tab.
Creating a Zone Camera Entry
Use the following steps to create a new camera entry:
1. Choose New Record.
w The fields in the lower pane of the tab open for changes.
2. Enter camera details for the zone.
3. Choose Save.
w The new entry appears in the list in the upper pane of the tab.
Changing a Zone Camera Entry
Use the following steps to change a camera entry:
1. From the upper pane of the Cameras tab, select the camera entry you want to change by double-clicking or choosing Get Record.
2. Choose Change Record.
w The fields in the lower pane of the tab open for changes.
3. Change camera details as necessary.
4. Choose Save.
Deleting a Zone Camera Entry
SBN will not allow you to delete a zone in the Zones tab of program #559 if it is linked to a camera. You must delete the camera entry in the Cameras tab before deleting the zone.
Use the following steps to delete a camera entry:
1. From the upper pane of the Cameras tab, select the camera entry you want to delete by double-clicking or choosing Get Record.
2. Choose Delete Record.
w A Confirm dialog box opens: "Are you sure?"
3. Choose Yes.
4. SBN removes the camera entry from the list in the upper pane of the tab.
Viewing Camera Footage
Use the following steps to view camera footage:
1. From the upper pane of the Cameras tab, select the camera with footage you want to view by double-clicking or choosing Get Record.
2. Choose View Camera.
w The camera footage displays in the right pane of the tab.
Note: Cameras with pan, tilt, and zoom capability may be manipulated through the Cameras Tab if the camera design or software will allow it. The PTZ checkbox in the camera’s information must be selected to do this.
Related Programs
The following table lists programs related to the Cameras tab.
Program |
Number |
Document Link |
Description |
Zones Tab |
N/A |
Define groups of areas or devices at the selected installation site from which alarm signals generate. These areas may have cameras set up. |
|
Data Entry Master and Basics |
559 |
The program from which you can access the Cameras tab. Set up and view installations from which alarms generate. |
Button Functions
The following table displays the buttons, describes the shortcut keys, actions, and functionality.
Button |
Name |
Shortcut Key |
Action |
Description |
|
Get Record |
ALT+F1 |
559/681 |
View details of the selected camera entry. |
|
Change Record |
F2 |
559/682 |
Change details of the selected camera entry. |
|
New Record |
F3 |
559/683 |
Create a new camera entry. |
|
Delete Record |
shift+F10 |
559/684 |
Delete the selected camera entry. |
|
Previous Record |
F4 |
559 |
View the previous camera entry for the installation. |
|
Next Record |
F5 |
559 |
View the next camera entry for the installation. |
|
View Camera |
F10 |
559/685 |
View footage from the selected camera. |
|
Stop Camera |
F11 |
559/685 |
Stop receiving footage from the selected camera. |





Modifications and Updates to Cameras
The following table lists modifications and updates to the Cameras document.
Mod Number |
Date |
Description |
n/a |
07/17/14 |
Images updated. |
n/a |
07/11/17 |
Images updated. |
08.86.10794, 07.86.25090, 08.85.10786, 07.85.25084 |
07/11/17 |
"Basic" tab created with "Zones" moved to new "Linked" tab. Since Linking is detail to Basics, you only see the records corresponding to whatever Basic record is loaded. Linking tab shows which Basic record is loaded via the textbox just below the buttons. |
Adding a Camera by Zone
Cameras can be added by zone, associating a camera with a specific zone on the installation.