
Import Interface
Import Interface
Import Interface
Module: Account Management
Overview
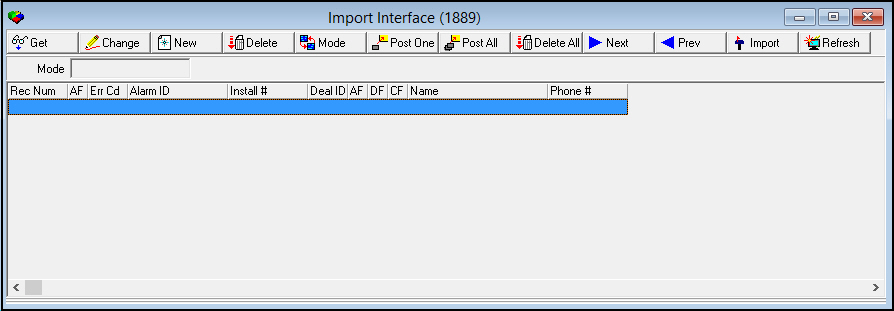
Import Interface (program #1889) imports customer data into the database tables from a third-party product. The Import Interface window is blank when the program opens.
To access this program, select Import Interface (program #1889) from the main menu of SBN.
This document covers the following topics:
Navigating to Import Interface
Creating, Editing, and Posting Records
Navigating to Import Interface
Use the following steps to access the Import Interface program:
1. From the main SBN toolbar, select Menu.
2. From the drop-down menu, select Go To.
3. In the Go To Program dialog box, type in "1889" and press Enter.
w Import Interface opens.
The Import Interface Window
To view information in the Import Interface window, you must first choose Toggle Mode to select the type of import to view. The upper pane of the window lists the entries in Import Interface. Several columns remain the same in all display modes. Other columns change to display information specific to the import type.
You can use six different modes in Import Interface to import data for
Contacts
Zones
Customers
Contracts
Cycle fees
Addresses
The following graphic shows the Import Interface window as the program opens.
Field/Column Descriptions
The following table describes the field and columns common to all import modes.
Column |
Description |
Mode |
Indicates which type of information displays in the Import Interface screen: contacts, zones, customers, contracts, cycle fees, or addresses. |
Record Number |
SBN-assigned record number. |
Applied Flag |
If this column displays an X, SBN has posted the record in the database. |
Error Code |
Displays the error message if the record was unable to post to the database. |
Alarm ID |
Customer ID of the account. |
Install # |
Installation number of the account. |
Dealer ID |
Dealer ID of the account. |
Add Flag |
An X appears in this column if you select the Add check box for a record in the lower pane of the Import Interface window. |
Delete Flag |
An X appears in this column if you select the Delete check box for a record in the lower pane of the Import Interface window. |
Change Flag |
An X appears in this column if you select the Change check box for a record in the lower pane of the Import Interface window. |
The Contacts Mode
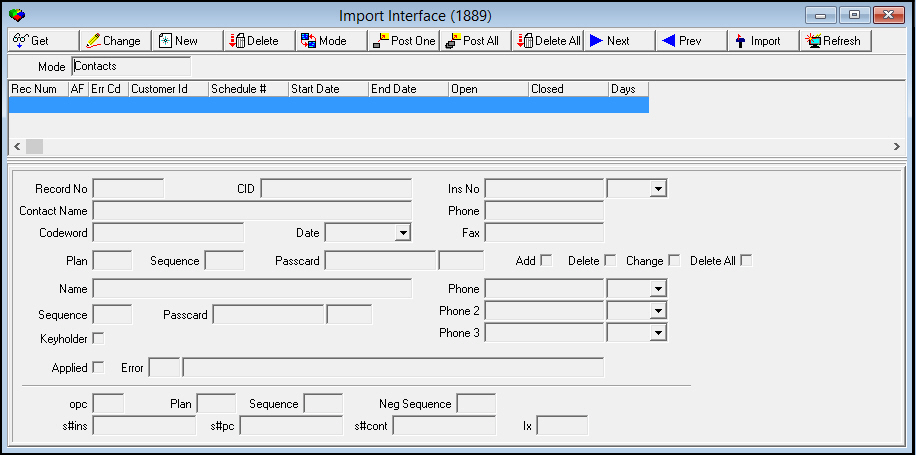
Use the Contacts mode to add, delete or change contacts on action plans. If you leave the plan number blank, SBN updates action plan 0.
The following graphic shows the lower pane of Import Interface in Contacts mode.
Field Descriptions
The following table describes the fields in the lower pane of Import Interface in Contacts mode.
Field |
Description |
Record Number |
SBN-assigned record number. |
CID |
Customer ID. |
Installation No |
Installation number of the account. |
Dealer
ID |
Dealer ID of the account. |
Contact Name |
Name of the person who authorized the addition, change, or deletion. |
Phone |
Phone number of the person who authorized the addition, change, or deletion. |
Codeword |
Code word for the contact. |
Date |
Effective date of the change. |
Fax |
Fax number of the contact. |
Plan |
Action plan number affected. |
Sequence |
When adding a contact, type the new call sequence number. When changing a contact, type the current call sequence number to change. |
Passcard & Passcard Extension |
When adding a contact, type the new passcard number and extension. When changing a contact with a passcard, type the current passcard number and extension. |
Add |
Select this check box to add a contact. Note: To import the contact record, you must check at least one flag. |
Delete |
Select this check box to delete a contact. Note: To import the contact record, you must check at least one flag. |
Change |
Select this check box to change a contact. Note: To import the contact record, you must check at least one flag. |
Delete All |
Select this check box to delete all contacts with a sequence number > 0 from the action plan. Note: To import the contact record, you must check at least one flag. |
Name |
Contact name for the action plan. |
Phone |
Contact phone number for the action plan. |
Phone Type |
Type of phone number. (This menu originates from program #1840.) |
Sequence |
Call sequence number. Note: If the number is greater than the next number in the sequence, SBN changes the sequence number to the next available number. |
Passcard |
Passcard number and extension. |
Phone 2 |
Second phone number. |
Phone Type |
Type of phone number for Phone 2. (This menu originates from program #1840.) |
Keyholder |
A check mark in this check box indicates that the contact possesses keys to the premises. |
Phone 3 |
Third phone number. |
Phone Type |
Type of phone number for Phone 3. (This menu originates from program #1840.) |
Applied |
A check mark in this check box indicates that you have posted the record to the database. |
Error (Number and Description) |
If an error occurred when importing the record, the error number and description displays. |
opc |
Displays a number to indicate the action taken. l 1 -- Add l 2 -- Delete l 3 -- Change |
Plan |
Action plan number updated. |
Sequence |
Actual sequence number assigned in the action plan. Note: Actual number may differ from original sequence entered. |
Neg Sequence |
Sequence number entered. |
s#ins |
Internal installation number. |
s#pc |
Internal passcard number. |
s#cont |
Internal contact number. |
lx |
Internal contact index number. |
Rules for Importing Contacts
Several rules apply to the different actions of importing contacts. The following rules apply:
Adding Contacts:
The sequence number cannot already exist.
If the account has passcards, the passcard can not already exist for this account.
If the account does not use passcards, you must type both a name and phone number.
The default authority level for contacts that SBN imports is set to 4.
Changing Contacts:
The sequence number must already exist.
If the account has passcards, both the passcard and extension must match.
Blanks do not update a field that was previously filled, except for the phone number. A blank phone number removes the existing number.
Deleting Contacts:
The sequence number must match.
If the account does not use passcards, the phone number must also match.
The Zones Mode
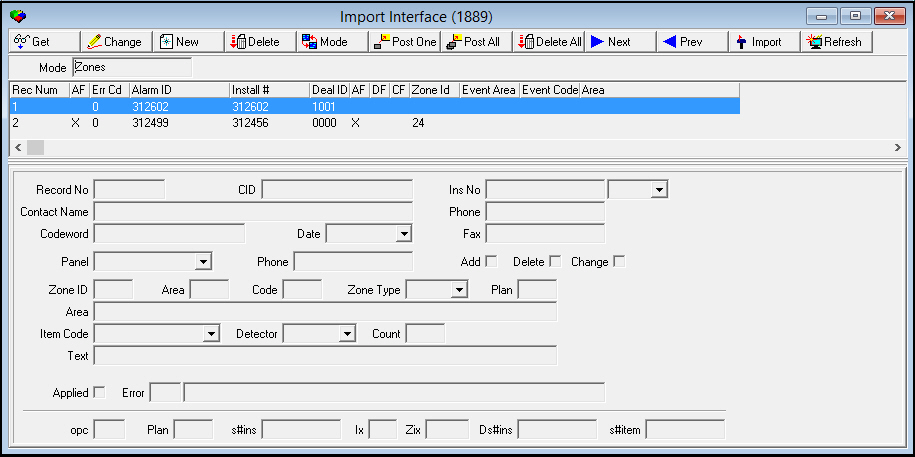
Use the Zones mode to add, delete or change zones in the Zones tab.
The following graphic shows the lower pane of Import Interface in Zones mode.
Field Descriptions
The following table describes the fields in the lower pane of Import Interface in Zones mode.
Field |
Description |
Record Number |
SBN-assigned record number. |
CID |
Customer ID. |
Installation Number |
Installation number of the account. |
Dealer
ID |
Dealer ID of the account. |
Contact Name |
Name of the person who authorized the addition, change, or deletion. |
Phone |
Phone number of the person who authorized the addition, change, or deletion. |
Codeword |
Code word for the contact. |
Date |
Effective date of the change. |
Fax |
Fax number of the contact. |
Panel |
Select a panel ONLY if you want to populate zones with defaults based on the panel type. Note: An error occurs if you try to add both the panel and a zone in the same record. |
Phone |
Telco phone number; only valid when you select a panel. |
Add |
Select this check box to add a zone. Note: To import the zone record, you must check at least one flag. |
Delete |
Select this check box to delete a zone. Note: To import the zone record, you must check at least one flag. |
Change |
Select this check box to change a zone. Note: To import the zone record, you must check at least one flag. |
Zone ID |
You must type a zone ID if you do not select a panel. The zone ID you enter becomes the zone number in the Zones tab. |
Area |
Type a code for the zone area, if applicable. |
Code |
Type a zone code to identify the type of signal that the zone generates, if applicable. |
Zone Type |
Select a valid zone type, if applicable. |
Plan |
Type a valid action plan number. |
Area |
Type a description of the protected area, if applicable. |
Item Code |
Item contained in the zone for this installation. |
Detector |
Detector type in this zone. |
Count |
Number of detector signals SBN expects for the selected detector. |
Text |
Information-only field; SBN does not import this field into the database. |
Applied |
A check mark in this check box indicates that you have posted the record to the database. |
Error |
If an error occurred when importing the record, the error number and description displays. |
opc |
Displays a number to indicate the action taken. l 1 -- Add l 2 -- Delete l 3 -- Change |
Plan |
Action plan number. |
s#ins |
Internal installation number. |
Ix |
CID index number, if the account contains multiple CIDs. |
Zix |
Internal zone number; only appears on records that users changed. |
Ds#ins |
If you select a panel, this field displays the internal installation number from the panel program used for default zones. |
s#item |
Internal item number. |
Rules for Importing Zones
Several rules apply to the different actions of importing zones. The following rules apply:
Adding Panels:
SBN allows only additions and changes to panels.
Zone, Area, and Code fields must be blank.
Panel type must be valid.
If you select add type, account cannot have any zones previously defined.
If you select change type, SBN deletes previous zones even if new panel does not contain defaults.
SBN posts this mode before zone mode records.
Adding Zones:
Zone, Area, and Code cannot exist.
Plan must be valid for the account.
You cannot specify the priority of the zone. The priority of the zone defaults to 9; you can change the priority in the zones tab after import.
SBN sets the priority and text of a new zone based on the zone type.
Changing Zones:
Zone, Area, and Code must match.
Plan must be valid for the account.
SBN sets the priority and text of a zone based on the zone type.
Deleting Zones:
Zone, Area, and Code must match.
The Customers Mode
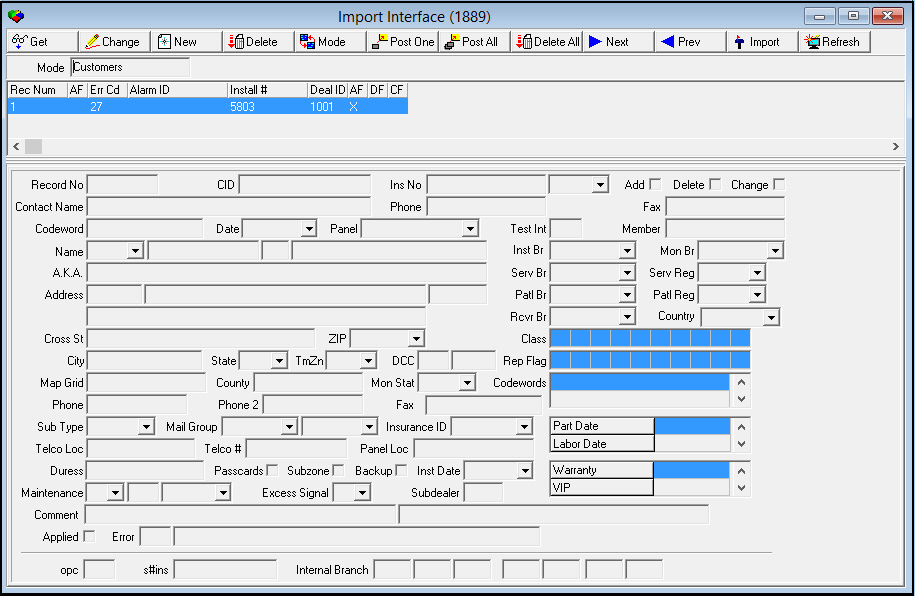
Use the Customers mode to add, delete, or change customer records in Data Entry Master and Basics (program #559).
The following graphic shows the lower pane of Import Interface in Customers mode.
Field Descriptions
The following table describes the fields in the lower pane of Import Interface in Customers mode.
Field |
Description |
Record No |
SBN-assigned record number. |
CID |
Customer ID. |
Ins No |
Installation number of the account. |
Dealer
ID |
Dealer ID of the account. (This menu originates from program #1537.) |
Add |
Select this check box to add a customer record. Note: To import the customer record, you must check at least one flag. |
Delete |
Select this check box to delete a customer record. Note: To import the customer record, you must check at least one flag. |
Change |
Select this check box to change a customer record. Note: To import the customer record, you must check at least one flag. |
Contact Name |
Name of the person who authorized the addition, change, or deletion. |
Phone |
Phone number of the person who authorized the addition, change, or deletion. |
Fax |
Fax number of the contact. |
Codeword |
Code word for the contact. |
Date |
Effective date of the change. |
Panel |
Panel type. (This menu originates from program #1742.) |
Test Interval |
Define a maximum test interval in seconds. If SBN does not receive a signal within this time, it generates a missing test signal. |
Member |
Number that identifies the customer as part of a specific marketing effort. |
Name |
Customer name. |
Inst Branch |
Installation branch. (This menu originates from program #1530.) |
Mon Branch |
Monitoring branch. (This menu originates from program #1530.) |
A.K.A. |
Also Known As or alias. An optional field for a customer who is called by more than one name. |
Serv Branch |
Service branch. (This menu originates from program #1530.) |
Serv Reg |
Service region. (This menu originates from program #1530.) |
Address (Number, Street Name, Street Type) |
Address of the installation. |
Patl Branch |
Patrol branch, if applicable. (This menu originates from program #1530.) |
Patl Reg |
Patrol region, if applicable. (This menu originates from program #1530.) |
Address
2 |
Additional address field. |
Rcvr Branch |
Receiver branch, if applicable. (This menu originates from program #1530.) |
Country |
Country in which the installation is located. (This menu originates from program #1865.) |
Cross St |
Nearest cross street to the installation address. |
ZIP |
Installation zip code. |
Class |
You may select up to ten codes for tracking services the customer requires or other customer-specific information. (These menus originate from program #1555.) |
City |
City of the installation address. |
State |
State of the installation address. (This field holds a maximum of 60 characters.) |
Tm Zn |
Time Zone of the installation address. |
DCC (Scanner and Port number) |
Derived Communication Channel scanner and port numbers for tracking this installation. |
Report Flag |
You may select up to ten codes for tracking customer-specific report functionality. (These menus originate from program #1555.) |
Map Grid |
Map coordinates of the installation address. |
County |
County; based on the zip code information for the installation address. |
Mon Stat |
Monitoring status. (This menu originates from program #1540.) |
Codewords |
Code words for this account. |
Phone |
The premises phone number. |
Phone 2 |
Additional phone number. |
Fax |
Fax number for the account. |
Sub Type |
Type of subscriber, such as residential or commercial. (This menu originates from program #1534.) |
Mail Group (1 and 2) |
Use these fields to group mailings for those customers with more than one account, so that they receive a single mailing of reports. (These menus originate from program #1800.) Note: When option ba198 is on, you must use valid mail groups. |
Insurance ID |
Insurance company responsible for the installation premises. (This menu originates from program #1541.) |
Part Date/Labor Date Grid |
|
Part Date |
Parts warranty expiration date. |
Labor Date |
Labor warranty expiration date. |
Online Date |
Date on which signal monitoring for this installation began. |
Contract Date |
Date on which a user created the contract for this installation. |
Misc Date 5 |
Customer-defined field; no functionality in SBN. |
Customer Since |
Date on which a user first recorded the customer online. |
Telco Loc |
Location of the telephone company termination block. |
Telco # |
Telephone circuit identifier. |
Panel Loc |
Location of the panel at the premises. |
Duress |
Downloadable duress code. |
Passcards |
Select this check box if the account uses passcards. |
Subzone |
Select this check box if the account is subzoned. |
Backup |
Select this check box if SBN should verify a backup signal from the second CID. |
Inst Date |
Installation date. |
Warranty |
Company-specific warranty text. |
VIP |
Free-form company-specific text. |
Maintenance |
Maintenance type. (This menu originates from program #1555.) |
Frequency |
Frequency, in days, of required maintenance. |
Last Maintenance Date (No label) |
Last maintenance date of the installation. |
Excess Signal |
Billing rate for excessive signal traffic at this installation. (This menu originates from program #1817.) |
Subdealer |
Four-digit field for subdealer identification. |
Comment (Line 1 and 2) |
Two lines for adding free-form text to the account. |
Applied |
A check mark in this check box indicates that you have posted the record to the database. |
Error (Code and Description) |
If an error occurred when posting the record, the number and description displays. |
opc |
Displays a number to indicate the action taken: l 1 = Add l 2 =Delete l 3 = Change |
s#ins |
Internal installation number. |
Internal Branch |
Internal branch numbers for l Installation l Monitoring l Receiver l Service branch l Patrol branch l Service regions l Patrol regions |
The Contracts Mode
Use the Contracts mode to add, delete, or change contracts in Contract Master (program #548).
The following graphic shows the lower pane of Import Interface in Contracts mode.
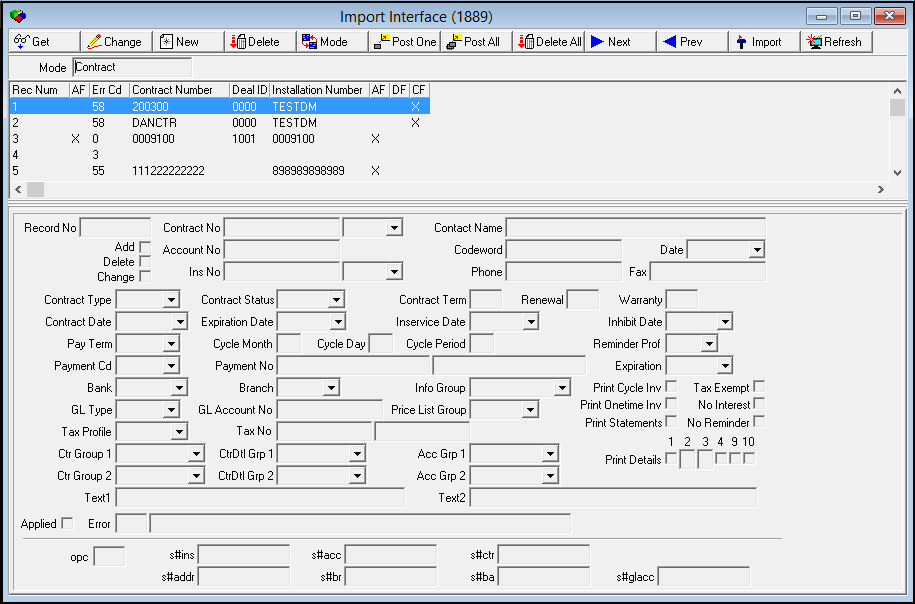
Field Descriptions
The following table describes the fields in the lower pane of Import Interface in Contracts mode.
Field |
Description |
Record No |
SBN-assigned record number. |
Contract No |
Contract number of the account. |
Dealer
ID |
Dealer ID of the account. |
Contact Name |
Contact name on the account. |
Add |
Select this check box to add a contract. Note: To import the contract record, you must check at least one flag. |
Account No |
Billing account number. |
Codeword |
Code word for the contact. |
Date |
Effective date of the change. |
Delete |
Select this check box to delete a contract. Note: To import the contract record, you must check at least one flag. |
Change |
Select this check box to change a contract. Note: To import the contract record, you must check at least one flag. |
Ins No |
Installation number of the account. |
Dealer
ID |
Dealer ID of the account. |
Phone |
Type the phone number of the person who authorized the addition or change. |
Fax |
Type a fax number, if needed. |
Contract Type |
Select the contract type. (This menu originates from program #1531.) |
Contract Status |
Select the contract status. (This menu originates from program #1532.) |
Contract Term |
Type the number of months in the contract term. |
Renewal |
Type the number of months in the renewal term. |
Warranty |
Type the number of months in the warranty term. |
Contract Date |
Select the date the contract becomes active. |
Expiration Date |
Select the contract expiration date. |
Inservice Date |
Select the date when monitoring begins. |
Inhibit Date |
Select the rate increase inhibit date. |
Pay Term |
Code that indicates the standard payment terms for this contract. (This menu originates from program #1529.) |
Cycle Month |
Type the month number that indicates the anniversary of the contract. |
Cycle Day |
Type the day of the month on which the cycle billing occurs. |
Cycle Period |
Type a number that indicates the frequency of the cycle billing in months: l 1 = monthly l 3 = quarterly l 12 = annually |
Reminder Prof |
Code for the customer's reminder profile, if the customer receives reminder notices. (This menu originates from program #1562.) |
Payment Cd |
Select a payment code if you directly debit cycle fees from the customer’s bank account or if you charge a credit card. (This menu originates from program #1528.) Note: If you print invoices, leave this field blank. |
Payment No (Routing and Account) |
If you selected a payment code, fill in the first field with the bank routing number and the second with the bank or credit card account number. |
Expiration |
Select the date the credit card expires. |
Bank |
The bank ID to use when you directly debit the customer's bank account. |
Branch |
Select a contract branch. (This menu originates from program #1530.) |
Info Group |
Select an information group. (This menu originates from program #1800.) |
Print Cycle Inv |
Select this check box to print cycle invoices. |
Tax Exempt |
Select this check box if the customer is tax exempt. |
GL Type |
Select a general ledger subscriber type. (This menu originates from program #1578.) |
GL Account Number |
Type a general ledger account number. |
Price List Group |
Select a price list group that will appear by default on work orders for this account. (This menu originates from program #1771.) |
Print Onetime Inv |
Select this check box to print one-time invoices. |
No Interest |
Select this check box if you do not charge the customer interest on late payments. |
Tax Profile |
Select a tax profile. (This menu originates from program #1514.) |
Tax No |
Two fields for typing tax exempt or tax ID numbers. |
Print Statements |
Select this check box to print statements. |
No Reminder |
Select this check box if the customer should not receive reminder letters. |
Ctr Group 1 |
Select a contract basics group 1 code. (This menu originates from program #1868.) |
CtrDtl Grp 1 |
Select a contract basics group 1 detail code. (This menu originates from program #1868.) |
Acc Grp 1 |
Select a billing account group. (This menu originates from program #1868.) |
Print Details (1-10) |
Each print flag has a unique meaning: l 1 -- q If flag 1 displays a check mark, invoices print with tax included q If blank, tax appears as a separate line item l 2 -- q If blank, invoices include only contract information q If the box displays a 1, invoices include the installation number q If the box displays a 2, invoices include the installation number and address q If the box displays a 3, invoices include the installation name and city only |
Ctr Group 2 |
Select a contracts basics group 2. (This menu originates from program #1800.) |
CtrDtl Grp 2 |
Select a contracts detail group 2. (This menu originates from program #1800.) |
Acc Grp 2 |
Select a billing group 2. (This menu originates from program #1800.) |
Text 1 |
Type text for the first Comment line in Contract Master. |
Text 2 |
Type text for the second Comment line in Contract Master. |
Applied |
A check mark in this check box indicates that you have posted the record to the database. |
Error |
If an error occurred when posting the record, the number and description displays. |
opc |
Displays a number to indicate the action taken: l 1 -- Add l 2 -- Delete l 3 -- Change |
s#ins |
Internal installation number. |
s#acc |
Internal billing account number. |
s#ctr |
Internal contract number. |
s#addr |
Internal address number. |
s#br |
Internal branch number. |
s#ba |
Internal bank number. |
s#glacc |
Internal general ledger subscriber type number. |
The Cycle Fees Mode
Use the Cycle Fees mode to add, delete, or change cycle fees in Billing.
The following graphic shows the lower pane of Import Interface in Cycle Fees mode.
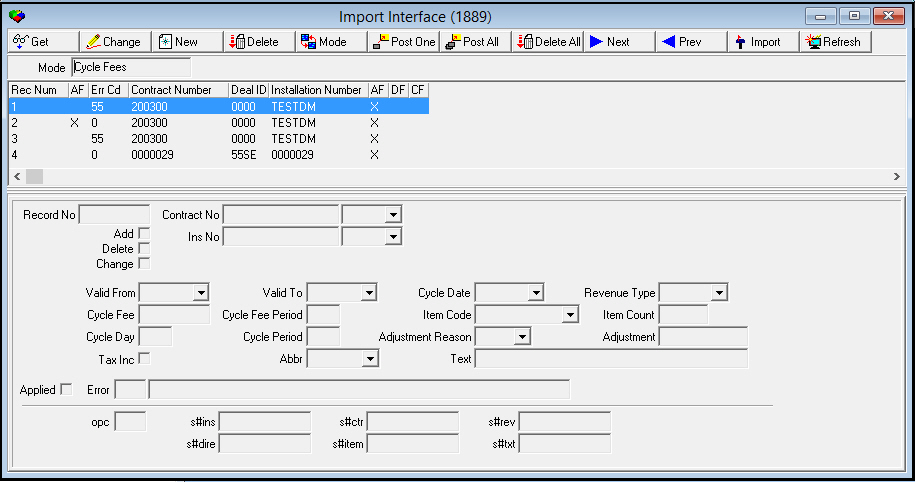
Field Descriptions
The following table describes the fields in the lower pane of Import Interface in Cycle Fees mode.
Field |
Descriptions |
Record No |
SBN-assigned record number. |
Contract No |
Contract number of the account. |
Dealer
ID |
Dealer ID of the contract. |
Add |
Select this check box to add a cycle fee. Note: To import the cycle fee record, you must check at least one flag. |
Delete |
Select this check box to delete a cycle fee. Note: To import the cycle fee record, you must check at least one flag. |
Ins No |
Installation number of the account. |
Dealer
ID |
Dealer ID of the installation. |
Change |
Select this check box to change a cycle fee. Note: To import the cycle fee record, you must check at least one flag. |
Valid From |
Select the cycle fee start date. |
Valid To |
Select the cycle fee end date. |
Cycle Date |
Type the day on which the next cycle billing should start. |
Revenue Type |
Select a revenue type. (This menu originates from program #1512.) |
Cycle Fee |
Type the amount of the cycle fee. |
Cycle Fee Period |
Type the number of months covered by the cycle fee. |
Item Code |
Select the item code covered by this cycle fee. |
Item Count |
Type the item quantity covered by this cycle fee. |
Cycle Day |
Enter the day of the month on which cycle billing occurs. |
Cycle Period |
Type a number that indicates the frequency in months that cycle billing occurs. For example l 1 = monthly l 3 = quarterly l 12 = yearly |
Adjustment Reason |
Select a reason for adjusting the cycle fee. (This menu originates from program #1783.) |
Adjustment |
Type the amount by which to adjust the cycle fee. |
Tax Inc |
Select this check box if the fee includes applicable taxes. |
Abbr |
Text abbreviation for special text that replaces the item description when invoicing this cycle fee. (This menu originates from program #1544.) |
Text |
Type a text description of the fee. |
Applied |
A check mark in this check box indicates that you have posted the record to the database. |
Error (Number and Description) |
If an error occurred when posting the record, the number and description displays. |
opc |
Displays a number to indicate the action taken: l 1 -- Add l 2 -- Delete l 3 -- Change |
s#ins |
Internal installation number. |
s#ctr |
Internal contract number. |
s#rev |
Internal revenue type number. |
s#dire |
Internal adjustment reason code number. |
s#item |
Internal item code number. |
s#txt |
Internal text abbreviation code number. |
The Addresses Mode
Use the Addresses mode to add, delete, or change addresses in Data Entry Master (program #559).
The following graphic shows the lower pane of Import Interface in Addresses mode.
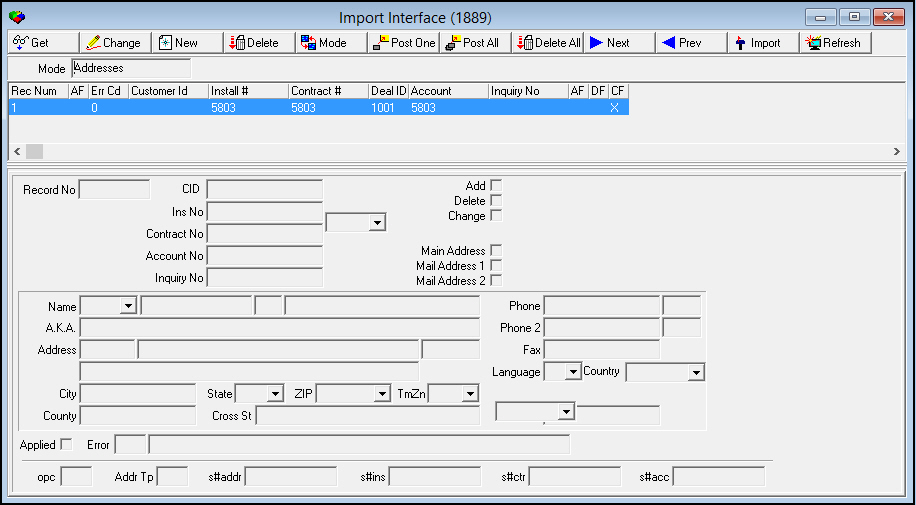
Field Descriptions
The following table describes the fields in the lower pane of Import Interface in Addresses mode.
Field |
Description |
Record No |
SBN-assigned record number. |
CID |
Customer ID. |
Add |
Select this check box to add an address. Note: To import an address record, you must check at least one flag. |
Delete |
Select this check box to delete an address. Note: To import an address record, you must check at least one flag. |
Ins No |
Installation number of the account. |
Dealer
ID |
Dealer ID of the account. |
Change |
Select this check box to change an address. Note: To import an address record, you must check at least one flag. |
Contract No |
Contract number of the account. |
Account No |
Billing account number. |
Main Address |
Select this check box if you are changing the main address. |
Mail Address 1 |
Select this check box if you are changing mail address 1. |
Inquiry No |
Inquiry number from the account. |
Mail Address 2 |
Select this check box if you are changing mail address 2. |
Name (Title, First, MI, Last) |
Customer name. |
Phone |
Customer phone number. |
Phone Type |
Type of phone number. (This menu originates from program #1840.) |
A.K.A. |
Additional name field. |
Phone 2 |
Second phone number of the customer. |
Phone 2
Type |
Type of phone number for the second number. (This menu originates from program #1840.) |
Address (Number, Street Name, Street Type) |
Installation address. |
Fax |
Fax number. |
Address
2 |
Second line for additional address information. |
Language |
Select a language code. (These choices are predefined in SBN.) |
Country |
Country in which the installation is located. (This menu originates from program #1865.) |
City |
City (part of the installation address). |
State |
State of the installation address. (This field holds a maximum of 60 characters.) |
ZIP |
Zip code (part of the installation address). |
TmZn |
Time Zone of the installation address. |
County |
County of the installation address. |
Cross St |
Nearest cross street to the installation address. |
Map Grid |
Map coordinates of the installation address |
Applied |
A check mark in this check box indicates that you have posted the record to the database. |
Error (Number and Description) |
If an error occurred when posting the record, the number and description display. |
opc |
Displays a number to indicate the action taken: l 1 -- Add l 2 -- Delete l 3 -- Change |
Addr Tp |
Identifies the type of address. |
s#addr |
Internal address number. |
s#ins |
Internal installation number. |
s#ctr |
Internal contract number. |
s#acc |
Internal bill account number. |
The Installation Mode
Use the Installation mode to add installation records in Data Entry Master (program #559).F
The following graphic shows the lower pane of Import Interface in Installation mode.
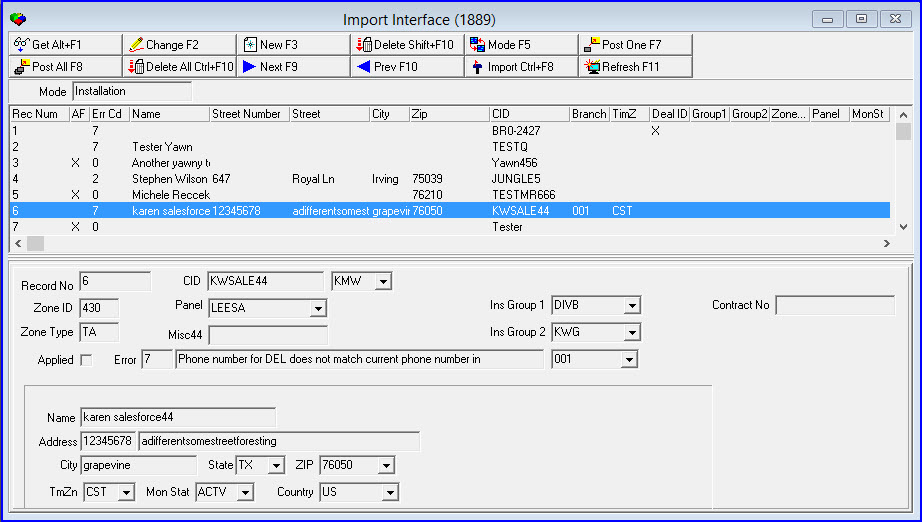
Field Descriptions
The following table describes the fields in the lower pane of Import Interface in Installation mode.
Field |
Description |
Record No |
SBN-assigned record number. |
CID |
Customer ID. |
Dealer
ID |
Dealer ID of the installation. |
Zone ID |
Zone ID of the installation. Note: Use option mo187 to define a zone ID that SBN automatically enters in this field when importing data into SBN from an external application. |
Panel |
Panel type of the installation. (This menu originates from program #1742.) Note: Use option mo189 to define a panel type that SBN automatically enters in this field when importing data into SBN from an external application. |
Installation Group 1 |
Financial group assigned to the installation; often used to group invoice and report information. (This menu originates from program #1868.) |
Zone Type |
Zone type of the installation. Note: Use option mo188 to define a zone type that SBN automatically enters in this field when importing data into SBN from an external application. |
Misc44 |
Data to enter in the customer-specific Misc44 field of the Data Entry Basics tab. |
Installation Group 2 |
Financial group assigned to the installation; often used to group invoice and report information. (This menu originates from program #1868.) |
Applied |
A check mark in this check box indicates that you have posted the record to the database. |
Error (Number and Description) |
If an error occurred when posting the record, the number and description display. |
Contract No. |
External number to the Installation Import in Program #1889. When using this field the validated for a valid, existing, contract number or the save is rejected. This field allows a user to link an installation with a contract number. If an invalid contract number is entered, a error message "Contract number does not exist" will display. When an installation is linked with a valid contract number, it will display in the account tree in Program #548. When linking an installation to a contract number the Cycle Fees will display in the Cycle Fee tab in Program #548. |
Installation Branch |
Installation branch. SBN automatically populates this read-only field when you select a valid zip code for the installation. |
Name |
Customer name. |
Address (Number, Street Name) |
Installation address. |
City |
City (part of the installation address). |
State |
State of the installation address. |
ZIP |
Zip code (part of the installation address). |
TmZn |
Time Zone of the installation address. |
Mon Stat |
Monitoring status of the installation. Note: Use option mo190 to define a monitoring status that SBN automatically enters in this field when importing data into SBN from an external application. |
Country |
Country in which the installation is located. (This menu originates from program #1865.) |
In the Installation Mode, when creating a new installation the user can link the installation to an existing contract number. In program #559 find the contract number and verify that the contract and installation were links.
The Work Order Mode
Use the Work Order mode to add work orders to installations in Data Entry Master (program #559).
The following graphic shows the lower pane of Import Interface in Work Order mode.
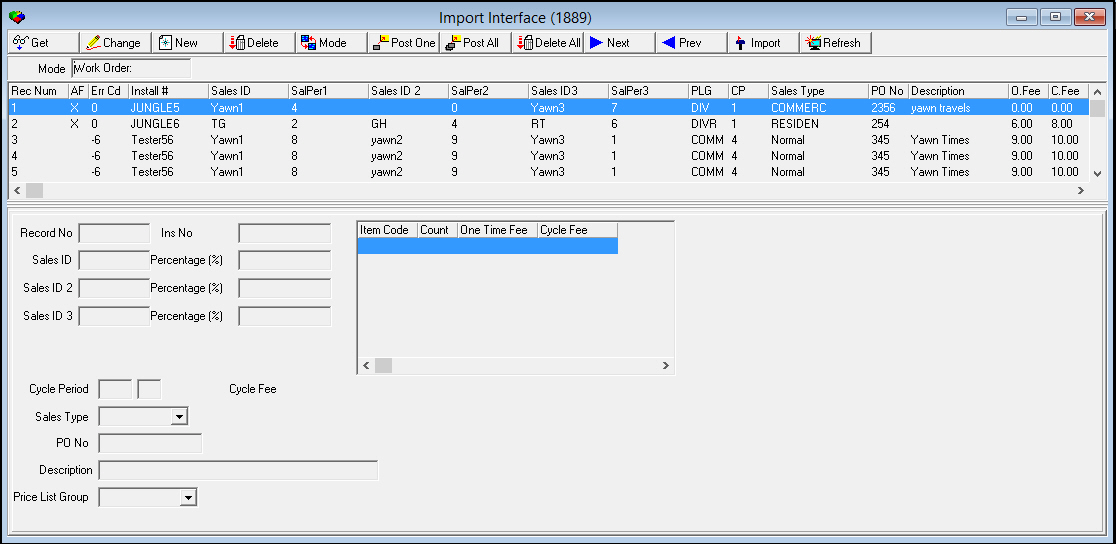
Field/Column Descriptions
The following table describes the fields and columns in the lower pane of Import Interface in Work Order mode.
Field |
Description |
Record No |
SBN-assigned record number. |
Ins No |
Installation number to assign to the work order. |
Sales ID |
Primary sales ID to assign to the work order. |
Percentage (1) |
Percentage of the work order that applies to the primary sales ID. |
Sales ID 2 |
Second sales ID to assign to the work order. |
Percentage (2) |
Percentage of the work order that applies to the second sales ID. |
Sales ID 3 |
Third sales ID to assign to the work order. |
Percentage (3) |
Percentage of the work order that applies to the third sales ID. |
Cycle Period |
Frequency, in months, to bill the work order:
|
Cycle Day (No label) |
Day of the month cycle billing for the work order occurs. |
Sales Type |
Sales type to assign to the work order. (This menu originates from program #1704/47.) |
PO No |
Purchase order number to assign to the work order. |
Description |
Text that appears in the Description field of the work order. |
Price List Group |
Price list group to assign to the work order. (This menu originates from program #1771.) |
Item Grid |
|
Item Code |
Item codes to assign to the work order. (Find valid item codes in program #1535.) |
Count |
Quantity of each selected item code. |
One Time Fee |
One-time fee for each item; based on the item price from the price list and the quantity. |
Cycle Fee |
Cycle fee for each item; based on the item cycle fee from the price list and the quantity. |
The Composite Mode
Use the Composite Mode to view open/close schedule changes imported using Import 159 of Operational Imports (program #541). After posting the records, you may view these changes in the Composite Schedule view of the Open/Close Schedule tab in Data Entry (program #559).
The following graphic shows the lower pane of Import Interface in Composite mode.
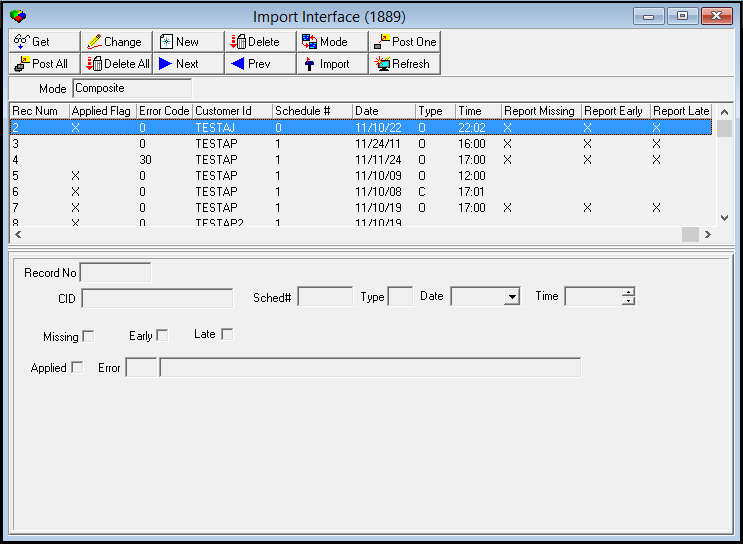
Field/Column Descriptions
The following table describes the fields and columns in the lower pane of Import Interface in Composite mode.
Field |
Description |
Record No |
SBN-assigned record number. |
CID |
Customer ID to apply the schedule change to. |
Sched# |
Open/close schedule number to apply the change to. |
Type |
Indicates whether the schedule change is for an Open (letter O) or a Close (letter C). Enter a decimal point (.) to reset to the standard schedule. |
Date |
Date to which the schedule change applies. |
Time |
Time for the Open or Close to be scheduled. |
Missing |
Select this check box if you want SBN to create alarm signals for Missed Opens/Closes. |
Early |
Select this check box if you want SBN to create alarm signals for Early Opens/Closes. |
Late |
Select this check box if you want SBN to create alarm signals for Late Opens/Closes. |
Applied |
A check mark in this check box indicates that you have posted the record to the database. |
Error (Number and Description) |
If an error occurred when importing the record, the error number and description displays. |
The Basic Mode
Use the Basic Mode to view open/close schedule changes imported using Import 160 of Operational Imports (program #541). After posting the records, you may view these schedule changes in the Special Periods tabs of the Open/Close Schedule tab in Data Entry (program #559).
The following graphic shows the lower pane of Import Interface in Basic mode.
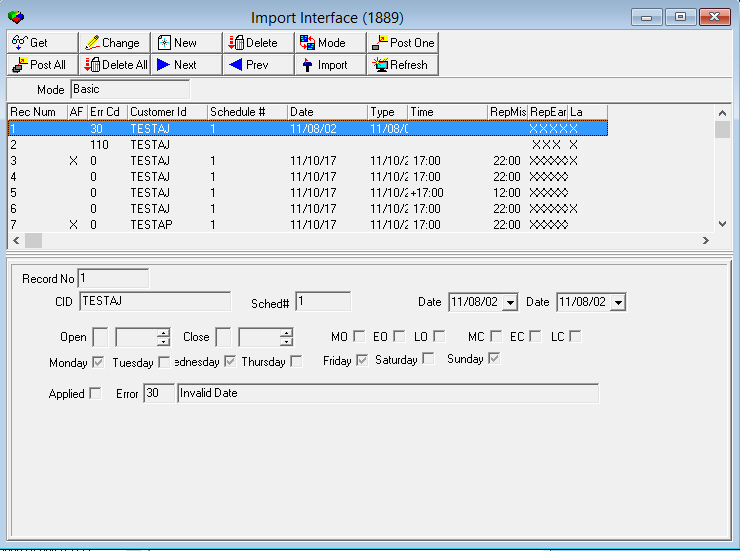
Field/Column Descriptions
The following table describes the fields and columns in the lower pane of Import Interface in Basic mode.
Field |
Description |
Record No |
SBN-assigned record number. |
CID |
Customer ID to apply the special schedule period to. |
Sched# |
Open/close schedule number to apply the special period to. |
Date (Start) |
Start date of the schedule period you want to change. |
Date (End) |
End date of the schedule period you want to change. |
Open |
Enter a + or leave blank. A + indicates the open time occurs on the following day but should remain attached to the current day; used for stores with an open or close time that occurs past midnight. |
Open Time (no label) |
Time for the Open to be scheduled in the special period. |
Close |
Enter a + or leave blank. A + indicates the close time occurs on the following day but should remain attached to the current day; used for stores with an open or close time that occurs past midnight. |
Close Time (no label) |
Time for the Close to be scheduled in the special period. |
MO |
Select this check box if you want SBN to create alarm signals for Missed Opens. |
EO |
Select this check box if you want SBN to create alarm signals for Early Opens. |
LO |
Select this check box if you want SBN to create alarm signals for Late Opens. |
MC |
Select this check box if you want SBN to create alarm signals for Missed Closes. |
EC |
Select this check box if you want SBN to create alarm signals for Early Closes. |
LC |
Select this check box if you want SBN to create alarm signals for Late Closes. |
Monday |
Select this check box to indicate that the scheduled open/close times apply to Mondays in the special period. |
Tuesday |
Select this check box to indicate that the scheduled open/close times apply to Tuesdays in the special period. |
Wednesday |
Select this check box to indicate that the scheduled open/close times apply to Wednesdays in the special period. |
Thursday |
Select this check box to indicate that the scheduled open/close times apply to Thursdays in the special period. |
Friday |
Select this check box to indicate that the scheduled open/close times apply to Fridays in the special period. |
Saturday |
Select this check box to indicate that the scheduled open/close times apply to Saturdays in the special period. |
Sunday |
Select this check box to indicate that the scheduled open/close times apply to Sundays in the special period. |
Applied |
A check mark in this check box indicates that you have posted the record to the database. |
Error (Number and Description) |
If an error occurred when importing the record, the error number and description displays. |
WO Installers Mode
Use the WO Installers Mode to view the new import that would allow Business to upload the work order installer hours from a csv (or tab delimited) (excel) file.
The following graphic shows the lower pane of Import Interface in WO Installers Mode.
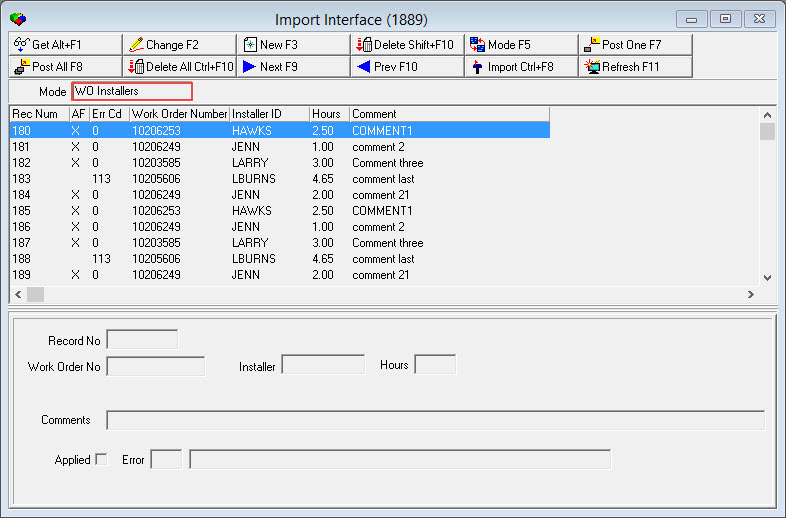
Field/Column Descriptions
The following table describes the fields and columns in the lower pane of Import Interface in WO Installers Mode.
Field |
Description |
Record No |
SBN-assigned record number. |
Work Order No. |
SBN-generated number that appears after you save the work order. |
Installer ID |
SBN assigned Installer ID |
Hours |
The number of hours to add to the installers entry in the WIP tab of the Work Order form. If there is not an existing entry, it will create an entry. |
Comments |
The comments are imported file and it replaces the comment on the WIP tab of the Work Order form for the installer. |
Applied |
A check mark in this check box indicates that you have posted the record to the database. |
Error (Number and Description) |
If an error occurred when importing the record, the error number and description displays. |
Creating, Editing, and Posting Records
Use the following procedures to create, edit, and post records in Import Interface. The following graphics show the procedures in Contacts mode, but these procedures apply to all modes available in Import Interface.
Use the following steps to create a record:
1. In the Import Interface (program #1889), choose Toggle Mode to select the mode of the specific record type you want to create.
2. Choose New Record.
w The fields in the lower pane of the window open.
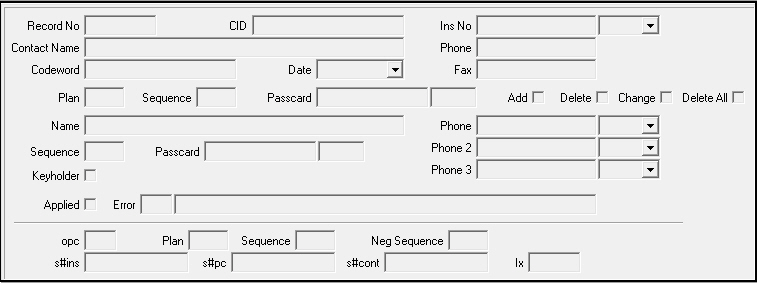
3. Enter information into the fields.
Note: For more information on specific fields for each import type, see the previous sections.
4. Choose Save.
Use the following steps to edit a record:
1. In the Import Interface (program #1889), choose Toggle Mode to select the mode.
2. Double-click the record you want to edit, or choose Get Record.
3. Choose Change Record.
w The fields in the lower pane of the window open.
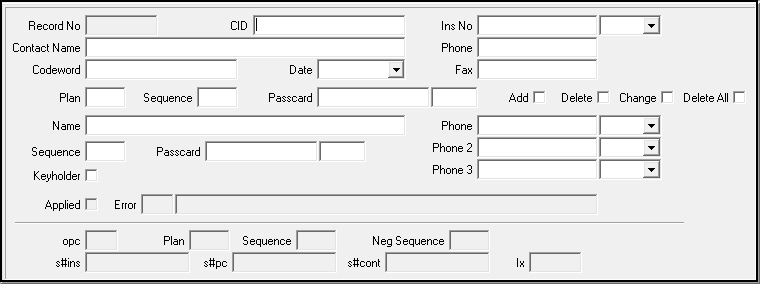
4. Change information, as needed.
5. Choose Save.
Use the following steps to post records:
1. In the Import Interface (program #1889), choose Toggle Mode to select the mode.
2. To post one record, select the line of the record you want to post.
3. Double-click your selection or choose Get Record.
4. Choose Post One Record.
w SBN posts the record and selects the Applied check box or displays an error code in the record if the posting fails.
or...
Choose Post All Records.
w SBN posts all valid records, selects the Applied check box, and displays error codes in the records that failed.
Deleting Records
You can delete records from the Import Interface window. You can choose:
Delete Record to delete one record.
Delete All Posted to delete all posted records.
Note: When you delete a zone, SBN deletes any delayed alarms for the zone as well.
Related Programs
The following table lists programs related to Import Interface.
Program |
Number |
Document Link |
Description |
Action Plans Tab |
N/A |
Create and maintain action plans to use in the event of an alarm. The information you enter in Contacts mode in Import Interface appears in the Action Plans tab of Data Entry Master and Basics (program #559). |
|
Zones Tab |
N/A |
Define monitoring areas within an installation. The information you enter in Zones mode in Import Interface appears in the Zones tab of Data Entry Master and Basics (program #559). |
|
Contract Master |
548 |
Create and maintain contracts for account billing and payments. The information you enter in Contracts mode in Import Interface appears in Contract Master (program #548). |
|
Cycle Fees Tab |
N/A |
Create and maintain cycle fees to charge the customer at regular invoice intervals. The information you enter in Cycle Fees mode in Import Interface appears in the Cycle Fees tab of Contract Master (program #548). |
|
Data Entry Master and Basics |
559 |
Create and maintain installation details. The information you enter in Customers mode and Addresses mode in Import Interface appears in Data Entry Master and Basics (program #559). |
Button Functions
The following table displays the buttons, describes the shortcut keys, actions, and functionality.
Button |
Name |
Shortcut Key |
Action |
Description |
|
Get Record |
Alt+f1 |
1889/ 1 |
Choose a record to view. |
|
Change Record |
f2 |
1889/ 2 |
Change the selected record. |
|
New Record |
f3 |
1889/ 3 |
Create a new record. |
|
Delete Record |
shift+f10 |
1889/ 4 |
Delete the selected record. |
|
Toggle Mode |
f5 |
1889/ 7 |
Select the type of import to view. |
|
Post One Record |
f7 |
1889/ 8 |
Post one record. |
|
Post All Records |
f8 |
1889/ 9 |
Post all valid records as a group. |
|
Delete All Posted |
ctrl+f10 |
1889/10 |
Delete all posted records. |
|
Next Record |
f9 |
View next record. |
|
|
Previous Record |
f10 |
View previous record. |
|
|
Import |
ctrl+f8 |
Access program #541, in which you can import open/close schedule changes that are visible in Composite mode and Basic mode. |
|
|
Refresh |
f11 |
Refresh screen to view recently imported records. |
|
|
Exit |
Esc |
Exit without saving. |
|
|
Save |
Enter |
Save existing record. |











Modifications and Updates to Import Interface
The following table lists modifications and updates to the Import Interface document.
Mod Number |
Date |
Description |
07.02.18857 |
10/20/09 |
SBN deletes delayed alarms on deleted zones. |
07.02.20995, 08.03.08350 |
09/02/11 |
Added Country fields to Customers, Addresses, and Installation modes. |
07.02.21046 |
10/14/11 |
Added Composite and Basic modes. Added Import and Refresh buttons. |
N/A |
07/18/14 |
Images updated. |
N/A |
02/19/20 |
Import Interface moved from Account Management to System Administration within SBN. |
F1 Help
| Delphi Forms | blcontractstatusform, blimport173form, blimport180form, maimportopenclose159form, ubdiscountreasonsform |
| Program Numbers | 541, 1532, 1783 |