
Certificates Report
Certificates Report
Certificates Report
Report #: 2193
Module: Account Generation
Overview
Use the Certificates Report to print certificates attached to CIDs in the Certificates tab of Data Entry (program #559).
This document covers the following topics:
Navigating to Certificates Report
Navigating to Certificates Report
Use the following steps to access the Certificates Report:
1. From the main SBN toolbar, select Menu.
2. From the drop-down menu, select Go To [ALT+F1].
3. In the Go To Program dialog box, type "2193."
w The Certificates Report opens.
The Certificates Report
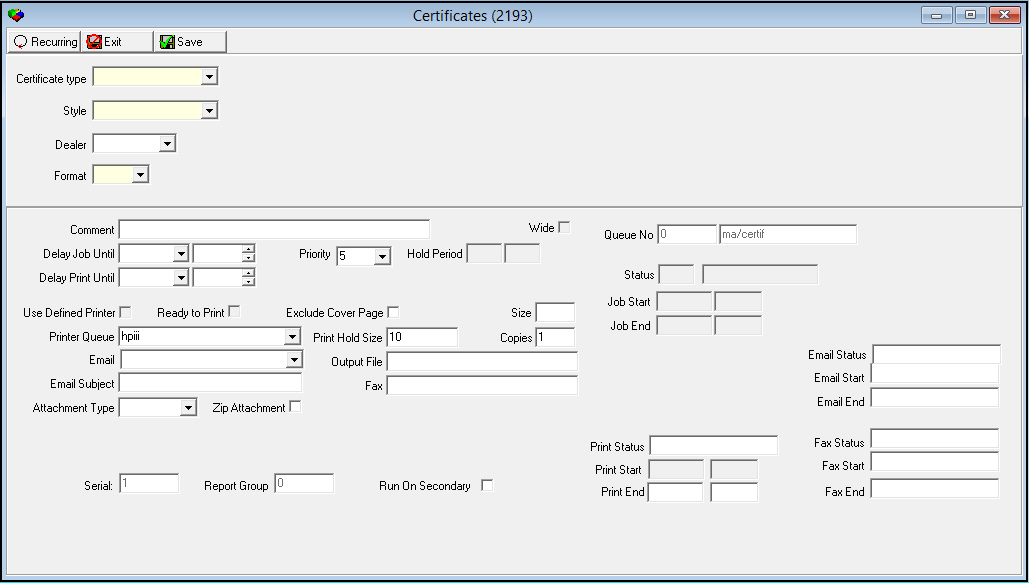
The report window contains two panes. Use the upper pane to define the content of the report, and use the lower pane to define the job output (how, when, and where you want to print the report). The following graphic shows Certificates as the report opens.
Field Descriptions
The following table describes the fields used in the upper pane of the Certificates Report.
Field |
Description |
Certificate Type |
Select a certificate type you want to print. (This menu originates from program #1653.) |
Style |
Select a certificate style you want to print. (This menu originates from the Styles tab of program #1653 for the selected certificate type.) |
Dealer |
You may select a dealer to limit the report to certificates associated with installations that have that dealer assigned. (This menu originates from program #1537 and is limited by the user's Dealer Access Profile assigned in program #1811.) |
Format |
Select a layout format for the report. (This menu originates from program #1590, abbreviation 39). |
Defining Report Parameters
Every report in SBN contains the same lower pane with fields for search parameters.
Report Parameters Pane
The following table describes the fields used in the lower pane of the Certificates Report.
Field |
Description |
Comment |
Type a description of the job that appears in the Report Queue (program #1558). |
Wide |
This box displays a check mark if the report requires wide paper, landscape printing, or condensed print. |
Queue No |
Displays the queue number assigned from the Report Queue. |
Report
Name |
Displays the program name of the report, if applicable. |
Serial |
Displays the number of the SBN report service that runs the report. (1, 2, 3, and so on.) Define the value of this field in Report Default Parameters (program #1561). Note: You may set up a high output report to run on one instance of the report service and let other reports run on another report service. |
Delay Job Until |
Select a date and time to use as the minimum start time for processing the report. Note: The report may remain held after this time if the priority requires the report to print at a certain time. |
Priority |
Defaults to the priority of the report defined in Report Default Parameters. You can override the default by selecting a priority from the drop-down menu. Note: You can set up the conditions in which a user may edit this field in Required Fields (program #1843). |
Hold Period |
If the priority defined for the report causes SBN to hold the report, these fields display the beginning and ending of the hold time. |
Delay Print Until |
Select a date and time to use as the minimum start time for printing the report. |
Status |
Displays the current status of the job. This is a read-only field. |
Status
Description |
Displays the description of the status of the job. This is a read-only field. |
Use Defined Printer |
If you have no report defined in the Reports tab of the Client Options window, this box appears grayed out. Select this check box to use the defined printer regardless of the printer selected in Printer Queue. This box defaults with a check mark if: l You have a default printer defined in the Reports tab of the Client Options window. l The Use Defined Printer check box is selected in Report Default Parameters. You may select a different printer by leaving this check box blank and selecting a different printer in Printer Queue. Note: If you leave this box blank, SBN uses the printer that defaults or that you select in Printer Queue to print the report. |
Ready to Print |
This box displays a check mark when the report is ready to print. |
Exclude Cover Page |
If the report is equipped with a cover page, select this check box to remove the cover page from the print job. |
Size |
Displays the actual size of the report in pages. |
Job Start |
Displays the date and time the report began processing. |
Job End |
Displays the date and time the report finished processing. |
Printer Queue |
Defaults to the printer queue defined for the report in Report Default Parameters. You can override the default by selecting a different printer queue from the menu. (This menu originates from program #1559.) Note: The menu displays only those printers flagged as In Use for the printer profile associated with the report in Report Default Parameters (program #1561). |
Print Hold Size |
Defaults to the print hold size defined for the report in Report Default Parameters. You can override the default by typing the maximum number of pages to print automatically. If the number of report pages exceeds the hold size, SBN l Holds the report in the Report Queue l Does not print the report l Does not migrate the report to the Done Queue Note: SBN holds a report with a hold size of 0 (zero) in the Report Queue and NEVER prints the report. Note: SBN will only email or fax reports l Defined with a hold size > 0 l With a print size that is less than or equal to the hold size |
Copies |
Defaults to the number of copies of the report to print defined in Report Default Parameters. You can override the default. |
Email Status |
Displays the current status of the report email if an email address is entered in the Email field. |
When option fe009 is on, you may select a valid email address to which SBN emails the report. Processing the report with a value in this field hands the report off to your email system. If the report size is larger than the hold size, SBN sends the report to the Report Queue and keeps the report on hold until you release it. Note: The email function does not support wide reports. Note: If the report equals 0 pages, excluding cover page, the email will state: �No Data Received.� Note: SBN will only email or fax reports l Defined with a hold size > 0 l With a print size that is less than or equal to the hold size |
|
Output File |
You may type the name of the destination file for output, if desired. The file path must be a directory known to the file server that generates the output. |
Email Start |
Displays the date and time the report email began processing. |
Email Subject |
You may type a subject that appears in the subject line of the email. |
Fax |
When option fe007 is on and Fax Gateway has been installed on your server, you can type a fax number to which SBN faxes the report. Processing the report with a value in this field hands the report off to the Fax system. If the report size is larger than the hold size, SBN sends the report to the Report Queue and keeps the report on hold until you release it. Note: If the report equals 0 pages, excluding cover page, the fax will state: �No Data Received.� Note: SBN will only email or fax reports l Defined with a hold size > 0 l With a print size that is less than or equal to the hold size |
Email End |
Displays the date and time the report email finished processing. |
Attachment Type |
You may select the format from the drop-down menu to which SBN converts the report when it exports with the email. When you select TXT2, SBN embeds the text of the report into the body of the email. Note: If you leave this field blank, the report scheduler will use the PDF format. |
Zip Attachment |
Select this check box to convert the report attachment to a .zip file. |
Run in Export Mode |
Select this check box to run the report in Export mode. In Export mode, SBN generates the report as a text file in the report directory. Note: Only a few reports including Month End Balances (Report #1171), Month End Revenue (Report #1172), Balance Listing (Report #1180), GL Payment (Report #1188), and Deferred Revenue Summary (Report #1903) include this check box. |
Print Status |
Displays the current print status of the report. |
Fax Status |
Displays the current fax status of the report if a fax number is entered in the Fax field. |
Print Start |
Displays the date and time the report began printing. |
Fax Start |
Displays the date and time the report began faxing. |
Print End |
Displays the date and time the report finished printing. |
Fax End |
Displays the date and time the report finished faxing. |
Running and Viewing a Report
SBN prints all certificates of the selected certificate type and style from all CIDs and updates the Print Date for the certificates in the Certificates tab of program #559.
Use the following steps to run and view a report:
1. In the Certificates Report, define the parameters in the upper and lower panes of the report.
2. Choose Save to save the report to the Report Queue.
3. In the Report Queue (program #1558), choose Own to display the report list.
4. In the report list, locate the Certificates Report.
5. When SBN displays 'DON' or 'RDY' in the Status column, the report is ready.
6. Double-click on the report.
w The Certificates Report window opens.
7. Choose Display Report.
w The Print Preview window opens.
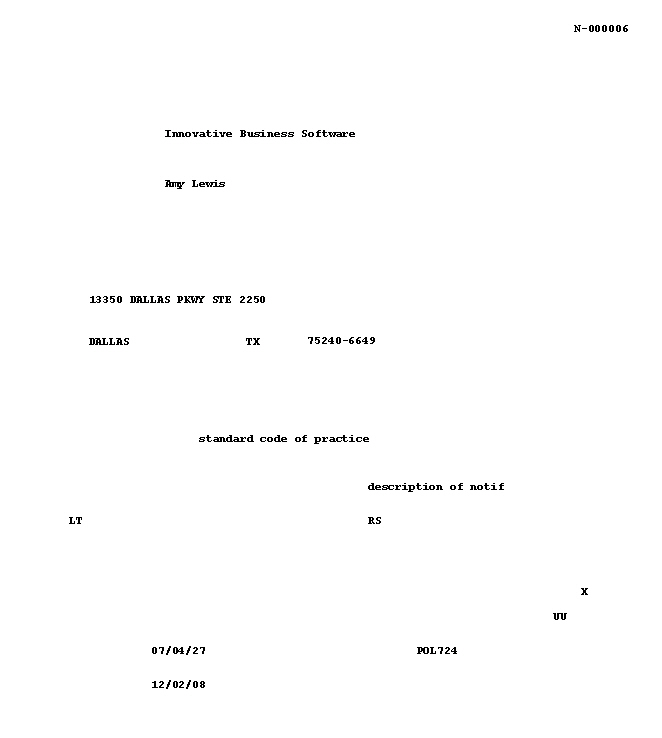
Report Example 1
The following graphic shows an example of the output of the Certificates Report in Format G. This report is formatted for template forms to be loaded in the printer so that the report data prints in blank fields on the form.
Field Descriptions
The following table describes the fields used in the Format G output of the report.
Column |
Description |
Certificate
Number |
Certificate number entered in the Certificates tab of program #559. |
Name of Issuing Company (No label) |
Company name that issued the certificate. |
Name
of Customer |
Customer name on the installation associated with the certificate. |
Address of Supervised Premises (No label) |
Installation address. |
Type
of System |
Panel type of the CID associated with the certificate. |
Standard/Code
of Practice Applicable |
Standard entered for the certificate in the Certificates tab of program #559. |
Security
Grade of System |
UL Grade entered for the CID in program #559. If the CID has no UL Grade, the installation UL grade entered in the Basics tab of program #559 appears here. |
Description of Notification (No label) |
Description of the notification code entered for the CID in program #559. (Define notification codes and descriptions in program #1590, index 35.) |
Means of Notification (No label) |
Notification code entered for the CID in program #559. (Define notification codes and descriptions in program #1590, index 35.) |
Type
of Premises |
Installation subscriber type. |
Endorsement
1 |
An X indicates that Endorsement 1 applies to the certificate. A blank indicates that Endorsement 1 does not apply. |
Endorsement 2 Reference (No label) |
Endorsement 2 Reference entered for the certificate in the Certificates tab of program #559. |
Installation
Date |
Installation date entered in the Basics tab of program #559. |
Police Authority Code (No label) |
Police agency entered for the certificate in the Certificates tab of program #559. |
Certificate Issue Date (No label) |
Issue Date entered for the certificate in the Certificates tab of program #559. |
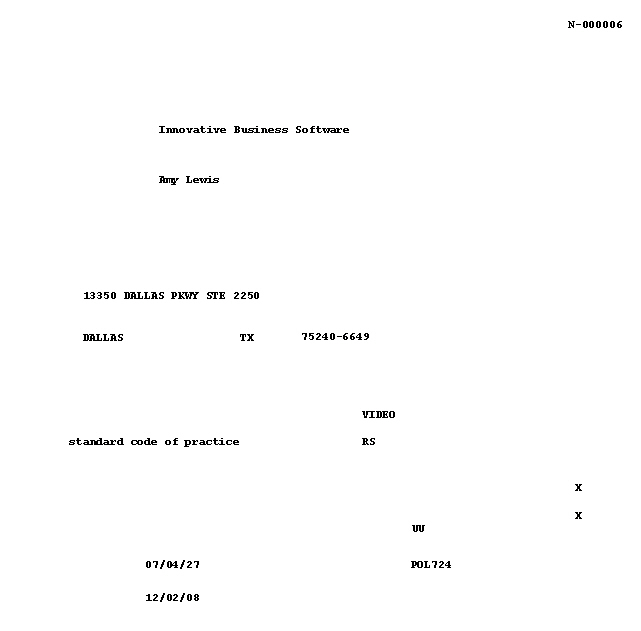
Report Example 2
The following graphic shows an example of the output of the Certificates Report in Format Q. This report is currently formatted for template forms to be loaded in the printer so that the report data prints in blank fields on the form.
Field Descriptions
The following table describes the fields used in the Format Q output of the report.
Column |
Description |
Certificate
Number |
Certificate number entered in the Certificates tab of program #559. |
Name of Issuing Company (No label) |
Company name that issued the certificate. |
Name
of Customer |
Customer name on the installation associated with the certificate. |
Address
of Protected Premises |
Installation address. |
Type
of System |
Panel type of the CID associated with the certificate. |
Standard/Code
of Practice Applicable |
Standard entered for the certificate in the Certificates tab of program #559. |
Type
of Signalling |
Line type of the CID associated with the certificate. |
Type
of Premises |
Installation subscriber type. |
Endorsement
1 |
An X indicates that Endorsement 1 applies to the certificate. A blank indicates that Endorsement 1 does not apply. |
Endorsement
2 |
An X indicates that Endorsement 2 applies to the certificate. A blank indicates that Endorsement 2 does not apply. |
Endorsement 2 Reference (No label) |
Endorsement 2 Reference entered for the certificate in the Certificates tab of program #559. |
Installation
Date |
Installation date entered in the Basics tab of program #559. |
Police Authority Code (No label) |
Police agency entered for the certificate in the Certificates tab of program #559. |
Certificate Issue Date (No label) |
Issue Date entered for the certificate in the Certificates tab of program #559. |
Related Programs
The following table lists programs related to the Certificates Report.
Program |
Number |
Document Link |
Description |
Data Entry Master and Basics |
559 |
View and edit details of installations and CIDs associated with certificates. |
|
Certificates Tab |
N/A |
Set up certificates for CIDs. |
|
Certificate Types |
1653 |
Define certificate types and styles to be assigned in the Certificates tab of Data Entry. |
Button Functions
The following table displays the buttons, describes the shortcut keys, actions, and functionality.
Button |
Name |
Shortcut Key |
Action |
Description |
|
Recurring |
alt+f1 |
2193 |
Open fields for recurring/template reports. |
|
Exit |
esc |
2193 |
Exit without saving changes to selected record. |
|
Save |
enter |
2193 |
Save changes to selected record. |


Modifications and Updates to Certificates Report
The following table lists modifications and updates to the Certificates Report document.
Mod Number |
Date |
Description |
07.02.21525, 08.03.08624 |
02/24/12 |
Report and document created. |
n/a |
07/11/14 |
Images updated. |
08.89.11498, 07.89.25986, 07.89.25988, 08.89.11500 |
08/30/18 |
Report Retired. |