
Medical Agencies
Program #: 1552
Module: System Administration
Overview
Use Medical Agencies (program #1552) to set up medical contact information for multiple branches and regions, as well as specific agencies by zip code. You may search Medical Agencies for specific agencies.
This document covers the following topics:
Navigating to Medical Agencies
Searching for Medical Agencies
Viewing the Details of an Agency
Changing the Details of an Agency
Setting Up an Agency for eDispatch/ASAP Address Verification
Using a Template for a New Agency
Navigating to Medical Agencies
Use the following steps to navigate to Medical Agencies:
1. From the main SBN toolbar, select Menu.
2. From the drop-down menu, select Go To [ALT+F1].
3. In the Go To Program dialog box, type in "1552."
w Medical Agencies opens.
The Medical Agencies Window
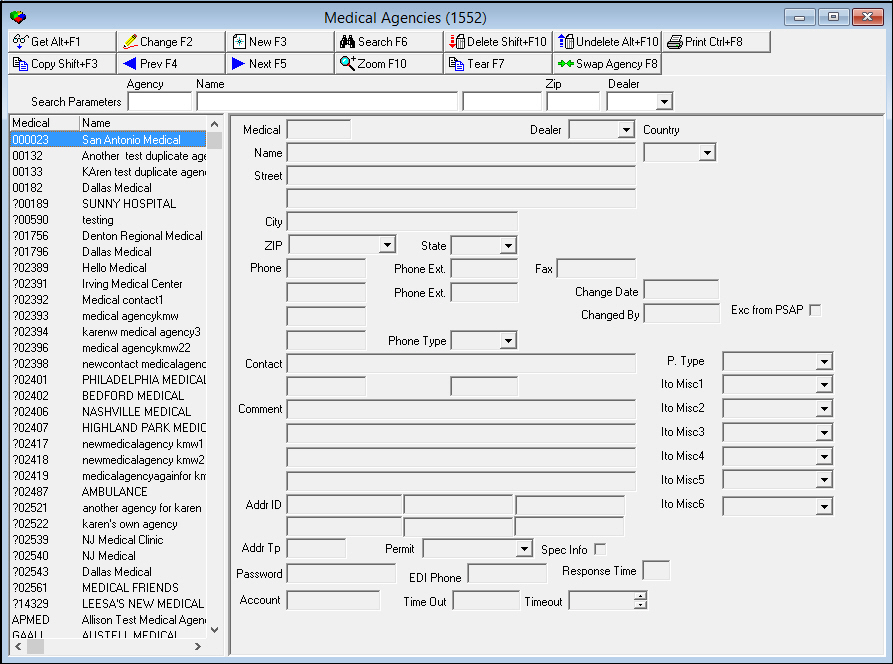
The window contains three panes:
The upper pane contains fields for selecting search parameters.
The left pane displays previously defined medical agencies.
The right pane displays details of a selected medical agency.
The following graphic shows Medical Agencies as the program opens.
Field/Column Descriptions
The following table describes the fields and columns used in Medical Agencies.
Field/Column |
Description |
Search Parameters |
|
Agency |
You may search for a medical agency by agency ID. |
Name |
You may search for a medical agency by name. |
Phone |
You may search for a medical agency by primary phone number. |
Zip |
You may search for a medical agency by zip code. |
Dealer |
You may search for a medical agency by the ID of the dealer associated with that agency. (This menu originates from program #1537.) O If you leave this field blank, the search includes all dealers. |
Columns |
|
Medical |
Medical agency ID. |
Name |
Name of the medical agency. |
Phone # |
Primary phone number for the medical agency. |
City |
City where the medical agency is located. |
Dealer ID |
ID of the dealer associated with the medical agency. |
Detail Fields |
|
Medical |
Medical agency ID. |
Dealer |
ID of the dealer associated with the agency. |
Name |
Name of the medical agency. |
Street |
Street address of the medical agency. |
Street
2 |
Additional line for the street address. |
City |
City where the medical agency is located. |
Zip |
Zip code where the medical agency is located. |
State |
State where the medical agency is located. (This field holds a maximum of 60 characters.) |
Country |
Country where the medical agency is located. |
Phone |
Primary phone number for the medical agency. |
Phone Ext. |
Extension of the primary phone, if necessary. |
Fax |
Fax number of the medical agency. |
Phone |
Secondary phone number for the medical agency. |
Phone Ext. |
Extension of the secondary phone, if necessary. |
Change Date |
Date on which the selected medical agency record was last changed. |
Phone |
Paging or other special phone number for the medical agency. |
Changed By |
User ID that last made changes to the selected medical agency record. |
Phone |
Paging or other special phone number for the medical agency. |
Phone Type |
Type of phone number typed in the previous field. (This menu originates from program #1840.) O The phone type determines how the phone call is treated when dialed automatically. For example, a pager phone type opens the paging dialog box rather than the dialer. |
Contact |
Contact name at the medical agency. |
Phone |
Phone number for the contact person. |
Phone Ext. |
Extension number for the contact person, if necessary. |
Comment |
Four lines for typing comments for this agency. This information appears when you zoom on the agency in Dispatch. O Maximum of 30 characters per line. |
Addr Tp |
Address type defines the Dispatch interface used for this agency. This field is NOT validated. Setting this field to ASAP is one part of onboarding an agency for ASAP. The full sequence — the nine-digit code, the save prompt, the action plan, and the monitoring status requirement — is on the ASAP Setup page. When submitted addresses do not appear, see ASAP Troubleshooting. Valid inputs are:
Note: When a Addr Tp is defined, all Guard actions in the Dispatch tab bypass the autodialer and transmit the dispatch event using the IP addresses defined in the Addr ID. |
Addr ID |
Primary IP address for special agency interface. |
Addr ID (No Label) |
Secondary IP address for special agency interface. |
Addr ID (No Label) |
Additional IP address for special agency interface. |
Addr ID (No Label) |
Additional IP address for special agency interface. |
Addr ID (No Label) |
Additional IP address for special agency interface. |
Addr ID (No Label) |
Additional IP address for special agency interface. |
Spec Info |
This check box indicates that there is additional information for this medical agency. This information displays after the phone number is dialed, but before the Call Resolution dialog box opens. |
Permit |
Permit profile assigned to this agency. (This menu originates from program # 1716.) |
Password |
Password used to authenticate information being electronically sent to the agency. |
EDI Phone |
Phone number SBN dials to electronically transfer information directly to the agency. |
Response Time |
Maximum response time for the agency, in minutes. |
Account |
General Ledger account for the agency. |
Timeout |
Amount of time that SBN should try transmitting the data electronically before notifying the operator there is a problem and an alternate contact method should be used. |
Exc from PSAP |
If this box is checked, PSAP will never replace this agency on an Action Plan. |
P Type |
You may select a panel type that the Intrado PSAP web service uses to replace the panel type of the first CID on an installation when PSAP adds the selected medical agency to Action Plan 0. (This menu originates from program #1742.) Note: A medical agency must exist on Action Plan 0 in order for PSAP to replace the panel type of the first CID on an installation with this data. |
Ito Misc1 |
You may select data that the Intrado PSAP web service adds to the Misc1 (Warranty) field of the Basics tab in program #559 when PSAP adds the selected medical agency to Action Plan 0. Note: A medical agency must exist on Action Plan 0 in order for PSAP to update the Basics tab of program #559 with this data. |
Ito Misc2 |
You may select data that the Intrado PSAP web service adds to the Misc2 (VIP) field of the Basics tab in program #559 when PSAP adds the selected medical agency to Action Plan 0. Note: A medical agency must exist on Action Plan 0 in order for PSAP to update the Basics tab of program #559 with this data. |
Ito Misc3 |
You may select data that the Intrado PSAP web service adds to the Misc3 (Pets) field of the Basics tab in program #559 when PSAP adds the selected medical agency to Action Plan 0. Note: A medical agency must exist on Action Plan 0 in order for PSAP to update the Basics tab of program #559 with this data. |
Ito Misc4 |
You may select data that the Intrado PSAP web service adds to the Misc4 (Call Out) field of the Basics tab in program #559 when PSAP adds the selected medical agency to Action Plan 0. Note: A medical agency must exist on Action Plan 0 in order for PSAP to update the Basics tab of program #559 with this data. |
Ito Misc5 |
You may select data that the Intrado PSAP web service adds to the Misc5 (Key #) field of the Basics tab in program #559 when PSAP adds the selected medical agency to Action Plan 0. Note: A medical agency must exist on Action Plan 0 in order for PSAP to update the Basics tab of program #559 with this data. |
Ito Misc6 |
You may select data that the Intrado PSAP web service adds to the Misc6 (GHQ Acc#) field of the Basics tab in program #559 when PSAP adds the selected medical agency to Action Plan 0. Note: A medical agency must exist on Action Plan 0 in order for PSAP to update the Basics tab of program #559 with this data. |
Searching for Medical Agencies
Use the following steps to search for Medical agencies:
1. In Medical Agencies, type information into one or more of the search parameter fields.
2. Choose Search.
w The columns in the left pane display the results that match your search parameters.

Viewing the Details of an Agency
You can view the details of a Medical Agency in the fields in the right pane.
Use the following steps to view the details of an agency:
1. In Medical Agencies, select the agency for which you want to view details from the left pane.
2. Double-click your selection or choose Get.
w The fields in the right pane display the details of the selected agency.
Adding an Agency
Use the following steps to add a new agency:
1. In Medical Agencies, choose New.
w The fields in the right pane open for changes.
2. Complete the Medical, Name, and Phone fields. Complete the reaming fields, as desired.
3. Choose Save.
w SBN adds the agency to the list of defined agencies in the left pane.
Changing the Details of an Agency
Use the following steps to change the details of an agency:
1. In Medical Agencies, select the agency you want to change from the left pane.
2. Choose Change.
w The fields that can be changed open for changes in the right pane.
3. Enter changes, as needed.
4. Choose Save.
Setting Up an Agency for eDispatch/ASAP Address Verification
When the Dispatch Service is running in the SBN Service Manager, it pulls installation records from program #559 in SBN that have an agency on an action plan with address type 'ASAP' defined in Medical Agencies (program #1552) and inserts the installation records into the ASAP Address Verification Queue (program #1675).
After an installation's address has been verified in program #1675, when SBN receives an alarm incident from a zone type that has an eDispatch event defined in program #1733, you may choose to send the incident to a PSAP (Public Safety Answering Point) to be handled outside of SBN in the Agency Details window of Dispatch (program #537).
Use the following steps to set up an agency for eDispatch:
1. In Medical Agencies, select the agency you want to change from the left pane.
2. Choose Change.
w The fields that can be changed open for changes in the right pane.
3. Enter the following data in the following fields:
Addr Tp - enter ASAP in this field
Addr ID (1) - enter the number of addresses that can be sent to a PSAP for address verification per time interval defined in the second Addr ID field
Addr ID (2) - enter the number of minutes in each interval that the number of addresses defined in the first Addr ID field can be sent to a PSAP for address verification. For example, if you enter 1440 in this field and 100 in the first Addr ID field, the PSAP will receive up to 100 addresses per 24 hours (1440 minutes).
Addr ID (3) - enter the PSAP ID that the PSAP provides once they feel the central station is in a good state to send live alarm signals. Live signals cannot be delivered to the PSAP without this ID.
Response Time - enter the number of minutes for the eDispatch retry interval. This is how long the system waits after sending a payload to the eDispatch Message Broker
Time Out - enter the number of minutes until the system no longer retries to send an eDispatch Chat message that the PSAP has not accepted. (If you enter 0 in this field, the system defaults to 1 minute.)
4. Choose Save.
w SBN displays the following message: 'This agency has been set to be capable of eDispatch. Do you want to submit all addresses that are serviced by this agency for validation?'
5. If you choose Yes, SBN submits all addresses for the agency to the ASAP Address Verification Queue (program #1675).
Deleting an Agency
Use the following steps to delete an agency:
1. In Medical Agencies, select the agency you want to delete.
2. Choose Delete.
w A Confirmation dialog box appears: "Delete XXX. Are you sure?"
3. Choose Yes.
w SBN deletes the selected agency.
Restoring a Deleted Agency
You can restore a deleted agency back into SBN.
Use the following steps to restore a deleted agency:
1. In Medical Agencies, choose Undelete.
w The Undelete window appears.
2. In the Undelete window, find the agency you want to restore and double-click it, or choose [Enter].
w SBN restores the agency to the active list of defined entries.
Using a Template for a New Agency
You can use one agency as a template for another agency.
Use the following steps to use one agency as a template for new agency:
1. In Medical Agencies, select the agency you want to use as a template.
2. Choose Copy Current Record.
w Fields in the left pane fill with the details of the selected agency, but remain open for changes.
3. Change any information needed for the new agency.
4. Choose Save.
w SBN adds the new agency to the list of defined entries.
Zooming into the Sublevel
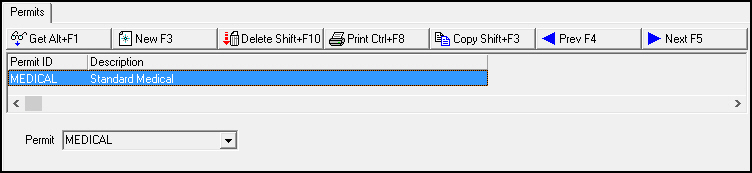
You can zoom into the sublevel of Medical Agencies and add permits to agency profiles. You can assign more than one permit to an agency. The following graphic shows the Permits tab in the Medical Agencies sublevel.
Field/Column Descriptions
The following table describes the fields and columns used in the Permits tab.
Field/Column |
Description |
Permit ID |
Select a permit to associate with the selected medical agency. (This menu originates from program #1716.) |
Description |
Text description of the permit. |
Button Functions
The following table displays the buttons, describes the shortcut keys, actions, and functionality.
Button |
Name |
Shortcut Key |
Action |
Description |
|
Get |
ALT+F1 |
1552/ 1 |
Get record. |
|
Change |
F2 |
1552/ 2 |
Change selected record. |
|
New |
F3 |
1552/ 3 |
Create new record. |
|
Delete |
SHIFT+F10 |
1552/ 4 |
Delete selected record. |
|
Undelete |
ALT+F10 |
1552/ 5 |
Restore deleted record. |
|
CTRL+F8 |
1552/ 6 |
Print selected records. |
|
|
Search |
F6 |
1552/ 7 |
Search for agencies based upon entered parameters. |
|
Copy |
SHIFT+F3 |
1552/ 999 |
Copy current agency to use as a template. |
|
Previous |
F4 |
1552/ 999 |
Select last record. |
|
Next |
F5 |
1552/ 999 |
Select next record. |
|
Zoom in/out of Sublevel |
F10 |
|
Access the Permits tab. |
|
Tear Away Selected Tab |
F7 |
|
View the Permits tab in a separate window. |
|
Swap Agency |
F8 |
1552/17 |
Replaces the agency with another selected agency on Action Plans on all installations with that agency. |













Modifications and Updates to Medical Agencies
The following table lists modifications and updates to the Medical Agencies document.
Mod Number |
Date |
Description |
08.81.09732, 07.81.23481, 07.81.23478, 07.81.23477, 07.81.23475, 08.81.09699, 07.81.23446 |
07/28/14 |
Added PSAP fields and Swap Agencies button. |
n/a |
08/19/14 |
Images updated. |
|
|
|