
Monitoring Dealers
Monitoring Dealers
Monitoring Dealers
Module: System Administration
Overview
Use Monitoring Dealers (program #2508) to allow Dealers from different Dealer Profiles authority to monitor the signals of the other Dealer. Only the Monitoring Dealer will be able to see the other Monitoring Dealers records. The Monitored Dealer will not be able to see the other Monitoring Dealer’s records. The Monitored Dealer is in control of when monitoring is active.
Monitoring Dealers are dealer restricted so each dealer will only see their records.
Note: Option ba470 must be Active so Dealer restrictions apply in the Alarm Queue.
Note: Option ba197 must be OFF - if on, branch restrictions apply and this program will not work correctly.
Navigating to Monitoring Dealers
Use the following steps to navigate to Monitoring:
1. From the main SBN toolbar, select Menu.
2. From the drop-down menu, select Go To [ALT+F1].
3. In the Go To Program dialog box, type in "2508."
w The Monitoring Dealers program opens.
The Monitoring Dealers Window
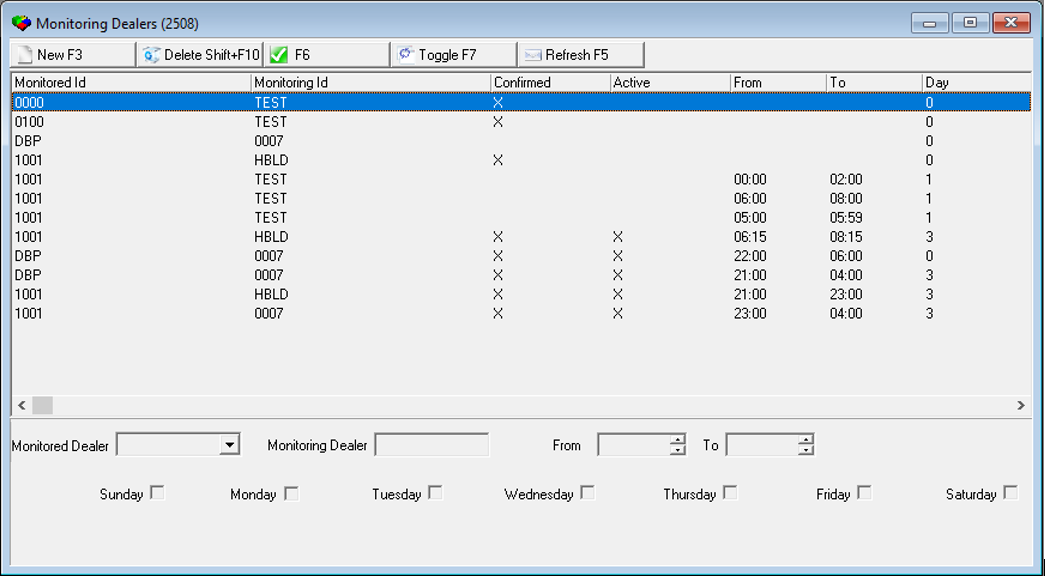
The Monitoring Dealers window contains two panes:
The Display pane (upper) shows the possibly linked Dealers.
The Set Up pane (lower) is how a user creates the link between Dealers.
The following graphic shows Monitoring Dealers as the program opens. The window remains blank until you select the Monitoring ID's and the Monitored ID's.
Field/Column Descriptions
The following table describes the fields and columns used in Monitoring Dealers.
Field/Column |
Description |
Monitored Id |
ID of the Dealer being monitored. |
Monitoring Id |
ID of the Dealer doing the Monitoring |
Confirmed |
"X" will appear when the "Confirm (F6)" button is selected |
Active |
"X" will appear when the "Toggle (F7)" button is selected. (E-mail notification will be sent to both parties if the associated dealers have an e-mail address linked to their account, and the E-mail notification service is Running. For more information, please see SBN Service Manager. |
From |
Start time of when the Monitoring Dealer will take over alarms for the Monitored Dealer. |
To |
End time of when the Monitoring Dealer will stop receiving the Monitored Dealers alarms, and the Monitored Dealer will begin monitoring their own alarms again. |
Day |
Day (1-7) the Monitoring Dealer will take over handling alarms for the Monitored Dealer. 1-Sun, 2-Mon, 3-Tues, 4-Wed, 5-Thurs, 6 |
Monitored Dealer |
Dropdown list of Dealers who may be Monitored. This field is auto-populated and read-only. |
Monitoring Dealer |
Textbox field. The Monitored Dealer must know and type the Monitoring Dealer ID. This field is validated on Save. |
From |
Start time. |
To |
End Time. |
Sun-Sat |
Select the days you want to be monitored/monitor. Note: Users can only select 1 day at a time. If a user wishes to have multiple days monitored, a connection must be created for each day. If a user wishes to have a whole week monitored, leave all days unchecked. |
Using the Monitoring Dealers
The User creating the record is always the Monitored Dealer. This record is asking another Dealer to monitor their accounts.
Use the following steps to send/accept the request:
1. Monitored Dealer is auto-populated and read-only.
2. Monitored Dealer must know and type the Monitoring Dealer's Dealer number. This field is validated on save.
w Record is saved.
3. A notification e-mail is sent to the Monitoring Dealer.

4. Monitoring Dealer will log into their SBN.
5. If user has authority to Monitoring Dealer (#2508), they will receive notification that a link request is pending.
w Click "OK" to go to #2508.
6. User highlights the record and clicks "Toggle" or "Delete" depending on if they accept or decline.
Note: Toggle only works if the dealer pressing the button is the same as the Monitoring Dealer defined in the record. Delete works for any row in the grid.
7. General Change Log entries are created for the following:
Program Number
Monitored Dealer
Monitoring Dealer
Action (Link accepted, Activated, Deactivated, or Deleted.)
Monitoring Activation
After a request is accepted the Monitored Dealer may activate/deactivate monitoring by clicking the "Toggle" button at the top of the form. This will create a Change Log Entry and send e-mail notifications.
On Activation, the Monitored Dealer will be added to the Dealer Profile of the Monitoring Dealer. On Deactivation, the Monitored Dealer will be deleted from the Dealer Profile of the Monitoring Dealer.
Deleting the Link
Either side may delete the record. This will permanently break the link. If this is done, the request process must be started over to create a new link.
E-mail Notification
If either Dealer has an associated e-mail address defined in program #1537, they will receive an e-mail for the following:
1. A link request is created.
2. A link request is accepted or deleted.
3. A link is activated.
4. A link is deactivated.
Button Functions
The following table displays the buttons, describes the shortcut keys, actions, and functionality.
Button |
Name |
Shortcut Key |
Action |
Description |
|
New |
F3 |
2508/3 |
New Record. |
|
Delete |
Shift+F10 |
2508/4 |
Delete Record. |
|
Confirm |
F6 |
2508/5 |
Confirm the acceptance of Monitoring Status. |
|
Toggle |
F7 |
2508/6 |
Toggle between Active/Inactive. |
|
Refresh |
F5 |
2508/7 |
Refresh the list of fields. |
Modifications and Updates to Monitoring Dealers
The following table lists modifications and updates to the Monitoring Dealers document.
Mod Number |
Date |
Description |
| 07.89.25876, 08.89.11390 | 06/18/18 |
Document created. |
| 07.91.26202, 08.91.11717 | 8/1/2019 |
Scheduling Added to bottom pane. Images updated. |