
Alarm Log History External Report
Report #: 2120
Module: Account Management
Overview
The Alarm Log History (External) report provides data from the Alarm Log and/or the Open / Close Log intended for outside users, such as customers. It provides pertinent information for customers, but filters out information that your company might consider confidential or sensitive.
Options mo117 and mo118 control whether passcard numbers and call list phone numbers appear on this report output.
Option ma001 controls the sort order of the report output.
When on, the report sorts by time, then sequence.
When off, the report sorts by incident number, time, then sequence.
You may set up an account in Data Entry so that SBN automatically emails or faxes this report when the report runs. To use this feature, you must set Flag 10 to either fax or email in the Rep Flag field of the Basics tab and define email addresses and fax numbers.
To access this report, select Alarm Log History (External) Report (report #2120) from the main menu of SBN.
The Alarm Log History (External) Report
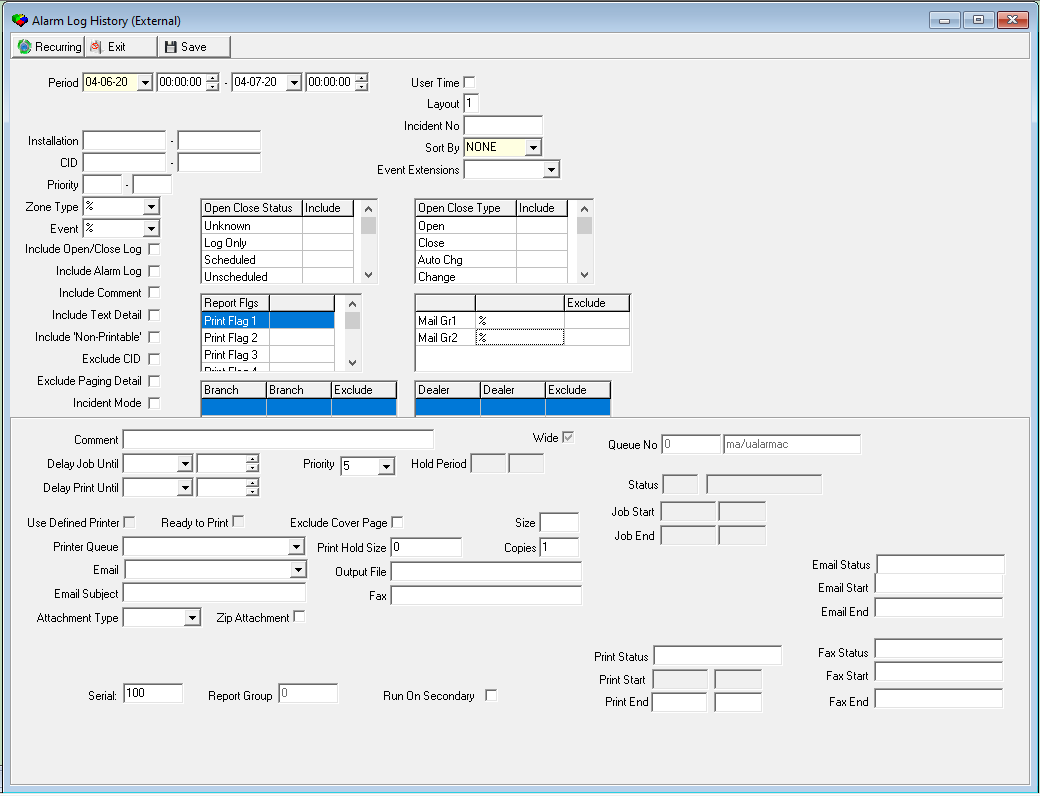
This window contains two panes: use the upper pane to define the content of the report; use the lower pane to define the job output - how, when, and where you want to print the report.
Note: See Report Parameters Pane for information on the fields in the lower pane, which are the same in every report.
Field Descriptions
The following table describes the fields used in the upper pane of this report.
Note: You can use wildcard characters in selected fields. For more information about using wildcards, see Searches.
| Field | Wildcards Allowed |
Description |
| Period | ||
| Date - From (No label) |
No |
You must select a date or a range of dates to limit the report to log entries that occurred during that range. Select the beginning date of the range. O This field defaults to the current date. |
| Time - From (No label) |
No |
You may select a range of time to limit the report to log entries that occurred during that range. Select the beginning time of the range. O This field defaults to 0:00 (Midnight). O You can use either the user time or the premises time for the report when you specify which you prefer in the field, User Time. |
| Date - To (No label) |
No |
You may select a range of dates to limit the report to log entries that occurred during that range. Select the ending date of the range. O This field defaults to tomorrow’s date. |
| Time - To (No label) |
No |
You may select a range of time to limit the report to log entries that occurred during that range. Select the ending time of the range. O This field defaults to 0:00 (Midnight). O You can use either the user time or the premises time for the report when you specify which you prefer in the field, User Time. |
| User Time |
No |
Enter a check mark to run the report and display data according to user time. O If you leave this box blank, the report runs and display data according to premises time. |
| Layout |
No |
Type the number of the layout you want to use. The default layout is 1. See Report Output Examples for more information on layouts 1-7. |
| Incident No | Yes |
You may type a specific incident to limit the report to that incident or use the % wildcard. O If you specify an incident, SBN ignores all other parameters. O If you leave this field blank, the report prints all incidents that fall within the other parameters. |
| Installation Range | ||
| Installation - From | No | You may type a range of installation numbers to limit the report to installations within that range. Type the beginning installation number of the range. |
| Installation - To (No label) |
No | You may type a range of installation numbers to limit the report to installations within that range. Type the ending installation number of the range. |
| Sort by | No |
You must select a sorting parameter for the report. O When this field appears on a report with a mail group identifier parameter, the Mail Group takes precedence. In that case, this field applies only to CIDs without any mail group identifier. |
| CID Range | ||
| CID | No |
You may type a range of CID numbers to limit the report to CIDs within that range. Type the beginning CID number of the range. O If an installation matches with more than one CID, the report includes only the first CID. |
| CID | No |
You may type a range of CID numbers to limit the report to CIDs within that range. Type the ending CID number of the range. O If an installation matches with more than one CID, the report includes only the first CID. |
| Event Extensions | No | You may select an event extension to limit the report to log entries that contain that extension. (This menu originates from program #1751.) |
| Priority Range | ||
| Priority | Yes |
You may type a range of priorities to limit the report to installations that have log entries with priorities within that range. The report then includes all log entries for these installations in the selected period. Type the beginning priority of the range. O If you leave these fields blank, the report includes all installations within the selected installation range. |
| Priority | Yes |
You may type a range of priorities to limit the report to installations that have log entries with priorities within that range. The report then includes all log entries for these installations in the selected period. Type the ending priority of the range. O If you leave these fields blank, the report includes all installations within the selected installation range. |
| Zone Type | Yes | You may either select a zone type to include in the report or use the % wildcard to include all zone types. (This menu originates from program #1733.) |
| Event | Yes | You may either select an event type to include in the report or use the % wildcard to include all event types. |
| Open Close Status | No |
You may include up to six Open / Close statuses by entering a check mark in the corresponding Include column: l Unknown l Log Only l Scheduled l Unscheduled l Missing l Status Set |
| Open Close Type | No |
You may include up to four Open / Close types by entering a check mark in the corresponding Include column: l Open l Close l Auto Chg l Change |
| Include Open / Close Log | No | Enter a check mark in this box to include Open / Close data in the report. |
| Include Alarm Log | No | Enter a check mark in this box to include Alarm Log data in the report. |
| Include Comment | No |
Enter a check mark in this box to include Alarm Log comments in the report. O This comment only appears on layouts 1,2,3 and 7. For more information see Report Examples. |
| Include Text Detail | No | Enter a check mark in this box to include the text description of the event or comment in the report. |
| Include Non-printable | No | Enter a check mark in this box to include those items flagged as non-printable by the P command in monitoring, and zones that do not have the print flag set. |
| Exclude CID | No | Enter a check mark in this box to exclude the CID number from the report. |
| Exclude Paging Detail | No | Enter a check mark in this box to exclude the text associated with a monitoring page from the report. |
| Incident Mode | No | Enter a check mark in this box to include the incident mode in the report. |
| Archive | No | Enter a check mark in this box to include archived Alarm Log data in the report. |
| Report Flags | ||
| Print Flag 1-10 | No |
You may limit the report to records with specific report flags by clicking in the field to the right of any of ten corresponding print flags, and selecting the report flag from the corresponding menu. (This menu originates from program #1555.) O If you leave all fields blank, the report includes all report flag values. O If you set up Mail Groups as report selection parameters, you must leave all report flag fields blank. O SBN uses Report Flag 10 to parse the output of this report. l Select M for email parsing. SBN only includes installations that have M for Report Flag 10 and also match other report parameters. SBN parses the report for email by addresses.e_mail1. SBN then emails only relevant pages of the report to each matching email address. In addition to the parsing, SBN emails the entire report to the address typed in the Email field of the lower pane of the report parameters, if available. l Select F for fax parsing, SBN only includes installations that have F for Report Flag 10 and also match other report parameters. SBN parses the report for faxes by addresses.fax. SBN faxes only relevant pages of the report to each matching fax number. In addition to the parsing, SBN faxes the entire report to the number typed in the Fax field of the lower pane of the report parameters, if available. |
| Mail Groups | ||
| Mail Gr1 | Yes |
You may select a specific Mail Group 1 group to limit the report to those records that match that group, or use the % wildcard to include all Mail Group 1 groups in the report. O If you set up Mail Groups as report selection parameters, you must leave all report flag fields blank. |
| Exclude | No | You may exclude a Mail Group 1 group from the report by selecting the group and then entering a check mark in this box. |
| Mail Gr2 | Yes |
You may select a specific Mail Group 2 group to limit the report to those records that match that group, or use the % wildcard to include all Mail Group 2 groups in the report. O If you set up Mail Groups as report selection parameters, you must leave all report flag fields blank. |
| Exclude | No | You may exclude a Mail Group 2 group from the report by selecting the group and then entering a check mark in this box. |
| Branch Ranges | ||
| Branch | Yes | You may select up to three ranges of branches to limit the report to branches within the ranges. Select the beginning branch number of a range. (These menus originate from program #1530.) |
| Branch | Yes | You may select up to three ranges of branches to limit the report to branches within the ranges. Select the ending branch number of a range. (These menus originate from program #1530.) |
| Exclude | No | You may exclude ranges of branches from the report by selecting the ranges and then entering a check mark in the corresponding Exclude box. |
| Dealer Ranges | ||
| Dealer | Yes | You may select up to three ranges of dealer IDs to limit the report to dealer IDs within the ranges. Select the beginning dealer ID of a range. (These menus originate from program #1537.) |
| Dealer | Yes | You may select up to three ranges of dealer IDs to limit the report to dealer IDs within the ranges. Select the ending dealer ID of the range. (These menus originate from program #1537.) |
| Exclude | No | You may exclude ranges of dealer IDs from the report by selecting the ranges and then entering a check mark in the corresponding Exclude box. |
Note: You must select at least one Include flag to identify the information you want to view in the report. The report output heading differs depending on your selections.
Running and Viewing a Report
For information on running and viewing a report, see Common Functions in SBN.
Report Example - Layout 1
The following graphic shows an example of the output of Layout 1 with the Alarm Log and Open / Close Log included.
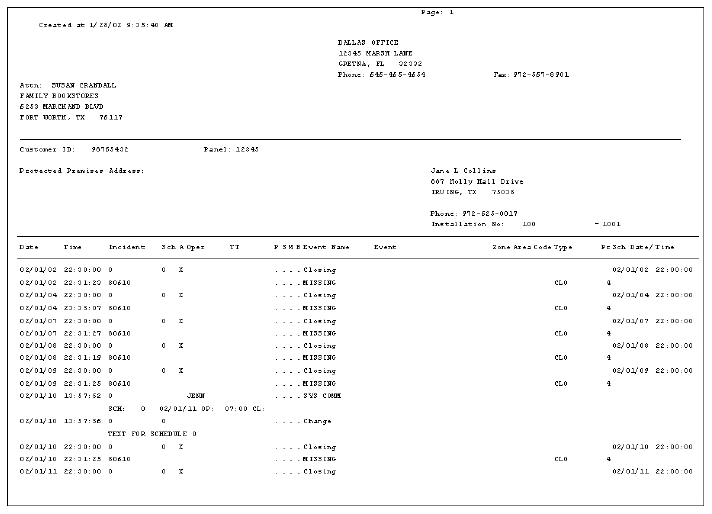
The following table describes the columns that can appear in the report depending on the parameters selected.
| Column | Description |
| Both Alarm Log and Open / Close Log | |
| Date | Premises date of the log item. |
| Time | Premises time of the log item. |
| Incident | Incident number for log item. |
| PIX |
Displays comments. This heading and information appear only when the report parameters include l Include Comments l Include Text Detail |
| Sch | Open / Close schedule number of log item. |
| A | If this column displays an X, an alarm occurred. |
| Oper | Operator ID of person who entered log item or handled alarm. |
| TT | Terminal ID of operator who handled alarm. |
| P | If this column displays an X, the event does not print when you generate a report. |
| S | If this column displays an X, a supervisor marked the incident so it does not print when you generate a consumer report. |
| M | If this column displays an X, you must manually select the date and time for this event. |
| B |
CID number from which the signal was received, if received from an account with multiple CIDs. If the Backup CID column in the Alarm Log pane displays a period (.), the signal is received from the primary CID. If this field displays numbers 2 - 9, the signal is received from the second through ninth CID. If this field displays an X, the signal is received from the 10th CID. When option ba219 is on, SBN uses base 0 for the CID index in the log. This means that if base 0 is being used, the first CID is index 0. When option ba219 is off, the first CID is index 1. |
| Event Name | Event code of the log item. |
| Event | Protected Area of the zone. |
| Zone | Zone ID reporting. |
| Area | Area ID of zone reported. |
| Code | Code of zone reported. |
| Type | Type of alarm reported. |
| Priority | Priority (1-99) of the signal received. |
| Scheduled Date / Time | Scheduled Open / Close time for event. |
Report Example - Layout 2
The following graphic shows an example of the output of Layout 2 with only the Open / Close Log included.
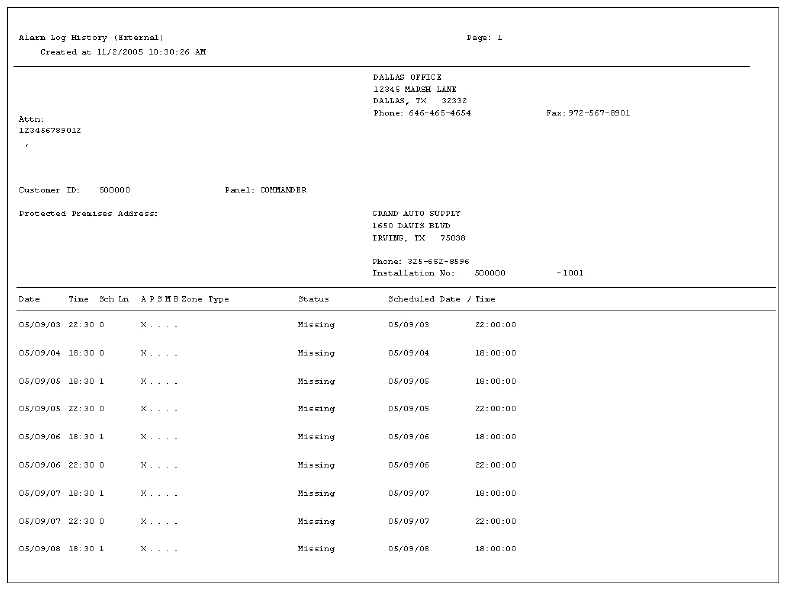
The following table describes the columns that can appear in the report depending on the parameters selected.
| Column | Description |
| Open / Close Log only | |
| Date | Premises date of the log item. |
| Time | Premises time of the log item. |
| Sch | Open / Close schedule number of log item. |
| PIX |
Displays comments. This heading and information appear only when the report parameters include l Include Comments l Include Text Detail |
| Ln | Line index number of the schedule. |
| A | If this column displays an X, an alarm occurred. |
| P | If this column displays an X, the event does not print when you generate a report. |
| S | If this column displays an X, a supervisor marked the incident so it does not print when you generate a consumer report. |
| M | If this column displays an X, you must manually select the date and time for this event. |
| B |
CID number from which the signal was received, if received from an account with multiple CIDs. If the Backup CID column in the Alarm Log displays a period (.), the signal is received from the primary CID. If this field displays numbers 2 - 9, the signal is received from the second through ninth CID. If this field displays an X, the signal is received from the 10th CID. When option ba219 is on, SBN uses base 0 for the CID index in the log. This means that if base 0 is being used, the first CID is index 0. When option ba219 is off, the first CID is index 1. |
| Zone | Zone ID reporting. |
| Type | Type of alarm reported. |
| Status | Open Close status (Unknown, Scheduled, Log Only, Unscheduled, Missing, Status Set). |
| Scheduled Date / Time | Scheduled Open / Close time for event. |
Report Example - Layout 3
The following graphic shows an example of the output of Layout 3 with only the Open / Close Log included.
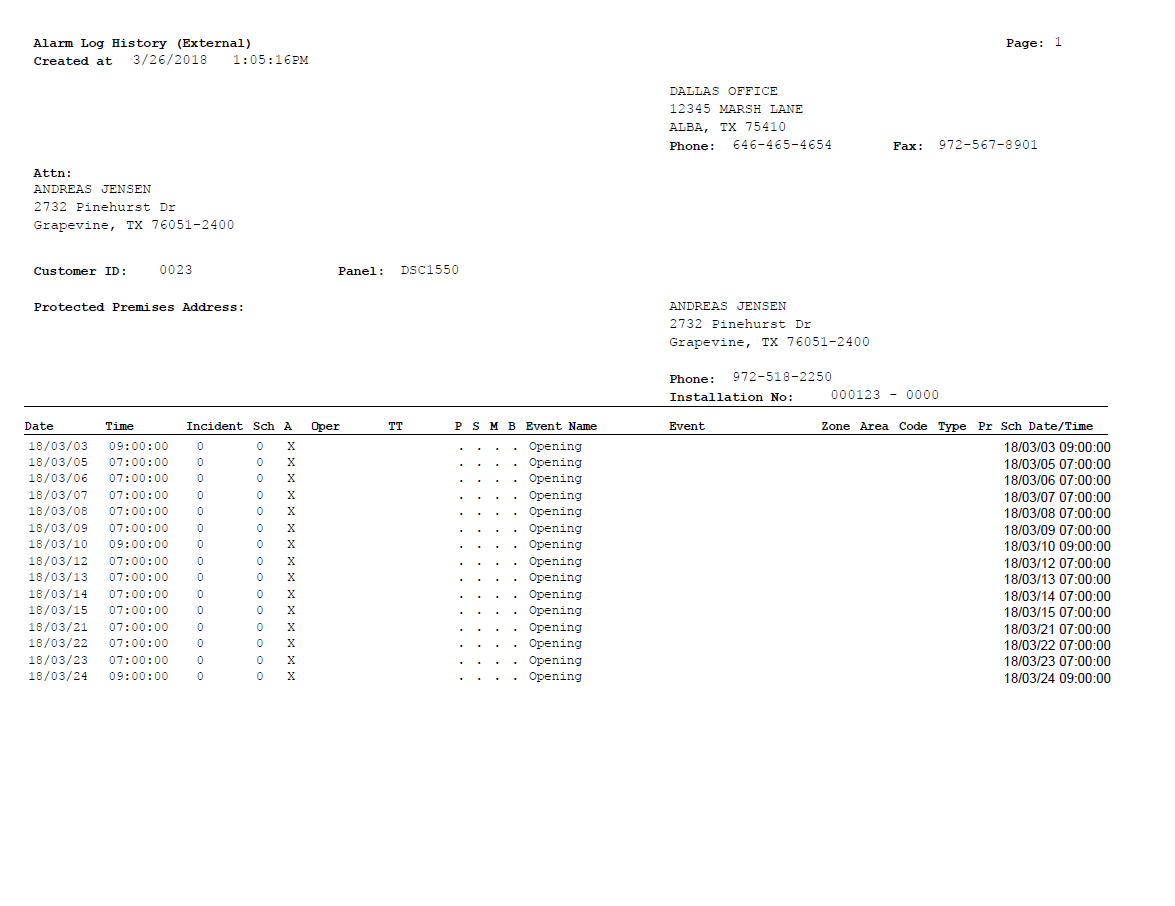
The following table describes the columns that can appear in the report depending on the parameters selected.
| Column | Description |
| Open / Close Log only | |
| Date | Premises date of the log item. |
| Time | Premises time of the log item. |
| Incident Sch | Open / Close schedule number of log item. |
| A | If this column displays an X, an alarm occurred. |
| Oper | Operator ID of person who entered log item or handled alarm. |
| TT | Terminal ID of operator who handled alarm. |
| P | If this column displays an X, the event does not print when you generate a report. |
| S | If this column displays an X, a supervisor marked the incident so it does not print when you generate a consumer report. |
| M | If this column displays an X, you must manually select the date and time for this event. |
| B |
CID number from which the signal was received, if received from an account with multiple CIDs. If the Backup CID column in the Alarm Log displays a period (.), the signal is received from the primary CID. If this field displays numbers 2 - 9, the signal is received from the second through ninth CID. If this field displays an X, the signal is received from the 10th CID. When option ba219 is on, SBN uses base 0 for the CID index in the log. This means that if base 0 is being used, the first CID is index 0. When option ba219 is off, the first CID is index 1. |
| Event Name | Event code of the log item. |
| Event Extension | Event extension attached to the event code or the zone protected area on an alarm signal. |
| Zone | Zone ID reporting. |
| Area | Area ID of zone reported. |
| Code | Code of zone reported. |
| Type | Type of alarm reported. |
| Pr | Priority (1-99) of the signal received. |
| Scheduled Date / Time | Scheduled Open / Close time for event. |
Report Example - Layout 4
The following graphic shows an example of the output of Layout 4 with the Alarm Log and Open / Close Log included.
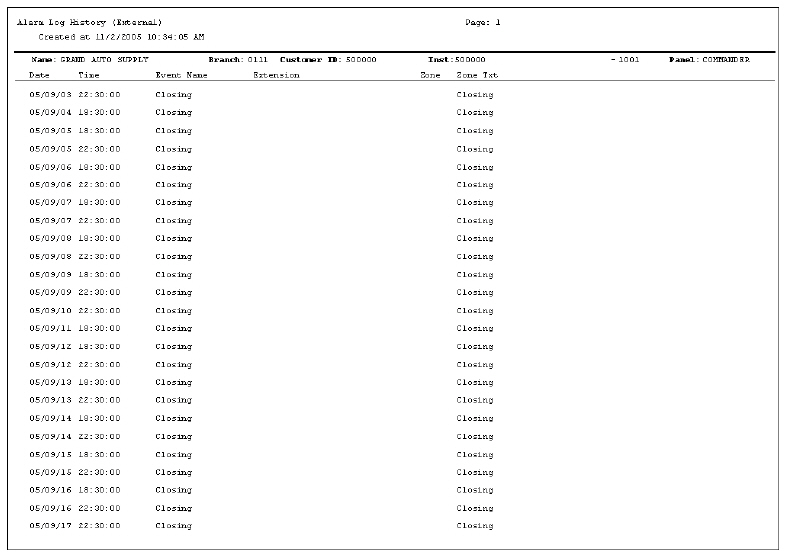
The following table describes the columns that can appear in the report depending on the parameters selected.
| Column | Description |
| Name | Installation name. |
| Branch | Installation branch. |
| CID | The Customer ID where that received the signal. |
| PIX |
Displays comments. This heading and information appear only when the report parameters include l Include Comments l Include Text Detail |
| Inst | Installation number with dealer ID. |
| pane | pane ID for the Customer ID reported. |
| Date | Date of the log item. |
| Time | Time of the log item. |
| Event Name | Event code of the log item. |
| Event Extension | Event extension attached to the event code or the zone protected area on an alarm signal. |
| Zone | The Zone ID that reported the signal. |
| Zone Txt | Signal type received on the zone. |
Report Example - Layout 5
The following graphic shows an example of the output of Layout 5 with only the Alarm Log included.
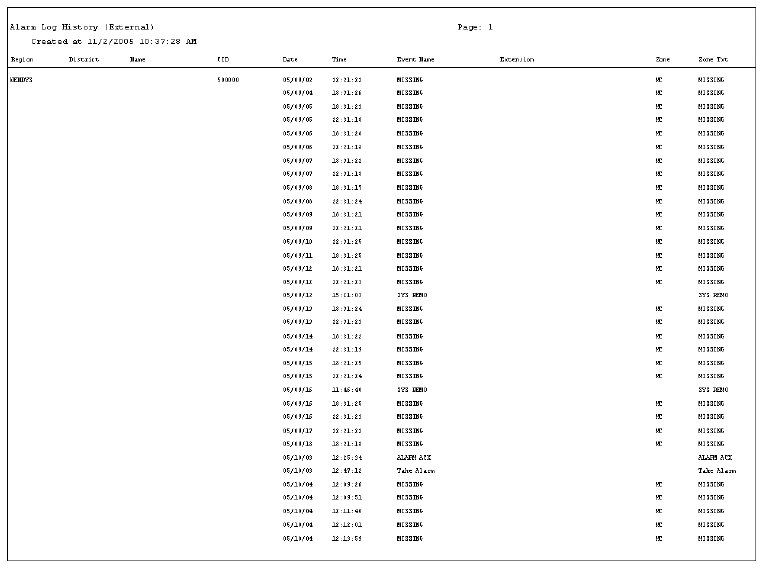
The following table describes the columns that can appear in the report depending on the parameters selected.
| Column | Description |
| Mail Group Headings | |
| Region | Mail group 1. |
| District | Mail group 2. |
| Details | |
| Name | Member number or name. |
| Customer ID | The Customer ID where that received the signal. |
| Date | Premises date of the log item. |
| Time | Premises time of the log item. |
| Sch | Open / Close schedule number of log item. |
| Ln | Line index number of the schedule. |
| Event Name | Event code of the log item. |
| Event Extension | Event extension attached to the event code or the zone protected area on an alarm signal. |
| Zone | The Zone ID that reported the signal. |
| Zone Txt | Signal type received on the zone. |
Report Example - Layout 6
The following graphic shows an example of the output of Layout 6 with only the Open / Close Log included.
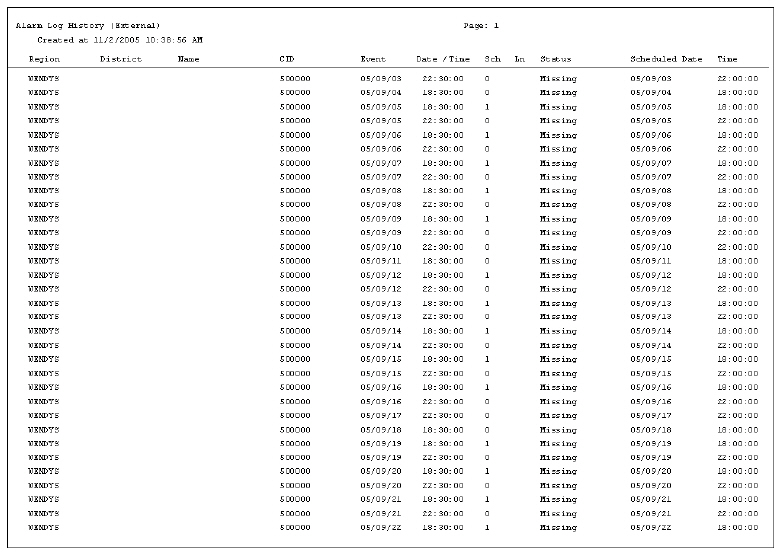
The following table describes the columns that can appear in the report depending on the parameters selected.
| Column | Description |
| Mail Group Headings | |
| Region | Mail group 1. |
| District | Mail group 2. |
| Details | |
| Name | Member number or name. |
| Customer ID | The Customer ID where that received the signal. |
| Date | Premises date of the log item. |
| Time | Premises time of the log item. |
| Sch | Open / Close schedule number of log item. |
| Ln | Line index number of the schedule. |
| Zone | Zone ID reporting. |
| Type | Type of alarm reported. |
| Status | Open Close status (Unknown, Scheduled, Log Only, Unscheduled, Missing, Status Set). |
| Schedule Date / Time | Scheduled Open / Close time for event. |
Report Example - Layout 7
The following graphic shows an example of the output Layout 7 with only the Alarm Log included.
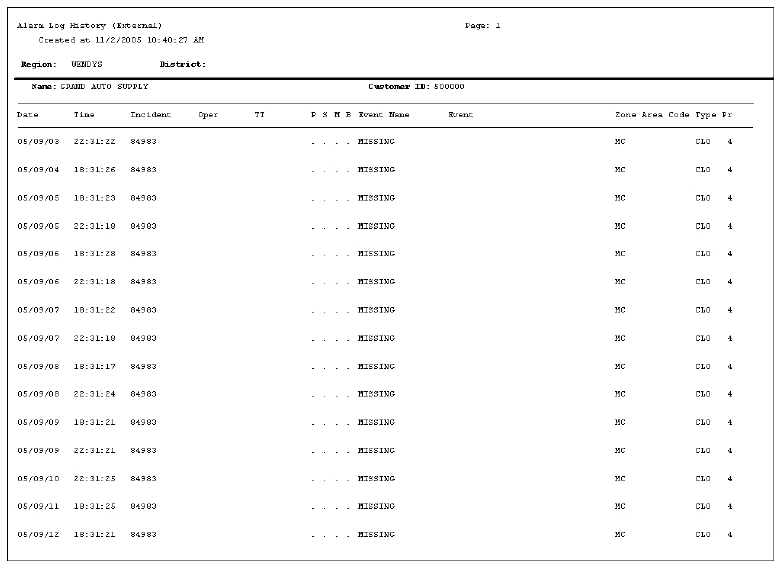
The following table describes the columns that can appear in the report depending on the parameters selected.
| Column | Description |
| Mail Group Headings | |
| Region | Mail group 1. |
| District | Mail group 2. |
| Details | |
| Name | Member number or name. |
| Customer ID | The Customer ID where that received the signal. |
| Date | Premises date of the log item. |
| Time | Premises time of the log item. |
| Oper | Operator ID of person who entered log item or handled alarm. |
| TT | Terminal ID of operator who handled alarm. |
| P | If this column displays an X, the event does not print when you generate a report. |
| S | If this column displays an X, a supervisor marked the incident so it does not print when you generate a consumer report. |
| M | If this column displays an X, you must manually select the date and time for this event. |
| B |
CID number from which the signal was received, if received from an account with multiple CIDs. If the Backup CID column in the Alarm Log displays a period (.), the signal is received from the primary CID. If this field displays numbers 2 - 9, the signal is received from the second through ninth CID. If this field displays an X, the signal is received from the 10th CID. When option ba219 is on, SBN uses base 0 for the CID index in the log. This means that if base 0 is being used, the first CID is index 0. When option ba219 is off, the first CID is index 1. |
| Event Name | Event code of the log item. |
| Event | Protected Area of the zone. |
| Zone | Zone ID reporting. |
| Area | Area ID of zone reported. |
| Code | Code of zone reported. |
| Type | Type of alarm reported. |
| Priority | Priority (1-99) of the signal received. |
Report Example - Layout 8
The following table describes the columns that can appear in the report layout 8.
| Column | Description |
| Report headings | |
| Phone | Mailing phone number |
| Fax | Mailing fax number |
| Attn | Installation (protected premises) Name and Mailing address |
| Customer ID | The reporting panel Customer ID |
| Panel | The panel type |
| Protected Premises | The installation Name and Address |
| Phone | Premise phone number |
| Installation Number | The protected premises installation number |
| Details | |
| Name | Member number or name. |
| Date | Premises date of the log item. |
| Time | Premises time of the log item. |
| Incident | The incident number (0 if no incident attached) |
| Sch | Schedule number (0 if no schedule attached) |
| A | If this column displays an X, an alarm occurred. |
| Oper | Operator |
| TT | Terminal ID of operator who handled alarm. |
| P | If this column displays an X, the event does not print when you generate a report. |
| S | If this column displays an X, a supervisor marked the incident so it does not print when you generate a consumer report. |
| M | If this column displays an X, you must manually select the date and time for this event. |
| B |
CID number from which the signal was received, if received from an account with multiple CIDs. If the Backup CID column in the Alarm Log displays a period (.), the signal is received from the primary CID. If this field displays numbers 2 - 9, the signal is received from the second through ninth CID. If this field displays an X, the signal is received from the 10th CID. When option ba219 is on, SBN uses base 0 for the CID index in the log. This means that if base 0 is being used, the first CID is index 0. When option ba219 is off, the first CID is index 1. |
| Event Name | Event code of the log item. |
| Event | Protected Area of the zone. |
| Zone | Zone ID reporting. |
| Area | Area ID of zone reported. |
| Code | Code of zone reported. |
| Type | Type of alarm reported. |
| Priority | Priority (1-99) of the signal received. |
| Sch Date/Time | Schedule Date/Time |
Report Layout 9
Report Layout 9 produces the same output as report layout 8. However, instead of the page headers, and page breaks after each installation, Layout 9 is designed to be a more compact form. The protected premises address appears as a line embedded within the report.
The column headers for report layout 9 are the same as report layout 8.
Button Functions
The following table displays the buttons, describes the shortcut keys, actions, and functionality.
| Button | Name | Shortcut Key | Action | Description |
 |
Recurring | Alt+F1 | 2120 | Open fields for recurring/template reports. |
 |
Exit | Esc | 2120 | Exit without saving. |
 |
Save | Enter | 2120 | Save existing record. |
Modifications and Updates to Alarm Log History (External) Report
The following table lists modifications and updates to the Alarm Log History (External) Report document.
| Mod Number | Date | Description |
| n/a |
07/17/14 |
Images updated. |
| n/a |
04/06/20 |
Images updated. |
Report 2120 Corrections
Report 2120 includes alarm-log comments shorter than 40 characters and handles multiple open/close events occurring in the same second.