
Action Plans
Action Plans
Module: Account Management
Overview
An action plan is a customer-defined list of contacts that operators use to handle emergency situations. Use the Action Plans tab to enter action plan information for customers. You can view information about all plans and contacts for each installation.
From Action Plans, you can create plans for everyday use, temporary replacement plans, and permanent substitute plans. Create temporary replacement plans for periods of two weeks or less; dispatchers typically use these plans when a customer goes out of town or is on vacation. Create permanent substitute plans for specific days of the week or holidays; dispatchers typically use these plans when a customer has a different schedule on a particular day of the week. For instance, if the customer's mother visits every Monday and she needs special assistance, the customer would request a permanent substitute plan for Mondays in case of an emergency.
Each action plan contains a Call List that operators use in Dispatch (program #537) when handling an alarm from the installation. You can assign agencies and contacts to the action plan's Call List. In the Action Plan Details window, you can also generate passcard numbers to assign to contacts, making them passcard holders. Dispatchers can use these passcards to validate the identity of the passcard holder when he/she is contacted.
When you create a new installation, SBN generates a base plan called Action Plan 0. If you do not create additional action plans for this installation, you must use the base plan. You may not delete the base plan. If you create and save a new installation after you use the Jump to Data Entry/Customer Service button in Marketing (program #562), SBN populates the base plan with the contacts from the Marketing Basics tab.
Note: You may not delete an action plan that contains attachments.
This document covers the following topics:
Viewing Details of Action Plans
Working in the Action Plan Details Window
Changing an Existing Action Plan
Setting Up User Validation Questions for a Contact
Navigating to Action Plans
Use the following steps to navigate to the Action Plans tab:
1. From the main SBN toolbar, select Menu.
2. From the drop-down menu, select Go To.
3. In the Go To Program dialog box, type in "559" and press Enter.
w Data Entry Master and Basics opens.
4. Choose the Action Plans tab in the lower pane of Data Entry.
Action Plan Options
You can manipulate the Action Plans window and functionality by using a number of options. The settings of the following options control different aspects of the Action Plans tab and how it relates to other tabs and programs. For detailed information on an option and its default setting, see SBN Options.
Option ba238 - This option sets a default number of expiration days for temporary action plans.
Option ba240 - When off, a change to a passcard does not automatically set the Print flag. If the option is off and you want to print, you can set the Print flag manually. A new passcard automatically sets the Print flag.
Option ba289 - When on and you change a passcard number, SBN creates an entry in the Change Log of all customers who use that passcard.
Option ba317 - When on, users may search by email address in the Basic Search tab. Also, SBN checks the email address entered into a new inquiry in Marketing (program #562) against existing inquires and displays a warning message if it finds duplicates.
Option ba355 - Use to define the minimum action plan to synch from in the Synch Contacts dialog box. If you leave this value blank, users may choose the minimum action plan.
Option ba356 - Use to define the maximum action plan to synch to in the Synch Contacts dialog box. If you leave this value blank, users may choose the maximum action plan.
Option ba393 - When on, the Email field in the addresses table must be unique or blank. This enforces email uniqueness to link to passcards for login or authorization purposes. Do not turn this option on unless ba317 is also on.
Option ba394 - When on, passcard extensions are generated using the dealer assigned to the installation, not the assigned branch.
Option ba420 - When on, you can only assign one Access Group in each contact's Access Card tab in the Contact Details window.
Option ba531 - When on, you can show authority level in the call list tab of the action plan.
Option hseccol - Use to define the color of text in which a contact flagged as High Security will appear in the Dispatch tab. Define this option with a legal Windows color name (e.g., Red, Black, Maroon). If you leave this option blank, SBN does not highlight the High Security contact in Dispatch.
Options maalv0 - maalv6 - When one of these options is defined, the contact name in Action Plans will be colored to a corresponding color based on the contact's authority level.
Option mo154 - When on, the passcard extension defaults from the Misc 37 field in the Basics tab of Data Entry (program #559) instead of from the Installation Branch. SBN bypasses the restrictions from ba107, as well.
Option mo155 - When on, the Delete field in the Contact Details window includes an *. You may select the * and a future expiration date for the passcard of the selected action plan. Until the passcard expires, the contact appears in yellow text. Upon expiration, the contact appears in red text, and SBN considers the contact’s passcard invalid. The expired passcard remains red until SBN deletes.
Option mo158 - If both option mo155 and option mo158 are on and you mark a passcard for future expiration( * ), the passcard expires on all action plans for the account.
Options mo198 and mo199 - These options define the monitoring event and event extension SBN enters in the Alarm Log when removing incidents from the Alarm Queue on zones attached to Action Plans of type 80-89.
Option temp156 - When this client-specific option is on and a user enters an existing passcard in the Action Plans tab with a passcard extension that is not a valid branch or dealer, SBN automatically populates the passcard holder name and contact details. When this option is off and a user enters an existing passcard with an extension that is not a valid branch or dealer, SBN does not populate the passcard holder name and contact details.
Option temp254 - Company-specific option for Company 254.
Option undfzpix - Use to define the action plan that the operators use to handle signals from unidentified zones. If an account does not contain the defined action plan, SBN uses Action Plan 0.
The Action Plans Tab
The following graphic displays the Action Plans tab as the program opens. The tab displays all previously entered action plans for the selected account.
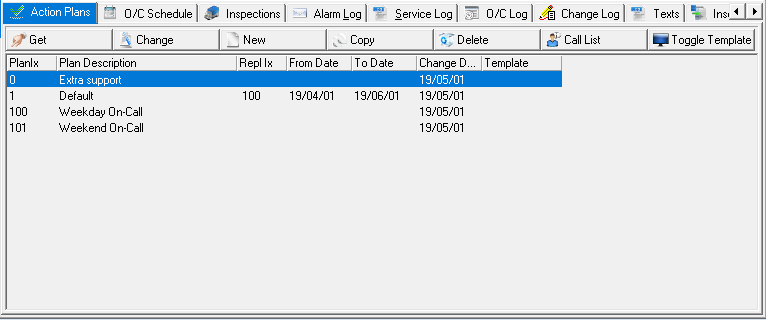
Column Descriptions - Action Plans
The following table describes the columns used in the Action Plans tab.
Column | Description |
Plan Index | Sequence number of the action plan. |
Plan Description | Free-form text description of the action plan. |
Replace Plan Index | The temporary replacement action plan number, if applicable. |
From Date | Date the temporary replacement action plan goes into effect. |
To Date | Date the temporary replacement action plan expires. |
Change Date | Date of any changes that were made to the selected action plan. |
Template | If toggle template is selected and the installation has a template CID associated you will see the installation where the template is taken from. |
Viewing Details of Action Plans
There are four detail windows in the Action Plans tab. Each detail window displays pertinent information about the selected action plan.
The Action Plan Details window displays plan details, agencies and contacts associated with the plan, and information about the zones associated with the action plan.
The Contact Details window - Basics tab displays phone numbers, call times, physical addresses, email addresses, and Access Card information for the contact associated with the action plan.
The Contact Details window - Medical tab displays special needs, medical history, medical conditions, and medication information for the customer on the selected account.
The Agency Details window displays contact names, phone numbers, physical addresses, and fax numbers for the agency associated with the action plan.
Viewing the Action Plan Details Window
In the Action Plan Details window, there are three panes of information.
The upper pane displays details about the action plan and temporary replacements plans or permanent substitute plans, if any.
The lower left pane displays the agencies and contacts associated with the action plan.
The lower right pane displays information about the zones associated with the action plan.
Use the following steps to view the details of an action plan:
1. Select the action plan for which you want to view details.
2. Double-click your selection or choose Get.
w The Action Plan Details window appears, displaying details of the selected action plan.
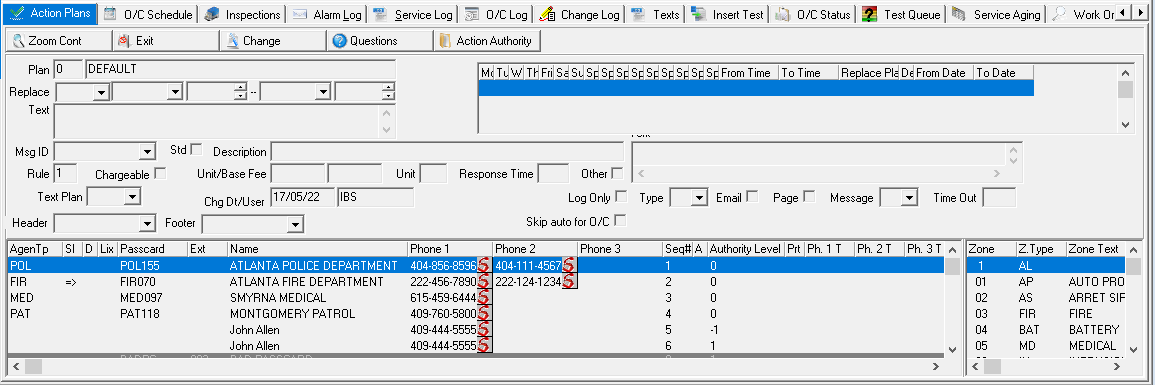
Field/Column Descriptions - Action Plan Details Pane
The following table describes the fields and columns used in the upper pane of the Action Plan Details window.
Field/Column | Description |
Plan | Action plan ID number. |
Plan Description (No label) | Name of this action plan. |
Temporary Replacement Plan | |
Replace | You can temporarily replace this action plan with another action plan for a specific time period. Choose a replacement action plan from the drop-down menu. Replacement Plan can now be used up to 3 times. Note: Dealer plan and template plan are now resolved individually based on the plan for the alarm that was generated. |
Start Date (No label) | Date the temporary replacement plan will commence. |
Start Time (No label) | Start time for the temporary replacement plan. |
End Date (No label) | Date the temporary replacement plan will end. Note: SBN automatically sets this date for 14 days after the Start Date. You can set the date to less than 14 days, but you cannot set the date to more than 14 days. |
End Time (No label) | End time for the temporary replacement plan. |
Yearly | This checkbox notes that a yearly temporary replacement action plan is enabled. Note: this checkbox is only enabled when Option ba238 is set to zero and action 559/110 is active. |
Monthly | This checkbox notes that a monthly temporary replacement action plan is enabled. Note: this checkbox is only enabled when Option ba238 is set to zero and action 559/110 is active. |
Substitute Plan Grid Note: SBN looks for and uses what is defined in the Replace Plan field first. If nothing is defined, SBN will use the Substitute Plan Grid. Note: If the Yearly or Monthly checkboxes are selected, this grid will disappear. | |
Deleted | In Change mode, select Delete X to delete the entire row from the substitute plan grid. Note: Action 559/105 controls this button. |
M T W Th F Sa Su | An X in any column indicates the day(s) this substitute action plan is in effect. |
Special Day 1-9 | An X in any column defines on which Holiday Day Type the substitute plan is in effect. Note: Each number corresponds to a holiday defined with a day type in Scheduled Holidays (program #1746). You can tie holidays to specific dates in the Holiday Calendar (program #1747). |
From Time | Start time for the substitute plan. |
To Time | End time for the substitute plan. |
Replace Plan Index | Action plan number of the substitute plan to take effect in the defined periods. |
Text | Free-form text that describes this action plan. You can type a customer-specific message that appears in the Dispatch tab in the event of the alarm. |
Msg ID | Select a Message ID from the drop-down menu; text to display to an operator when an alarm comes in for the zone attached to this action plan. (This menu originates from program #1828.) This field is dealer specific. |
Std | Select this check box if the message displayed in the Msg ID field is standard. Note: Each company defines whether messages are standard or non-standard. |
Description | Descriptive label for the message ID. Note: SBN automatically defines this field after you select a Msg ID. |
Text | Text description of the selected message ID. Note: SBN automatically defines this field after you select a Msg ID. |
Rule | Rules downloaded to the panel, including the format and data. |
Chargeable | Select this check box to charge this customer for a patrol response. Note: SBN only saves chargeable information when the action plan contains a patrol agency. |
Unit Fee | Rate to charge the customer for each unit of time the patrol is at the site. |
Base Fee | The one time fee to charge the customer for this patrol response. |
Unit | Number of minutes covered by the unit price. |
Response Time | Maximum time for initial response if you charge the customer the base fee. |
Other | Select this check box if you want to substitute another agency for the primary one. |
Text Plan | Select text from another action plan to display along with the selected action plan text when an alarm from the associated zone appears in Monitoring. |
Chg Dt | Date the last change was made to the action plan. SBN automatically updates this read-only field when a user changes the action plan. |
Chg User | User who last changed the action plan. SBN automatically updates this read-only field when a user changes the action plan. |
Log Only | Select this check box if signals generated from zones attached to this action plan should be recorded in the Alarm Log only and not go to the Alarm Queue. |
Type | Select a type that indicates what actions SBN takes and which contacts SBN emails and/or pages when a signal is generated from a zone attached to this action plan. For more information, see Defining the Action Plan Type. Note: The zone class defined in the Zones tab for the zone associated with this action plan overrides the Action Plan Type if the way SBN handles signals for the zone class differs from the way SBN handles signals for the Action Plan Type. |
Select this check box to email contacts with email addresses when a signal is generated from a zone attached to this action plan. SBN formats the email based on the Message field. | |
Page | Select this check box to page contacts when a signal is generated from a zone attached to this action plan. SBN formats the paging message based on the Message field. Select PGR in the Phone Type field of Contact Details in order to page a contact. |
Message | Select the message that SBN emails and/or pages to contacts when a signal is generated from a zone attached to this action plan. (This menu originates from program #1667.) Note: You may enter alternate message text for specific dealers and languages in program #1667. The alternate text is used for installations with the selected dealer and/or language assigned in Data Entry Master (program #559). |
Time Out | Time, in seconds, for which you set a timer for signals generated from zones attached to this action plan. After the timer expires, the alarm goes to an operator’s queue. This field is only applicable to Action Plan Type 1. If you leave the field blank or enter 0, SBN does not set the timer feature. |
Header | Select the text to display in the header of the emails SBN sends the contacts when a signal is generated from a zone attached to this action plan; SBN formats the email based on the Message field. (This menu originates from program #1828.) |
Footer | Select the text to display in the footer of the emails SBN sends the contacts when a signal is generated from a zone attached to this action plan; SBN formats the email based on the Message field. (This menu originates from program #1828.) |
Skip Auto for O/C | When you select this check box, SBN does not send emails or pages for Open or Close signals (on Open/Close zones). When you do not select this check box, SBN sends emails and/or pages for Open and Close signals. |
Column Descriptions - Agency and Contact Details Pane
The following table describes the columns used in the lower left pane of the Action Plan Details window.
Column | Description |
Agency Type | Code for the selected response agency. |
Special Info | A => indicates that additional information on this passcard exists. Note: The contact's Codeword also indicates that additional information exists. When option mo229 is on, this column only displays the => symbols if Special Needs are entered for a contact in the Medical tab of the Contact Details window. |
Downloadable | An X in this column indicates that you can download this passcard information to the panel. Note: This feature is only activate if the Passcards check box in the Data Entry Basics tab is selected. Note: The Open/Close Status tab only includes installations with passcards that are downloadable. |
Line Index | Number used to identify this contact. The contact types this number into the keypad when entering the premises. |
Passcard | Displays the number that identifies this passcard holder. When SBN looks up passcards, it looks for Passcard + Extension. Note: To use passcards, select the Passcards check box in the Data Entry Basics tab. Note: If a passcard is currently flagged as High Security and you use that same passcard (Passcard + Extension) in a different action plan on the same account or in a new account that uses passcards, the High Security flag in the new action plan or account will default with the current status. Note: The Passcard drop-down in New or Change mode will only show passcards associated with the current installation. |
Extension | Displays the extension number for this passcard. When SBN looks up passcards, it looks for Passcard + Extension. Note: This field defaults to the ID of the installation branch; you can override the default. Note: If option mo154 is on, this field defaults from the number entered in Misc37 in the Data Entry Basics tab. SBN bypasses the restriction from ba107, as well. Note: If option ba394 is on, the extension defaults to the dealer ID. |
Name | Name of this passcard holder. Note: If options maalv0 through maalv6 are defined, the contact name field appears in the designated color. |
Phone 1 | Phone number for this passcard holder. |
Phone 2 | Second phone number for this passcard holder. |
Phone 3 | Third phone number for passcard holder. |
Sequence # | The call sequence number indicates the order in which you should call each contact person. |
Authority | Level of authority given to this passcard holder. A = all authority L = limited authority |
Authority Level | The authority level indicates what changes this contact can make to the account. 1 or 2 = can make schedule changes. 0 = cannot make schedule changes; this level is typically assigned to agencies. |
An X in this column indicates that you need to print this passcard. Note: Use option ba240 to set up this field. If a user selects the No Passcard Print check box in the Basics tab of program #559, SBN does not allow you to select the Print column for any action plan contacts on the installation. | |
Phone 1 Type | Phone type of the first phone number for the contact. (This menu originates from program #1840.) |
Phone 2 Type | Phone type of the second phone number for the contact. (This menu originates from program #1840.) |
Phone 3 Type | Phone type of the third phone number for the contact. (This menu originates from program #1840.) |
No SMS 1-3 | These columns represent phone number fields 1-3 when a person within the Action Plan chooses to opt-out of SMS messaging. |
|
|
Internet Level | Internet access levels (0 - 9) allow you to permit the passcard holder access to account information online. |
Codeword | Displays the codeword specific to each contact. A codeword can be hidden by selecting the Codeword Not Visible check box in Panel Types, program 1742. |
Action Profile | The action profile that controls the user’s access for the selected action plan. Users may have different action profiles associated with different action plans. |
Enabled | Customer-defined field; no functionality in SBN. |
High Security | An X in this column indicates this is a High Security contact. When an alarm signal arrives for this installation or action plan, the information for the selected contact appears in the Dispatch tab highlighted in the color defined by option hseccol. Note: In order to save an X in this column, you must select the Passcards check box in the Data Entry Basics tab. Note: If a passcard is currently flagged as High Security and you use that same passcard (Passcard + Extension) in a different action plan, the High Security flag in the new action plan will default with the current status. |
Cardholder | An X in this column indicates that the Cardholder check box is selected in the Contact Details window. |
Email Address | Email address of the passcard holder. Note: If option ba393 is on, this address must be unique throughout the system. This allows you to use the email address to validate a user for login or authorization. You may also type in the email address to look up the contact information (same functionality as passcards). |
Type | Select a contact type from the drop-down menu. This menu only displays with contacts and passcard holders; this menu does not display for agencies. |
Relation | Select the relation between this contact and the customer on the account from the drop-down menu. This menu only displays with contacts and passcard holders; this menu does not display for agencies. |
Installation # | Select an Installation number from the drop-down menu. This menu displays all installations the passcard holder is associated with. |
Investigator | Select this check box to indicate that a contact is an Investigator on the Action Plan. If a zone has a UL Grade attached that has the Spec Tick check box or the Spec Tick 2 check box selected in program #1732, an operator may contact an Investigator on the Action Plan to satisfy UL requirements. (See the Spec Tick and Spec Tick 2 field descriptions in UL Security Grades for more information.) |
Must Call | Select this check box to indicate that a monitoring operator must call the selected contact in order to resolve an alarm on a zone with this action plan. You may designate as many Must Call contacts as you wish. Note: SBN does not save check marks in this check box for agency contacts. |
Medical Info | This column displays an X if any information is in the text fields in the Medical tab of the Action Plans Contact Details window. |
Email Exclude | If this column displays an X for the action plan contact entering an Open or Close signal, SBN does not send an email message to any contacts on the action plan. If the Email Exclude column does not display an X for the contact entering an Open or Close signal, SBN sends an email message to all contacts on the action plan. |
Contact Text | Displays information from the Comment field under the Basic tab when zoomed into a contact. |
Column Descriptions - Zone Details Pane
The following table describes the columns used in the lower right pane of the Action Plan Details window.
Note: These columns are read-only. You can attach an action plan to a zone in the Zones tab.
Column | Description |
Zone | Displays the number that identifies the zone attached to the selected action plan. |
Zone Type | Zone type generated for this zone. (This menu originates from program #1733.) |
Zone Text | System-generated description of the zone, based on the zone type. (This description originates from program #1733.) |
Viewing the Contact Details Window - Basic Tab
In the Action Plan Details window, you can zoom to the details of any contact. The Contact Details window - Basics tab displays phone numbers, call times, physical addresses, and email addresses in the left pane and Access Card information in the right pane for the contact associated with the action plan.
Use the following steps to view contact details for an action plan:
1. In the Action Plans Details window, select the contact for which you want to view details.
2. Double-click your selection or choose Zoom Agency or Contact.
w The Contact Details window opens with the Basic tab displayed.
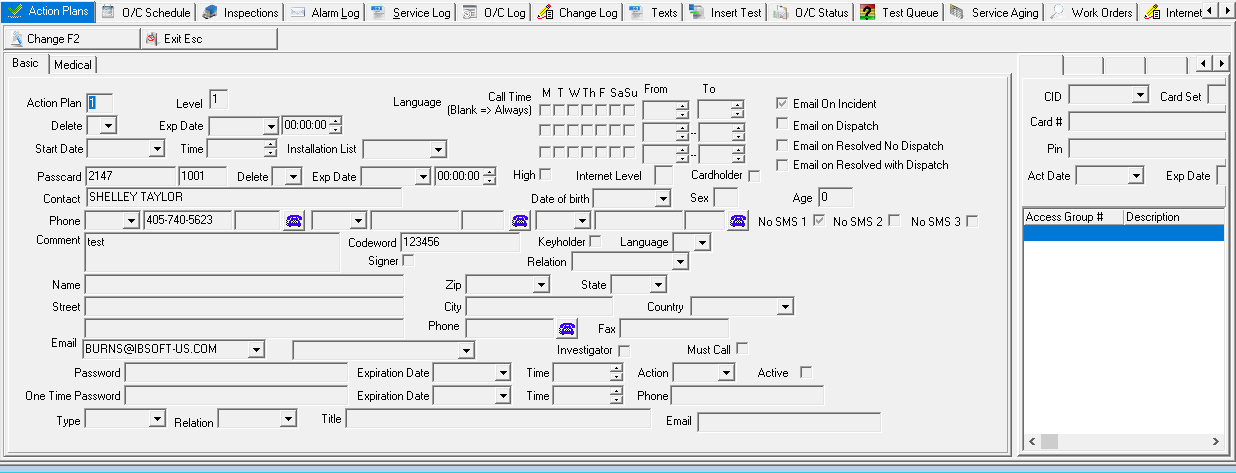
Note: SBN automatically updates the Access Control Panel with the information you enter in the Access Card tabs in the right pane.
Field Descriptions - Contact Details Window - Basic Tab
The following table describes the fields used in the Contact Details Basic tab.
Field | Description |
Action Plan | Action plan number to which this contact is assigned. |
Level | The Authority Level indicates what changes this contact can make to the account. 1 or 2 = can make schedule changes. 0 = cannot make schedule changes; this level is typically assigned to agencies. |
Call Time | Three lines of call times; select specific days and times the contact should NOT be available as a contact for this plan. Note: While the current time falls inside one of these do-not-call windows, the contact appears in gray in the Dispatch tab. |
Alarm Incident Email Check Boxes Select as many of these check boxes as you wish. SBN sends a separate email for each check box you select. Option mo221 must be on in order for SBN to send emails for these check boxes. | |
Email on Incident | If you select this check box, SBN sends an email to the installation email addresses entered in the Email 1 and Email 2 fields of Data Entry (program #559) when SBN receives an alarm incident on the installation. The email includes the CID, the name on the installation, the installation address, the date and time that SBN received the incident, and the incident number. |
Email on Dispatch | If you select this check box, SBN sends an email to the installation email addresses entered in the Email 1 and Email 2 fields of Data Entry (program #559) when an agency is dispatched in an alarm incident on the installation. The email includes the CID, the name on the installation, the installation address, the date and time that SBN received the incident, the incident number, and the events recorded in the Alarm Log for the incident. |
Email on Resolved No Dispatch | If you select this check box, SBN sends an email to the installation email addresses entered in the Email 1 and Email 2 fields of Data Entry (program #559) when an alarm incident on the installation is resolved and no agency has been dispatched to the installation. The email includes the CID, the name on the installation, the installation address, the date and time that SBN received the incident, the incident number, and the events recorded in the Alarm Log for the incident. |
Email on Resolved with Dispatch | If you select this check box, SBN sends an email to the installation email addresses entered in the Email 1 and Email 2 fields of Data Entry (program #559) when an alarm incident on the installation is resolved and an agency has been dispatched to the installation. The email includes the CID, the name on the installation, the installation address, the date and time that SBN received the incident, the incident number, and the events recorded in the Alarm Log for the incident. |
Delete (No label) | This drop-down menu offers the following choices: If this field is blank, the selected contact is active. If this field displays an X, delete the selected contact from this action plan only. If option mo155 is on, users may select the * and then select a future date/time for the contact's passcard to expire. The passcard appears in yellow text until the expiration time arrives. Once the expiration time occurs, the passcard appears in red. Note: If both option mo155 and option mo158 are on and you mark a passcard for future expiration( * ), that passcard expires on all action plans for the account. |
Exp Date | The date that SBN deletes the selected contact from this action plan only, if applicable. |
Exp Time (No label) | The time that SBN deletes the selected contact from this action plan only, if applicable. |
Start Date | Date the contact becomes available in the action plan. |
(Start) Time | Time the contact becomes available in the action plan. |
Passcard | Passcard number for this contact. Action 559/114 determines whether you can edit this field. If 559/114 is enabled, this field is read-only. When the action is disabled, you can edit the passcard number. |
Extension (no label) | Passcard extension for this contact. Action 559/114 determines whether you can edit this field. If 559/114 is enabled, this field is read-only. When the action is disabled, you can edit the passcard extension. |
Delete | This drop-down menu displays choices for deleting this passcard from all installations and action plans: Blank - the passcard is still active on this plan. - - the contact is inactive on this action plan only. X - SBN removes the contact from the system and from all action plans on the date and time specified. Note: Background task 13 in program #1712 deletes passcards that have expired and those that are flagged to be deleted in the Contact Details window of the Action Plans tab. |
Exp Date | Date and time for SBN to delete the passcard from the system and from all action plans. Note: If both option mo155 and option mo158 are on, when a signal arrives for the installation, a passcard that has a future expiration date set appears in both Action Plans and Dispatch in yellow text. Once the expiration date passes, the passcard appears in both Action Plans and Dispatch in red text. Note: Background task 13 in program #1712 deletes passcards that have expired and those that are flagged to be deleted in the Contact Details window of the Action Plans tab. |
High | Customer-defined field; no functionality in SBN. |
Internet Level | Internet access levels (0 - 9) allow you to permit the passcard holder access to account information. |
Cardholder | Customer-defined field; no functionality in SBN. |
Contact | Contact's name. |
Date of Birth | Contact's date of birth. |
Sex | Gender of the contact. |
Age | Age of the contact, in years. SBN populates this field according to the entry in the Date of Birth field. |
Phone (Type, Number, Extension) | In the first phone field, select a phone type from the drop-down menu. (This menu originates from program #1840.) The second and third phone fields display the phone number and phone number extension. Enter phone information for all contacts on an action plan when you define the Action Plan Type. (See Defining the Action Plan Type.) Note: If the phone type is a pager, SBN launches the paging window instead of the auto-dialer when a signal is generated from a zone attached to this action plan. |
No SMS 1-3 | These flags represent phone number fields 1-3. If a person within the action plan chooses to opt-out of SMS messages, the data entry personnel can update their SMS status by selecting the flag which correlates to the appropriate phone field the person is choosing to opt-out of. (ie - Phone 1 = No SMS 1). |
Comment | Free-form text displaying any information about the passcard holder. |
Codeword | Codeword specific to this contact. |
Keyholder | Select this check box to specify if the contact possesses keys to the installation. |
Language | Select the language the contact speaks from the drop-down menu. |
Signer | Customer-defined field; no functionality in SBN. |
Name | Contact's full name. |
Zip | Select the contact's zip code from the drop-down menu. |
State | Select the state the contact is in from the drop-down menu. (This field holds a maximum of 60 characters.) |
Street | Contact's street address. |
City | City in which the contact lives. |
Country | Country in which the contact lives. |
Street 2 (No label) | Additional street line for the contact’s address. |
Phone (No label) | Additional phone number for the contact. |
Fax | Contact's fax number. |
Email address or email distribution group for the contact. You can either type a specific email address or choose an email distribution from the menu. (The email distribution lists originate from program #1898.) Enter an email address for all contacts on an action plan when you define the Action Plan Type. (See Defining the Action Plan Type.) Note: SBN saves all email addresses in uppercase. Note: If option ba393 is on, this email address must be unique throughout the whole system. | |
Email 2 (No label) | Secondary email address or email distribution group for the contact. You can either type a specific email address or choose an email distribution from the menu. (The email distribution lists originate from program #1898.) Enter an email address for all contacts on an action plan when you define the Action Plan Type. (See Defining the Action Plan Type.) Note: SBN saves all email addresses in uppercase. |
Investigator | Select this check box to indicate that a contact is an Investigator on the Action Plan. If a zone has a UL Grade attached that has the Spec Tick check box or the Spec Tick 2 check box selected in program #1732, an operator may contact an Investigator on the Action Plan to satisfy UL requirements. (See the Spec Tick and Spec Tick 2 field descriptions in UL Security Grades for more information.) |
Password | Contact's password. |
Expiration Date | Date the contact's password expires. |
Time | Time the contact's password expires. |
Action | Select an action profile to assign to the customer. (This menu originates from program #1502). |
Active | Select this check box to indicate that the contact is active. |
One Time Password | A one-time password granted to the selected contact. |
Expiration Date | Date the one-time password expires. |
Time | Time the one-time password expires. |
Phone | Phone number for authenticating password. |
Type | Select a contact type from the drop-down menu |
Relation | Select the relation this contact has to the customer on the account from the drop-down menu. |
Title | Customer-defined field; no functionality in SBN. |
Access Card Section Assign up to five access cards per passcard holder per installation. | |
CID | CID attached to the access card. |
Card Set | Select the appropriate card set from the drop-down menu. (This menu originates from the AC CardSets tab.) |
Card # | Card number assigned to this passcard holder. |
Pin | PIN number attached to the card, if required. |
Act Date | Date the access card becomes active. |
Exp Date | Date the access card expires. |
Access Group # | Select Access Groups to attach to this card from the drop-down menu. (This menu originates from the AC Access Groups tab.) Note: If option ba420 is on, you can only assign one Access Group in each contact's Access Card tab. |
Managing Codeword Permissions
Choose the On Demand Codewords button in Data Entry (program #559) if you want to view the codewords for an installation and its action plans. IBS added actions 559/916, 559/917, 559/918, and 559/919 to manage the permissions for when codewords appear.
These actions control the following settings:
559/916 - Never see codewords
559/917 - Always see codewords
559/918 - See codewords if an alarm incident is in the user's terminal
559/919 - Controls On Demand Codewords button in program #559
The operator will never see codewords with the following action settings:
When all four actions are turned off
When 559/916 is on and the rest are off
When 559/916 and 559/917 are on and the rest are off
When 559/916 and 559/918 are on and the rest are off
When 559/916, 559/917, and 559/918 are on and 559/919 is off
When 559/916 and 559/919 are on and the rest are off
When 559/916, 559/917, and 559/919 are on and 559/918 is off
When 559/916, 559/918, and 559/919 are on and 559/917 is off
The operator will always see codewords with the following action settings:
When all four actions are turned on
When 559/917 is on and the rest are off
When 559/917 and 559/918 are on and the rest are off
When 559/917 and 559/919 are on and the rest are off
When 559/917, 559/918, and 559/919 are on and 559/916 is off
The operator will only see codewords if an incident is in the terminal when 559/918 is on and the rest of these actions are off.
The operator will only see codewords on demand when 559/919 is on and the rest of these actions are off.
The operator will only see codewords on demand and if an incident is in the terminal when 559/918 and 559/919 are on and the rest of these actions are off.
Viewing the Contact Details Window - Medical Tab
In the Action Plan Details window, you can zoom to view the medical information for the selected contact. Operators and agencies may use this information when handling an alarm on this installation. The Contact Details window - Medical tab displays special needs, medical history and conditions, and medication information for the contact.
Use the following steps to view medical details for a contact:
1. In the Action Plans Details window, select the contact for which you want to view details.
2. Double-click your selection or choose Zoom Agency or Contact.
w The Contact Details window opens.
3. Choose the Medical tab.
w The Medical tab opens.
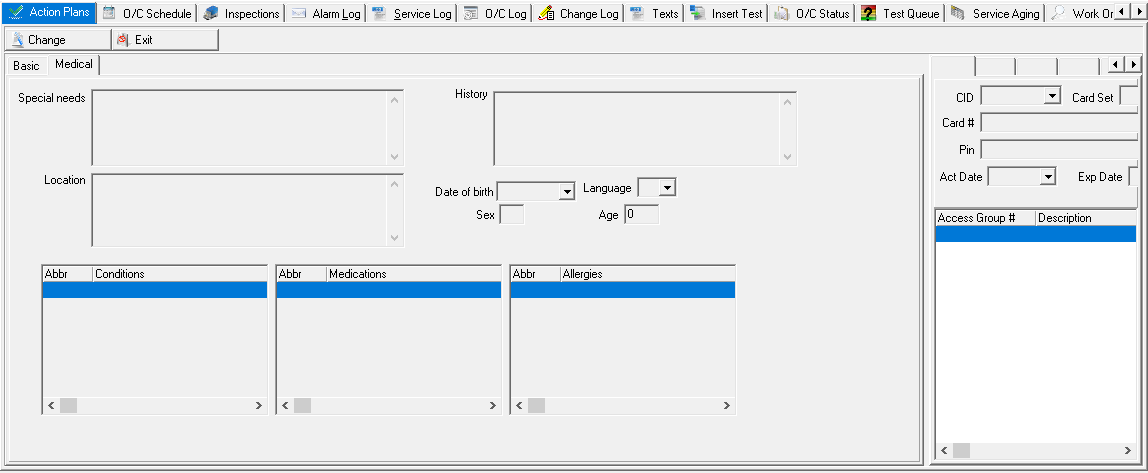
Field Descriptions - Contact Details Window - Medical Tab
The following table describes the fields used in the Contact Detail Medical tab.
Field | Description |
Special Needs | Free-form text description of any special needs the contact has. |
History | Free-form text description of the contact's medical history. |
Location | Free-form text description of where the contact is located. |
Date of birth | Displays the contact's date of birth. |
Language | Displays the contact's language preference. |
Sex | Displays the contact's gender. |
Conditions | List contact's medical conditions, or select conditions from the drop-down menu. |
Medications | List contact's medications, or select medications from the drop-down menu. |
Allergies | List contact's allergies, or select allergies from the drop-down menu. |
Viewing the Agency Details Window
Inside each action plan you can zoom into the details of any agency. All agency details originate from the agency record in one of the following programs, depending on the agency type:
Police Agencies (program #1546)
Fire Agencies (program #1547)
Medical Agencies (program #1552)
Patrol Agencies (program #1717)
Use the following steps to view agency details for an action plan:
1. In the Action Plans Details window, select the agency for which you want to view details.
2. Double-click your selection or choose Zoom Agency or Contact.
w The Agency Details window opens.
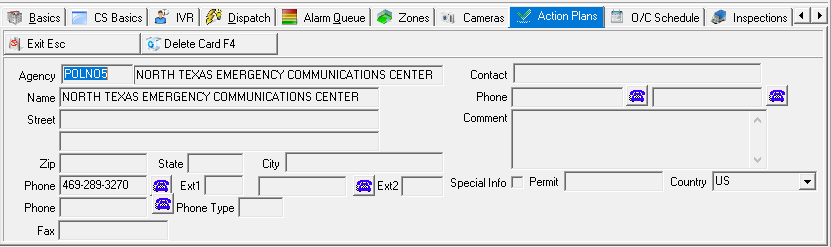
Field Descriptions - Agency Details Window
The following table describes the fields used in the Agency Details window. These are read-only fields.
Field | Description |
Agency | Agency ID code. |
Agency Description (No label) | Agency description for the agency ID code. |
Contact | Contact name at the agency. |
Agency Name | Name of the agency. |
Phone | Phone number for the agency's contact person. |
Street | Agency's street address. |
Comment | Free-form text with notes about this agency. |
Zip | Agency's zip code. |
State | State in which the agency is located. |
City | City in which the agency is located. |
Phone | Agency's phone number. |
Ext1 | Extension for the first phone number. |
Phone | Additional phone number for the agency. |
Ext2 | Extension for the second phone number. |
Special Info | If this check box is selected, a window with additional information displays in Monitoring after you place the call to the agency, and before the event extension dialog box appears. |
Permit | Permit profile assigned to the agency, if any. |
Phone | Information-only phone number for the agency. (This number does not appear in the Monitoring window.) |
Phone Type | Type of phone listed in the previous field. |
Fax | Agency's fax number. |
Creating a New Action Plan
From the Action Plans tab, you can set up new action plans for customers when they provide instructions for when emergency situations occur. Customers must have at least one action plan defined on their account, but can have an unlimited amount of action plans defined for different situations. For example, you can create action plans to use in most circumstances or create plans for vacation days and holidays.
Note: If option undfzpix is on, you may define an action plan to use when signals arrive from unidentified zones. If an account does not contain the defined action plan, SBN uses Action Plan 0.
There are two ways you can create a new action plan:
Use an existing action plan as a template for the new action plan
Create an entirely new action plan
After you create an action plan, you need to add agency and contact information.
Using an Action Plan as a Template for a New Action Plan
If an existing action plan is very similar to an action plan you want to create, use this method and save data entry time.
Use the following steps to use an action plan as a template:
1. Open the installation for which you want to create a new action plan.
2. In the Action Plans tab, select the action plan you want to use as a template.
3. Choose Copy Current Record.
w The Copy Action Plans dialog box opens.
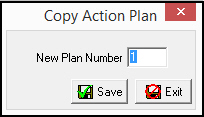
4. SBN generates the next consecutive action plan number.
5. You may change the New Plan number, if needed.
6. Choose Save.
w SBN adds the new action plan to the Action Plans tab.
Note: Once you choose Save, you cannot change the action plan number.
7. Change the details of the new action plan, as needed. See Changing an Existing Action Plan.
Creating an Entirely New Action Plan
Use the following steps to create an entirely new action plan:
1. Open the installation to which you want to add an action plan.
2. In the Action Plans tab, choose New.
w The Action Plan Details window opens in New mode.
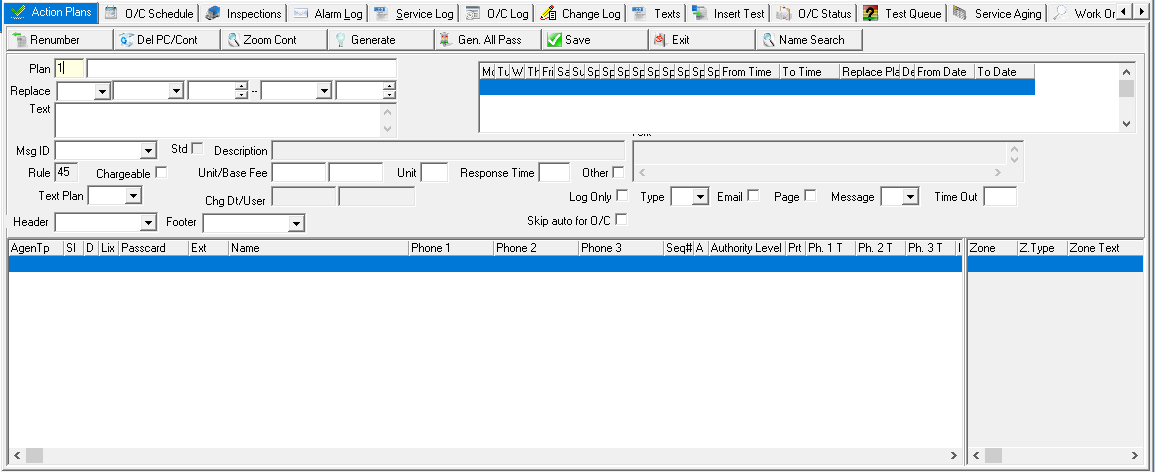
3. SBN generates the next consecutive action plan number.
4. Complete the necessary fields. See Working in the Action Plan Details Window for creating action plan information for each pane.
5. Choose Save.
Working in the Action Plan Details Window
There are several aspects of action plans that you can activate from the Action Plan Details window. Some of these aspects are essential for operators handling an alarm in Dispatch, while other aspects allow you to customize action plan functionality. These aspects include:
Assigning Passcard Holders and Contacts to an Action Plan
Assigning Agencies to an Action Plan
Setting Up a Temporary Replacement Plan
Setting Up a Permanent Substitute Plan
Defining the Action Plan Type
The selection in the Type field determines what actions SBN takes when a signal is generated from a zone attached to the selected action plan. The selection in the Message field determines the text that SBN sends in an email and/or page. (The menu of the Message field originates from program #1667.) It is important that you set up these fields properly for each action plan.
Note: You may enter alternate Message text for specific dealers and languages in program #1667. The alternate text is used for installations with the selected dealer and/or language assigned in Data Entry Master (program #559).
When you define the Action Plan Type, select the Email and/or Page check boxes to indicate if contacts should be sent emails, pages, or both. Define the Phone and Email fields for all contacts on the action plan to ensure that all contacts indicated by the selected Action Plan Type receive alarm pages and emails. Designate whether a contact has a pager in the Phone Type field in the Contact Details window. Define the contact's email address (or addresses) in the Email 1 and/or Email 2 fields of the Contact Details window.
Type Numbers
The following table describes the types you can assign to action plans.
Note: If you select the Suppress Multiple Alarm Emails check box in Data Entry Master and Basics (program #559), SBN does not send emails if more alarms are generated from a CID already in the Alarm Queue. Also, SBN does not create an Alarm Log entry stating that an email was sent.
Type | Action |
1 | SBN emails and/or pages all contacts on the action plan and enters the alarm signal in the Alarm Queue (if you do not select the Log Only check box). SBN attaches a timer to the alarm if you specify one in the Time Out field and enters the alarm signal in the Alarm Queue when the timer expires. |
2 | SBN emails and/or pages the contact on the action plan with Sequence Number 1 and enters the alarm signal in the Alarm Queue (if you do not select the Log Only check box). |
3 | SBN emails and/or pages all contacts on the action plan with a Sequence Number greater than 0 and enters the alarm signal in the Alarm Queue (if you do not select the Log Only check box). |
4 | SBN emails and/or pages all contacts on the action plan, creates an alarm incident, removes it from the Alarm Queue, and logs it in the Alarm Log (if you do not select the Log Only check box). If you select the Log Only check box, SBN only records in the event in the Alarm Log and emails and/or pages all contacts. Options mo198 and mo199 define the monitoring event and event extension SBN enters in the Alarm Log when removing the incident from the Alarm Queue. |
5 | SBN emails and/or pages all contacts on the action plan with a Sequence Number greater than 0 when a user removes the alarm from the Alarm Queue (if you do not select the Log Only check box). Note: The monitoring event used to remove the alarm from the Alarm Queue (in this case, event 60 SYS REMO) must have the Email check box selected in program #1621 in order for SBN to email action plan contacts. |
6 | SBN emails and/or pages all contacts on the action plan when a user removes the alarm from the Alarm Queue (if you do not select the Log Only check box). Note: The monitoring event used to remove the alarm from the Alarm Queue (in this case, event 60 SYS REMO) must have the Email check box selected in program #1621 in order for SBN to email action plan contacts. |
7 | SBN emails and/or pages contacts based on the contact rule. (This type is not yet implemented.) |
Assigning Passcard Holders and Contacts to an Action Plan
Use the Agency and Contact Details pane at the bottom of the Action Plan Details window to manage all contact information for each action plan. You can enter contacts by generating a passcard, choosing a holder from a list of previously generated passcards, or by assigning a contact that has no passcard information. To assign passcard holders, the installation you are working in must be set up to accept passcard holders in Data Entry Master and Basics.
The rule assigned to the installation panel in the CID grid of program #559 determines passcard length and other passcard generation requirements for the installation. For more information, see the Panel Rules document (program #1603) in Utilities.
Note: If option ba289 is on, when a user changes a passcard number, SBN creates an entry in the Change Log of every customer who uses that passcard.
Generating a Passcard
Use the following steps to generate a passcard:
1. Select the action plan to which you want to add a contact.
2. Choose Change.
w The Action Plan Detail window opens in Change mode.
3. In the Agency and Contact Details pane, click in the Passcard column.
4. Choose Generate or Generate All Passcards.
w SBN generates a passcard number and extension.
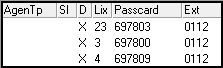
5. Enter information in the following columns:
In Name enter the contact's name.
In Phone 1 enter a phone number for this contact.
Note: You can add additional phone numbers in other Phone columns.
In Sequence# enter this contact's call sequence order number.
In Authority enter an authority level for this contact.
6. Choose Save.
Assigning a Previously Generated Passcard
Use the following steps to assign a previously generated passcard:
1. Select the action plan to which you want to add a contact.
2. Choose Change.
w The Action Plan Detail window opens in Change mode.
3. In the Agency and Contact Details pane, click in the Passcard column.
4. Choose a passcard holder from the drop-down menu. If you find the passcard holder you want to assign in the drop-down menu, skip to step 8.
5. To search for a passcard holder, click in the Passcard column and choose Name Search.
w The Name Search screen opens.
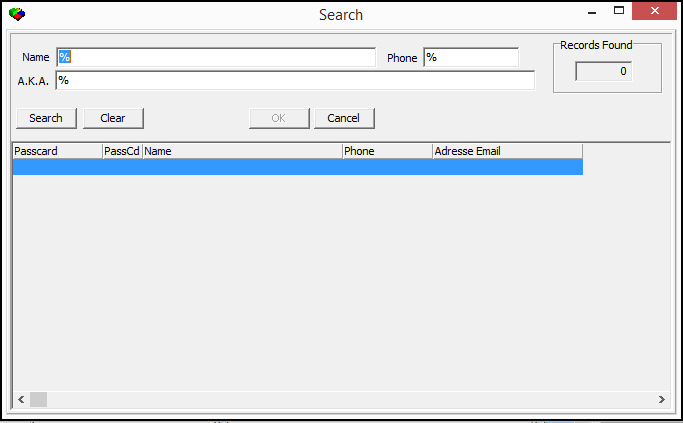
6. Enter a name, phone number, or alias and choose Search.
w The results that match your search parameters appear in the bottom pane.
7. Double-click your selection.
w SBN adds the passcard holder to the Agency and Contact Details pane.
8. Enter information in the following columns:
In Sequence# enter this contact's call sequence order number.
In Authority enter an authority level for this contact.
9. Choose Save.
Assigning a Contact with No Passcard
Use the following steps to assign a contact that has no passcard information:
1. Select the action plan to which you want to add a contact.
2. Choose Change.
w The Action Plan Detail window opens in Change mode.
3. In the Agency and Contact Details pane, start entering contact information in the Name field. Enter information in the following columns:
In Phone 1 enter a phone number for this contact.
Note: You can add additional phone numbers in other Phone columns.
In Sequence# enter this contact's call sequence order number.
In Authority enter an authority level for this contact.
4. Choose Save.
Entering Contact Details
The Contact Details window displays additional fields that provide information for each contact, including fields for comments, a specific street address, and additional phone and pager numbers. After a user has deleted a contact from a plan, you may reactivate the contact from this window by removing the X that appears in the Delete field.
Use the following steps to add contact details:
1. In the Action Plan Details window, select the contact to which you would like to add details.
2. Double-click your selection or choose Zoom Agency or Contact.
w The Contact Details window appears.
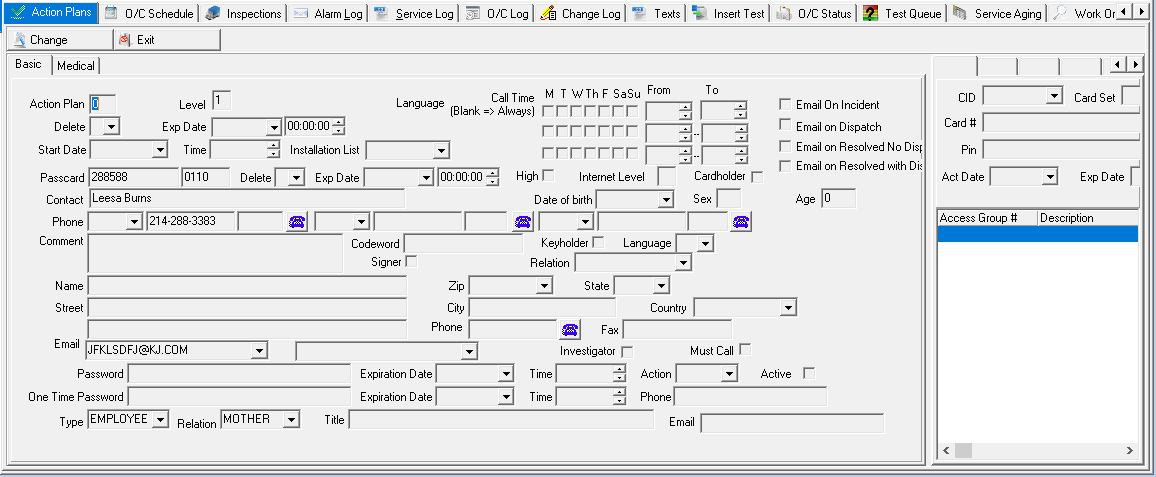
Note: For the field descriptions in the this window, see Field Descriptions - Contact Details Window - Basic Tab.
3. Choose Change.
w The fields open for changes.
Note: The Passcard and Passcard Extension fields only open for changes if action 559/114 is disabled. If the action is enabled, these fields are read-only. For more information about actions, see Action Profiles.
4. Enter detailed information, as needed.
5. Choose Save.
Deleting a Contact
From the Contact Details window, you can delete a contact from the selected action plan or from all installations.
Use the first Delete field to delete this contact from this action plan only.
Use the second Delete field to delete this contact from all installations.
If you choose to delete a contact, you may specify a future date for the termination to become effective. SBN automatically deletes the contact on the date and time specified. Once you have scheduled a contact for deletion, SBN turns the Passcard field red until the pending termination takes effect.
Assigning Agencies to an Action Plan
All agency details originate from the agency record in one of the following programs, depending on the agency type:
Police Agencies (program #1546)
Fire Agencies (program #1547)
Medical Agencies (program #1552)
Patrol Agencies (program #1717)
You can also create a new agency in an action plan by choosing an agency type, then entering new agency details. When you create a new agency in an action plan, a dialog box opens asking if you want to create a new entry. If you choose Yes, another dialog box opens asking if you want to create a new link for the agency. If you choose Yes, SBN saves the new agency to the corresponding program depending on agency type. If you have a country code selected for the installation, SBN saves that country code for the new agency.
Use the following steps to enter an agency:
1. Select the action plan to which you want to add an agency.
2. Choose Change.
w The Action Plan Detail window opens in Change mode.
3. In the Agency and Contact Details pane, click in the Agency Type column.
w A menu of agencies appears.
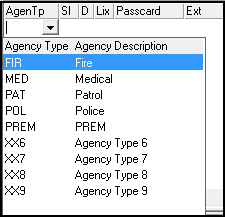
4. Select the correct agency type from the drop-down menu.
5. To select an agency by:
Passcard, click in the Passcard column and select the correct agency from the drop-down menu.
Note: If you know part or all of the Agency ID, you can enter it in this field. After you type the known characters, click the arrow to view a shortened Agency ID menu. You can also type a (%) percent sign and click the arrow to view a complete list of Agency IDs.
w SBN populates the Passcard, Name, and Phone columns.
Phone number, click in the Phone 1 column and select the correct agency from the drop-down menu.
Note: If you know all or part of the phone number of the desired agency, you can enter it in this field. After you type known numbers, click the arrow to view a shortened Agency menu. You can also type a (%) percent sign and click the arrow to view a complete menu of agency phone numbers.
6. Enter information in the following columns:
In Sequence# enter this agency's call sequence order number.
In Authority enter an authority level for this agency.
7. Choose Save.
Setting Up a Temporary Replacement Plan
From the Action Plans Details window, you can set up temporary replacement plans to replace current action plans for a specific date and time range. Create temporary replacement plans for periods of two weeks or less. For example, you can create temporary action plans if customers want different people to be contacted when they are on vacation.
Use the following steps to create a temporary replacement plan:
1. Select the action plan to which you want to add a temporary plan.
2. Choose Change.
w The Action Plan Detail window opens in Change mode.
3. Complete the following fields:

In Replace select the plan you want to use as the temporary replacement plan.
In Start Date (no label) select the start date for the temporary replacement plan.
In Start Time (no label) select the start time for the temporary replacement plan.
In End Date (no label) select the end date for the temporary replacement plan.
In End Time (no label) select the end time for the temporary replacement plan.
4. Choose Save.
If Option ba238 is enabled and set to 0, and action 559/110 is active, you may choose to have the temporary replacement action plan occur either yearly or monthly. When this option and action are set, the Yearly and Monthly checkboxes are enabled. Selecting either checkbox causes the Permanent Substitute Grid to disappear. By entering a year in the End Date fields that occurs in the future, you may create a recurring temporary event that happens either every month or every year until the date expires.
Use the following steps to create a monthly or yearly temporary replacement plan:
1. Select the action plan to which you want to add a monthly or yearly temporary plan.
2. Choose Change.
w The Action Plan Detail window opens in Change mode.
3. Select either the Yearly or Monthly checkbox.
4. Complete the following fields:

In Replace select the plan you want to use as the temporary replacement plan.
In Start Date (no label) select the start date for the temporary replacement plan.
In Start Time (no label) select the start time for the temporary replacement plan.
In End Date (no label) select the end date for the temporary replacement plan. For monthly or yearly temporary replacement action plans, the month, but not the year, must be the same as that in the Start Date.
In End Time (no label) select the end time for the temporary replacement plan.
5. Choose Save.
The start and stop dates, as well as whether a plan is recurring monthly or yearly, now appears in the Action Plan Summary Tab.
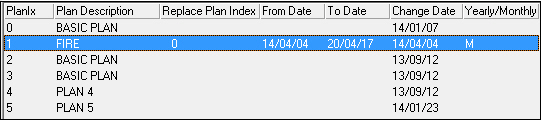
With action 559/110 set to inactive and Option ba238 set for 14 days, the yearly and monthly checkboxes are read only and are not allowed to be edited. The action plan will automatically set a time interval of 14 days and the dates are shown on the Action Plan Tab but the yearly and monthly column is blank.
If Action 559/110 is set to active and Option ba238 has a value, you may set temporary action plans for an interval longer than what is shown in the value option. However, you will not be able to set yearly or monthly recurring replacement plans and the fields are read-only.
Setting Up a Permanent Substitute Plan
From the Action Plans Details window, you can set up permanent substitute plans for specific days and times for this installation. You must create the permanent substitute plan prior to assigning it to a specific action plan. (See Creating a New Action Plan.)
Plans may also replace specific holidays. Columns 1-9 indicate holiday day types. Define scheduled holidays in Scheduled Holidays (program #1746), set the dates for these holidays in Holiday Calendar (program #1747), and define them in the Permanent Substitute Plan grid.
Note: To enter a substitute plan within the regular action plan, you must select the specific days and times or holiday day types the substitute plan will cover.
Use the following steps to enter a permanent substitute plan:
1. Select the action plan to which you want to add a substitute plan.
2. Choose Change.
w The Action Plan Detail window opens in Change mode.
3. In the Permanent Substitute Plan grid, select the days you want the substitute plan to take effect by double-clicking in the appropriate columns.
w SBN places an X in the selected columns.

4. In From Time and To Time, choose the times you would like the substitute plan to take effect.
Note: If you leave these columns blank, the time defaults to 0:00 (midnight).
5. In Replace Plan Index select the action plan number to use as a permanent substitute from the drop-down menu.
6. Choose Save.
Setting Up Patrol Information
From the Action Plans Details window, indicate whether you charge a customer for patrol responses and define the rate of charge. You can charge these fees to a customer as one-time fees or as cycle fees. Use Patrol Agencies (program #1717) to define specific patrol agency charges to the Monitoring center.
Use the following steps to add patrol information:
1. Select the action plan to which you want to add patrol information.
2. Choose Change.
w The Action Plans Details window opens in Change mode.
3. Complete the following fields:

Note: SBN generates the Rule number associated with the panel designated for the installation.
Select the Chargeable check box if you want to charge the customer for a patrol response.
In Unit Fee enter the rate to charge the customer for each unit of time the patrol is at the site.
In Base Fee enter the one time fee to charge the customer for patrol service.
In Unit enter the number of minutes that are included in the unit price.
In Response Time enter the maximum time for initial response by the patrol unit if you charge the customer a base fee.
Select the Other check box if you want to substitute another agency for the primary one.
4. Choose Save.
Changing an Existing Action Plan
You may need to change an existing action plan if the customer wants a permanent change. This is not the same as creating a temporary action plan.
Note: Action 559/111 controls full access to fields that can be edited in Change mode. Only the Phone, Phone Type, and Phone Extension fields are editable when action 559/102 is on and both actions 559/111 and 559/114 are off.
Use the following steps to change an existing action plan:
1. Select the action plan that you want to change.
2. Choose Change.
w The Action Plan Detail window opens in Change mode.
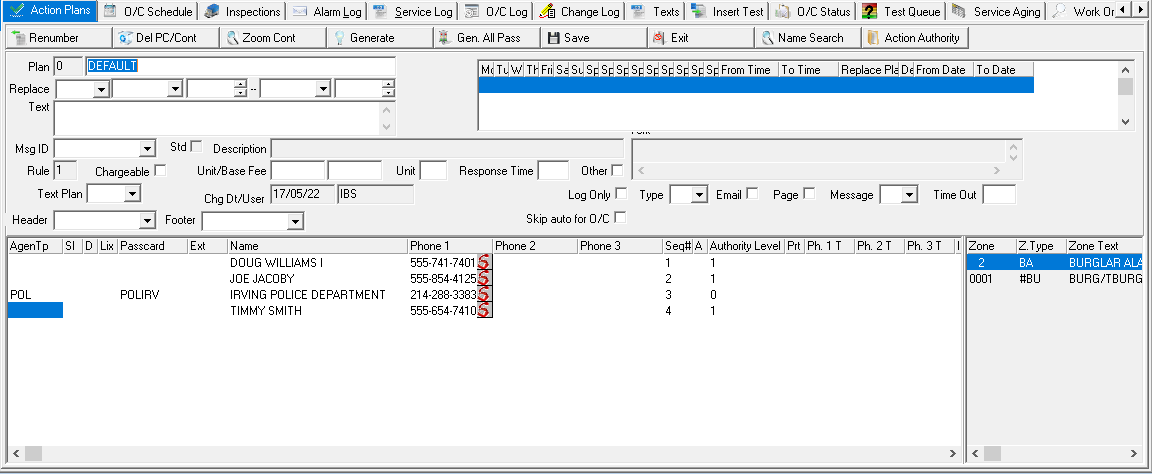
Note: For detailed descriptions of the fields in this window, see Field/Column Descriptions - Action Plan Details.
3. Change details, as necessary.
4. Choose Save.
Deleting an Action Plan
You may delete any action plan defined in the Action Plans tab except for the base plan.
Use the following steps to delete an action plan:
1. Select the action plan you want to delete.
2. Choose Delete.
w SBN asks you to confirm your selection.
3. Choose Yes.
w SBN deletes the selected action plan.
Viewing the Call List
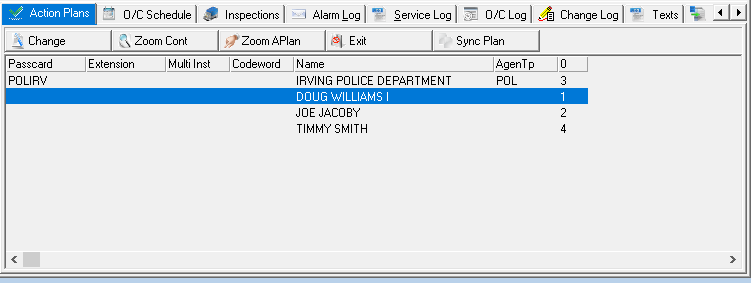
From the Action Plans tab, choose View Call List to see all of the contacts for this installation and the call sequences for every action plan. To the right of each contact, the contact name, codeword, and action plans are listed.
In each action plan column, SBN displays the call sequence corresponding to that plan. The call sequence displays the order in which you are to call each contact.
Note: SBN displays an error message if the total number of contacts times the number of action plans for the installation is greater than 10,000.
The following graphic displays the Call List window as it opens.
Viewing Details of an Agency or Contact
From the Call List window, you can view details of any listed agency or contact.
Use the following steps to zoom on the agency or contact:
1. In the Call List window, select the agency or contact for which you want to view details.
2. Choose Zoom Agency or Contact.
w Either the Agency Details window or the Contact Details window opens.
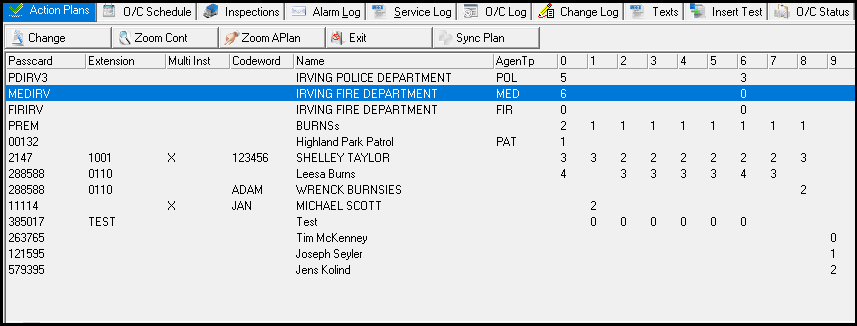
Authority Level
Action Plan Authority Level was added to the Call List grid. Each call list column has an Authority Level column.
Viewing Details of an Action Plan
From the Call List window, you can also view the action plan associated with each contact.
Use the following steps to zoom on the action plan associated with the agency or contact:
1. In the Call List window, select the agency or contact for which you want to view the associated action plan.
2. Choose Zoom Action Plan button.
w The Action Plan Details window opens.
Working in the Call List
In the Call List of the Action Plans tab, you can renumber the sequence of a call list, add contacts to the Call List of multiple action plans, copy the sequence of a call list from one action plan to another, and sync contacts on action plans.
Renumbering the Call List Sequence
Use the following steps to renumber the sequence of a call list:
1. In the Call List window, choose Change.
w The Call List opens for changes.
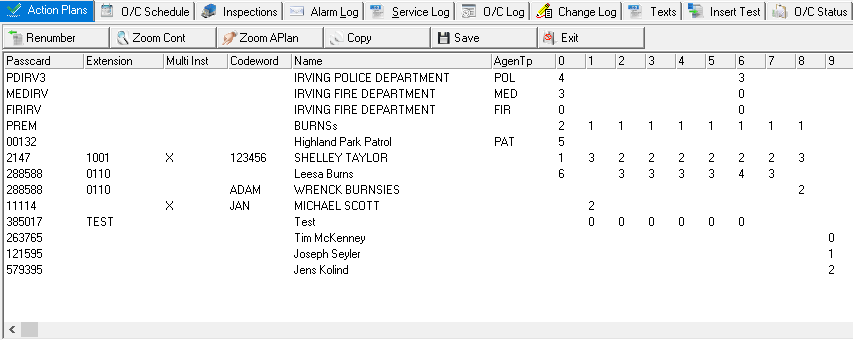
Note: To view grids more easily, you can configure them to display highlighting in SBN Client Options.
2. Click in the cell of the call sequence number you want to change.
w SBN highlights the number.
3. Change the highlighted sequence number to the desired sequence number for that action plan. (Leave your cursor in the cell.)
4. Choose Renumber Contact Sequence.
w SBN renumbers the call list sequence for the selected action plan.
5. Choose Save.
Adding Contacts to the Call List of Multiple Action Plans
When you create the Call List for the base plan (Action Plan 0), you can enter contacts into multiple action plans at one time.
Use the following steps to enter contacts to multiple action plans:
1. Enter all agencies and contacts with their sequence numbers, authority, security levels, and passwords into Action Plan 0.
2. Enter additional action plans required for this installation, but leave the contact and agency information blank.
3. Choose View Call List.
w The Call List appears.
4. Choose Change.
w The Call List opens for changes.
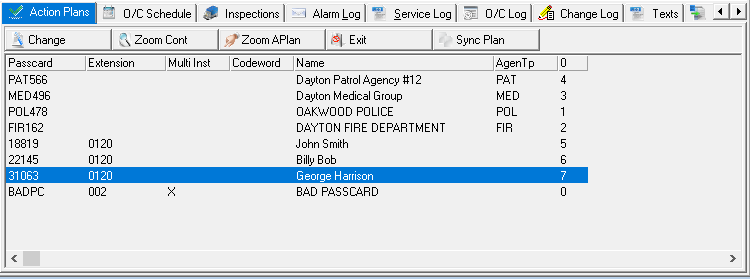
5. Assign sequence numbers for contacts in all action plans.
Note: Passcard Search (program #558) provides a global search and replace function for passcards.
6. Choose Save.
w SBN adds the selected agencies and contacts to the action plans.
Copying the Sequence of a Call List
You can copy the sequence of a call list from one action plan to another action plan.
Use the following steps to copy the sequence of one call list to another action plan:
1. In the Call List window, choose Change.
w The Call List opens for changes.
2. Click in the column of the action plan with the call list sequence you want to copy.
3. Choose Copy Current Record.
w SBN highlights the column of the action plan.
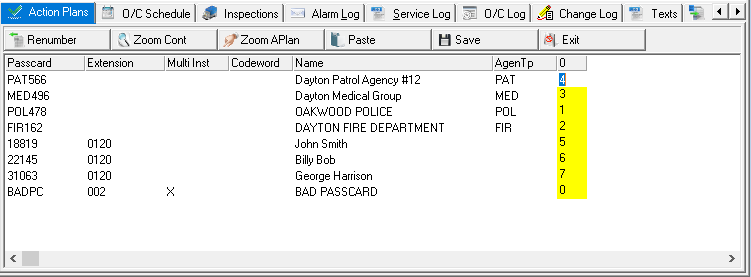
4. Click in the column of the action plan into which you want to paste the sequence of the call list.
5. Choose Paste.
w SBN pastes the sequence of the call list into the action plan.
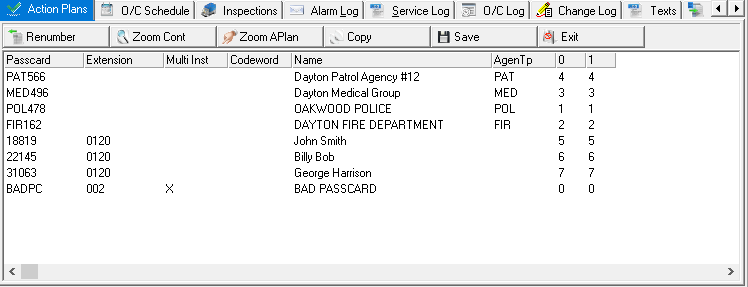
6. Choose Save.
Syncing Contacts on Action Plans
From the Call List, you can synchronize the contacts from one action plan to other action plans for the same installation. When SBN copies the contacts, it also copies the call sequence, authority level, download indicator, and line number for the contact. You cannot synchronize agencies or site contacts with this function; you can only synchronize passcard holders.
Note: If you select the No Sync Allowed check box in the Data Entry Basics tab for this installation, you cannot sync contacts.
Use the following steps to sync contacts:
1. In the Call List window, select the plan from which you want to sync contacts.
2. Click on any sequence number.
3. Choose Sync Contact on Plans.
w The Sync Contacts dialog box appears.
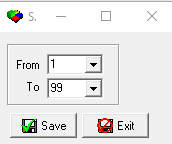
4. Select a range of action plans from which you want to copy contacts:
In From select the first action plan of the range from which you want to copy contacts.
Note: Define the minimum From with option ba355. If this option is undefined, you may select any From - To range.
In To select the last action plan of the range from which you want to copy contacts.
Note: Define the maximum To with option ba356. If this option is undefined, you may select any From - To range.
5. Choose Save.
w A confirmation dialog box appears: "Are you sure?"
6. Choose Yes.
w SBN copies the contacts from the action plan selected in From, to all actions plans up to and including the action plan selected in To.
Note: When syncing contacts, the must call flags from Plan 0 will not be copied to the other action plans.
Must Call Contacts
If the Must Call column for a contact is marked with an X on the Action Plans tab, it means that you must call that contact before resolving an alarm on a zone with that action plan.
When you choose the Alarm Resolutions button in Dispatch (program #537), the Must Call dialog box appears, displaying the Must Call contacts. However, if the Seq# column displays 0 for a contact with an X in the Must Call column, this contact will not appear in the Must Call dialog box in Dispatch.
Setting Up User Validation Questions for a Contact
A Questions button appears in the Action Plan Details window when action 559/920 is active. Use this button to set up user validation questions for contacts so that operators can verify a contact's identity if he/she forgets his/her codeword.
The following graphic shows the Questions button in the Action Plan Details window.
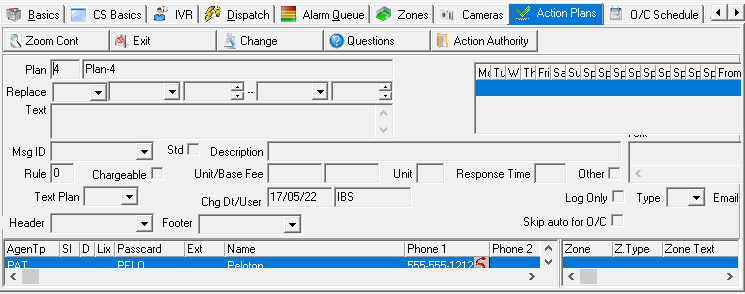
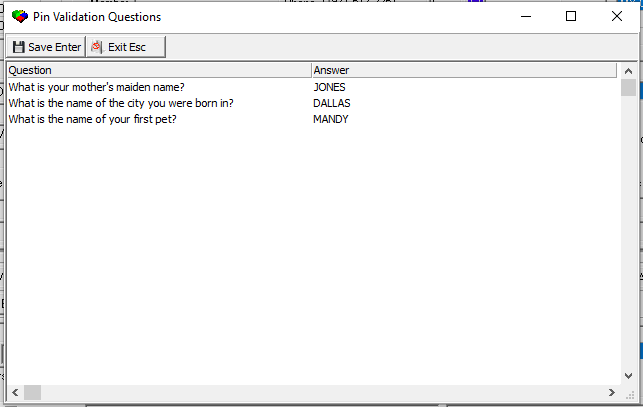
When you select a contact in the Contact Details pane and choose the Questions button, the PIN Validation Questions window appears, displaying the contact's existing validation questions and answers, if defined. (The menu of available questions originates from program #1704/63.)
Note: You cannot define validation questions for agencies.
The following graphic displays the PIN Validation Questions window.
Verifying Contact Authority on Action Plans
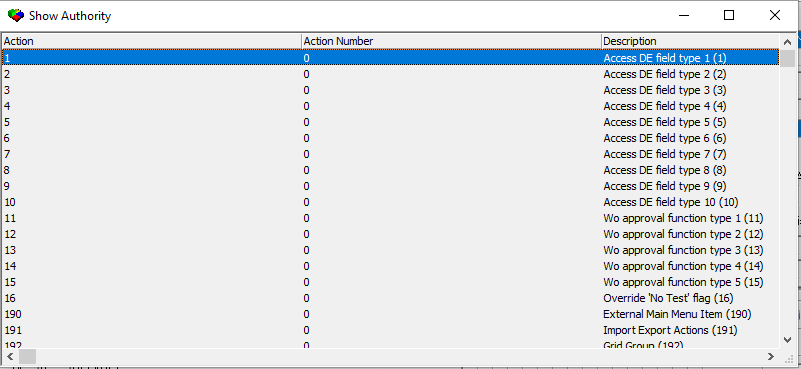
In an action plan, contacts may have action profiles associated with them, listing actions authorized to each contact. Creating action profiles is done within Action Profiles (program #1502), but accessing that information may be done within the Action Plans tab.
Use the following steps to verify contact authority:
1. From the Action Plans tab, double-click on the action plan you wish to view. This opens the Action Plan details tab.

2. Select the contact you wish to view and click the Action Authority button or press CTRL+F5 to open the Show Authority window.
Related Programs
The following table lists programs related to the Action Plans tab.
Program | Number | Document Link | Description |
Scheduled Holidays | 1746 | Define holidays to use in the Permanent Substitute Plan grid in the Action Plan Details window. | |
Holiday Calendar | 1747 | Use this calendar to define the Permanent Substitute Plan grid in the Action Plan Details window. | |
Standard Text | 1828 | Define standard text to display when an operator takes an alarm. Associate message IDs with action plans. | |
Marketing and Marketing Basics | 562 | SBN populates the base plan on an installation with the contacts from the Marketing Basics tab. | |
Data Entry Master and Basics | 559 | Program from which you can access the Action Plans tab. Select the Passcards check box in the Basics tab to use Passcard and High Security functionality in Action Plans. | |
Alarm Log Tab | N/A | SBN logs activity for alarms generated from a zone attached to a selected action plan. The Type field determines what actions SBN takes. | |
Dispatch Tab | 537 | Information entered in the Text field of the Action Plan Details window appears in the Dispatch tab when an operator takes an alarm. Call List and Contact Detail information appears in this program. | |
Open/Close Status Tab | N/A | This program only includes installations with passcards that are downloadable. | |
Police Agencies | 1546 | Define all information for police agencies displayed in the Agency Detail window. | |
Patrol Agencies | 1717 | Define all information for patrol agencies displayed in the Agency Detail window. | |
Fire Agencies | 1547 | Define all information for fire agencies displayed in the Agency Detail window. | |
Medical Agencies | 1552 | Define all information for medical agencies displayed in the Agency Detail window. | |
Zones Tab | N/A | Define the zone information that appears in the Action Plan Details window; attach an action plan to a zone. | |
Phone Types | 1840 | Use the phone number types to define the Phone field in the Contact Details window. | |
Email Distribution | 1898 | Use the email distribution groups defined in this program to define the Email field in the Contact Details window. | |
Actions | 1502 | Use the action profiles to define the Action field in the Contact Details window. | |
Access Control | N/A | Define Access Card Sets and Access Groups to populate the Access Card menus in the Contact Details window. | |
Change Log Tab | 1768 | Keeps record of any actions made in Action Plans. |
Button Functions
The following table displays the buttons, describes the shortcut keys, actions, and functionality.
Button | Name | Shortcut Key | Action | Description |
Action Plans Tab | ||||
| Get | alt+f1 | 559/101 | View the Action Plan Details window. |
| Change | F2 | 559/102 | Make changes to the selected action plan. |
| New | f3 | 559/103 | Create a new action plan. |
| Copy Current Record | shift+f3 | 559/104 | Copy the selected action plan. |
| Delete | SHIFT+F10 | 559/105 | Delete the selected action plan. |
| View Call List | shift+f8 | 559/106 | View the Call List window. |
| Toggle Template | F9 | 559/39 | Selects between templates in displaying action plans. |
Action Plan Details | ||||
| Zoom Agency or Contact | F6 | 559/101 | View the Contact Details or Agency Details window. |
| Change | F2 | 559/102 | Make changes to selected action plan. |
| Questions | SHIFT+F6 | 559/920 | Set up validation questions and answers for contacts. |
| Action Authority | CTRL+F5 | 559/923 | Opens the Show Authority window. |
| Renumber Contact Sequence | alt+f1 | 559/109 | Renumber contact sequence. |
| Delete Passcard/Contact | f3 | 559/921 | Delete the selected passcard or contact. |
| Generate | F7 | 559/108 | Generate a passcard number and extension. |
| Generate All Passcards | F8 | 559/116 | Generate all new passcards. |
| Name Search | F9 | 559/117 | Search passcard holders by name, AKA, or phone number. |
Contact Details | ||||
| Change | F2 | 559 | Make changes to selected contact. |
| Delete Card | F4 | 559 | Delete selected passcard. |
Agency Details | ||||
| Delete Card | F4 | 559 | Delete selected passcard. |
Call List | ||||
| Change | F2 | 559 | Make changes to the Call List. |
| Zoom Agency or Contact | F6 | 559 | View the Contact Details or Agency Details window. |
| Zoom Action Plan | F8 | 559 | View the Action Plan Details window. |
| Sync Contact on Plans | SHIFT+F5 | 559/115 | Sync contacts on action plans. |
| Renumber Contact Sequence | alt+f1 | 559 | Renumber contact sequence. |
| Copy | shift+f3 | 559 | Copy action plan call sequence. |
| Paste Action Plan Call Sequence | CTRL+F3 | 559 | Paste action plan call sequence. |
| Save | ENTER | 559 | Save changes. |
| Exit | Esc | 559 | Exit without saving. |
Modifications and Updates to Action Plans
The following table lists modifications and updates to the Action Plans document.
Mod Number | Date | Description |
n/a | 12/03/08 | document rewritten |
08.03.06475, 07.02.17960 | 04/13/09 | Delete column and delete row functionality in Action Plan Details window. |
07.02.18228, 08.03.06624 | 04/15/09 | Added Header and Footer fields. |
07.02.17682 | 04/20/09 | SBN does not create an Alarm Log entry for suppressed emails. |
07.02.18635, 08.03.06869 | 06/24/09 | Added Country field to Basic tab of Contact Details window. |
07.02.19870 | 06/25/10 | Added options mo198 and mo199. |
08.03.07685 | 07/27/10 | Added Investigator check box to Contact Details Basic tab. |
07.02.21716, 08.03.08741 | 06/01/12 | Added Must Call column to Action Plan Details window. |
07.02.21765, 08.03.08769, 07.02.21863, 08.03.08807, 07.02.21867 | 07/16/12 | Added option mo221 and Alarm Incident Email check boxes to Contact Details Basic tab. |
07.02.22066, 08.03.08925 | 10/19/12 | Added Phone Type 1-3 columns to the Action Plan Details window. |
08.03.08966, 07.02.22153 | 02/27/13 | Added Medical Info column to Action Plan Contact Details window. Added Age field to Contact Details Basic tab. |
07.78.22410, 08.78.09132, 08.78.09125, 07.78.22401 | 03/12/13 | Added Questions button to Action Plan Details window. |
07.78.22345, 08.78.09084, 07.78.22328 | 03/19/13 | Added Email Exclude column to Action Plan Contact Details window. |
07.79.22793, 07.79.22791 | 09/04/13 | Action changed for Delete Passcard/Contact button. |
07.79.22966 | 10/23/13 | Retired monpag options. Replaced them with program #1667. |
08.80.09530, 07.80.23172, 08.79.09315, 07.79.22807 | 04/04/14 | Added monthly and yearly options to the temporary retirement action plan procedures. |
07.80.23293, 07.80.23290 | 04/08/14 | The Medical Info column displays an X if any information is in the text fields in the Medical tab of the Action Plans Contact Details window. |
n/a | 07/16/14 | Images updated. |
07.81.23701 | 10/21/14 | Added note about how must call flags from Plan 0 will not be copied when syncing call lists. |
08.81.09780, 07.81.23570 | 10/24/14 | Added Toggle Template button and option temp254. |
08.81.09658, 07.81.23385 | 10/31/14 | Added Verifying Authority on Contact Plans section. |
07.89.25929, 07.89.25932 | 07/17/18 | Added Contact Text to Agency and Contact Details Pane table. |
08.89.11502, 07.89.25991, 07.89.25990 | 10/19/18 | Replacement Plan can now be used up to 3 times. Dealer plan and template plan are now resolved individually based on the plan for the alarm that was generated. |
n/a | 03/31/20 | Images updated. |
07.93.26812, 08.93.12088, 07.93.26815, 08.93.12091, 07.93.26816, 08.93.12093 | 12/07/21 | New No SMS 1-3 flags added in both Zoomed contact and within the column fields table. Images updated. |
07.93.27137, 08.93.12304, 08.93.1230, 07.93.27129 | 02/21/23 | Changed display of template column to show template installation associated. |
08.93.12272, 07.93.27073, 07.93.27072 | 11/21/22 | Added check box for "Disallow template override" |
Contact Phone and Email Selection
Phone and email drop-downs were added to the program 559 call list, and the contact-person telephone field was extended to 30 characters.