
SBN Client Options
SBN client options, including the Dialer Prefix used to add an outside-line or long-distance prefix to outbound calls (dialer type, communications, and display settings).
Module: Reference
Configuring SBN Client Options
SBN provides several Options tabs in which you can customize the way you see information in SBN. You can configure the following SBN client options:
- Regional
- Layout
- Grids
- Directories
- Tools
- Communications
- Dialer
- Reports
- Video
- Document Retrieval
- Relay
- Access Control
To access the Options tabs from any program in SBN, choose View > Options or press [CTRL+O].
Configuring Regional Options
Use the Regional tab to specify the language in which SBN text appears. If text appears in a language you do not use, set your regional options to the default that your company has set.
Use the following steps to configure Regional options:
1. From any program in SBN, choose View > Options.
w The Options window opens with the Regional tab displayed.
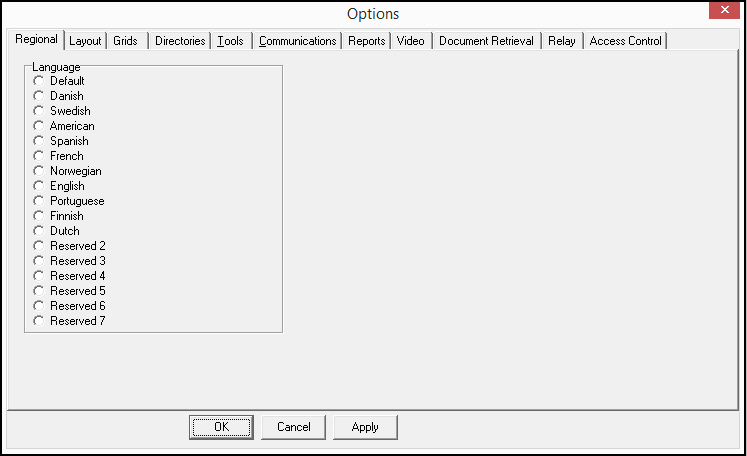
2. In the Regional tab, click the radio button to select the language displayed in SBN.
3. Choose Apply.
w SBN saves your Regional options.
Configuring Layout Options
Use the Layout tab to define the appearance of toolbars in SBN.
Use the following steps to configure Layout options:
1. From any program in SBN, choose View > Options.
2. In the Options window, choose the Layout tab.
w The Layout tab appears.
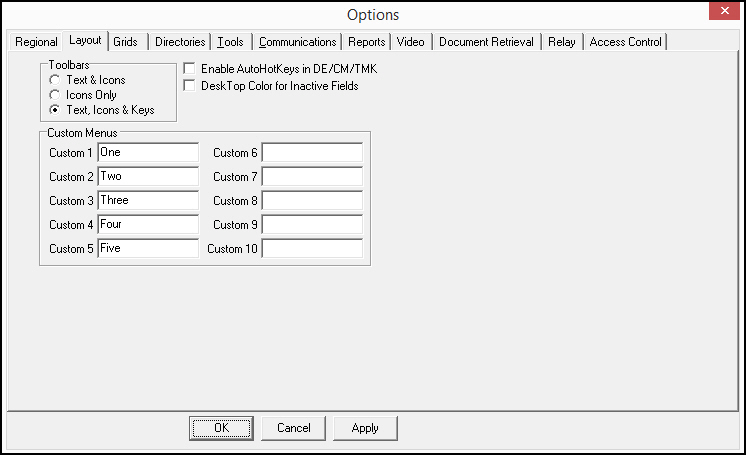
3. Choose a Toolbars option:
l Text & Icons - toolbar buttons appear with text and icons

l Icons Only - toolbar buttons appear with icons only

l Text, Icons & Keys - toolbar buttons appear with text, icons, and hotkeys

4. Select or clear the Enable AutoHotKeys in DE/CM/TMK (Data Entry, Contract Master, and Marketing) option.
Note: To avoid conflicting hot key assignments, SBN must use a method that re-assigns hot keys as new features are added or removed, so they may change occasionally. The current hot key is always evident by the underlined character in the menu item or label. For example, the menu item File has F for the hot key. To use hot keys, press ALT+ the hot key, as in this example ALT+F.
Note: You may define your own hot keys in GUI Messages (program #1606). If you choose to do this, you must define all the hot keys yourself in program #1606; SBN will no longer handle this process.
5. Select or clear the Desktop Color for Inactive Fields. This changes the background color of fields in SBN.
Note: When you select Desktop Color for Inactive Fields, all inactive fields in SBN change to the Windows desktop color. You can configure the desktop color according to user preference.
6. Choose Apply.
w SBN saves your Layout options.
Note: If you are in an SBN program when you change your options, you will need to close the program and re-enter it to see your changes applied.
Configuring Grids Options
Use the Grids tab to define the display of grids in different windows.
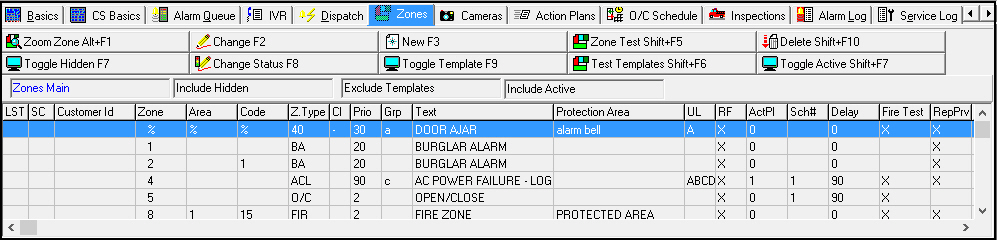
If you do not select options in the Grids tab, grids will appear similar to the one below.

Use the following steps to configure your Grids options:
1. From any program in SBN, choose View > Options.
2. In the Options window, choose the Grids tab.
w The Grids tab opens.
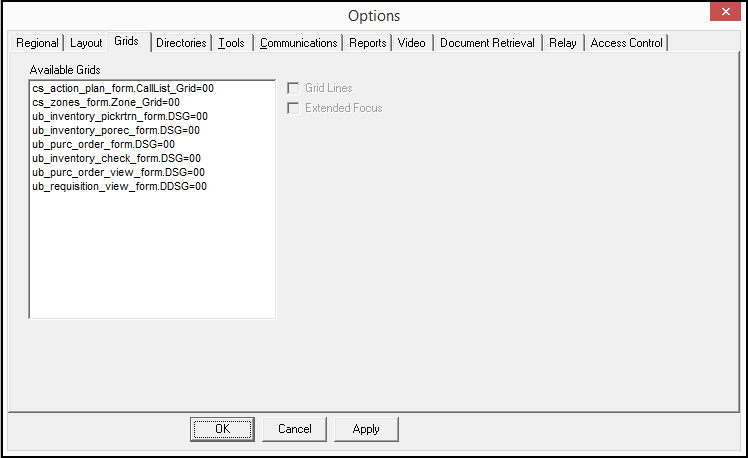
3. To enable grid lines, select the form name and select the Grid Lines check box.
Note: When you view the selected grid, grid lines will appear. See the example below.
4. Choose Apply.
w SBN saves your Grids options.
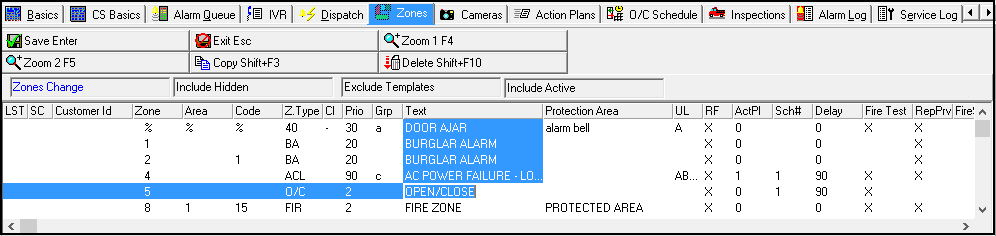
5. To enable extended focus (the highlight row and column functionality in the grids), select the form name and select the Extended Focus check box.
Note: When you view the selected grid in Change mode, row and column highlighting will appear with focus on the selected cell. See the example below.
6. Choose Apply.
w SBN saves your Grids options.
Configuring Directories Options
Use the Directories tab to configure specific directory paths for Reports, Exports, Imports, Faxes, Images, and PRobot. For more information on these directory paths, see Directory Descriptions.
The fields in this tab contain drop-down menus when action 1656/16 is disabled in your action profile. The directory paths defined in Directory Types and Locations (program #1656) for a directory type appear in the drop-down menu of the corresponding Directory field in SBN Client Options. For example, the directory paths defined for the Report Directory Type in program #1656 appear in the Report Directory field of SBN Client Options when action 1656/16 is disabled.
When action 1656/16 is enabled in your action profile, the fields in this tab allow you to type in or browse for directory paths.
Use the following steps to configure Directories options:
1. From any program in SBN, choose View > Options.
2. In the Options window, choose the Directories tab.
w The Directories tab appears.
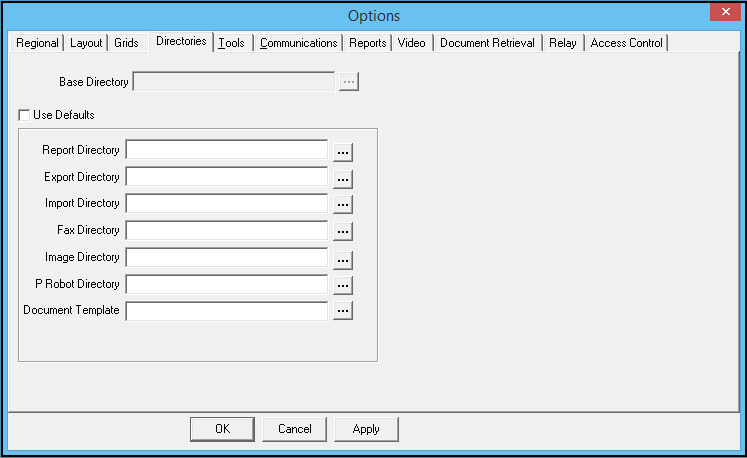
Note: If you leave the fields blank, SBN will use your current working directory.
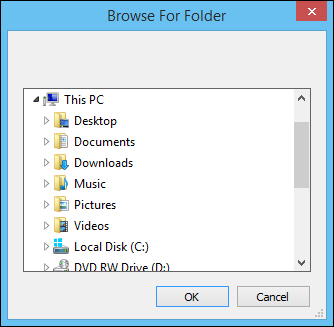
3. Select the  button to browse for a directory.
w The Browse for Folder dialog box opens.
or...
If action 1656/16 is disabled in your action profile, the fields in this tab contain drop-down menus defined in program #1656. If you attempt to save a directory path that does not exist in the drop-down menu, SBN displays an error message and does not allow you to save.
4. Select the correct directory.
5. Choose OK.
w The Select Directory dialog box closes.
6. Choose Apply.
w SBN saves your Directories options.
Directory Descriptions
The following table describes each directory listed in the Directories tab.
Directory | Description |
Report | This directory defines where the Report Outputs for the report queue are located. You must have this directory defined to view reports in the Report Queue. |
Export | This directory defines a default folder for all exports run in SBN. When an export is run, it will be saved in the specified directory. |
Import | This directory defines a default folder for all imports run in SBN. When an import is run, it will be saved in the specified directory. |
Fax | This field allows you to point to a custom fax program (path and filename). When a report is designated to be faxed, this option will launch the specified program or bat file and pass two parameters: the path and name of the file to be faxed, and the phone number of the receiving fax machine. Note: IBS recommends that the path and name of the custom fax program not contain spaces. |
Image | This directory allows you to specify the folder where images are stored to be used with the floor plans functionality in the Floor Plans tab of Data Entry (program #559). |
P Robot Directory | Used to link to the Inventory programs. Note: This option is currently for Securitas Denmark only. |
Configuring Tools Options
Use Tools options to:
- Reload menus throughout SBN
- View field IDs and names for any field in SBN
- Specify a .wav file for the beep in the Dispatch tab of Data Entry (program #559)
Use the following steps to set up Tools options:
1. From any program in SBN, choose View > Options.
2. In the Options window, choose the Tools tab.
w The Tools tab opens.
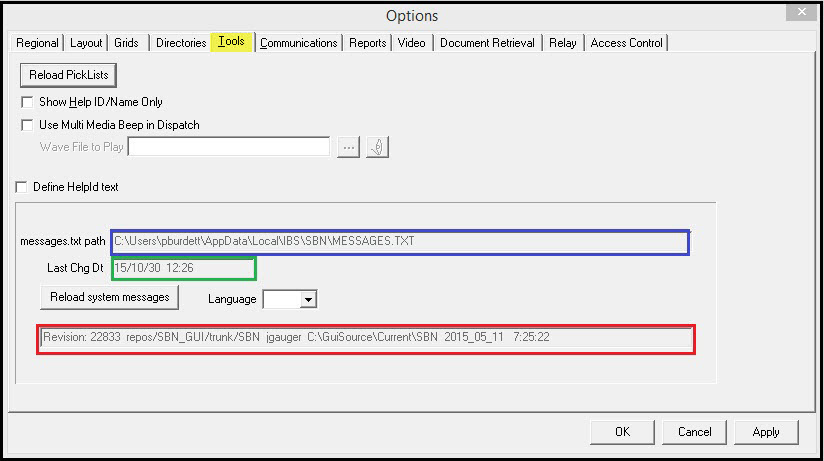
3. You may complete the following fields:
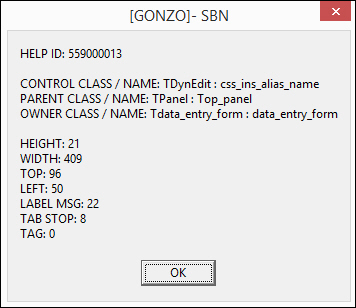
l In Show Help ID/Name Only:
q Select this check box to display the internal information about a field when you right-click on that field.
or...
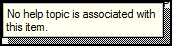
q Leave this box blank to display a context-sensitive definition when you right-click on a field.
l Select the Use Multi Media Beep in Dispatch check box to require SBN to play a .wav file when there are active signals in the Dispatch tab.
4. When you change system administration settings, you can choose Reload Picklists to refresh all menus in SBN.
5. Choose Apply.
w SBN saves your Tools options.
6. The message.txtpath box list the message.txt path for a particular machine.
7. The Last Chg Dt box displays the last change date of the GUI messages, when updated in (Program #1606).
8. The SVN Repository box, displays the svn repository and build path, when a new branch is created in (Program #559).
Configuring Communications Options
Use the Communications tab to configure the way SBN communicates with various servers.
Use the following steps to set up Communications options:
1. From any program in SBN, choose View > Options.
2. In the Options window, choose the Communications tab.
w The Communications tab opens.
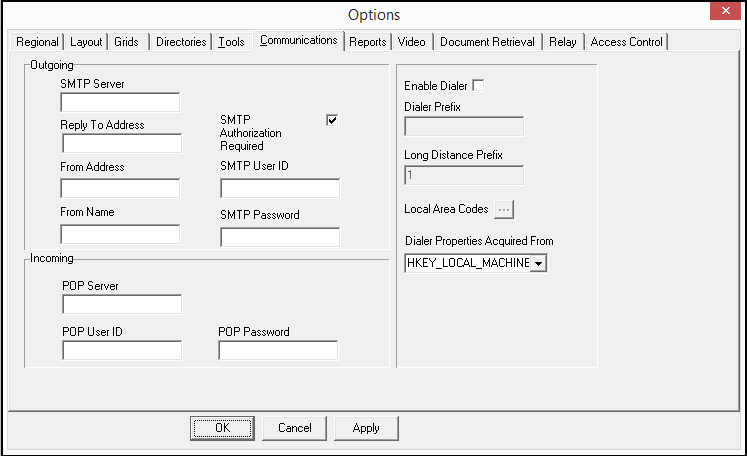
3. In Dialer Properties Acquired From, select the registry key in which dialer properties are stored/retrieved.
4. Type Outgoing server details to allow email to be sent from SBN. If your company's email server requires SMTP Authorization before sending, select the SMTP Authorization Required check box and provide the user ID and password for you email server.
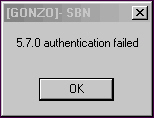
w If the password supplied in the SMTP authorization does not work, the system displays the following message:
5. Type Incoming server details if your company's email server also requires POP3 information (in addition to SMTP) to authenticate outgoing email.
6. If you do not use auto-dialing, skip to step 8.
7. If you use auto-dialing:
a. Select the Enable Dialer check box.
b. In Dialer Prefix, type a dialer prefix or a long distance prefix, if necessary.
c. Choose Local Area Codes to define area codes that do not require a Long Distance Prefix.
w The Local Area Codes window opens.
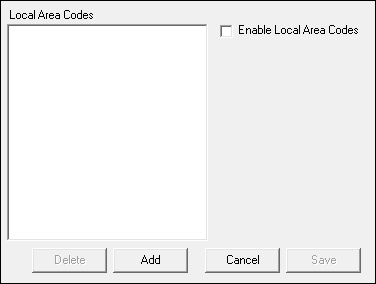
d. Select the Enable Local Area Codes check box to turn on the Local Area Code functionality. This functionality allows SBN to dial numbers with defined local area codes without using a long distance prefix.
e. Choose Add.
w The Add Local Area Code dialog box opens.
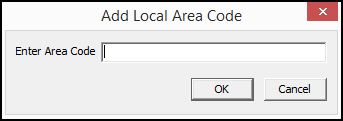
f. Type the area code.
g. Choose OK.
w The area code appears in the list of Local Area Codes.
h. Repeat Steps 10-12, as needed, to add all area codes that do not require a long distance prefix.
Note: The dialer will use a long distance prefix for calls to any area code other than defined local area codes.
8. Choose Apply.
w SBN saves your Communications options.
Configuring Dialer Options
Use Dialer options to configure settings for the type of dialer you use.
Dialer Prefix
The Dialer Prefix is the digit or digits SBN adds to the front of every number it dials, so calls reach an outside line and, when needed, the long-distance network. For example, a prefix of 9 seizes an outside line, and 91 seizes an outside line and adds the long-distance 1. With a Dialer Prefix of 91, a stored number such as 469-767-1457 is dialed as 914697671457. The Dialer Prefix applies to all outbound calls, including the AEONIX dialer.
You enter the Dialer Prefix while setting Communications options, in the Dialer Prefix field (see the auto-dialing step above). It is stored per workstation in the Windows Registry. The Dialer Properties Acquired From setting controls where the Dialer Prefix is read and saved: HKEY_LOCAL_MACHINE applies to every Windows user on that workstation, and HKEY_CURRENT_USER applies only to the logged-in Windows user.
Note: Saving to HKEY_LOCAL_MACHINE requires Windows administrator rights on the workstation. If SBN runs without administrator rights and the Dialer Prefix does not persist after a restart, set Dialer Properties Acquired From to HKEY_CURRENT_USER, which any user can save.
Note: The Dialer Prefix is separate from the Long Distance Prefix and Local Area Codes, which determine when the long-distance prefix is added to a number.
For a focused overview, see the Dialer Prefix page.
Use the following steps to set up Dialer options:
1. From any program in SBN, choose View > Options.
2. In the Options window, choose the Communications tab
3. Choose the Enable Dialer checkbox to enable the Dialer tab.
4. Select the Dialer tab.
w The Dialer tab opens.
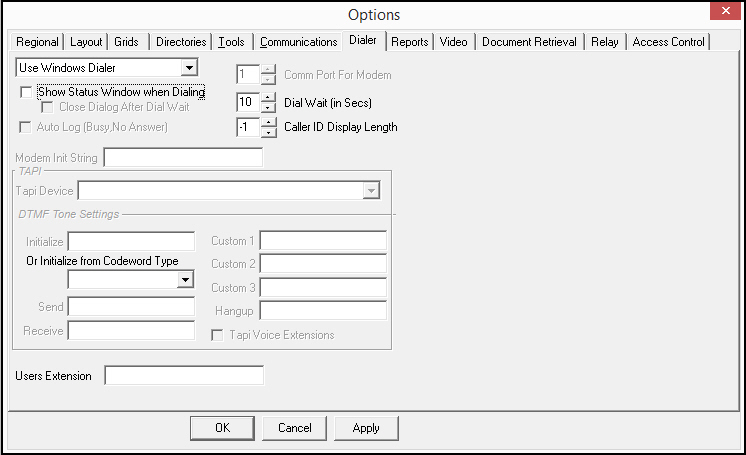
5. From the menu of Dialer Types, select the type of dialer you want to use.
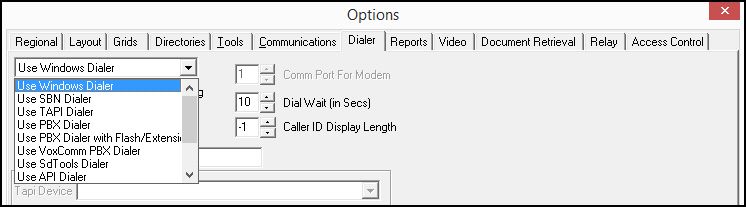
Note: If you choose the Windows Dialer, you do not configure settings inside SBN.
- If you choose the SBN Dialer, configure:
l The Comm Port for Modem
l The Dial Wait (in seconds)
l Modem Init String settings
Note: The Dial Wait option sets the length of time between when the operator dials the number and when SBN turns the line over to the operator.
Note: Use the Modem Init String to configure a prefix to dial before dialing all numbers.
- If you choose the TAPI or PBX Dialer, type settings in the fields in the TAPI section of the tab.
l Select the Tapi Device by choosing a device from the drop-down menu
l Select the TAPI Voice Extensions check box if your modem device supports Voice Extensions and you wish to use the DTMF tone settings.
l Type any DTMF tone setting defaults.
Note: These tone settings do not override the settings present in the panel rules.
6. Select the Show Status Window when Dialing to view the progress of the Dialer.
7. Select the Close Dialog After Dial Wait to automatically exit the status window once the dial wait time has expired.
8. Choose Apply.
w SBN saves your Dialer options.
Configuring Reports Options
Use Reports options to specify
- A default email address for sending reports
- A default printer for printing reports
Use the following steps to configure Reports options:
1. From any program in SBN, choose View > Options.
2. In the Options window, choose the Reports tab.
w The Reports tab opens.
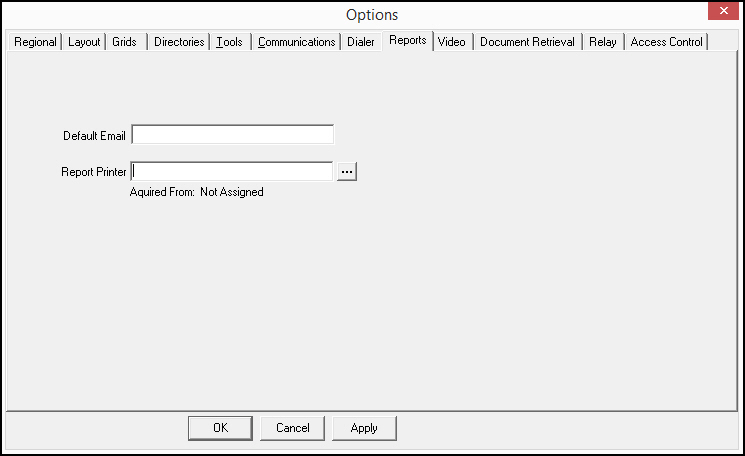
3. Set a default email to use when sending reports.
Note: When you define an email, SBN overrides any email selected in the report default parameters. For more information see The Report Default Parameters Window.
4. If you wish to use a specific printer for reports, type a printer path or select the button. The specified printer must be accessible to the computer running the report scheduler, as well as the terminal running SBN.
Note: The system administrator can remove the HKEY_LOCAL_MACHINE key to enable SBN to write the default Report Printer to HKEY_CURRENT_USER. The Report Printer key must be typed in SOFTWARE/IBS/SBN/General in either HKEY_CURRENT_USER or HKEY_LOCAL_MACHINE.
5. Choose Apply.
w SBN saves your Report options.
Configuring Video Options
Use Video options to specify the following parameters for video files:
- Servers
- Users
- Passwords
- Folder path
Use the following steps to configure Video options:
1. From any program in SBN, choose View > Options.
2. In the Options window, choose the Video tab.
w The Video tab opens.
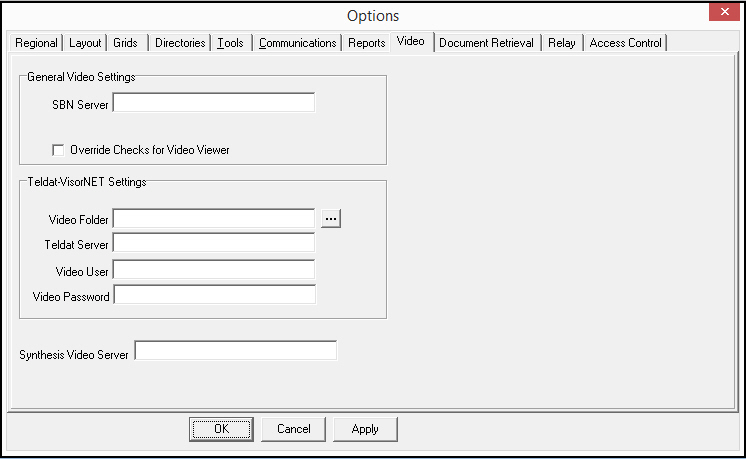
3. Type the path of the folder in the directory you wish to store the video files or browse for a directory path by choosing the button.
w If you choose the button, the Browse For Folder dialog box appears.
4. Select the correct directory.
5. Choose OK.
w The Select Directory dialog box closes.
6. Complete the remaining fields.
7. Choose Apply.
w SBN saves your Video options.
Video Options Field Descriptions
The following table describes the fields in the Video tab.
Field | Description |
SBN Server | SBN server name used for most video integrations. |
Override Checks for Video Viewer | Select this check box to prevent SBN from performing checks to panel types or alarm log lines. SBN will then send the current (or top, if none selected) alarm log line to the video viewer regardless of panel. |
Video Folder | Path of folder where video files are stored for Teldat video. |
Teldat Server | Name of the server that stores the video files for Teldat video. |
Video User | Username of the account used to login to the video server. |
Video Password | Password of the account used to login to the video server. |
Synthesis Video Server | Name of the server that stores video files for Synthesis video. |
Configuring Document Retrieval Options
Use Document Retrieval to link SBN to third-party software that uses a database to hold separate documents related to accounts in SBN. This is currently configured to work with one software application and two databases.
Use the following steps to configure Document Retrieval options:
1. From any program in SBN, choose View > Options.
2. In the Options window, choose the Document Retrieval tab.
w The Document Retrieval tab opens.
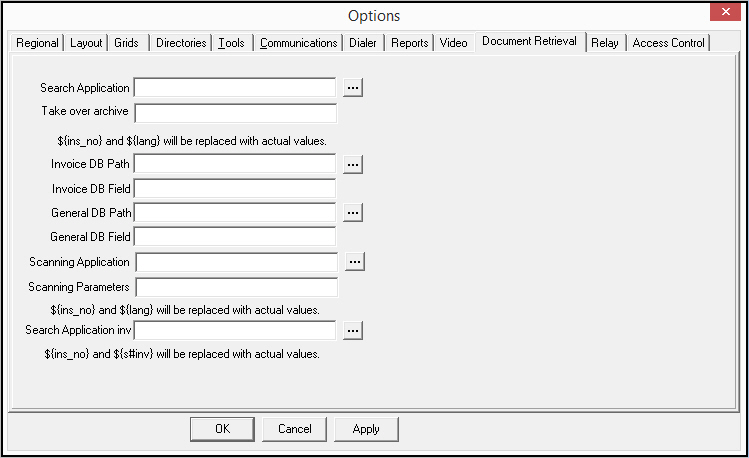
3. Enter the paths and fields according to the Document Retrieval Descriptions table.
4. Choose Apply.
w SBN saves your Document Retrieval options.
Document Retrieval Field Descriptions
The following table describes the fields in the Document Retrieval tab.
Field | Description |
Search Application | Type or browse for the file path for the program executable file, URL, batch file, HTTP, or script. Parameters specified after the application path get passed to the application. |
Take over archive | Name of the archive to be taken over for storage. |
Invoice DB Path | Type or browse for the file path where the Invoice database is located. |
Invoice DB Field | Type the field name from the application that contains the information to match in SBN. |
General DB Path | Type or browse for the file path where the General database is located. |
General DB Field | Type the field name from the application that contains the information to match in SBN. |
Scanning Application | Type or browse for the file path for the program executable file, URL, batch file or script. |
Scanning Parameters | List of parameters to pass to the scanning application. |
Search Application Inv | Type or browse for the file path for the program executable file, URL, batch file or script. Parameters specified after the application path get passed to the application. The Document Retrieval button in the Invoice Status tab of Contract Master (program #548) uses this path to retrieve invoice documents when option docretr is on. Note: This field is only visible when option docretr is on. |
Configuring Relay Options
Use Relay options to specify parameters for a relay card used to control external devices such as lights, horns, or sirens. You can define three types of functions for each of eight relays. For Relay options to work, you must have a relay card configured. This option is intended to be enabled on only one workstation.
Use the following steps to configure Relay options:
1. From any program in SBN, choose View > Options.
2. In the Options window, choose the Relay tab.
w The Relay tab opens.
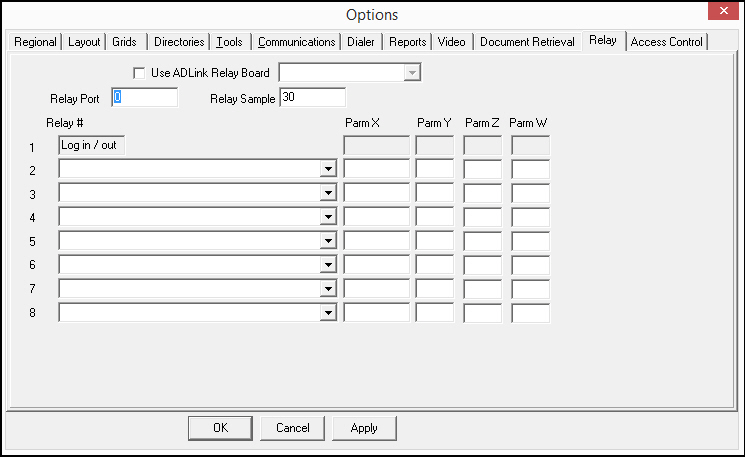
Note: The first relay is hardcoded to Log In/Out of the workstation. Relay 1 alerts users whether the primary workstation is logged off. If the primary workstation is logged off, no other relays will work. When wiring for external devices, include Relay 1 in the wiring configuration. Relays 2-7 are open for configuration.
Note: IBS recommends relay cards ACL7125 from Circuit Specialist or AX50008 from Axiom Tech Inc., or a printer card. You must configure hardware for this functionality before it will work properly.
Note: To activate the ADLink PCI-7250 relay card:
q Install the ADLink file 'PCI-DASK.dll' in the path of the workstation
q Install the drivers for the card
Note: If you select the Use ADLink check box, you must type a value > 0 t into the Relay Port Field. Support has been provided for one board only.
3. Type a Relay Port number. The port number is the address assigned to relay or printer cards.
Note: You can test any port number between 0 and 199 without writing information to the port. Ports numbered 200 or greater cause information to write to the port. This allows you to test the port functions without writing to the port itself.
Note: Once you type the port number, a relay status appears in the status bar at the bottom of the SBN screen. This status appears as REL:01100000, where a zero indicates that the relay is off, and a one indicates that the relay has been activated.
4. From the menu, select one of the following functions:
l Red Alarms in Queue (X) with a Priority greater than (Z) and less than (Y) pending for more than (W) minutes
l More than (X) alarms in Immediate Queue (Y) with Machine ID (Z).
l More than (X) jobs pending in (Y) copytask
l More than (X) pending in Email Queue
l More than (X) pending in Paging Queue
l More than (X) pending in Report Queue
Note: Zero as a queue number configures the relay to look in all queues.
5. Choose OK.
w SBN saves your Relay options.
Configuring Access Control Options
Use Access Control to configure a download input directory or an upload output directory for information in the Access Control tabs in Data Entry (program #559).
Use the following steps to configure Access Control options:
1. From any program in SBN, choose View > Options.
2. In the Options window, choose the Access Control tab.
w The Access Control tab opens.
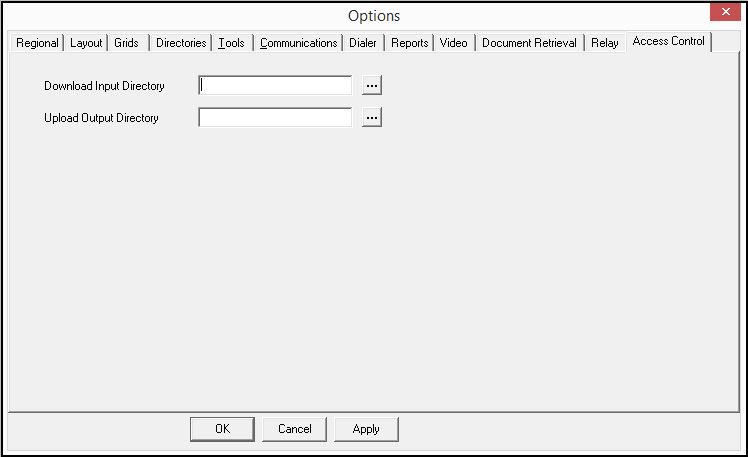
3. Type the path of the folder you wish to download directories from/upload directories to, or browse for a directory path by choosing the button.
w If you choose the button, the Select Directory dialog box appears.
4. Select the correct directory.
5. Choose OK.
w The Select Directory dialog box closes.
6. Choose Apply.
w SBN saves your Access Control options.
Modifications and Updates to SBN Client Options
The following table lists modifications and updates to the SBN Client Options document.
Mod Number | Date | Description |
n/a | 12/01/08 | document rewritten |
07.02.22000, 08.03.08892 | 09/12/12 | Added action 1656/16 and program #1656 to define Directory drop-down menus. |
n/a | 08/14/14 | Images updated. |
08.92.11868, 07.92.26480 | 11/20/20 | New SBN Anywhere Dialer available with SBN Client Options. The SBN Dialer utilizes the Twilio integration to complete calls. New options must be filled in with correct information for dialer to work: api_eng, twi_app, twi_auto, twi_disp, twi_phn1, twi_phn2, twi_tok, and twi_wait. |