
Certificates
Certificates
Certificates
Module: Account Management
Overview
Use the Certificates tab in Data Entry (program #559) to add system installation certificates to CIDs. This tab is available if action 559/910 is enabled in your action profile.
This document covers the following topics:
Viewing Details of a Certificate
Navigating to Certificates
Use the following steps to navigate to the Certificates tab:
1. From the main SBN toolbar, select Menu.
2. From the drop-down menu, select Go To.
3. In the Go To Program dialog box, type in "559" and press Enter.
w Data Entry Master and Basics opens.
4. Choose the Certificates tab in the lower pane of Data Entry.
The Certificates Tab
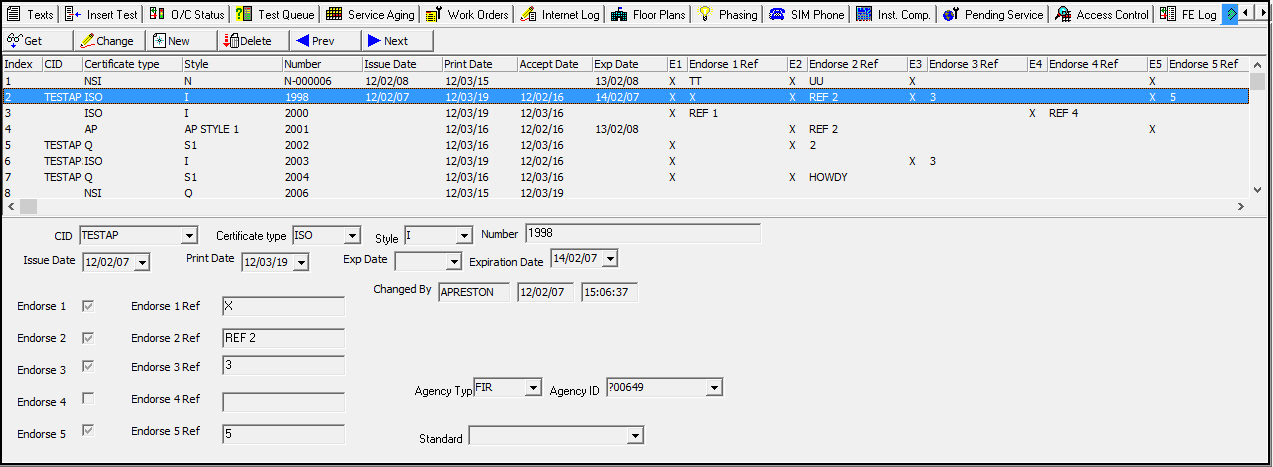
The following graphic shows the Certificates tab with information displayed.
Field/Column Descriptions
The following table describes the fields and columns in the Certificates tab.
|
Field/Column |
Description |
|
Index |
Sequential number of the certificate line item. |
|
CID |
CID to which the certificate applies. (You may enter % to apply the certificate to all CIDs on the installation.) |
|
Certificate Type |
Type of the selected certificate. (This menu originates from program #1653, and includes certificate types defined for the installation dealer and types with no dealer.) Note: If the panel of the selected CID has a certificate type defined in program #1742, that type appears in this field by default when you create a certificate. |
|
Style |
Style of the selected certificate, which determines the Endorse check boxes and Endorse Reference fields that appear. (This menu originates from the Styles tab of program #1653 for the selected certificate type.) Note: If the panel of the selected CID has a certificate style defined in program #1742, that style appears in this field by default when you create a certificate. |
|
Number |
Certificate number. You may type in a number or use the Generate button to assign a defined number from program #1654. |
|
Issue Date |
Date the certificate was issued. |
|
Print Date |
SBN updates the date in this column each time the certificate is printed using Report #2193. |
|
Accept Date |
SBN enters the date in this column when the certificate data is exported using Export 165 in program #542. Once a certificate has an Accept Date, SBN will not export it again. |
|
Expiration Date |
Date the certificate expires. |
|
Endorse 1 |
Select this check box to indicate that Endorsement 1 applies to the selected certificate. |
|
Endorse 1 Ref |
Type in a value to appear beside Endorsement 1 when you print the selected certificate. |
|
Endorse 2 |
Select this check box to indicate that Endorsement 2 applies to the selected certificate. |
|
Endorse 2 Ref |
Type in a value to appear beside Endorsement 2 when you print the selected certificate. This field accepts up to 30 characters and is protected when filled. Note: SBN automatically populates this field with the Revision text entered for the selected certificate style in program #1653. |
|
Endorse 3 |
Select this check box to indicate that Endorsement 3 applies to the selected certificate. |
|
Endorse 3 Ref |
Type in a value to appear beside Endorsement 3 when you print the selected certificate. |
|
Endorse 4 |
Select this check box to indicate that Endorsement 4 applies to the selected certificate. |
|
Endorse 4 Ref |
Type in a value to appear beside Endorsement 4 when you print the selected certificate. |
|
Endorse 5 |
Select this check box to indicate that Endorsement 5 applies to the selected certificate. |
|
Endorse 5 Ref |
Type in a value to appear beside Endorsement 5 when you print the selected certificate. |
|
Agency Type |
Type of agency associated with the certificate, which determines the agencies that appear in the Agency ID field. Note: If an agency of the selected type exists on an action plan for the installation, SBN automatically populates the Agency ID field with that agency. |
|
Agency ID |
Specific agency associated with the certificate. The selection in the Agency Type field determines which agencies appear in this menu.
Note: If an agency of the type selected in the Agency Type field exists on an action plan for the installation, SBN automatically populates the Agency ID field with that agency. |
|
Standard |
Standard of the selected certificate. (This menu originates from program #1655 and includes only standards defined for the selected certificate type and style.) |
Viewing Details of a Certificate
Use the following steps to view certificate details:
1. Select the certificate for which you want to view details.
2. Double-click your selection or choose Get Record.
w The certificate details appear in the fields in the lower pane of the tab.
Creating a Certificate
Use the following steps to create a certificate:
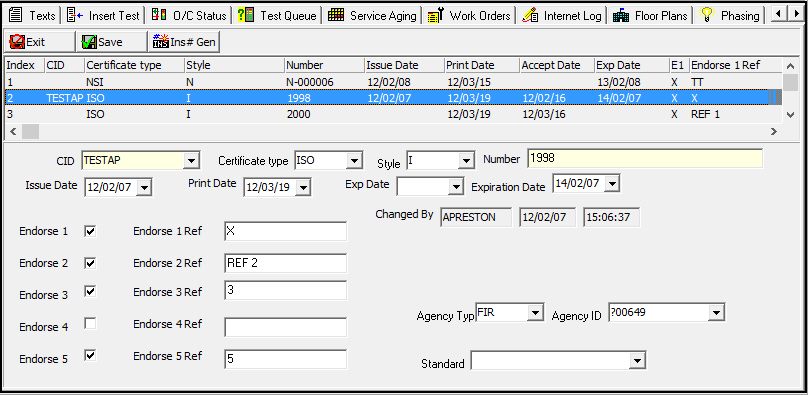
1. Choose New Record.
w The fields in the lower pane of the tab open to enter new information.
2. Select a CID to attach the certificate to, or type in % to attach the certificate to all CIDs on the installation.
Note: If the CID panel has a certificate type and style defined in program #1742, that type and style appear in this window by default.
3. You may type in a certificate number or choose Generate to use a defined certificate number from program #1654.
Note: If the selected certificate style has no certificate numbers available in program #1654, the Generate button does nothing.
4. Complete the remaining fields, as necessary.
w When you select a certificate style, Endorse check boxes and Endorse Reference fields defined for the selected style in program #1653 appear in the lower left corner of the pane.
5. Choose Save.
Changing Certificate Details
Use the following steps to change the details of a certificate:
1. From the upper pane of the Certificates tab, select the certificate you want to change by double-clicking or choosing Get Record.
2. Choose Change Record.
w The fields in the lower pane of the tab open for changes.
3. Change certificate details as necessary.
Note: You can use the Generate button to assign a defined certificate number from program #1654 to an existing certificate, but you must clear the Number field first. If the selected certificate style has no certificate numbers available in program #1654, the Generate button does nothing.
4. Choose Save.
Deleting a Certificate
Use the following steps to delete a certificate:
1. From the upper pane of the Certificates tab, select the certificate you want to delete by double-clicking or choosing Get Record.
2. Choose Delete Record.
w A Confirm dialog box opens: 'Are you sure?'
3. Choose Yes.
4. SBN removes the certificate from the list in the upper pane of the tab.
Related Programs
The following table lists programs related to the Certificates tab.
|
Program |
Number |
Document Link |
Description |
|
Data Entry Master |
559 |
The program from which you can access the Certificates tab. View and edit details of CIDs associated with certificates. |
|
|
Certificate Types |
1653 |
Define certificate types and styles to be assigned in the Certificates tab. |
|
|
Certificate Number Generator |
1654 |
Generate certificate numbers that may be assigned in the Certificates tab. |
|
|
Certificate Standards |
1655 |
Define certificate standards to be assigned in the Certificates tab. |
|
|
Certificates Report |
2193 |
Print certificates attached to CIDs in the Certificates tab. |
Button Functions
The following table displays the buttons, describes the shortcut keys, actions, and functionality.
|
Button |
Name |
Shortcut Key |
Action |
Description |
|
|
Get Record |
ALT+F1 |
559/911 |
View details of the selected certificate. |
|
|
Change Record |
F2 |
559/912 |
Change details of the selected certificate. |
|
|
New Record |
F3 |
559/913 |
Create a new certificate. |
|
|
Delete Record |
shift+F10 |
559/914 |
Delete the selected certificate. |
|
|
Previous Record |
F4 |
559/911 |
View the previous certificate. |
|
|
Next Record |
F5 |
559/911 |
View the next certificate. |
|
|
Generate |
F7 |
559/915 |
Assign a defined certificate number from program #1654 to the selected certificate. |






Modifications and Updates to Certificates
The following table lists modifications and updates to the Certificates document.
|
Mod Number |
Date |
Description |
|
07.02.21485, 08.03.08593 |
02/13/12 |
document created |
|
n/a |
07/17/14 |
Images updated. |