
Schedule Capacity
Schedule Capacity
Schedule Capacity
Program #: 575
Module: System Administration
Overview
Use Schedule Capacity (program #575) to set up, maintain, and allocate resource schedules to use in the Schedule Board (program #563).
This program contains the default schedules for all resources. Use this program to enter exceptions to the schedule for specific days and times. You must perform an initial search for resource type and branch (if necessary) to see available resources for scheduling.
To access this program, select Schedule Capacity (program #575) from the main menu of SBN.
The Schedule Capacity Window
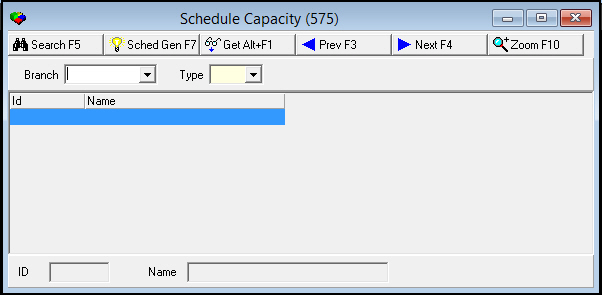
The following graphic shows the Schedule Capacity window. The window remains empty until you perform a search.
Note: The Region field does not appear unless you select SALE in the Type field.
Field/Column Descriptions - Main Window
The following table describes the fields and columns used in the main window of Schedule Capacity.
|
Field/Column |
Description |
|
Branch |
Branch for which you want to view resources. (This menu originates from program #1730.) O You may only view or make changes to branches listed in your user branch profile. |
|
Type |
Resource type to schedule: l Installer l Technician l Salesperson |
|
Region |
Sales Region for which you want to view resources. Regions are assigned to resources in the Sales Persons tab of program #1811. When this field is blank, SBN displays all salespersons whether they have a Region assigned or not. Note: This field does not appear unless you select SALE in the Type field. |
|
ID |
Resource ID: l Installer ID l Technician ID l Salesperson ID (These IDs originate from program #1811.) |
|
Name |
Name of the resource. |
Searching for Resources
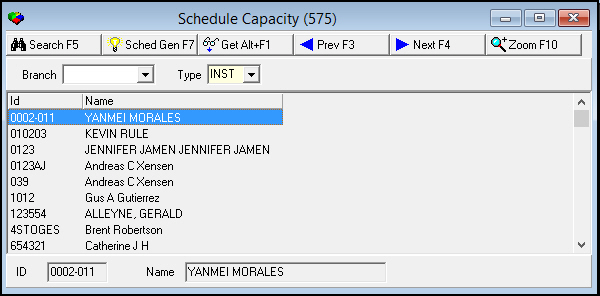
Before you can create, change, or delete schedules, you must first complete a search for a specific type of resource.
Use the following steps to search for resources:
1. In Schedule Capacity, select your search parameters.
Note: You may search by branch, resource type, or a combination of both.
2. Choose Search.
‰ The search results display in a list below the search parameters.
Using Common Functions
See the reference document Common Functions in SBN for more information.
Generating Schedules
Use the Generate Schedules function to create standard schedules and generate them into specific dates to use in the Schedule Days tab and the Schedule Board (program #563). You can generate schedules for all resources in the selected branch or for a specific resource ID.
Note: The actions that control access to generating specific resource types have moved:
l Action 222 (generate Installer for schedule capacity) is now action 575/41
l Action 223 (generate Sales Person for schedule capacity) is now action 575/42
l Action 227 (generate Technician for schedule capacity) is now action 575/43
Use the following steps to generate schedules for all resources in the selected branch:
1. In the Schedule Capacity, perform a search for the resource type and branch.
2. Choose Schedule Generation.
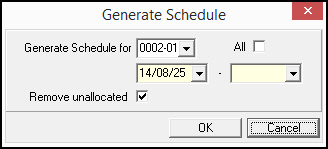
‰ The Generate Schedule window opens.
3. Complete the following fields:
l In All - enter a check mark to generate all schedules.
l In the Date fields (unlabeled) - select a beginning and ending date for which you want to generate schedules. The beginning date defaults to today’s date. You may override the default.
l In Remove unallocated - this field defaults to a check mark; leave the check mark if you want to remove any work codes or changes made to the default week for dates already scheduled but that have no jobs allocated to them.
4. Choose OK.
Use the following steps to generate schedules for a specific resource:
1. In the Schedule Capacity (program #575), perform a search for the resource type and branch.
2. From the search results, select the resource for which you want to generate a schedule.
3. Choose Schedule Generation.
‰ The Generate Schedule window opens.
4. Complete the following fields:
l In Generate Schedule for - this field defaults to the ID of the selected resource. You may override the default.
l In the Date fields (unlabeled) - select a beginning and ending date for which you want to generate schedules. The beginning date defaults to today’s date. You may override the default.
l In Remove unallocated - this field defaults to a check mark; leave the check mark if you want to remove any work codes or changes made to the default week for dates already scheduled but that have no jobs allocated to them.
5. Choose OK.
Zooming into the Sublevel
The Schedule Capacity program contains a sublevel with three tabs:
-
Standard Week - in which you set up a standard schedule for a resource
-
Schedule Days - in which you generate the standard week schedule into specific dates
-
Tech Diary - in which you can view miscellaneous resource information.
The Standard Week Tab
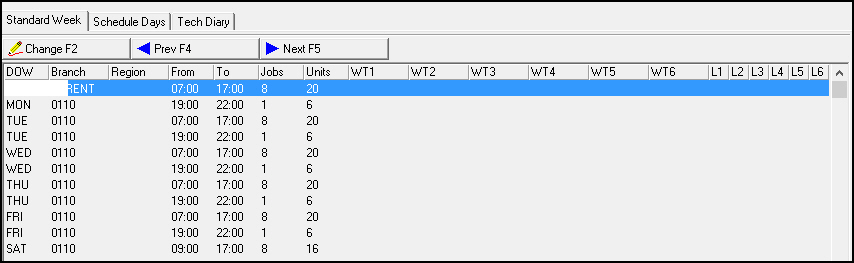
Use the Standard Week tab to set up a standard schedule for the resource. The standard schedule contains the days, times, branch, region, number of jobs, number of units, work types and levels for each resource. You can schedule up to six lines for each day. For each line that you schedule in Schedule Capacity, a separate line appears in the Schedule Board (program #563) for this resource. If these lines contain different branches, each line displays in the branch defined. SBN uses this standard week to generate the recurring schedule for the resource.
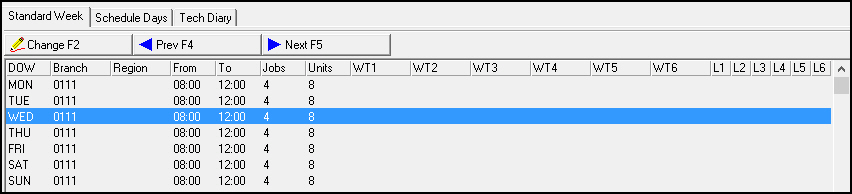
The following graphic shows the Standard Week tab with a schedule displayed.
Column Descriptions - Standard Week Tab
The following table describes the columns used in the Standard Week tab.
|
Column |
Description |
|
DOW |
Day of the week for the schedule. |
|
Branch |
Branch location for the scheduled time. (This menu originates from program #1530.) Note: You may leave this column blank to make the resource a global resource that can be assigned jobs at any branch. |
|
Region |
Branch region for the selected branch. (This menu originates from program #1530.) |
|
From |
Beginning time for the schedule slot. |
|
To |
End time for the scheduled slot. |
|
Jobs |
Maximum number of jobs that you can scheduled in one day for the resource. |
|
Units |
SBN calculates the number of units. O This field is no longer required. |
|
Work Type 1 - Work Type 6 |
Six work types that can be defined for the resource for that schedule line. |
|
Level 1 - Level 6 |
Six difficulty levels that can be defined for the resource for that schedule line. These fields are information-only fields specified by the company. |
Defining the Standard Week
When you first create or update a resource schedule, you must enter or change the standard week. This standard week becomes the basis for the recurring schedule for the resource. Every time SBN generates schedules it retrieves work times, branch, and other details from the standard week.
Once you have defined one day in the standard week, you can use this day to generate the default week. SBN then applies the same details from the first day to all days on the schedule. You can then go through and delete days out of the schedule, if needed.
Use the following steps to define a standard week:
1. In Schedule Capacity, perform a search for a specific resource.
2. Select the resource from the search results.
3. Choose the Zoom in/out of Sublevel to open the sublevel tabs.
4. In the Schedule Capacity sublevel, choose the Standard Week tab.
‰ The standard week for the resource appears.
5. Choose Change Record.
‰ The grid opens for changes.
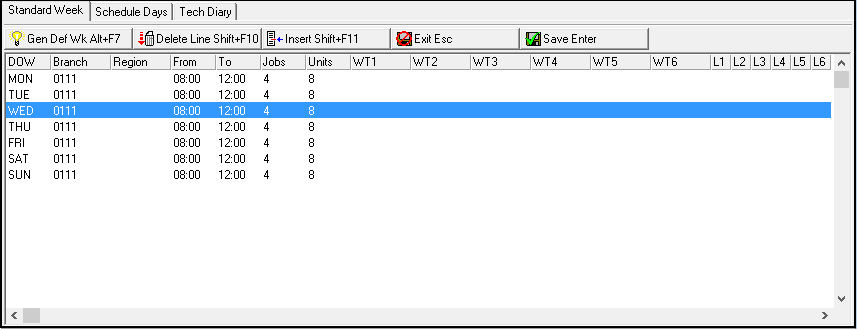
Note: For more information on these columns, see Column Descriptions - Standard Week Tab.
6. Enter the specific information for one or multiple lines of the first scheduled day.
Note: For more information on inserting lines, see Inserting Lines.
Note: You can use the first day to create the other days of the standard week; see Deleting Days from the Standard Week.
Inserting Lines
You may add lines to any day in the standard week schedule.
Use the following steps to insert lines:
1. While the standard week appears in Change mode, select the line below the space where you want to insert a line.
2. Choose Insert Record.
‰ SBN inserts a blank line above your selection.
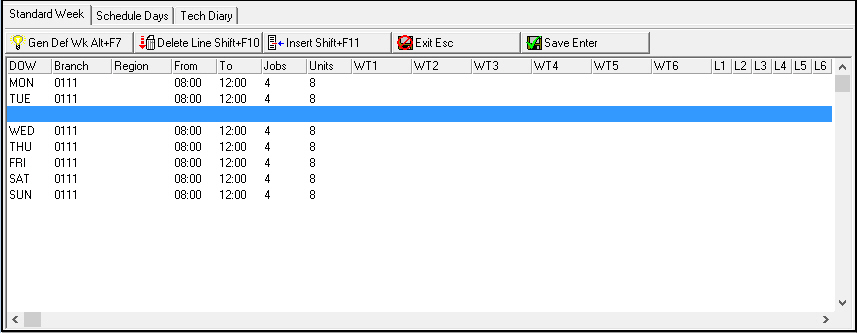
3. Add details to the new line.
4. Repeat steps 1-3 as needed.
5. Delete any unnecessary lines. (See the following section.)
6. When you finish defining the standard week, choose Save.
Deleting Days from the Standard Week
Use the following steps to delete days from the standard week:
1. Click on the far left of the line you want to delete.
2. Choose Delete Line.
‰ SBN deletes the selected line.
3. Repeat steps 1-2 for each line you want to delete from the standard week.
4. When you finish defining the standard week, choose Save.
Generating a Standard Week
You may use one schedule day to generate all other schedule days for the standard week. Action 575/29 controls access to the Generate Default Week button.
Use the following steps to generate a standard week:
1. Use the previous steps to define the first day of a standard week.
2. Delete additional lines. Deleting Days from the Standard Week.
3. Place your cursor at the last line of the day you want to copy.
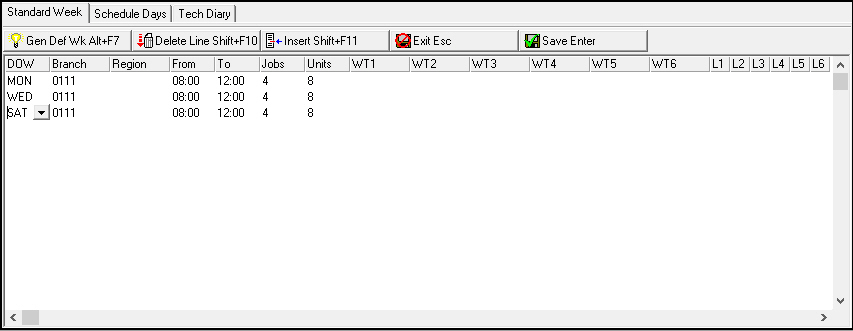
4. Choose Generate Default Week.
‰ SBN copies all lines above and including the line your cursor is on. SBN adds the copied lines to each schedule day below the line your cursor is on.
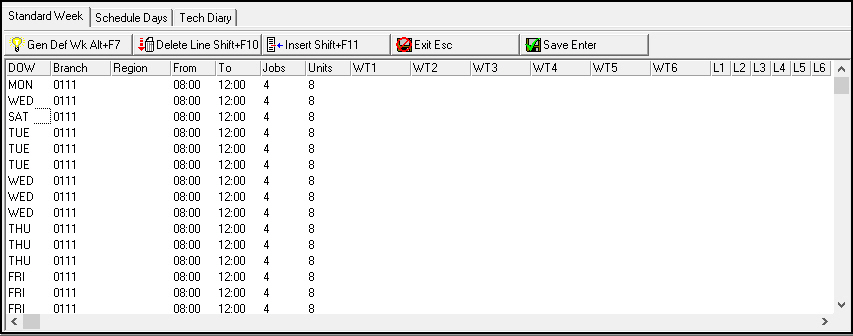
5. Add or delete lines, as necessary.
6. When you finish defining the standard week, choose Save.
The Schedule Days Tab
Once you have defined a standard week for a resource, use the Schedule Days tab to generate the standard week schedule into specific dates.
Note: You cannot use the Schedule Days tab to change and delete schedule information for individual time slots. Instead, use Scheduling (program #563) to perform these functions.
Note: Actions 575/20-29 control access to this tab and the function buttons within the tab.
The following graphic shows the Schedule Days tab with information displayed.
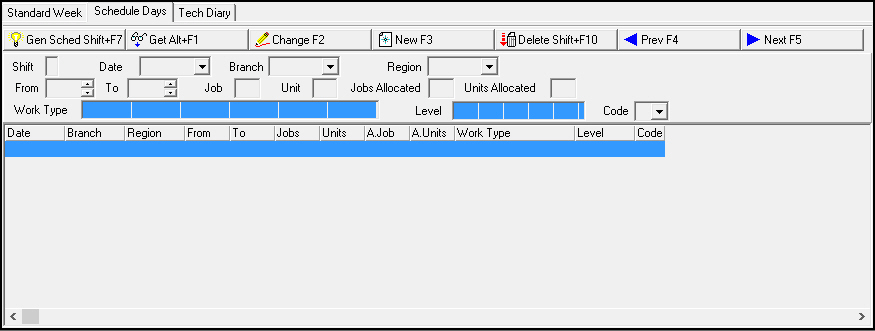
Field/Column Descriptions - Schedule Days Tab
The following table describes the fields and columns used in the Schedule Days tab.
|
Field/Column |
Description |
|
Shift |
Shift index number. This number starts with zero and goes up to five for the maximum number of six lines. |
|
Date |
Schedule date for the date selected. |
|
Branch |
Branch where the resource is scheduled. Note: You may leave this column blank to make the resource a global resource that can be assigned jobs at any branch. |
|
Region |
Branch region assigned for the resource for the scheduled time. |
|
From |
Beginning time for the schedule line. |
|
To |
Ending time for the schedule line. |
|
Job |
Maximum number of jobs that you can schedule for the resource during the selected time. |
|
Units |
Maximum number of units that you can schedule for the resource during the selected time. |
|
Jobs Allocated |
Number of jobs allocated in the Schedule Board for the selected day and time. |
|
Units Allocated |
Number of units allocated in the Schedule Board for the selected day and time. |
|
Work Type |
Six work types assigned to the resource for the selected day and time. (This menu originates from program #1526.) |
|
Level |
Six difficulty levels assigned to the resource for the selected day and time. |
|
Code |
Work code used to block out specific slots of time in the schedule board. (This menu originates from program #1782.) |
Generating a Standard Week into Schedule Days
After you define a standard week for a resource, use the Schedule Days tab to generate that standard week into specific dates for use in the Scheduled Days tab and the Schedule Board (program #563). You may generate a standard week into specific dates for one or all resources for a selected branch.
Use the following steps to generate a standard week into Schedule Days:
1. Define a standard week for a resource. See Defining the Standard Week.
2. Choose the Schedule Days tab.
3. Choose Generate Schedule.
‰ The Generate Schedule window opens.
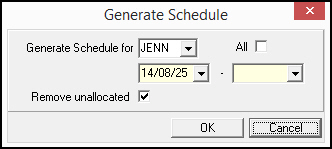
4. Complete the following fields:
l In Generate Schedule for - select the resource ID for whom you want to generate the standard week into schedule days. This field defaults with the ID of the resource selected in the upper pane of the window. You may override the default.
l In All - enter a check mark in this field if you want to generate the defined standard week into the schedule days for all resources of the branch displayed in the upper pane of the Schedule Capacity window.
l In the Date fields (unlabeled) - select the range of dates for which you want the standard week to apply. This field defaults with the current date. You may override the default.
l In Remove Unallocated - enter a check mark to remove any work codes or changes made to the default week for dates already scheduled but that have no jobs allocated.
5. Choose OK.
‰ SBN generates the defined standard week schedule into the selected schedule days.
The Tech Diary Tab
Use the Tech Diary tab to view miscellaneous resource information. This tab displays work a resource has performed that may not revolve around a service ticket. This is a read-only tab.
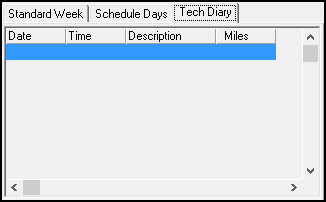
Column Descriptions - Tech Diary Tab
The following table describes the columns used in the Tech Diary tab.
|
Field/Column |
Description |
|
Date |
Date the resource worked. |
|
Time |
Time the resource worked. |
|
Description |
Description of the job the resource performed. |
|
Miles |
Number of miles the resource traveled for the selected job. |
Button Functions
The following table displays the buttons, describes the shortcut keys, actions, and functionality.
|
Button |
Name |
Shortcut Key |
Action |
Description |
|
|
Search |
F6 |
575/ 1 |
Search for existing records. |
|
|
Schedule Generation |
F7 |
575/ 2 |
Schedule resource. Defaults to the ID of the selected resource |
|
|
Get |
ALT+F1 |
575/ 3 |
Get record. |
|
|
Change |
F2 |
575/ 12 |
Change selected record. |
|
|
Previous |
F4 |
575/ 13 |
Select last record. |
|
|
Next |
F5 |
575/ 14 |
Select next record. |
|
|
Generate Default Week |
ALT+F7 |
575/ 15 |
Generate default week. |
|
|
Delete Line |
SHIFT+F10 |
575/ 16 |
Delete selected record. |
|
|
Insert |
SHIFT+F11 |
575/ 17 |
Insert record. |
|
|
Generate Schedule |
SHIFT+F7 |
575/ 21 |
Generate resource schedule. |
|
|
New |
F3 |
575/ 29 |
Create new record. |
|
|
Zoom |
F10 |
575/ 999 |
Zoom in/out of sublevel. |












Modifications and Updates to Schedule Capacity
The following table lists modifications and updates to the Schedule Capacity document.
|
Mod Number |
Date |
Description |
|
n/a |
8/25/14 |
Images updated. |
F1 Help
| Delphi Forms | blagingqueueusersform |
| Program Numbers | 1730 |