
Billing Training
Billing Training
SBN OVERVIEW
Logging On to SBN
 Log on to SBN the same way you log on to most Windows applications.
To log on to SBN:
Start SBN. The Logon dialog box opens.
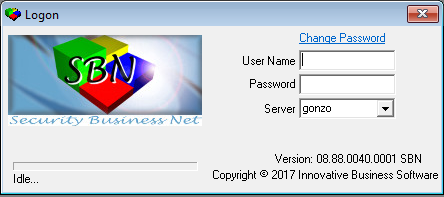
Complete the following fields:
Note: This field is not case-sensitive.
Note: This field is case-sensitive.
If the version on the machine does not match the version specified on the server, SBN asks if you want to proceed.
The SBN Main menu opens.
If the version on the machine does not match the version specified on the server, SBN asks if you want to proceed.
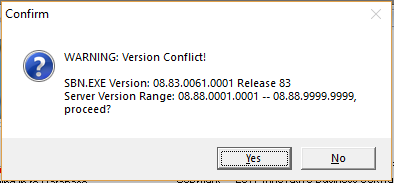
Note: Some companies may prevent user from logging in if a version conflict exists.
Using the SBN Main Menu
When you first open SBN and maximize the window, you see four main areas of the window:
 Working in the SBN Main Menu
In the main menu you can explore, view, and search the menu tree. The menu lists all programs available in SBN, based on your user access profile. You can create, and name multiple custom menus based on your user function.
You can access the main menu from anywhere in SBN by using the shortcut [CTRL+M].
Expanding/Collapsing the Menu Tree
You can expand or collapse the entire menu tree.
To expand the menu tree:
Right click on the main menu, select Menu.
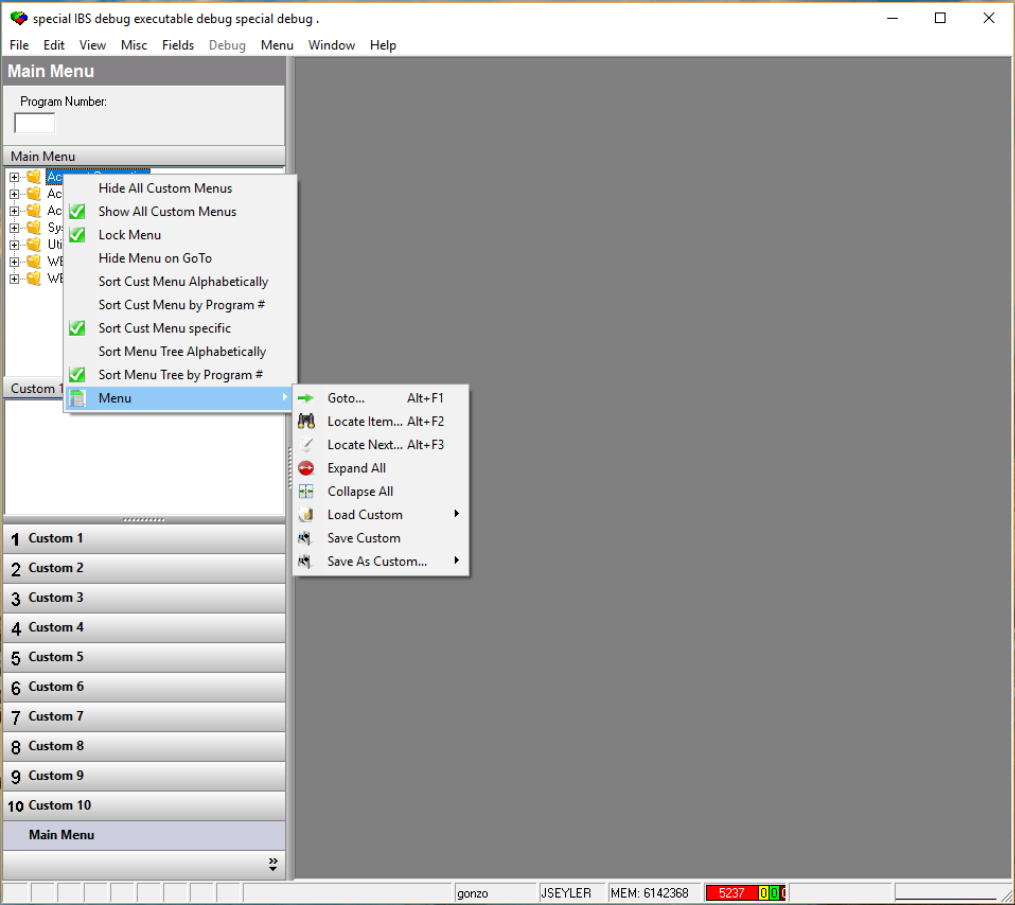
Choose Expand All.
The menu expands to display a list of all programs available in SBN.
Collapsing the menu tree
From the main menu, select Menu.
Choose Collapse All.
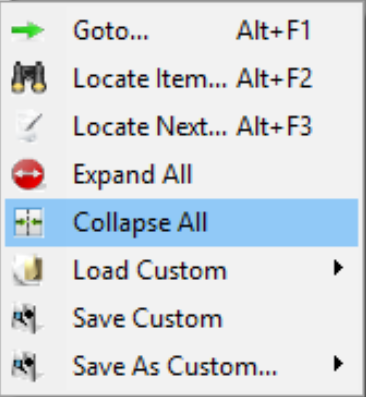
The menu collapses to its original state.
Searching for Programs
You can access an SBN program by:
To search for a program by name:
From the main menu, select Menu.
Choose Locate Item [ALT+F2].
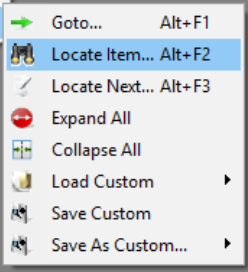
The Locate Item dialog box opens.
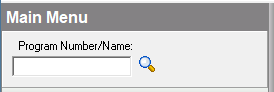
Type part or all of the program name or number.
Note: Try to type only the first letters/digits that you are certain about as the search feature looks for an exact match.
SBN locates the first program name that matches your search.
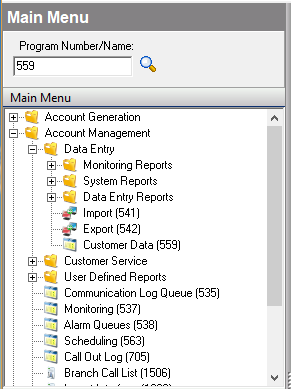
If the program is not the one you need, choose Locate Next [ALT+F3].
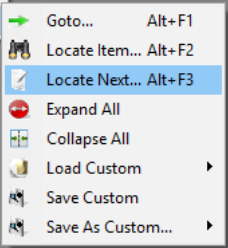
SBN locates the next program name that matches your search.
Using a Shortcut to a Program
Once you become familiar with program numbers, you can use the SBN shortcut Go To, which takes you directly to that program when you type the number.
To use the shortcut:
If you have several windows open, be sure to access the main menu first as you cannot use this feature from any other window.
In the main menu, select Menu.
Choose Go To [ALT+F1].
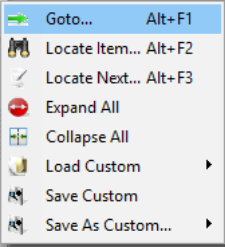
The Go To dialog box opens.
Type the three or four digit program number.
Press ENTER.
The main window of the program opens.
Creating Custom Menus
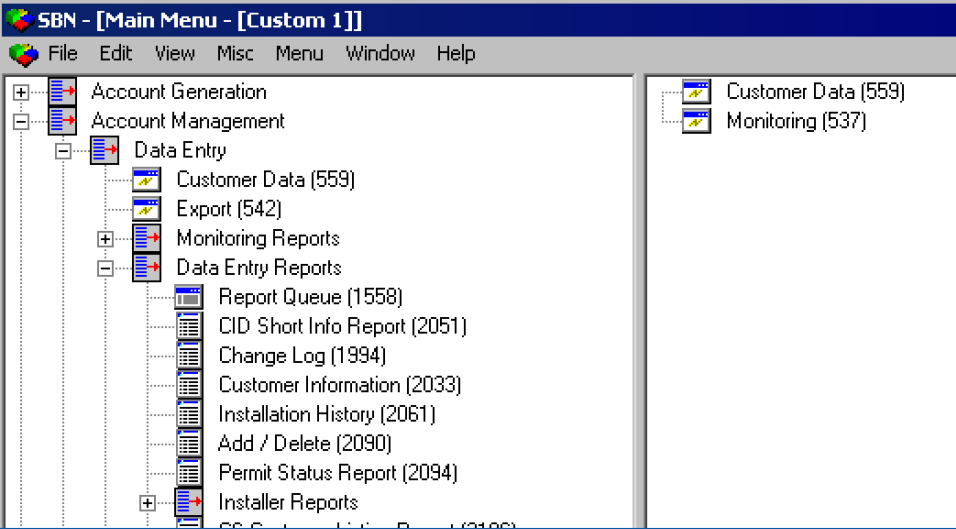
You can create up to ten custom menus by selecting the program you use most and dragging it into the right pane of the window. SBN provides ten custom menu names (numbered 1-10), but you can create your own descriptive names in SBN Options.
To create a custom menu:
In the main menu, select Menu.
Expand the menu to see available programs.
Locate the first program you want to add to the custom menu and drag it and drop to the custom menu
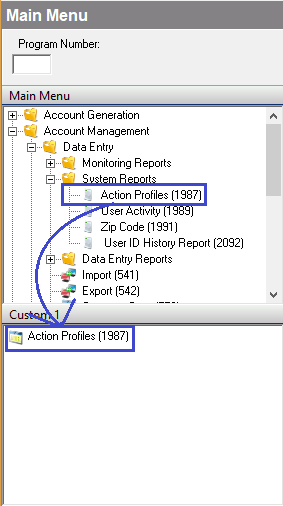
Locate each program that you want to add and drag then drop.
Note: To remove a program from a custom menu, you can drag it from the custom panel and back into the main menu.
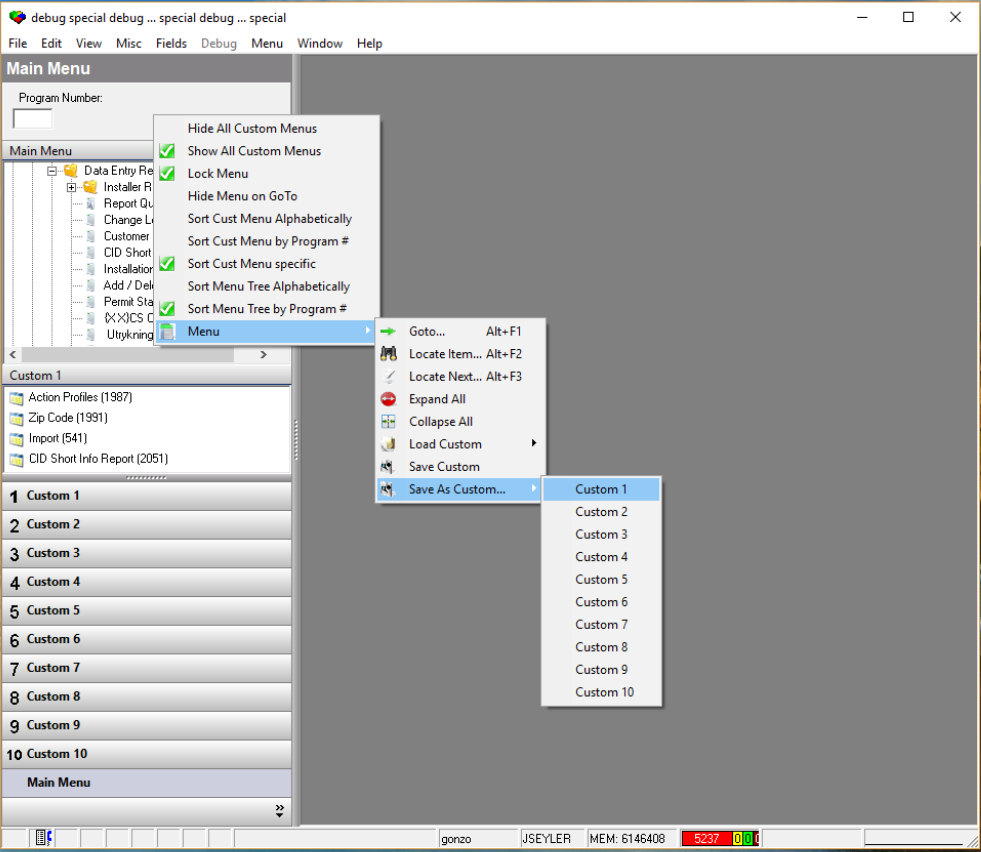
Right click on Menu > Save As Custom and choose a custom menu number (1-10) from the list.
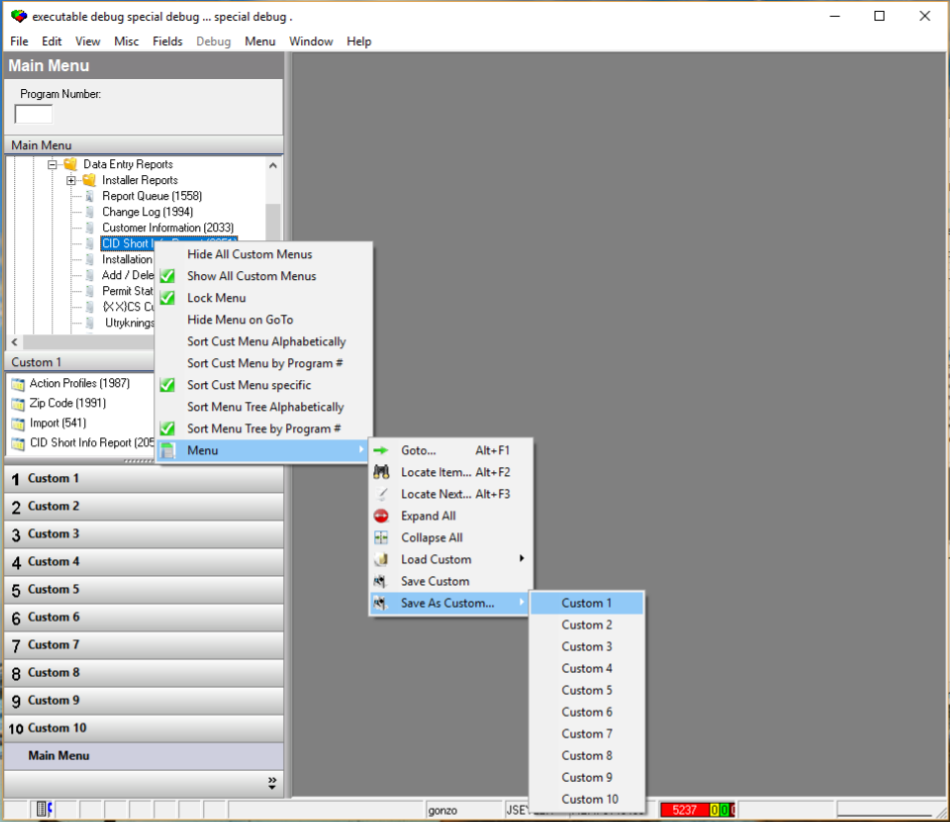
SBN adds your custom menu to the list.
Loading a Custom Menu
When you log into SBN, the main menu defaults to your first custom menu.
To load any other custom menu:
In the main menu, Right click >Load Custom.
Select the custom menu you want to open.
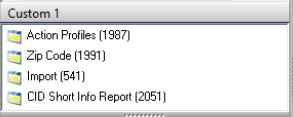
The title bar displays the name of the menu.
Naming Custom Menus
To name your custom menus:
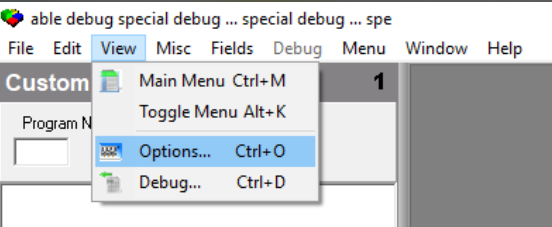
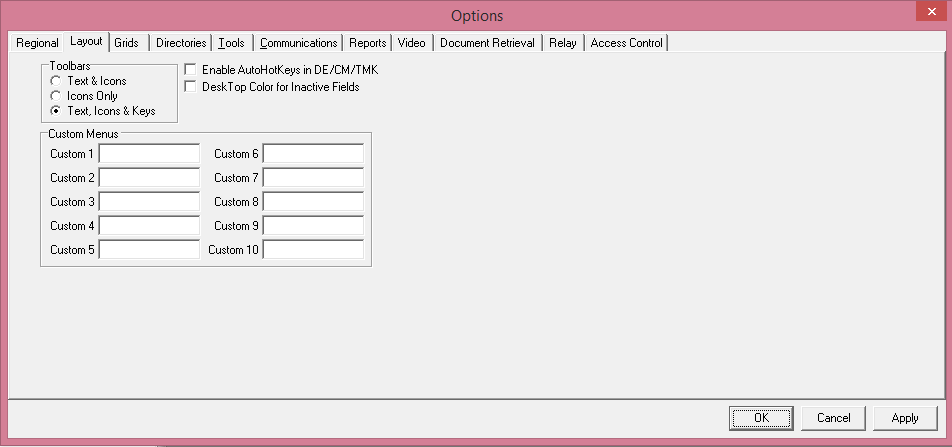
In the main menu, choose View > Options [CTRL+O]. The Options window opens.
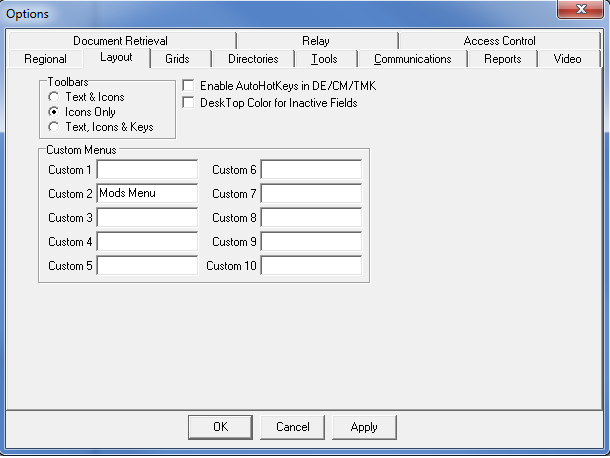
Select the Layout tab.
The Options program displays the Layout tab.
In the Custom Menus fields type descriptive names for your custom menus.
Choose Apply. SBN saves the names of your custom menus.
Configuring SBN Options
SBN contains several options tabs so that you can customize the way SBN displays information.
To access the Options tabs from anywhere in SBN, choose View > Options [CTRL+O].
The Options Window
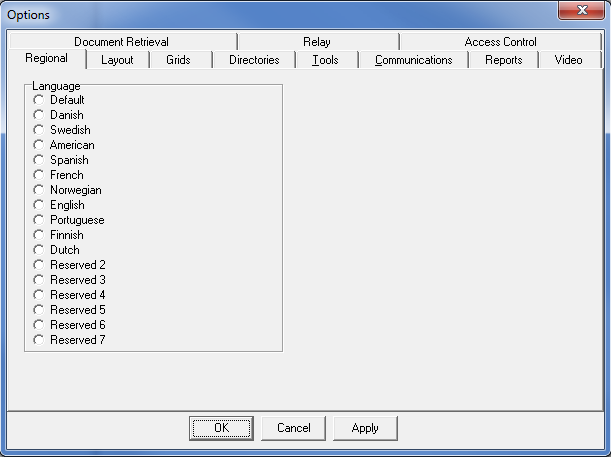
The following graphic shows the options window. The window defaults to the Regional tab.
Configuring Regional Options
Use the Regional tab to specify the language in which SBN text appears. If text appears in a language you do not use, set your regional options to Default.
To configure your regional options:
In the Regional tab, click the radio button to the left of one of the following:
Choose Apply.
SBN saves your regional options.
Configuring Layout Options
Use the Layout tab to specify the appearance of toolbars in SBN.
To configure your layout options:
From the Options window, select the Layout tab. The Options window displays the Layout tab.
Select a toolbar option.



Select or clear the Enable AutoHotKeys in DE/CM/TMK (Data Entry, Contract Master, and Marketing) option.
Note: To avoid conflicting hotkey assignments, SBN uses a method that reassigns hotkeys as Innovative adds or removes features, so they may change occasionally. The current hotkey is always the underlined character in the menu item or label. For example, the menu item File has F for the hotkey. Use the hotkeys, by pressing ALT+ the hotkey, or in this example ALT+F.
Select or clear the Desktop Color for Inactive Fields. This changes the background color of inactive fields when you view windows in SBN.
Note: When you select Desktop Color for Inactive Fields, all inactive fields in SBN change to the Windows desktop color. You can configure the desktop color according to user preference.
Note: If your desktop color is white and you select Desktop Color for Inactive Fields, your inactive fields will appear the same in both View mode and in Change mode.
Choose Apply.
SBN saves your Layout options.
Note: If you are in an SBN program when you change your options, you will need to close the program and reopen it to see your changes applied.
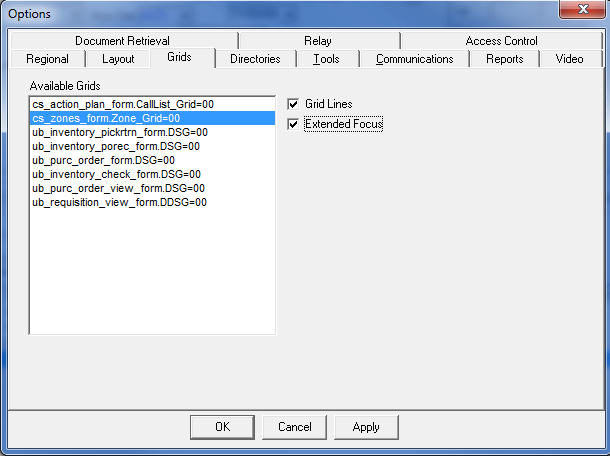
Configuring Grids Options
Use the Grids tab to specify how SBN will display grids in different windows.
To configure your grids options
From the Options window, choose the Grids tab. The Options window displays the Grids tab.
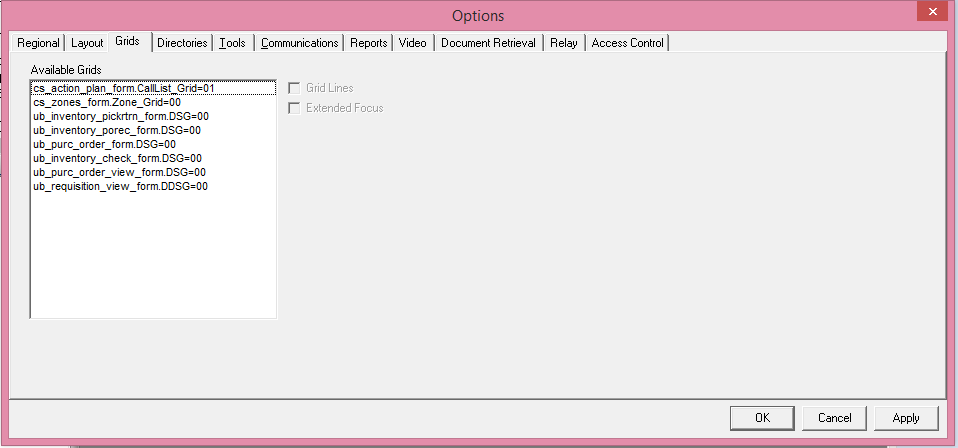
To enable grid lines, select the form name and enter a check mark in the Grid Lines box.
Choose Apply.
Note: When you view the selected grid, grid lines will appear. See the example below.
To enable extended focus (enables SBN to highlight the row and column in a grid), select the form name and enter a check mark in the Extended Focus box.
Choose Apply.
Note: When you view the selected grid in change mode, SBN will highlight the row and column and will focus on the selected cell. See the example below.
Repeat steps 2-5 for each form, as needed.
Searching for Accounts
You may access the Search window in SBN from the following programs:
In each of these programs, you can choose Search [ALT+F1] to access the Search window.
Important: You cannot be in New or Change mode when you perform a search.
You can perform three kinds of searches:
Performing a Basic Search
You can access the Basic tab in the Search window from the following programs:
The following graphic shows the Basic tab.

When you search for a record using the Basic tab, you can fill only one search parameter. You cannot use wildcard characters except in the CID field. You can type a partial CID with the % wildcard and the search will display a list of results.
If SBN locates a single record, SBN automatically displays it in the program from which you began the search. If SBN finds multiple records that match your search parameters, a dialog box opens from which you can choose the correct record. You can right-click in the list and choose Print to print the entire list of results.
To perform a basic search
In a program that offers the search feature, choose Search [ALT+F1]. The search window opens and displays the Basic tab.
Complete one search parameter. You may choose to the right of many of the parameters to browse for the relevant information.
Note: While passcards are unique, some codewords (account or contact) may be the same. If option ba121 is on, the search includes these codewords.
Note: If you access the Search window from Insert Test or Open/Close Status, and type a passcard and extension, the passcard and extension will default into Insert Test or Open/ Close Status.
Press [ENTER].
One of the following occurs:
To print the search results in the dialog box, right-click in the list of results and choose Print.
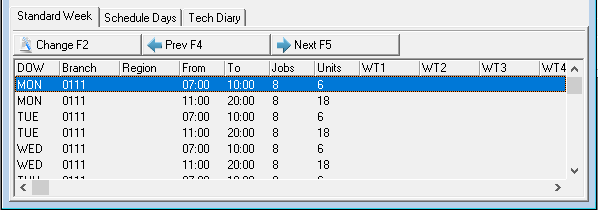
To perform another search, choose clear.
Repeat steps 2-4.
Performing an Advanced Search
You can access the “Advanced” tab in the Search window from the same programs as the Basic search.
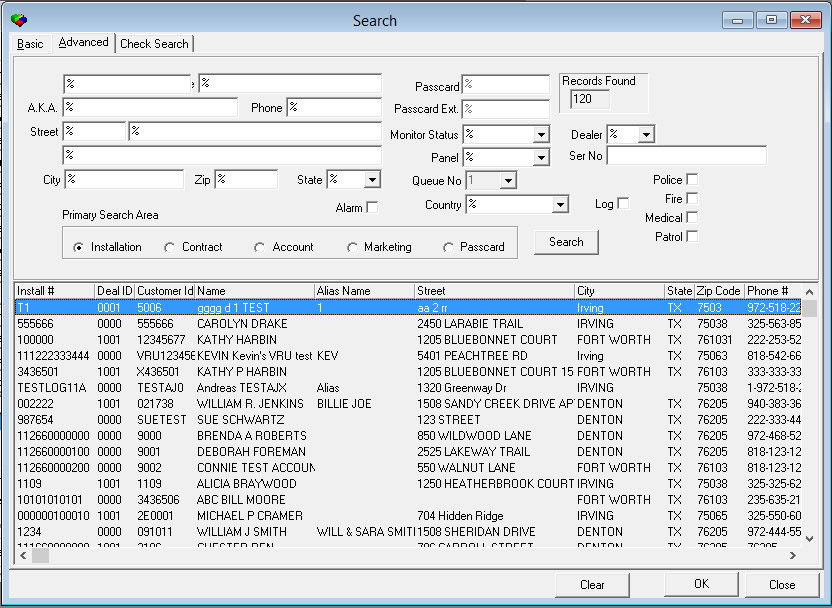
The following graphic shows the “Advanced” tab.
In an advanced search you can use partial information with wildcards. The search parameters in the “Advanced” tab are case sensitive, so you must type data exactly as the database stores it.
You can type as much or as little information in the search parameters, as needed. The more information you enter, the more you limit the search. The less information you enter, the longer the search may take, and the results may be extensive. If you leave all fields blank, SBN searches all records. Innovative recommends that you limit your search as much as possible.
The “Advanced” tab displays search results differently depending on the area you select in the Primary Search Area radio buttons:
The search results also display the monitoring status for each account that matches your search parameters.
Note: The radio button defaults to the area from which you accessed the Search window, but you may override the default.
Using Wildcard Characters
You may use wildcard characters in every search parameter in the “Advanced” tab. With wildcard characters you can type partial information to search for specific data.
The wildcard characters tell the search feature what to look for. For example, if you are familiar with searching using MS-DOS, you probably know that an asterisk (*) is a wildcard that can represent any number or type of characters. In SBN, you can use several types of wildcard characters. The following table describes the wildcard characters available in SBN.
Tips for Successful Advanced Searches
When you perform an advanced search, remember the following:
Last and First Name, Telephone, Street name/number are indexed fields, meaning SBN can search these fields more quickly. We recommend you type the known information in the first part of the field and then type the % wildcard. This speed’s up the search because SBN searches alphabetically. For example, if you are trying to find a customer named Hanson or Hansen, you might type Hans% for the search criteria in the name field.
Street address: Do not use the % wildcard for the street number. Generally, the fastest search method is to type the house number (in Street 1) followed by % (for any street name).
If you do not find an account after a first attempt, try again with less information. For example, if the known information is ANGELA SMITH and the search did not find the account, you might try ANGELA%. You could find the last name was misspelled.
To perform an advanced search
From a program that offers the search feature, choose Search [ALT+F1]. The SBN Search window opens.
Select the Advanced tab.
The Search window displays the “Advanced” tab. All fields default with the % wildcard.
Narrow the search by completing one or more fields.
Choose Search.
If one result matches your search parameters, SBN displays the account information in the program from which you accessed the Search window. SBN Overview
If more than one result matches your criteria, SBN displays a list in the pane below the search parameters. Choose the correct account from the list.
To perform another search, choose Clear.
Repeat steps 2-4.
Performing a Check Search
You can access the Check tab from the same programs as the Basic and Advanced tabs:
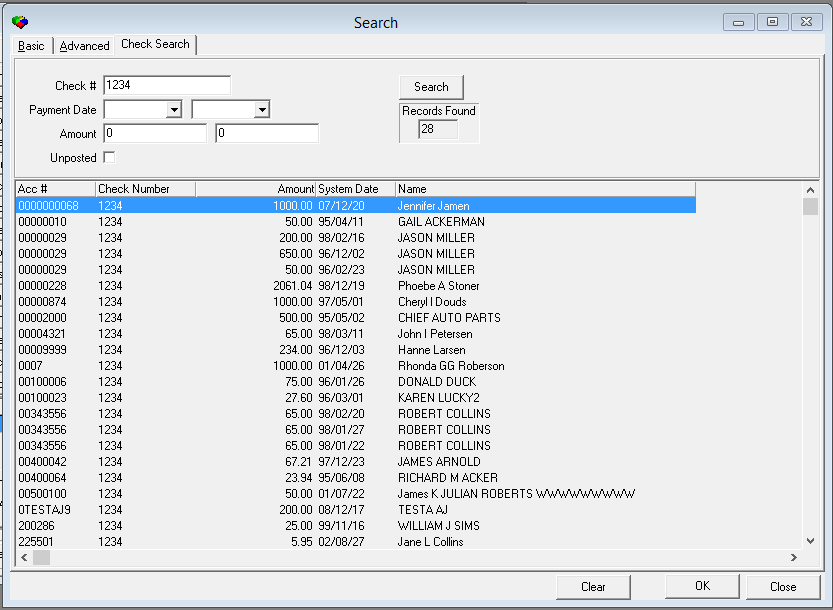
The following graphic shows the Check tab.
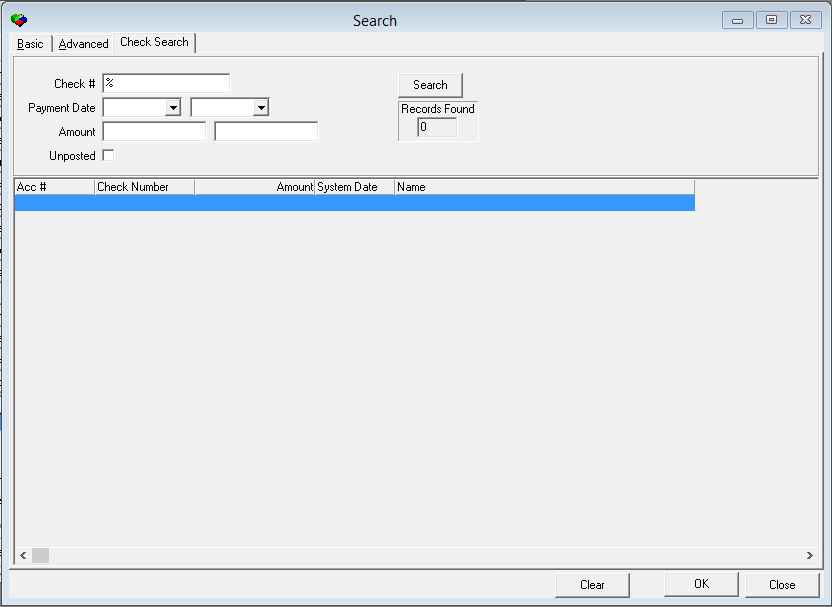
When you search for a record using the Check tab, you must enter a check mask or a range of payment dates. You can type a partial check number with the % wildcard.
To perform a check search
From a program that offers the search feature, choose Search [ALT+F1]. The SBN Search window opens.
Select the Check tab.
The Search window displays the Check tab.
Complete as many fields as needed for your search:
Note: You can use the % wildcard to search for a partial check number.
Choose Search.
SBN displays a list of results that match your search parameters.
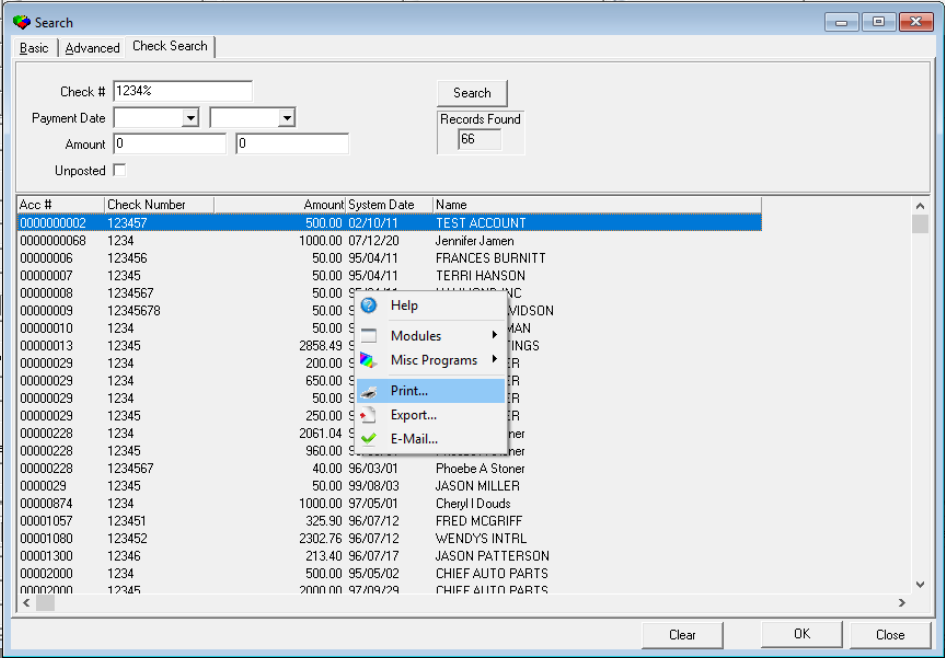
To print the search results, right-click inside the results list, and choose Print.
To clear the tab for a new search, choose Clear.
Repeat steps 3-4.
Logging off SBN
You may log off of SBN to:
To log on as another user:
From the main menu, choose File > Log off.
SBN asks if you are sure.
Choose Yes. The Logon dialog box opens.
Log in as another user.
To exit SBN completely:
From the main menu, choose File > Exit. SBN asks if you are sure.
Choose Yes. SBN closes.
CONTRACT MASTER
Module topics
This module includes the following topics:
SBN Billing Architecture
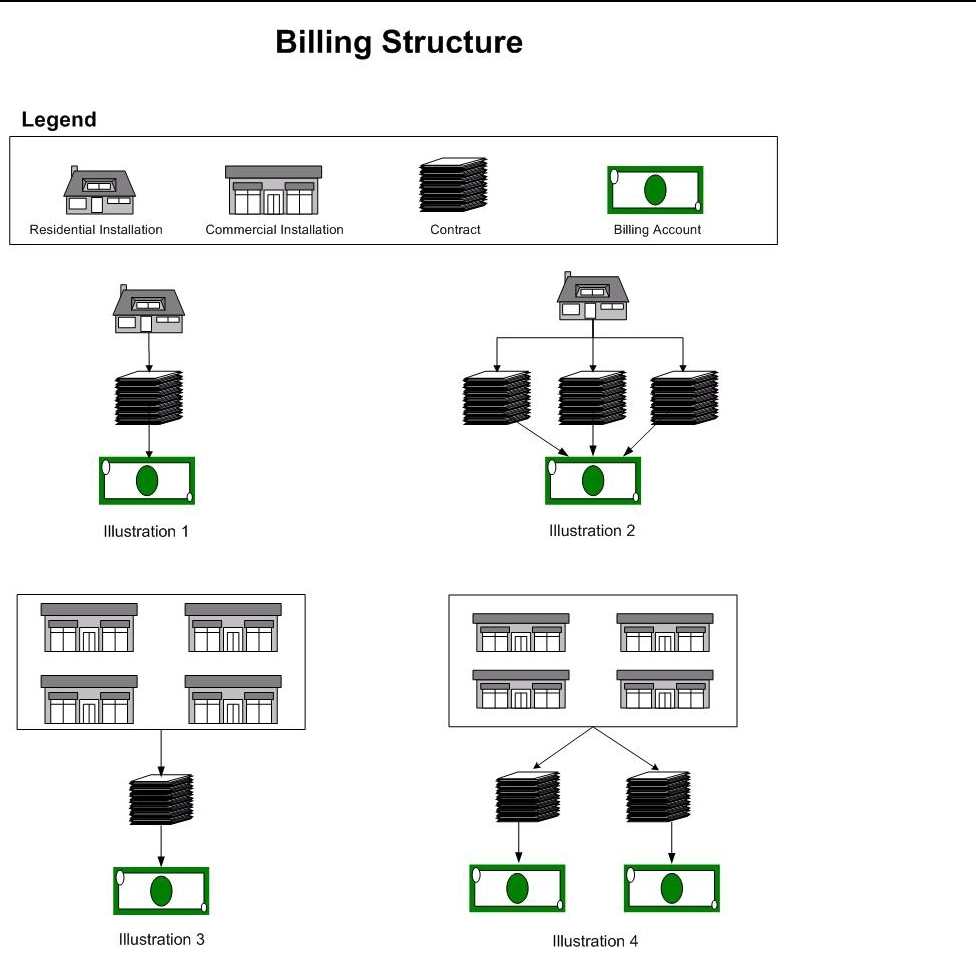
The Contract Master
The following graphic shows the Contract Master in View mode. The main window of the Contract Master contains three areas:
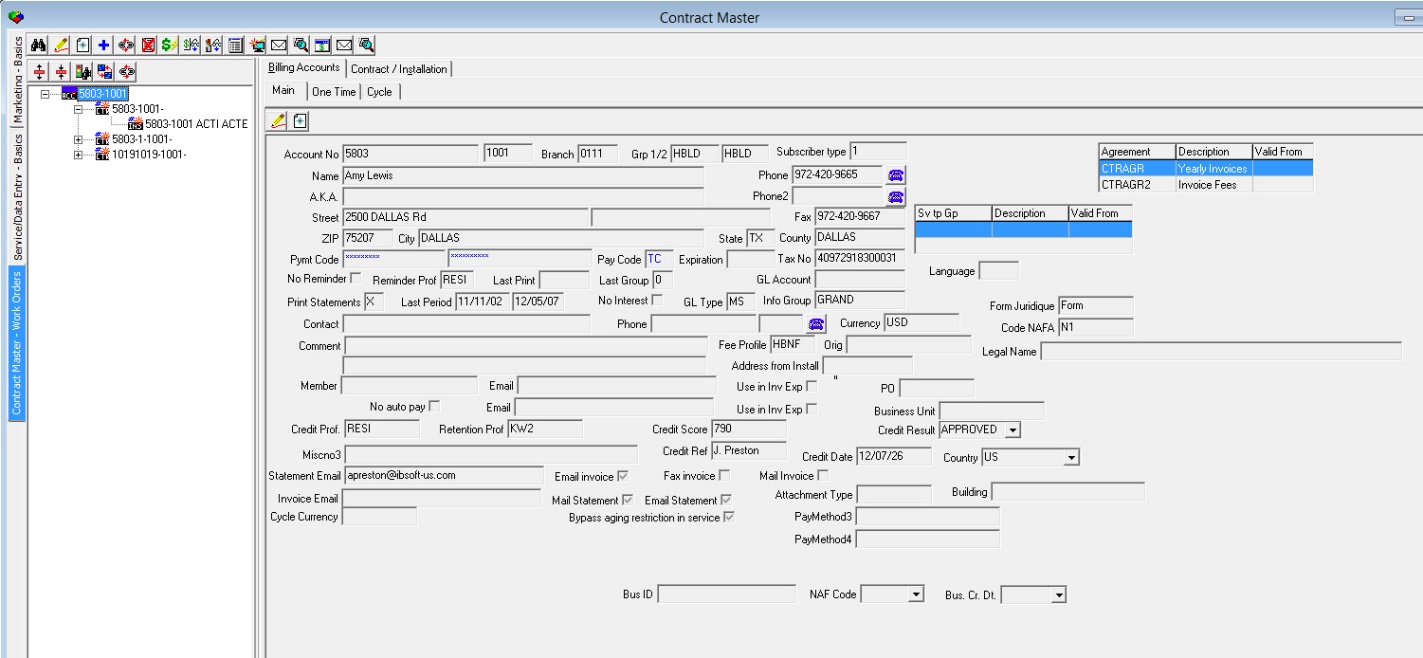
Note: PayMethod3 and PayMethod4 fields were added to the Billing Accounts tab of Contract Master. These fields were previously only visible in Change mode of the Billing Accounts tab. They are customer-defined and have no functionality in SBN.
Note: The NAF Code, Business Create Date, and Business ID fields were added to the Contract Master window at the bottom of the screen. These fields are customer-specific and have no SBN functionality.
The NAF Codes (program #1660) defines the menu of the NAF Code field.
Using the Tree View
The tree view in Contract Master allows you to view contracts, installations, and billing accounts in an expandable list. Also, the tree provides the ability to tie icons to specific dealers, branches, subscriber types or groups.
Customizing the Order of Program Tabs in Contract Master
You can customize the order of the program tabs that appear below the Contract Master window. There are three ways to customize the order of these tabs:
SBN determines the order of the tabs in Contract Master primarily based on the entry in the Prg 548 Tabs field for your user action profile in program #1502. If this field is blank, SBN uses the value of option cmtab to determine the order of the tabs. If the option value is blank as well, SBN orders the tabs in their default sequence.
The Billing Information Pane
The billing Information pane includes three different tabs that show specific information about the billing account.
Choose Change [F2] within the Billing Information pane to change information. The following graphic shows the Billing Information pane.
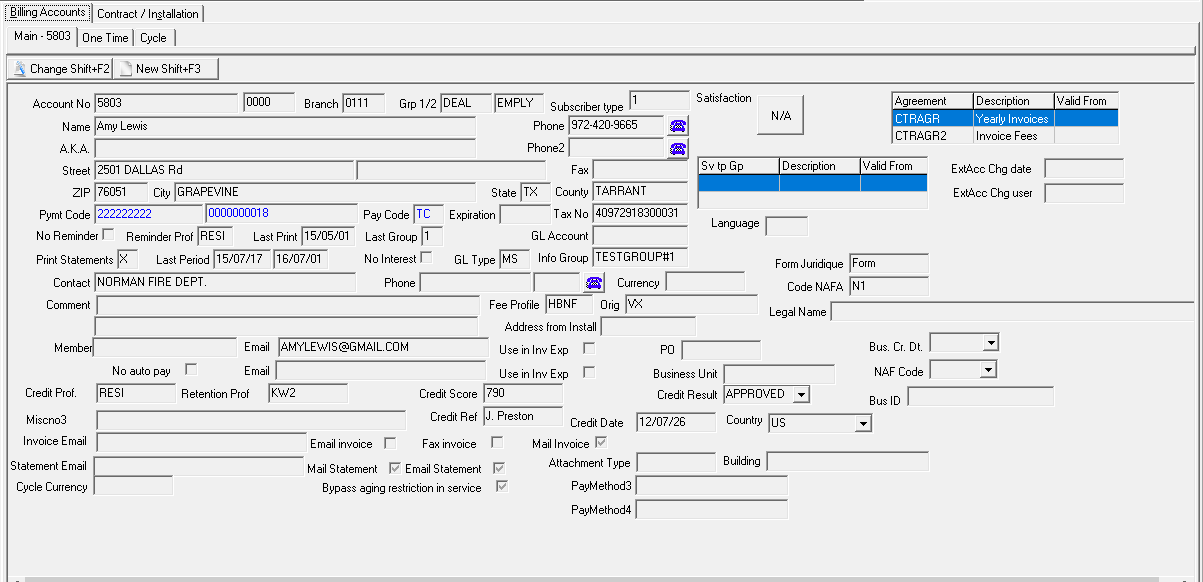
Note: For descriptions of the fields in this pane, see the document Contract Master.
The Main Tab
Use the Main tab to view general billing information for this account. Enter information when you add a new contract or when you change contract information.
The One Time Tab
Use the One Time tab to view records for customers who want you to bill all one-time fees to a separate billing address. Enter information when you change contract information or when you add a new contract. When you choose the One Time tab, the Contract Information section changes to list any contracts attached to the One Time account, if it is different from the Main account.
The Cycle Tab
Use the Cycle tab to view records for customers who want you to bill all cycle fees to a separate billing address. Enter information when you change contract information or when you add a new contract. When you choose the Cycle tab, the Contract Information section changes to list any contracts attached to the Cycle account, if it is different from the Main account.
The Contract/Installation Information Pane
The following graphic displays the Contract Information panes of the main window of the Contract Master. The columns in the left pane display all contracts — in summary form — attached to the main contract. The fields in the right pane display details about the contract selected from the columns. Choose Change [F2] from the upper menu bar of the main window to change information.
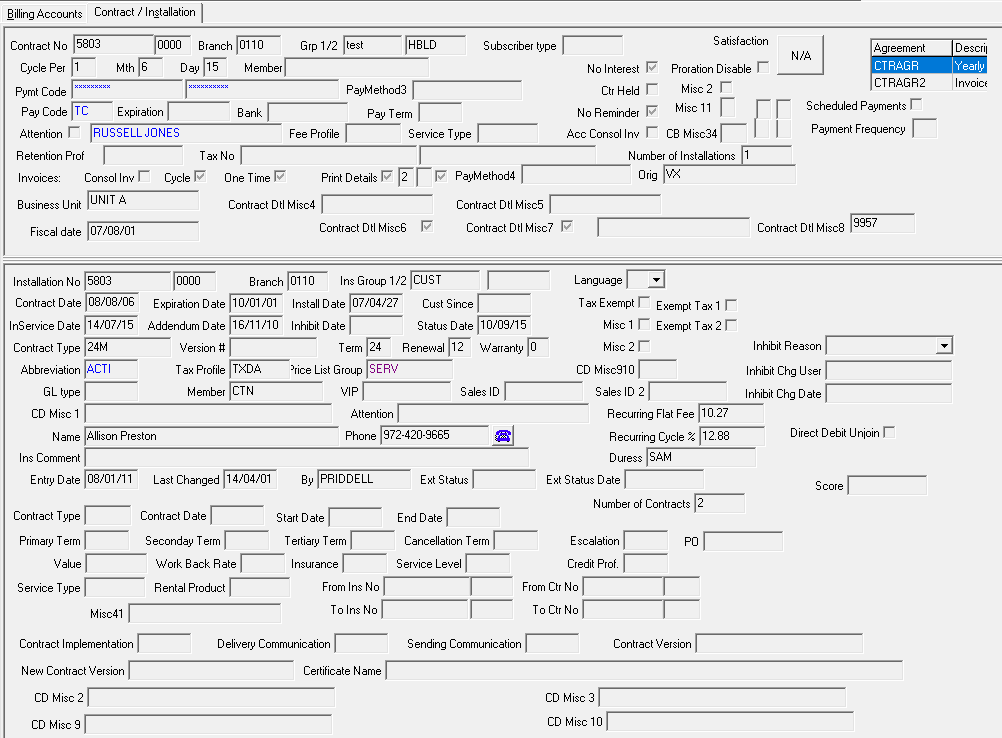
Viewing Account/Contract Information
By using the buttons available, you can change the view of the Contract Information panes in the main window of the Contract Master.
Viewing Contracts by Account
You can view each contract on account, in order, by account number.
To view contracts by account:
Choose By Acc [F8].
The tree view changes to the Contracts by Account view.
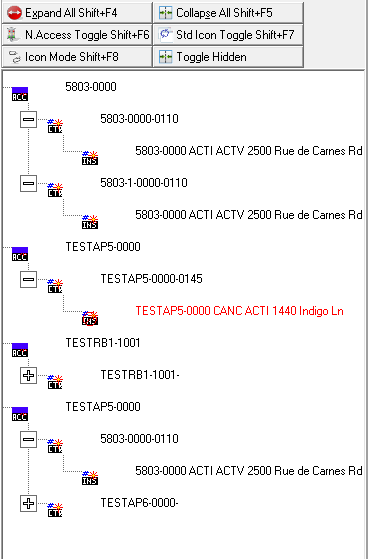
To change the view back to Contracts by Installation, choose By Inst [F9].
Viewing Contracts by Installation
You can switch the view of the right pane of Contract Information to see all contracts on an installation, in order, by installation number.
To view contracts by installation:
Choose By Inst [F9].
The tree view changes to the Contracts by Installation view.
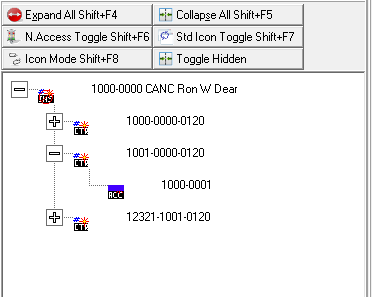
To change the view back to Contracts by Account, choose By Acc [F8].
Changing Contracts
Use the Contract Change dialog box to change general contract information about the selected account. After you save the changed information, SBN returns the focus to the main window of Contract Master.
To change contract information:
In program #548, choose Change [F2]. The Contract Change dialog box opens.
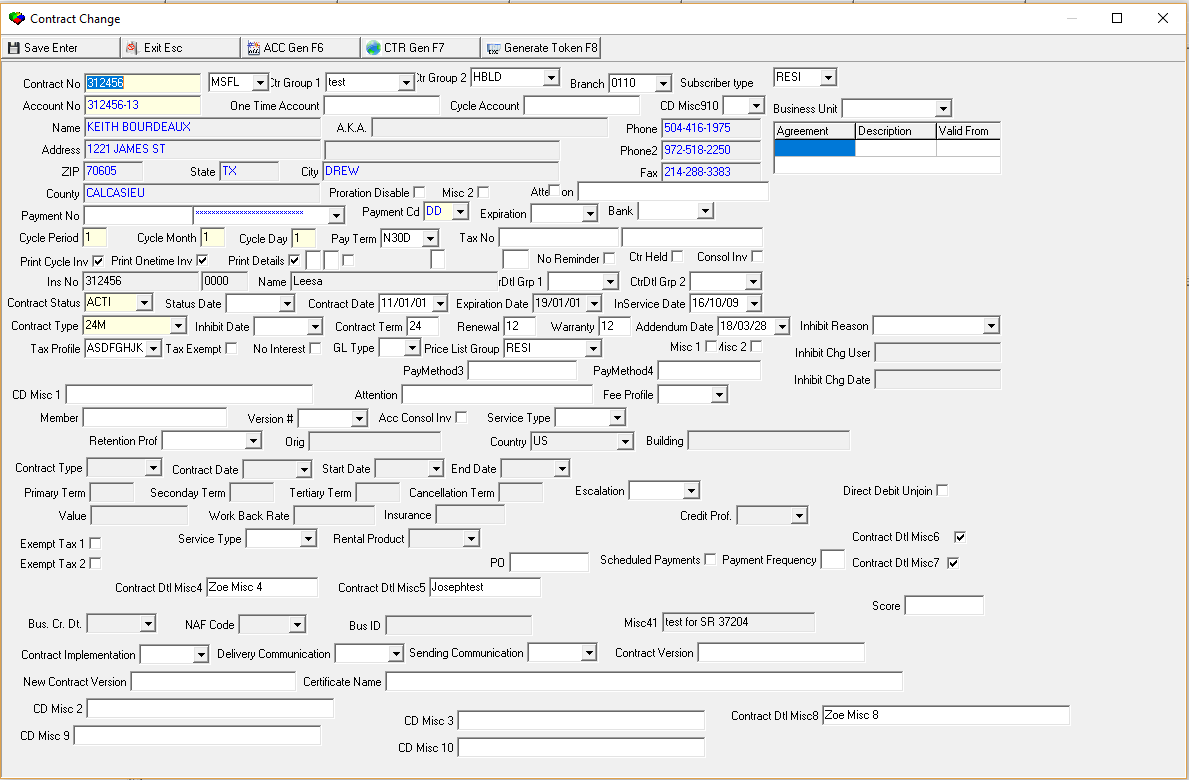
Note: Text that appears in blue defaults from the Billing Information pane. You cannot edit that information in this dialog box.
Change the details, as needed.
Choose Save [ENTER].
Changing Billing Information
Use the Billing Account Change dialog box to change information in the Billing Information pane. After you save your changes, SBN returns the focus to the main window of the Contract Master.
To change billing information:
In Contract Master (program #548), choose Change [SHIFT+F2].
The Billing Account Change dialog box opens.

Change information, as needed.
Choose Save [ENTER].
Changing Account Addresses
From the main window of Contract Master, you can view details about and change mailing addresses for the selected installation and billing account in two ways:
To change a mailing address from the Billing Information pane:
With the account open that you want to change, in the Main tab, choose Change [SHIFT+F2].
The Billing Account Change dialog box opens.
Change the mailing address, as needed.
Choose Save [ENTER].
To change a mailing address from the Mailing Address dialog box:
With the account open that you want to change, from the upper toolbar choose Installation Mail [F12] or Billing Mail [SHIFT+F10].
The Mailing Address dialog box opens.
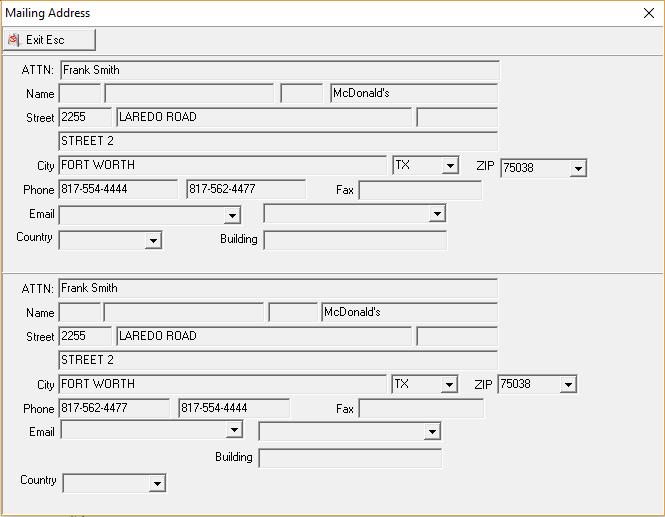
Choose Change [F2]. Fields open for changes.
Change the mailing address information, as needed.
Choose Save [ENTER].
Linking Billing Accounts
To access this program from the main menu of SBN, select Contract Master (program #548) and then select the Linked Billing Account tab.
Use Linked Billing Accounts to add or change information on accounts that are linked to the selected contract. You can attach billing accounts that are linked to the selected contract to a work order. The following graphic shows the Linked Billing Accounts tab in View mode.
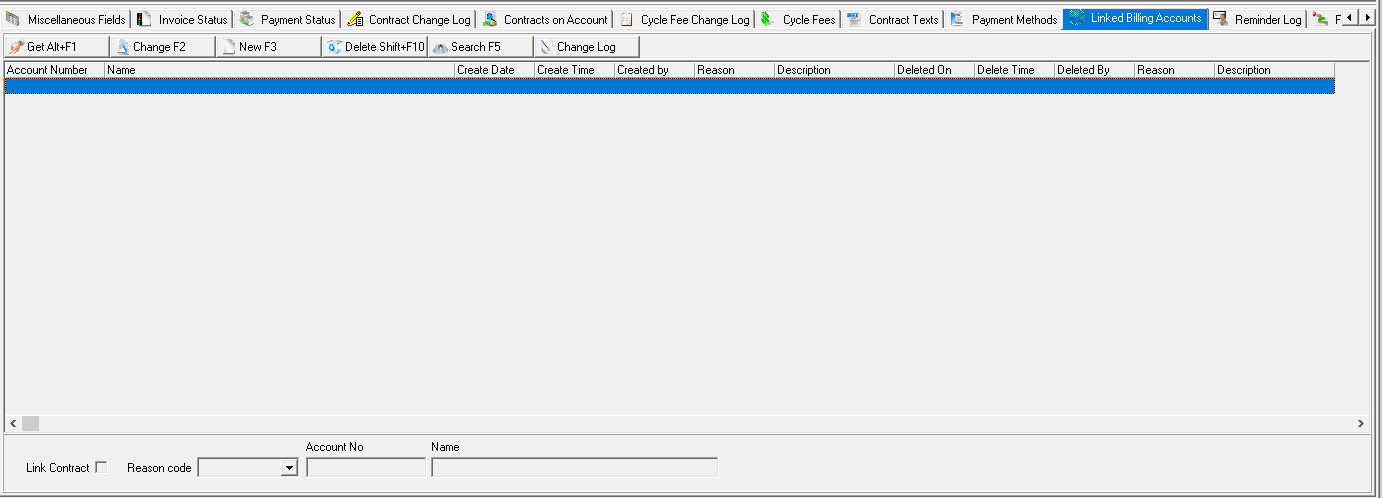
The columns display all billing accounts linked to the selected contract. Use the fields in the lower pane to add and edit linked billing account numbers. For descriptions of the columns and fields in this tab, see the document Linked Billing Accounts.
Adding a Linked Billing Account
To add a link to a billing account:
In the Linked Billing Accounts dialog box, choose New Record [F3].
If the account contains Direct Debit information, SBN displays a warning message.
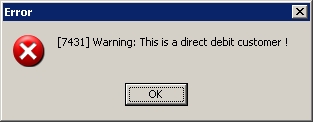
The Account Number field in the lower pane opens.
Type the number of the account you want to link to the selected account.
Choose Save [ENTER]. SBN displays the linked billing account in the columns.
To change a link to a billing account:
In the Linked Billing Accounts dialog box, double-click your selection or choose Get Record [ALT+F1].
Choose Change Record [F2].
Choose Save [ENTER]. SBN displays the changes to the linked billing account in the columns.
Canceling a Contract
Use the Cancel Contract window to cancel a contract. From the Cancel Contract window, you can enter information about why you are cancelling the selected contract. You can reopen a contract that has previously been cancelled by choosing Reset Contract [F4] from the toolbar.
SBN records all changes made in the Cancel Contract window in the Contract Change Log. However, SBN considers any information that did not previously appear on the contract for this installation as new information and does not record the new information in the Contract Change Log. SBN records all changes after the first one on each installation in the log.
When you select a contract status that contains an X in the “Cancel” column of the menu, SBN:
The Cancel Contract Window
Use the Cancel Contract window to enter specific information about when and why to cancel the contract. From this window, you can access the New Install or New Customer windows to enter marketing information about the new customer at this address or about the new address of the customer.
For descriptions of the fields in this window, see the document Contract Master. The following graphic shows the Cancel Contract window with information displayed.
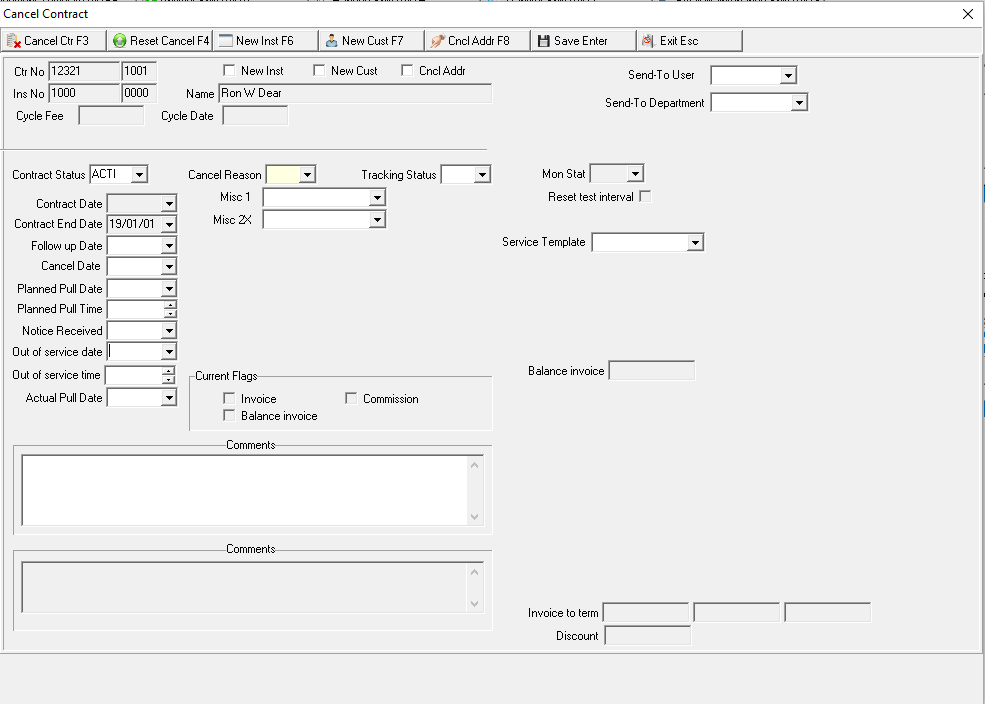
To cancel a contract:
From the main window of Contract Master (program #548), choose Cancel Ctr [F6]. The Cancel Contract window opens.
Complete the following fields:
Note: If your action profile includes action 548/158 you must enter a Cancel Date and an account balance of zero before you can cancel an account. If your action profile does not include this action and you attempt to change the contract status from active, SBN displays a warning message.
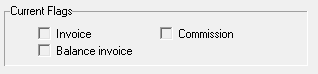
Choose Cancel Ctr [F3]. The Cancel Flags appears in the dialog box.
Choose an additional button to complete your task. or...
Choose Save [ENTER].
If you leave both Invoice to Term and Balance Invoice blank, SBN asks if you are sure.
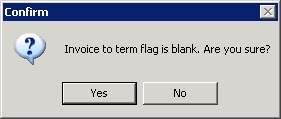
If you are sure, choose Yes. If not, type an X in either Invoice to Term or Balance Invoice. Repeat this process for all contracts you wish to terminate for the selected installation.
Note: If you enter a future date in the Out of Service Date field, when you choose Save SBN enters the monitoring status you select into the New Mon Stat field of Data Entry (program #559) for the installation, and the Out of Service Date into the New Mon Stat Date field of Data Entry. If you select the Reset Test Interval check box and enter a future date in the Out of Service Date field, SBN enters 000:00:00:00 into the New Test Interval column of the CID grid in Data Entry for the installation.
Note: SBN allows users to create service requests in the Service Log tab of Data Entry (program #559) on contracts that are scheduled to be canceled in the future.
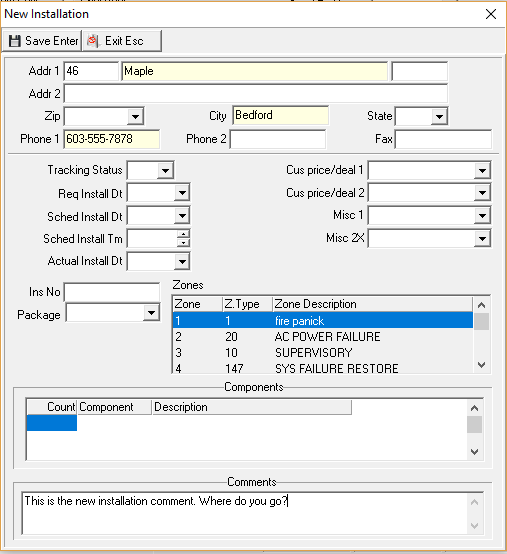
The New Installation Dialog Box
Choose New Installation [F6] in the toolbar of the Cancel Customer window to enter information relating to the new installation for the current customer on the cancelled contract.
The following graphic shows the New Installation dialog box.
The New Customer Dialog Box
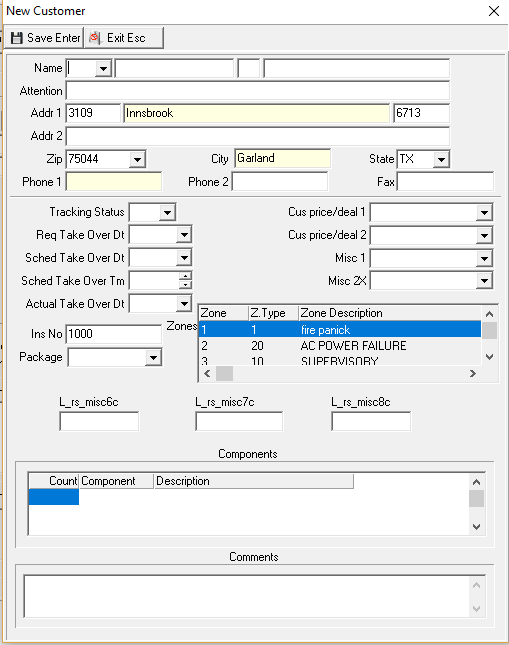
Choose New Customer [F7] in the toolbar of the Cancel Customer window to enter information relating to a new customer at the address on the cancelled contract. The following information defaults from the cancelled contract into this dialog box:
The following graphic shows the New Customer dialog box.
The Cancel Address Dialog Box
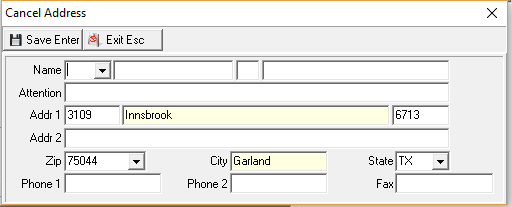
Choose Cancel Address [F8] in the toolbar of the Cancel Contract window to enter a new address for a cancelled customer who will receive future correspondence (final bill, etc.). The address and selected installation information of the current contract default into this window.
Viewing the Cancel Contract Queue
To access this program, select Cancel Contract Queue (program #1869) from the main menu of SBN.
Use Cancel Contract Queue to search for and view all contracts currently being cancelled or recently cancelled.
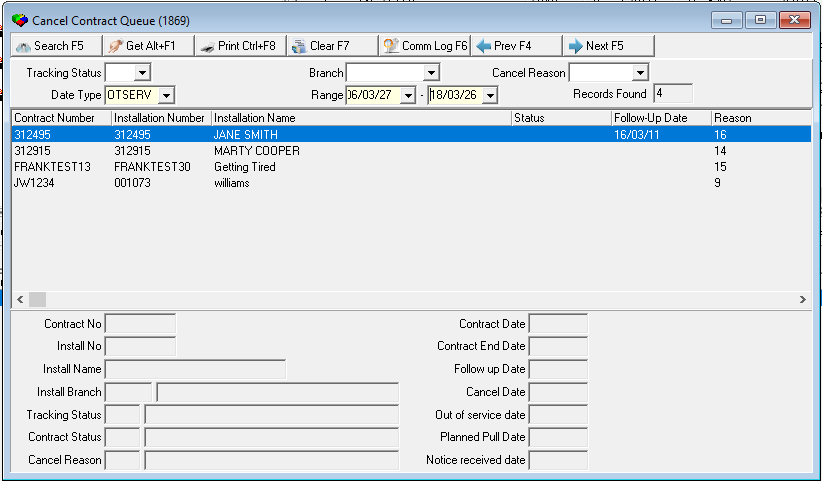
Note: For descriptions of the fields in this window, see the document Cancel Contract Queue.
Searching for Cancelled Contracts
The Contract Cancel Queue will only display cancelled contracts after you perform a search.
To search for cancelled contracts:
In Contract Cancel Queue (program #1869), select your search criteria.
Choose Search [F5].
SBN displays the search results in the middle pane of the window.
To perform another search, choose Clear Screen to clear the search fields.
Repeat Steps 1-2.
Viewing Details of a Cancelled Contract
You can view details of a contract previously cancelled.
To view details of a cancelled contract:
In Contract Cancel Queue (program #1869), perform a search for cancelled contracts.
From the search results, select the cancelled contract for which you want to view details.
Double-click on the selection or choose Get Record [ALT+F1].
The fields in the lower pane of the window fill with the details of the selected canceled contract.
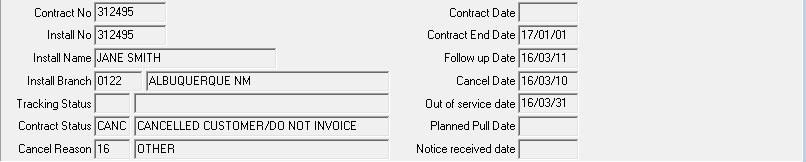
Displaying the Communication Log
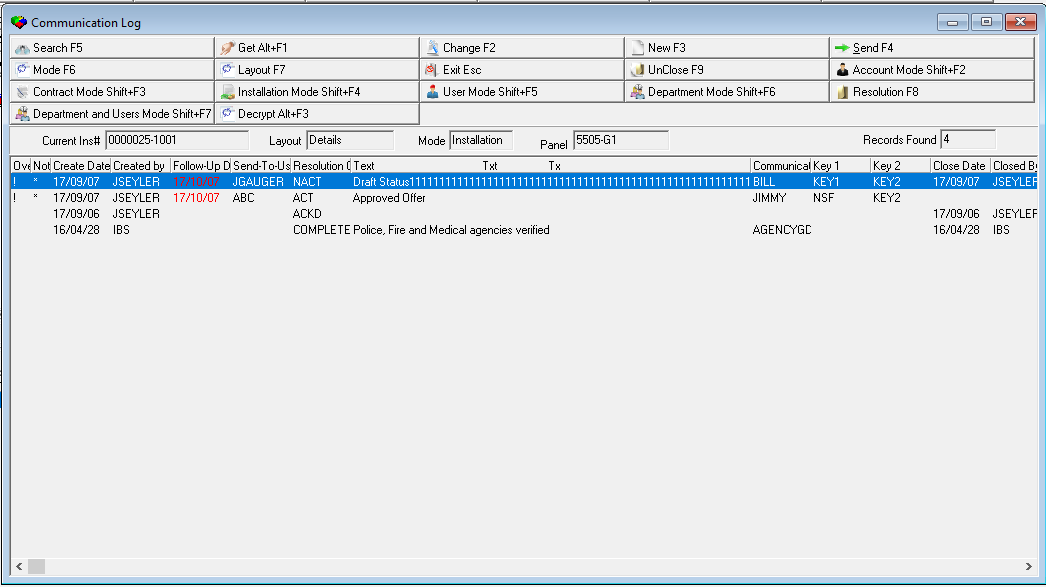
You can easily view all communications for a contract by displaying the Communication Log from the Contract Cancel Queue.
To view the Communication Log:
In Contract Cancel Queue (program #1869), perform a search for cancelled contracts.
Select the cancelled contract for which you want to view details.
Choose Communication Log [F6].
SBN displays the Communication Log for the selected contract. For descriptions of the fields in this program, see the document Communication Log.
Customer Billing Information
Module
This module includes the following topics:
Invoice History
To view invoice history, select the Invoice Status tab in Contract Master (program #548).
The Invoice Status Tab
Use Invoice Status to view all past and current invoices on one account or contract. This tab displays information about the current status, balance, and reminder status of invoices. SBN can display up to 1,000 invoices for one account.
The following graphic shows the Invoice Status tab of a selected account. The fields in the left pane display account information. The columns in the right pane display the history of invoices on this account.
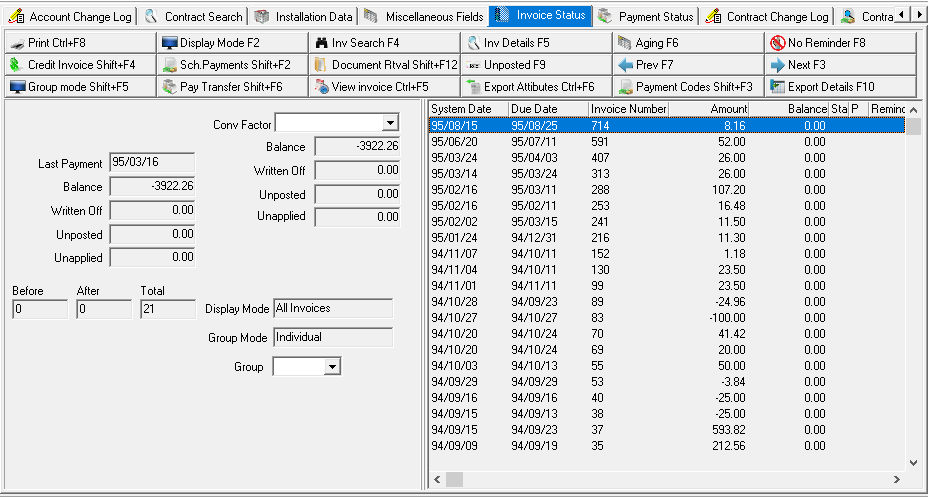
For descriptions of the columns and fields in this tab, see the document Invoice Status.
Changing the View
From the Invoice Status tab, you can change the view of the invoices by choosing Display Mode [F2].
To change the view of the Invoice Status tab:
Choose Display Mode [F2]. SBN changes the display mode of the tab.
Repeat the procedure to view a third mode or to return to the default view.
Searching for an Invoice
From the main window of the Invoice Status tab, you can search for a specific invoice number for any customer account or contract.
To search for an invoice:
Choose Invoice Search [F4]. The invoice search dialog box opens.
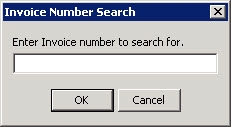
Type the full number of the invoice for which you want to search.
Choose OK.
SBN displays the invoice details in the right pane of the tab.
Note: If you type an invalid invoice number, SBN displays the closest invoice for this account.
The Invoice Details Window
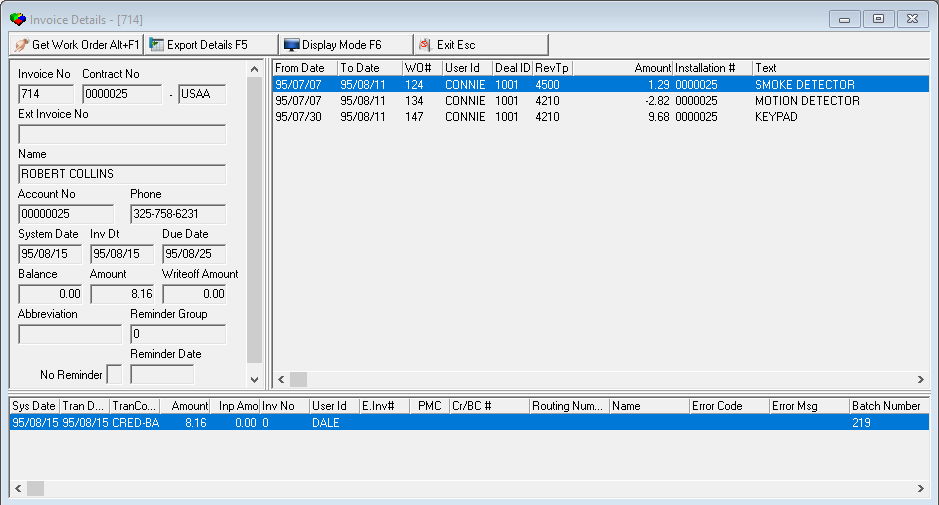
From the main window of the Invoice Status tab, you can view more details about any invoice, including invoices on accounts with no active contracts. You can view information about past actions taken on each invoice.
To access the Invoice Details window from the main Invoice Status tab, choose Invoice Details [F5].
The following graphic shows the Invoice Details window of a selected invoice. The fields in the left pane display details of the selected invoice. The columns in the right pane display revenue and work order information for this account. The columns in the lower pane display payments applied to this account.
Getting Work Order Information
From the Invoice Details window, you can view additional information about any work order on this account.
To view a work order:
From the Invoice Details window, select the work order for which you want more information.
Choose Get Work Order [ALT+F1]. The Work Orders window appears.
Choose Exit [ESC] to return to the Invoice Details window.
Viewing Export Details
From the Invoice Details window, you can view details about exports for this account. This is a read-only pop-up window.
To view export details:
Choose Export Details [F5]. The Export Details pop-up window appears.
Choose or press [ESC] to return to the Invoice Details window.
Viewing Aging
From the main window of the Invoice Status tab, you can view the Aging window, which displays the current status of invoices and payments on this account or contract. The Aging window displays payments owed by this customer in two different formats:
To view Aging:
Choose Aging [F6]. The Aging window appears.
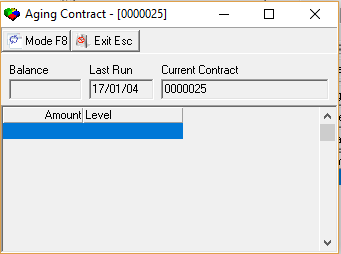
Note: Use Toggle [F8] to view aging information by Contract or by Account.
For descriptions of the columns and fields in this window, see the document Invoice Status.
Working with Invoice Details
You can perform many functions from within the Invoice Details window:
You can switch between line item view and revenue view by choosing Display Mode [F6].
Choose Exit [ESC].
Scheduling Payments for an Invoice
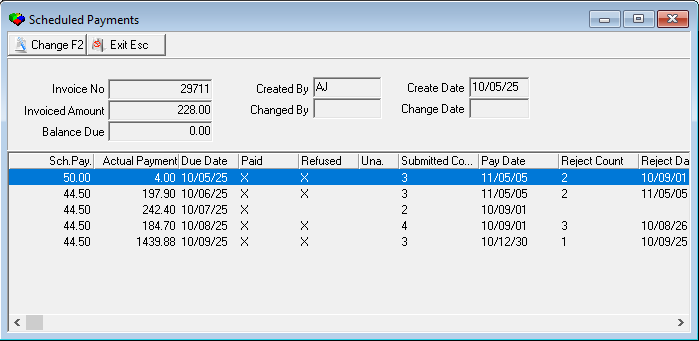
In Invoice Status, you can view, change, or add payments that have been promised by a customer for any invoice.
To access Invoice Status, select Contract Master (program #548) from the menu of SBN and then select the Invoice Status tab.
Viewing Scheduled Payments
To view scheduled payments on an invoice:
In Contract Master, open the account, contract, or installation for which you want to view scheduled payments.
Select the Invoice Status tab.
Select the invoice for which you want to view scheduled payments.
Choose Scheduled Payments [SH+F2]. The Scheduled payments dialog box appears.
Choose Exit [ESC].
Changing Scheduled Payments
Use Schedule Payments to change or add scheduled payments to an existing invoice on this account.
To change a schedule payment:
From the main window of the Invoice Status tab, select the invoice for which you want to add or change the payment schedule.
Choose Scheduled Payments [SH+F2].
The Scheduled Payments window appears. For descriptions of the fields and columns in this window, see the document Invoice Status.
Choose Change [F2]. Fields open for changes.
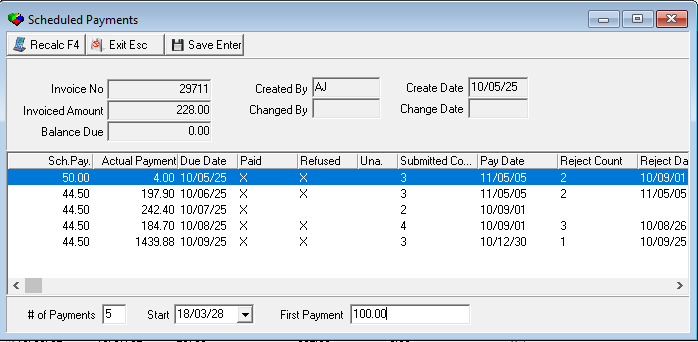
Complete the fields, as needed.
Note: From this dialog box you can recalculate future payments before you save by choosing Recalculate [F4].
Choose Save [ENTER] to return to the Invoice Status tab.
Payment History
To access this program from the main menu of SBN, select Contract Master (program #548) and then select the Payment Status tab.
The Payment Status Tab
The Payment Status tab displays a record of payments transactions for the selected billing account. The following graphic shows the Payment Status Tab.
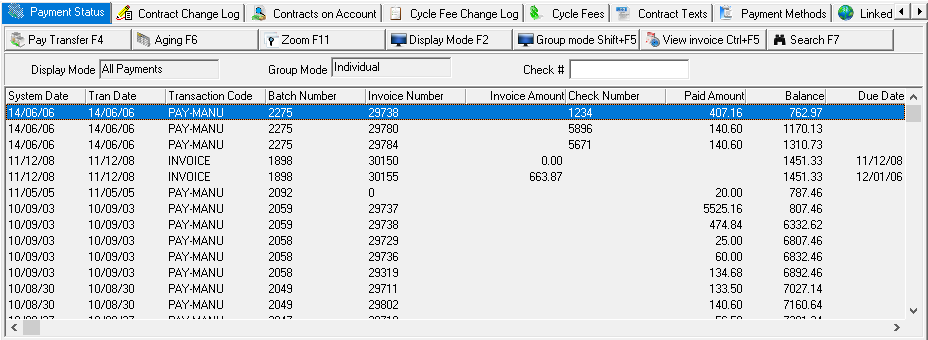
The fields in the upper pane of the window identify the current Display and Group modes. Use the Check # field and the Search button to search for payments associated with a specific check number.
The columns in the lower pane display the payment details of this account. For descriptions of the columns in this pane, see the document Payment Status.
Note: SBN displays a maximum of 1,000 payments for an account.
Viewing Aging on an Account or Contract
From the Payment Status tab, you can view information about the aging history of an account or contract. You can view any aging events by:
To view Aging:
Choose Aging [F6]. The Aging window appears.
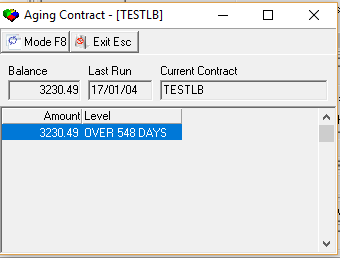
Note: Use Toggle [F8] to view aging information by Contract or by Account.
Choose Exit [ESC].
Setting the No Reminder Flag
From the Invoice Status tab, you can change the No Reminder flag for any invoice to indicate if reminders will print for customers who are late with an invoice payment.
To access Invoice Status, select Contract Master (program #548) from the main menu of SBN and select the Invoice Status tab.
The following table describes the reminder flags.
To change the No Reminder flag:
In Contract Master, open the account, contract, or installation for which you want to view scheduled payments.
Select the Invoice Status tab.
Select the invoice for which you want to change the No Reminder flag.
Choose No Reminder [F8]. The No Reminder Flag dialog box opens.
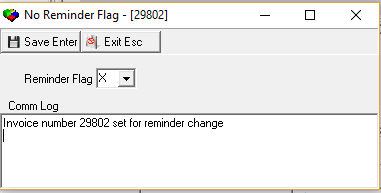
In Reminder Flag — select the correct status for the No Reminder flag.
Choose Save [ENTER].
Contract Texts
To access this program from the main menu of SBN, select Contract Master (program #548) and then select the Contract Texts tab.
Use Contract Texts to enter any additional information about the contract or installation that will appear on related work orders. The following graphic shows the Contract Texts tab with text saved in the two fields.
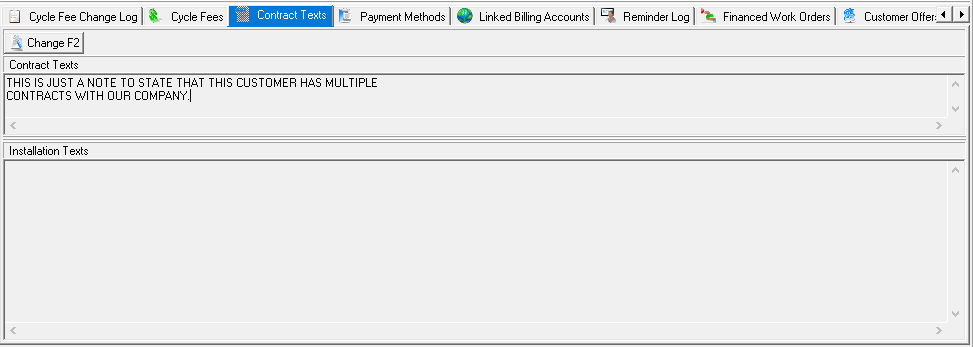
For descriptions of the fields in this tab, see the document Contract Texts.
Changing Contract and Installation Text
To change information in the Contract Texts tab:
In the Contract Texts tab, choose Change Record [F2]. The two fields open for changes.
Type text into the fields.
Choose Save Existing Record [ENTER].
Billing Change Logs
Viewing the Contract Change Log
The Contract Change Log tracks:
To view the Contract Change Log:
From Contract Master (program #548) open the contract for which you want to view changes to the contract.
Select the Contract Change Log tab.
SBN displays changes to the contract, with the most recent at the top of the list. The following graphic shows the Contract Change Log.
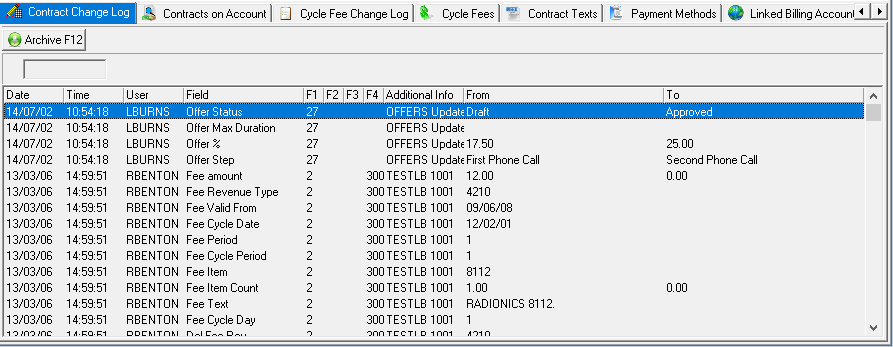
For descriptions of the columns in this tab, see the document Contract Change Log.
Viewing the Account Change Log
The Account Change Log tracks all changes that are made to the Billing Information pane in the main window of the Contract Master.
To view the Account Change Log:
From Contract Master (program #548) open the account for which you want to view changes.
Select the Account Change Log.
SBN displays changes to the account, with the most recent at the top of the list.
The following graphic shows the Account Change Log.
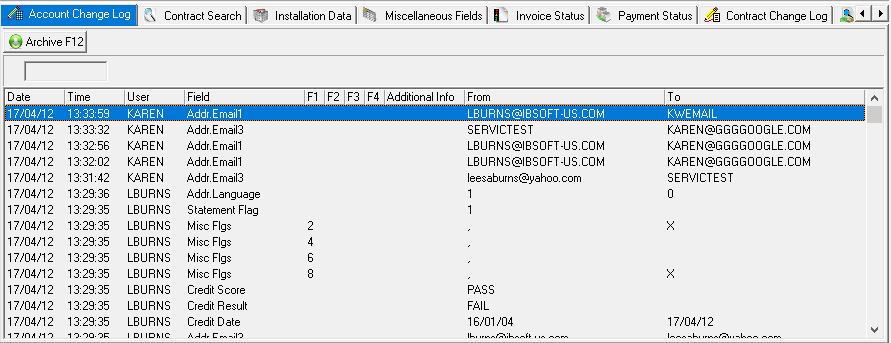
For descriptions of the columns in this tab, see the document Account Change Log.
Viewing the Cycle Fee Change Log
The Cycle Fee Change Log tracks all changes made to cycle fees for an account from:
To view the Cycle Fee Change Log:
From Contract Master (program #548) open the account for which you want to view changes.
Select the Cycle Fee Change Log tab.
SBN displays changes to the cycle fees, with the most recent at the top of the list.
The following graphic shows the Cycle Fee Change Log.
For descriptions of the columns in this tab, see the document Cycle Fee Change Log.
Paths to Invoices/Credits
Module topics
This module includes the following topics:
Work Orders
The Work Order tab and the Work Order window combine provide comprehensive information and control over work orders.
The Work Order Tab
Use the Work Order tab to view information about
The following graphic shows the Work Order tab with customer information displayed. For descriptions of the columns in this tab, see the document Work Orders.
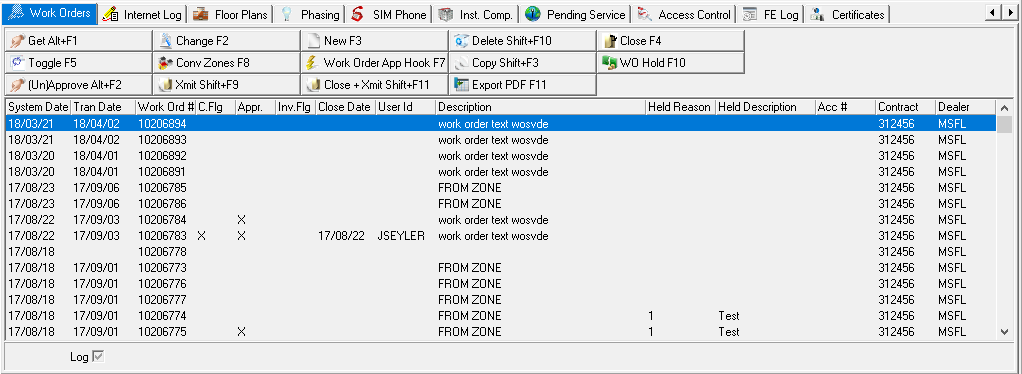
The Work Order Window
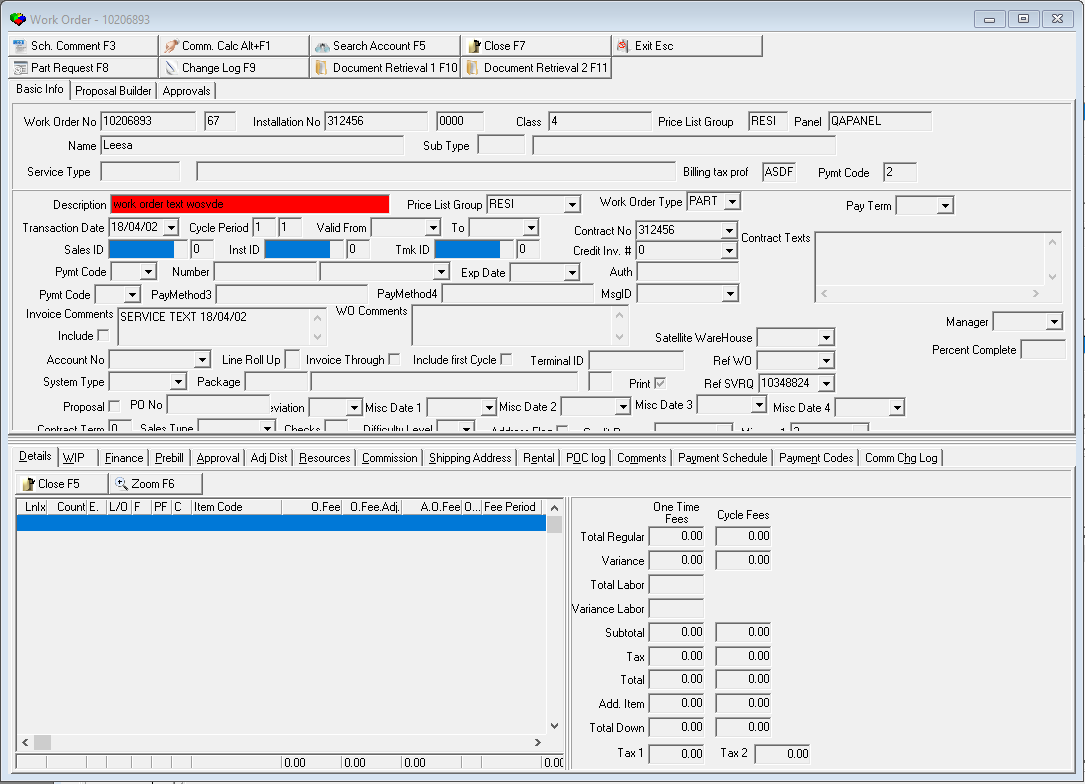
Use the Work Order window to approve and close specific work orders. The work order window contains three panes:
The following graphic shows a blank work order window. For descriptions of the columns and fields in this window, see the document Work Orders.
Note: You may have a selected work order open in only one screen at a time.
Viewing a List of Work Orders
You can view a list of work orders associated with an account, installation, or contract by choosing the Work Orders tab from Marketing, Service/Data Entry, or Contract Master
Viewing Details of a Work Order
You can view details about any work order.
To view details of a work order:
From the Work Order tab, select the work order for which you want to view details.
Choose Get Record [ALT+F1].
The Work Order window opens and displays details of the selected work order.
Work Order Change Log
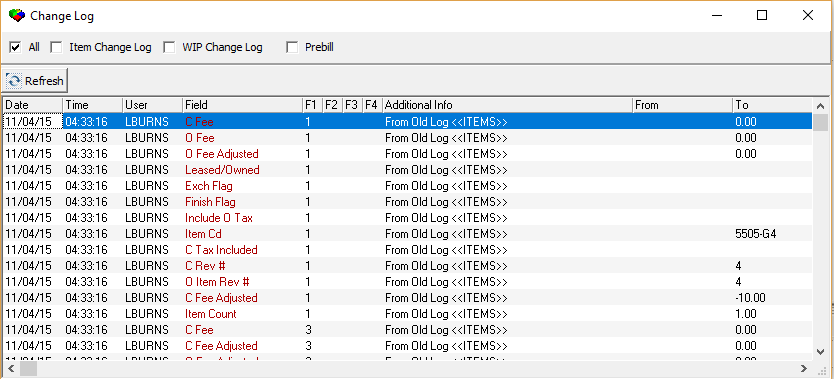
The Work Order Change Log displays all changes made to the selected work order. (The Log, Commission Change Log, and WIP Change Log tabs have been removed and replaced with this Change Log.)
When you choose the Change Log button in the Work Order Details window, the Change Log window opens. This window contains five check boxes:
The following graphic shows the Change Log window. The All check box is selected by default, which displays all the Change Log entries, but you can filter the log entries by selecting one of the other four check boxes.
Approving a Work Order
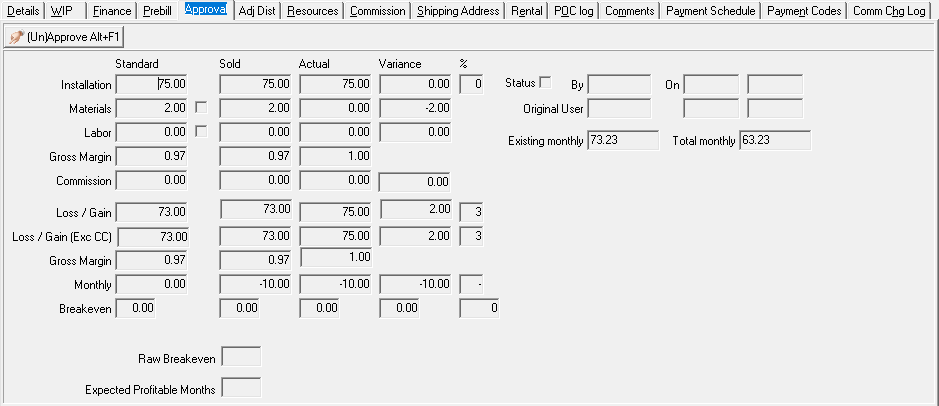
Use the Approval tab in the lower pane of the Work Order window to approve a work order. To approve a work order you must first save the work order, and then open the work order in Get [ALT+F1] mode.
Note: Before you can approve a work order, you must attach it to a contract.
At the time of approval, SBN compares the value of the work order to the Credit Profile, if defined. If an account or contract is not specified, SBN uses the credit profile on the primary account on the first contract listed for the installation. If the account balance exceeds the limit set by the credit profile, an error appears. Some users may have an action defined that allows the override of this feature.
If a work order contains an item kit (defined in Items - program #1535), SBN saves the item kit contents when you approve the work order. The Pick/Return Work Order window in Branch Inventory (program #1757) displays item kit contents as they were when the work order was approved. If you change the item kit in program #1535 after approving the work order, your changes will appear in the Work Order Details tab, but not in the Pick/Return Work Order window of program #1757.
The following graphic shows the Approval tab with information displayed.
To approve a work order:
From the Work Order tab, select the work order that you want to approve.
Choose Get Record [ALT+F1]. The Work Order window opens, with information displayed.
Select the Approval tab.
Choose Approve/Unapprove work order [ALT+F1].
Closing a Work Order
You can access the Close button from the Work Order tab or the Work Order window. Before you close a work order:
You must approve the work order.
You must attach the work order to a contract.
To close a work order from the Work Order tab:
In Work Order tab, select the work order you want to close.
Choose Close/Reopen [F4].
The Transaction Date field appears at the bottom of the tab.
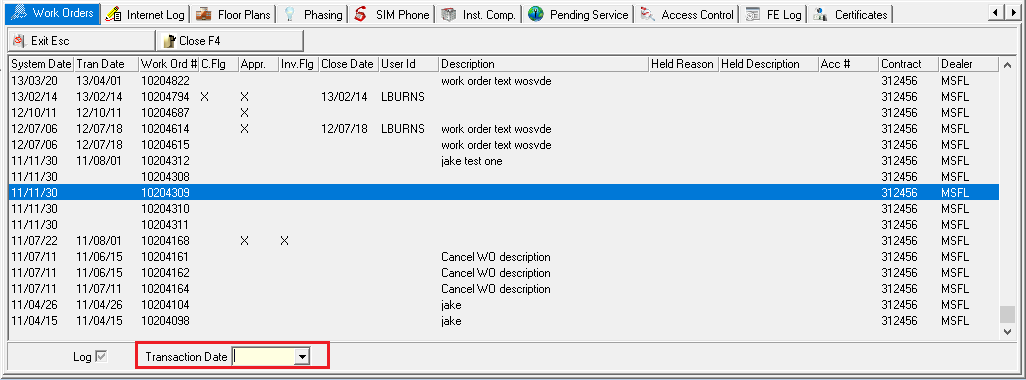
In Transaction Date — select the close date.
When you close a work order created from Service, you can type an Invoice Ref number, if needed. This number will update the Invoice Ref field in the Service Ticket. Choose Close/Reopen [F4] to complete the close process.
To close a work order from the Work Order window:
In the Work Order tab, select the work order you want to close.
Choose Get [ALT+F1]. The Work Order window opens.
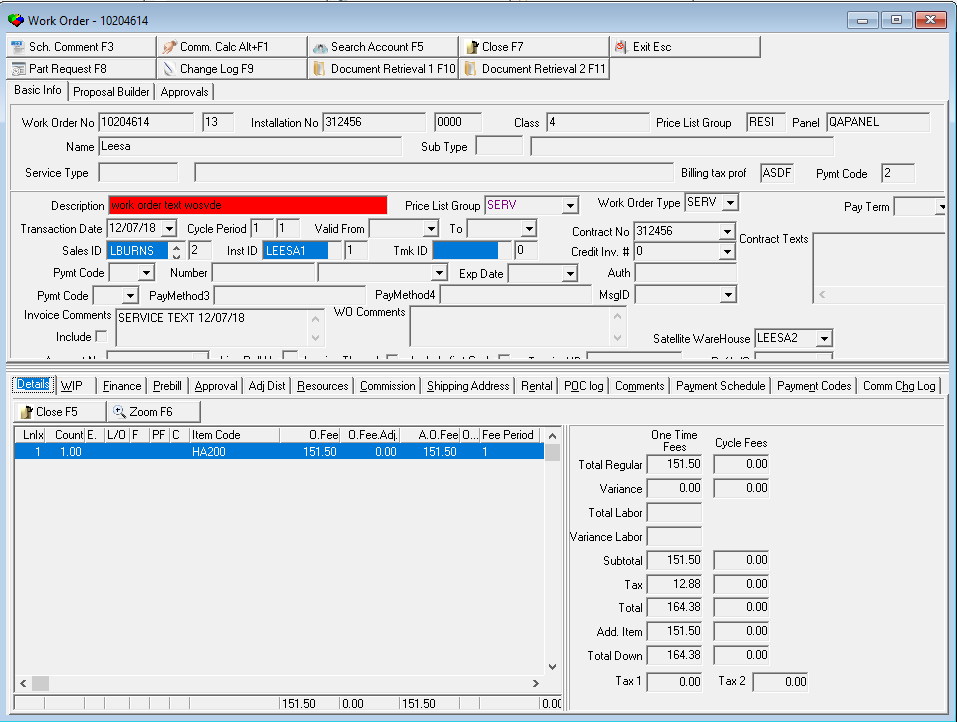
Choose Close/Reopen [F7]. SBN asks if you are sure.

Choose Yes.
SBN confirms that it successfully closed the work order.
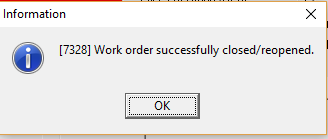
Choose OK.
SBN enters the current date as the close date.
Recurring Fees
The cycle fees tab contains all recurring charge information. All cycle fee management occurs in this tab, you can add, change, or delete a cycle fee. Cycle fees can also be added from a Work Order.
The following graphic shows the Cycle Fees tab with customer information displayed. For descriptions of the columns in this tab, see the document Cycle Fees.
From the Cycle Fee tab, you can add a recurring fee.
To add a cycle fee:
In Contract Master (program #548) open the account, contract, or installation that you want to add a recurring fee.
Select the Cycle Fees tab. Choose New [F3]. The new cycle fee grid opens.
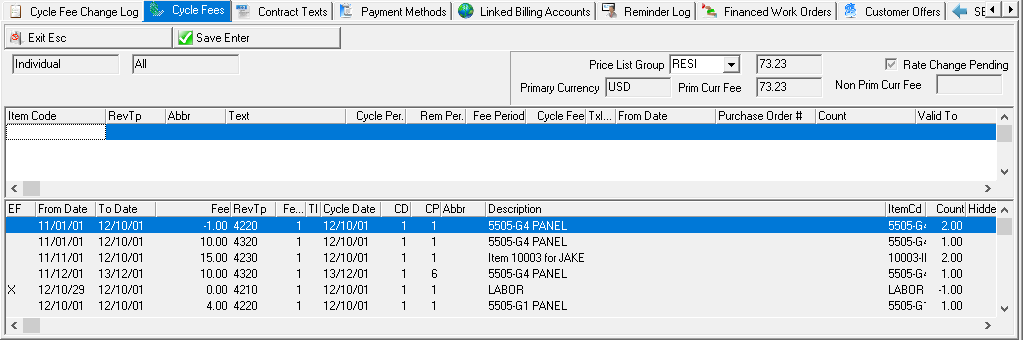
Complete the fields.
Choose Save [ENTER].
To change a cycle fee:
In the Cycle Fee tab, choose Change [F2]. The cycle Fee change screen opens.
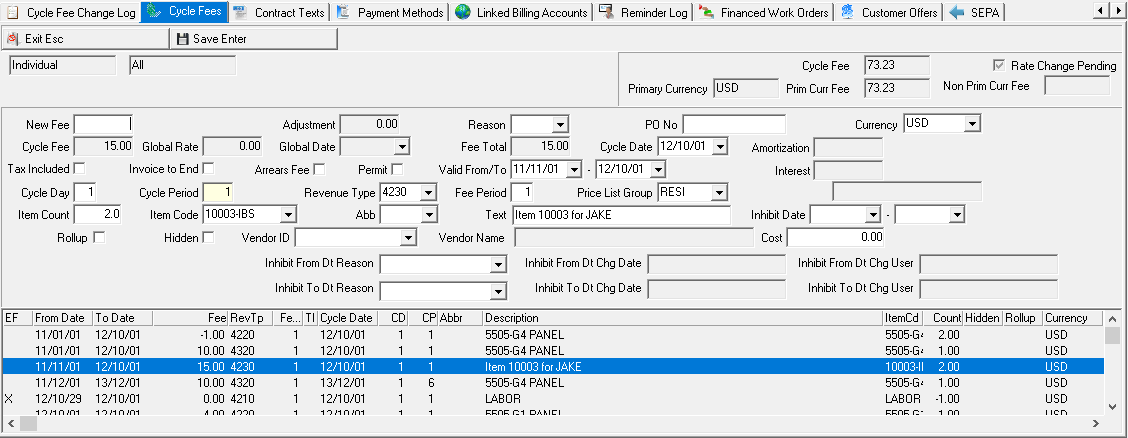
Change the fields.
Choose Save [ENTER].
Updating the Cycle Fee Date
The Update Cycle Fee Date button allows you to change the recurring billing date for all cycle fees listed for an installation.
To update the cycle fee date:
Choose Change Cycle Date [F4]. The Cycle Date screen opens.
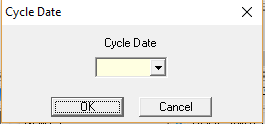
Pick the correct cycle date. Choose OK. All cycle fee dates change.
Deleting Valid to Date
When terminating or suspending billing, the cycle fee contains a Valid To date that prohibits billing after the date. The Delete Valid Date button allows you to remove the valid to date for all cycle fees listed for an installation.
To delete the valid to date:
Choose Delete Valid To Date [F5]. The Confirm screen opens.
Choose Yes.
The system removes all cycle fee valid to dates. Paths to Invoices/Credits
Moving Cycle Fees
From the Cycle Fees tab, you can move cycle fees for the selected contract to another contract. You can move one fee or all fees.
To move cycle fees:
Choose Move [F8]. The Move Cycle Fees dialog box appears.
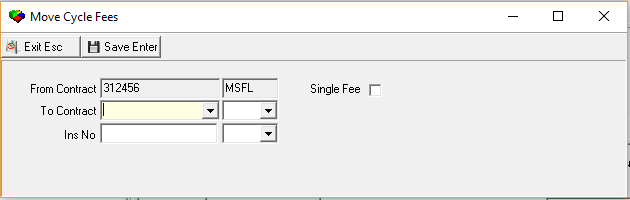
Complete the fields.
Note: You may use the unlabeled fields to select dealer IDs.
Note: If you do not check the Single Fee box, all fees are moved to the selected contract.
Choose Save [ENTER].
Note: SBN displays the following warning if:
Crediting an Invoice
You may credit an invoice by:
OR
Applying a Credit to an Invoice
From the Invoice Status tab, you can apply a credit to an invoice. You can only credit invoices that have no payments applied to them.
To access the Invoice Status tab, select Contract Master (program #548) from the main menu of SBN then select the Invoice Status tab.
To apply a credit to an invoice:
In Contract Master (program #548) open the account, contract, or installation to which you want to apply a credit.
Select the Invoice Status tab.
Select the Invoice you want to credit.
Choose Credit Invoice. The Credit Reason dialog box opens.
Select the reason you are applying a credit to the selected invoice.
Choose OK.
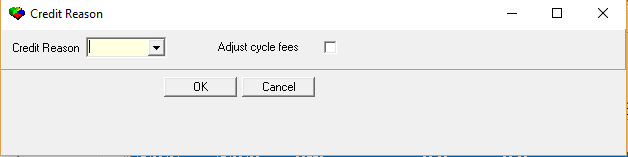
Note: If this customer usually pays by direct debit, SBN displays a warning message.
SBN asks you to confirm that you want to apply a credit to the selected invoice.
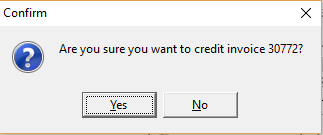
Choose YES. SBN asks if you want to print a copy of the credit.
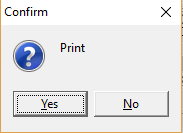
Choose YES if you want to print a copy of this transaction; choose No if you do not want to print a copy of this transaction.
Choose OK. A dialog box opens for entering comments into the Communication Log.
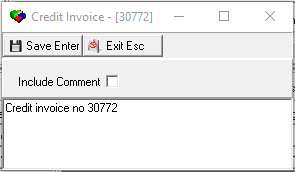
Type comments.
In Include Comment — enter a check mark to enter the comment in the Comments field of the work order.
Choose Save [ENTER].
Note: Text typed in this dialog box appears in the following locations:
Note: You can access the Communication Log by choosing [CTRL+W] from anywhere in SBN.
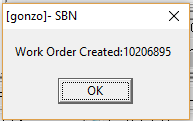
13. SBN confirms that it created a work order for this credit and displays the work order number.
Creating a Credit Work Order
You can create a new work order that will contain
Note: This method also allows you to defer the credit over time.
To create a credit work order:
In Contract Master (program #548) open the account, contract, or installation to which you want to apply a credit.
Select the Work Order tab.
Choose New [F3]. The Work Order window opens.
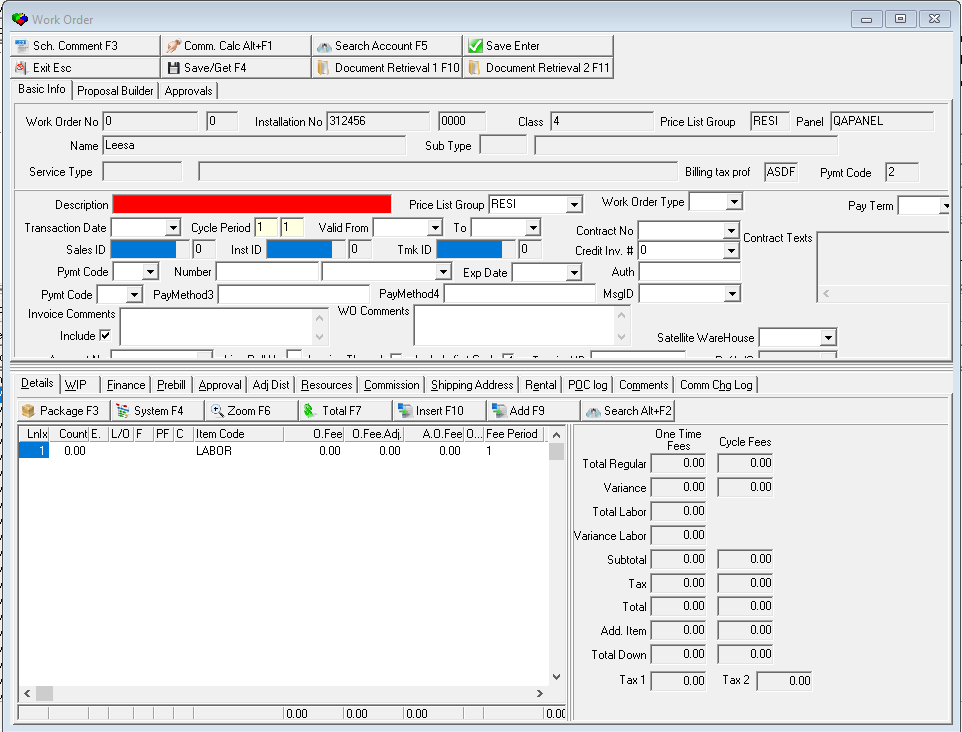
Enter information in the Detail pane. The following table describes the fields in the middle pane of the window:
WARNING: The Credit Invoice # field must be completed in order to apply the credit to a specific invoice. A credit reason may also be required.
Enter items in the Details Tab. When you enter items individually, you can edit all columns in the Details tab including the flags, one time text and cycle text. The following table describes the fields contained in the Items Details Tab:
WARNING: The Cover To/Cover From fields must be completed in order to defer the credit over a specific period of time.
Choose Save New Record [ENTER]. SBN asks if you want to approve.
Choose Yes to proceed to the approval tab or No to save and close the work order.
You can also choose Save Existing Record and View in Get Mode [F4].
Note: When you save the work order, the work order remains in Get mode so that you can make changes in selected tabs, close, or approve the work order.
SBN applies the credit work order to the account when your administrator runs the next Credit Invoice batch.
Invoices and Statements
Module topics
This module includes the following topics:
The Invoice Manager
Use the Invoice Manager (program #1557) to specify the conditions to use to calculate invoice batches and to generate invoices.
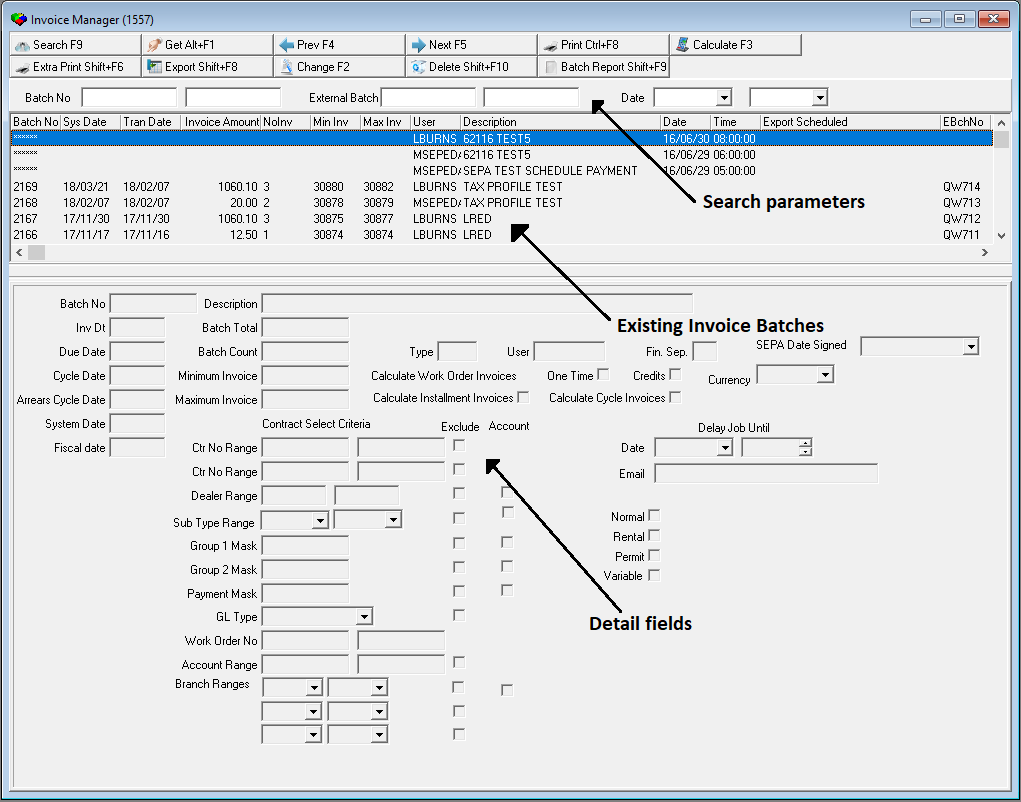
To access this program, select Invoice Manager from the main menu of SBN. The Invoice Manager window contains three panes:
The following graphic shows the Invoice Manager as the program opens. The middle pane displays a list of existing invoice batches.
Creating an Invoice Batch
Use the Invoice Manager to generate customer invoices and to display the total amount of all calculated invoices.
Your action profile must include the following actions to perform the following tasks:
When you calculate invoices, SBN creates a new batch.
You can specify all of the parameters for an invoice batch and save them in the Invoice Manager for use in the future. You can also create batches with a delayed date and time for running in the future. You can run a trial batch to display the number of invoices and batch total that would be created by running this batch.
Option bl210 was added to allow you to run and export a batch at a later time. When this option is on, SBN exports the batch immediately after it is run. When option bl210 is off and an invoice batch is scheduled to run at a later time and be exported at a later time, SBN does not export the batch until the scheduled later time.
When you calculate invoices from the Invoice Manager, SBN checks all cycle fees and work orders to invoice all those accounts ready for invoicing, depending on the flags you select in the Calculate Invoice window. During the calculation process SBN processes:
When you calculate one-time invoice batches, SBN will find uninvoiced work orders that contain one-time fees and charge those. If a work order contains a zero one-time fee and a cycle fee item, SBN copies the cycle fee information to the Cycle Fee tab and creates a batch with zero invoices and a zero dollar amount.
You may calculate, and export batches based on parameters that pull data from either the contract or account of record.
Options blinvmin and blinvmax determine the range for the Due Date field. If the due date is outside of this range, SBN displays a warning message.
You can turn on option bl214 to prevent you from running an invoice batch with a transaction date older than the previous batch of the same type (cycle or one-time). SBN also displays an error message.
You can turn option bl215 off to produce negative cycle invoices. When this option is on, SBN does not allow you to produce negative cycle invoices and displays an error message in the Calculate window.
Option bl216 allows you to define a list of work order types for which SBN produces negative one-time invoices for work orders in Invoice Manager. To set the value of this option, enter each work order type in all capital letters with single quotes around each type, and place a comma between each type. When this option is not defined, SBN does not allow you to run invoices with a negative amount and displays an error message in the Calculate window.
Option bl217 allows you to define the number of days into the future that SBN allows invoice dates to be in Invoice Manager.
When you calculate work order invoices, SBN creates invoices for work orders with the pay code selected in the Payment Mask field. SBN only invoices work orders with a blank pay code if the contract or account associated with a work order contains the selected pay code
Select action 1557/20 to run batches of invoices for cycle fees, one-time fees, and credits at the same time in Invoice Manager. If the action is not selected, you can run only one type of invoice at a time.
To create an invoice batch:
In Invoice Manager (program #1557), choose Calculate Invoices [F3].
The fields in the lower pane of the window open for calculation information.
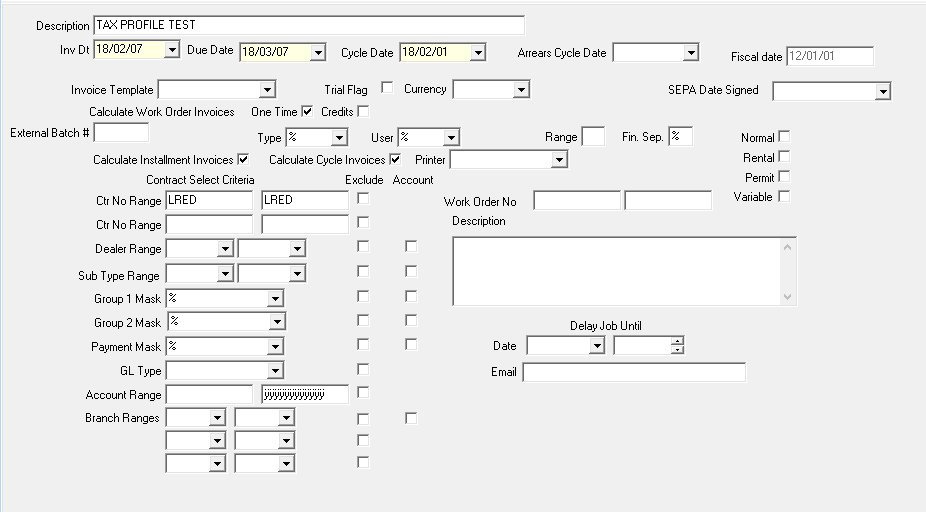
Note: Based on your settings, some information defaults into the fields, but you can override the defaults. The Normal, Rental, Permit, and Variable (Arrears) check boxes allow you to limit invoice batches to particular types of cycle fees.
Complete the fields.
Choose Calculate Invoices [F3] again.
Note: “Are you Sure?” message will appear.
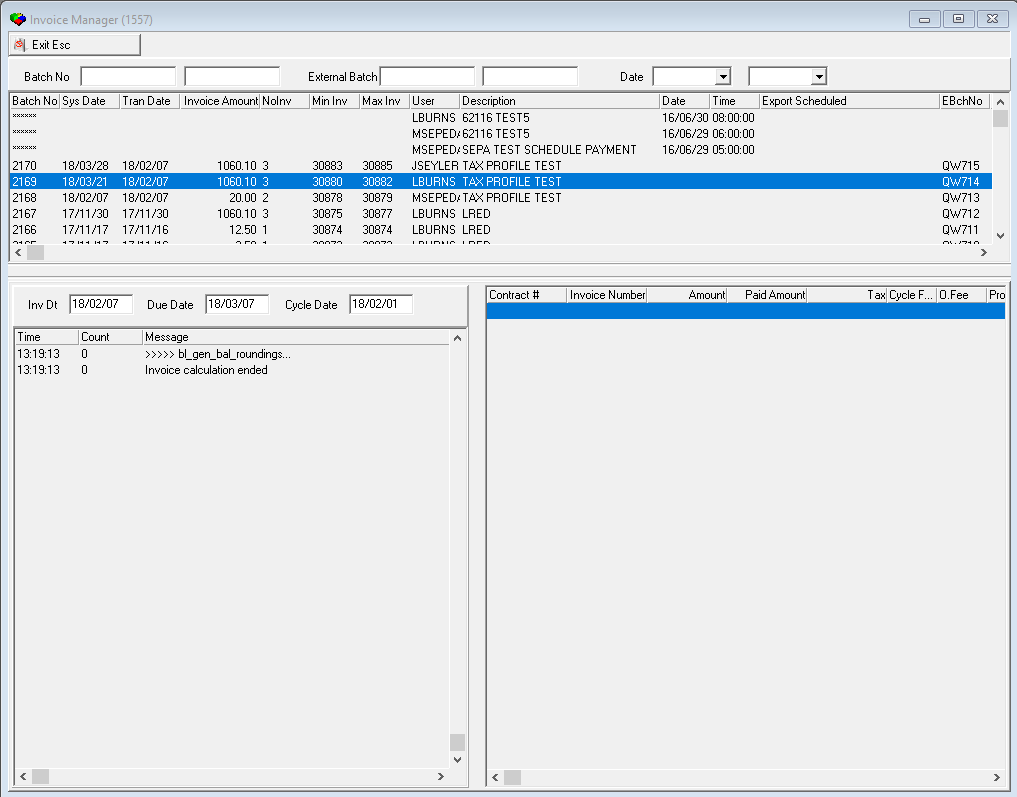
Two additional panes appear. The lower left pane displays the process as SBN calculates invoices.
Choose Exit [ESC] to return to the main window.
Using an Invoice Template
SBN contains several invoice templates that you can select to automatically fill many of the invoice information fields.
To use an invoice template:
In Invoice Manager (program #1557), choose Calculate Invoices [F3].
The fields in the lower pane of the window open for calculation information.
In Invoice Template — select a template to use. SBN fills many of the invoice information fields.
Complete additional fields, as needed.
Choose Calculate Invoices [F3] again.
Two additional panes appear. The lower left pane displays the process as SBN calculates invoices.
Choose Exit [ESC] to return to the main window.
Running a Trial Batch
When you create an invoice batch, you can run a trial batch before you generate the invoices.
To run a trial batch:
In Invoice Manager (program #1557), choose Calculate Invoices [F3].
Complete the fields.
In Trial Flag — enter a check mark.
Choose Calculate Invoices [F3] again.
Two additional panes appear. The results of the trial batch will display in the lower right pane of the window.
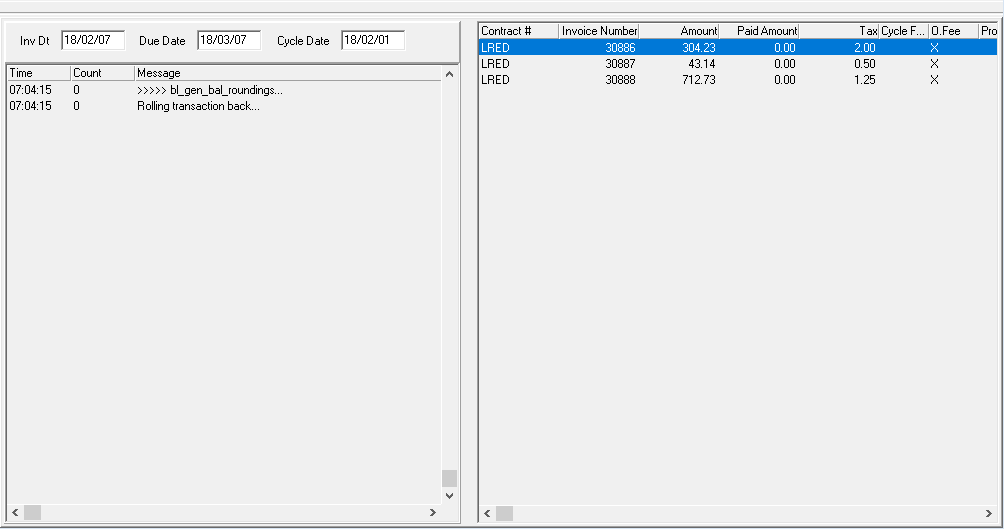
Choose Exit [ESC].
The invoice calculation window will reappear with the parameters that you used.
To run a live batch from the trial, remove the check from Trial Flag.
Choose Calculate Invoices [F3] again.
Two additional panes appear. The lower left pane displays the process as SBN calculates invoices.
Choose Exit [ESC] to return to the main window.
Delaying an Invoice Batch
You can create an invoice batch and set a delay time for SBN to generate the invoice batch later.
To delay an invoice batch:
In Invoice Manager (program #1557), choose Calculate Invoices [F3].
Complete the fields.
In Delay Job Until, complete the following tasks:
Choose Calculate Invoices [F3] again.
Two additional panes appear. In the lower left pane, SBN displays a note that delayed invoice calculations were inserted.
Choose Exit [ESC] to return to the main window.
Printing the Invoice Register
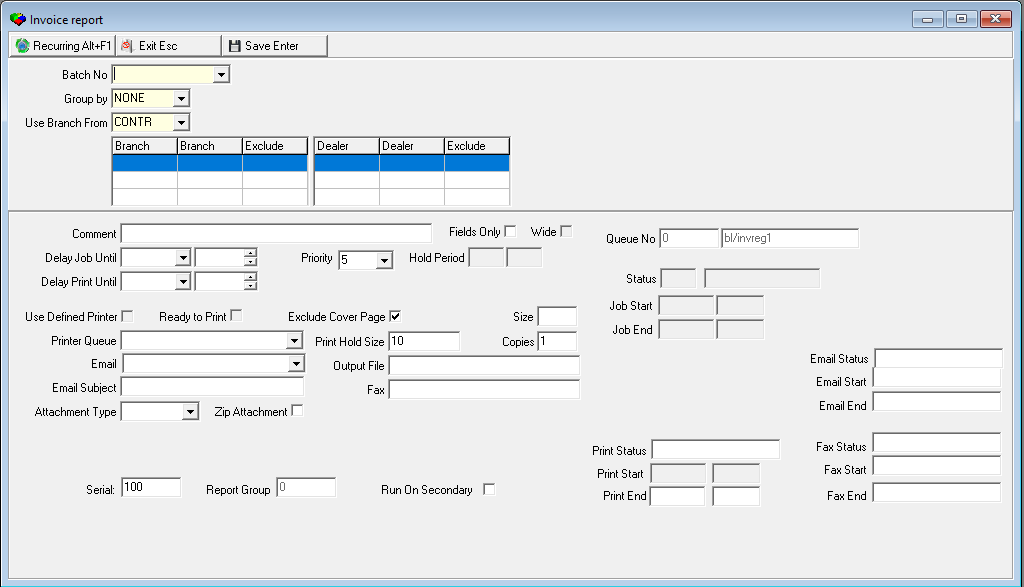
Use the Invoice Register Report (program #1152) to print a register of an invoice batch.
To access this report, choose Extra Print [SHIFT+F7] from Invoice Manager (program #1557) or select Invoice Register Report (program #1152) from the main menu of SBN.
This window contains two panes. In the upper pane you define the content of the report. In the lower pane you define the job output — how, when, and where you want to print the report.
Note: Because all reports have the same lower pane, these fields are described in detail the reference document Report Parameters Panes.
Running and Viewing the Report
To run the report:
In Invoice Register Report (program #1152), define the parameters for the report.
Choose Save [ENTER] to save the report to the print queue.
In Report Queue (program #1558), choose Own [F5] to display the report list.
Locate the report in the report list. Invoices and Statements
Choose Own [F5] again to refresh the status of the report.
When the list of reports displays an X in the Print Flag column, which indicates the report is ready, double-click it or choose Get Record [ALT+F1].
Choose Display Report [F3]. The Print Preview window opens.
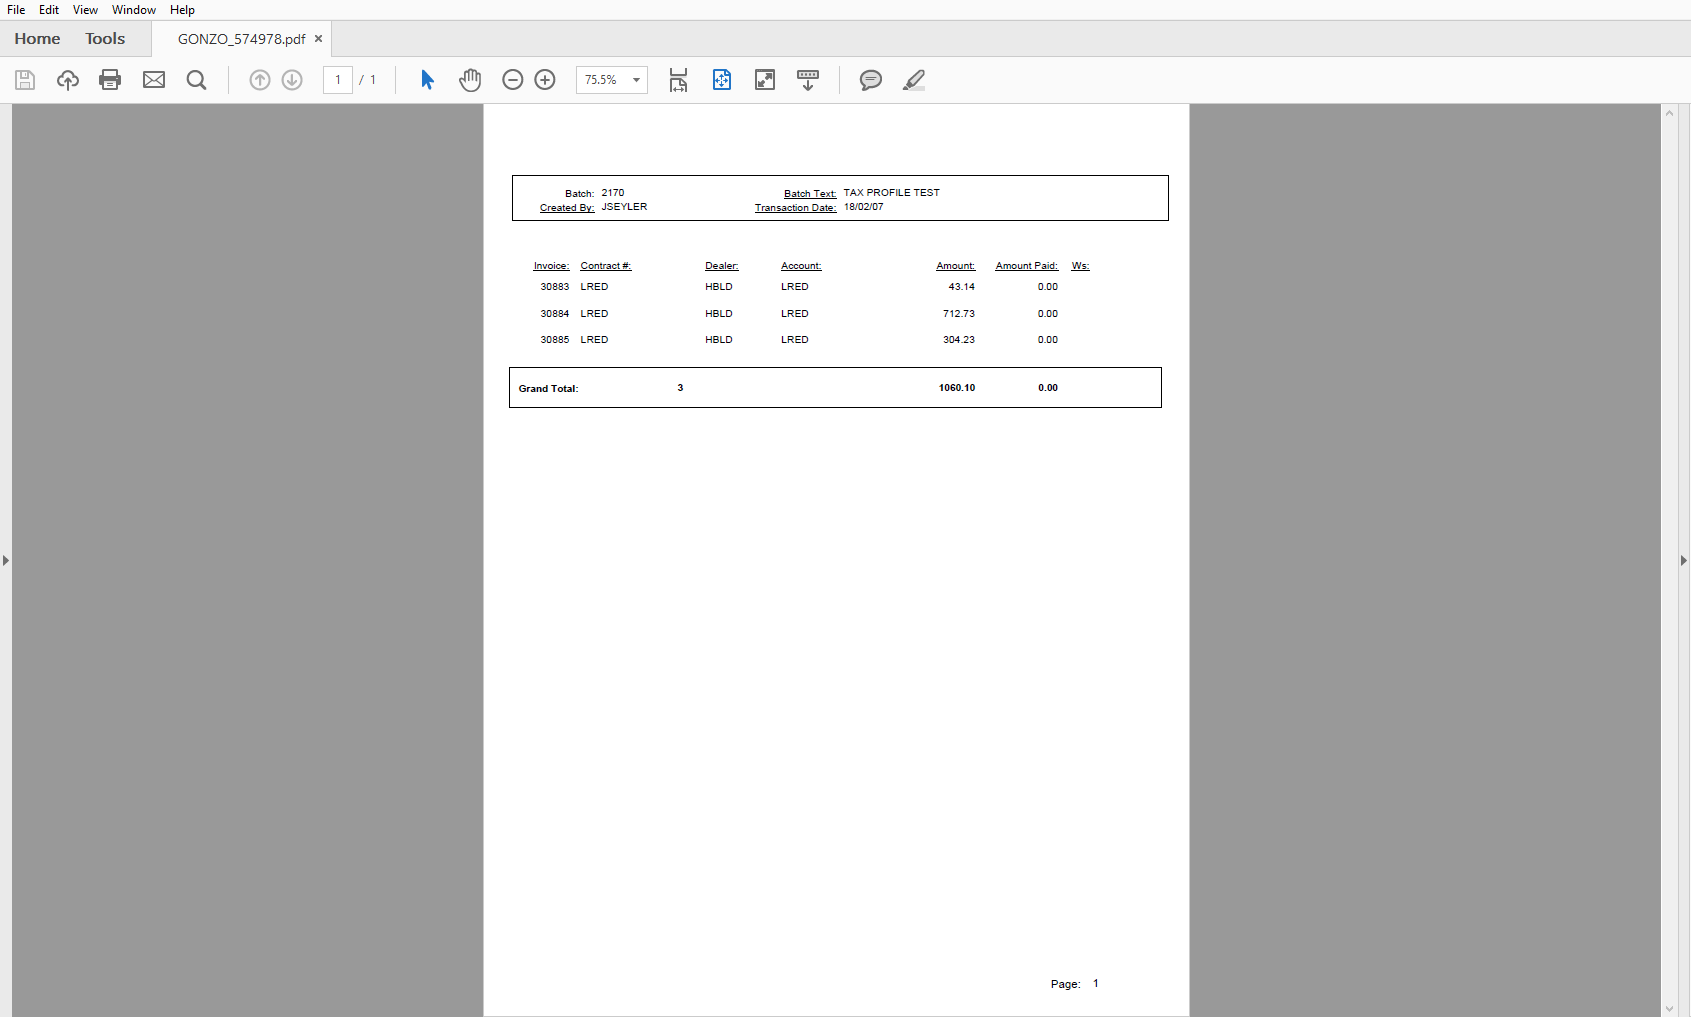
Choose Print.
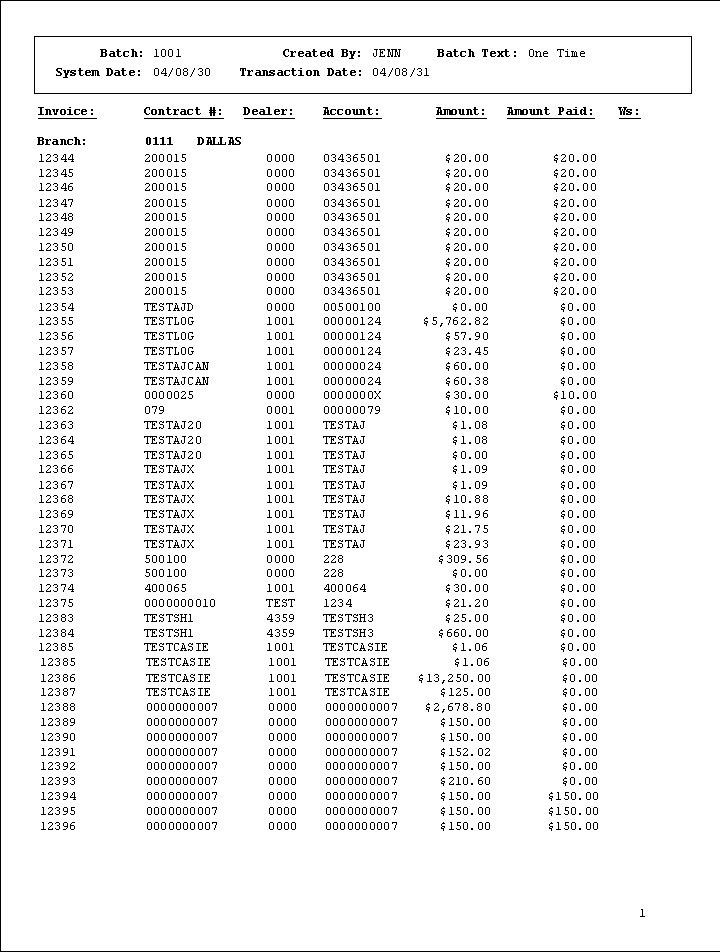
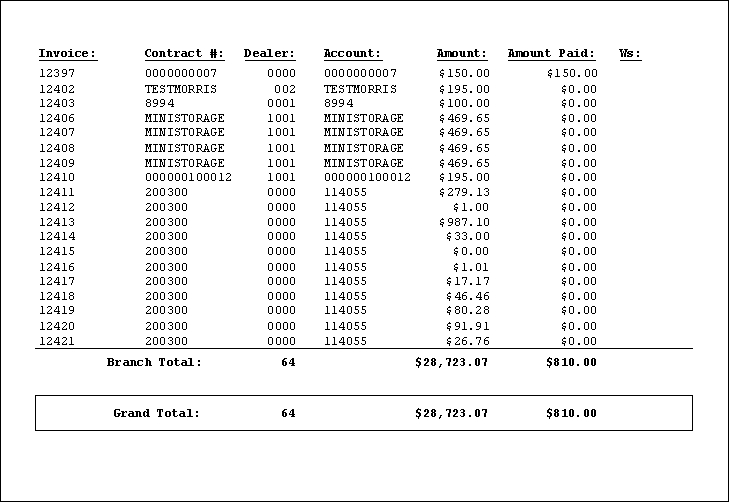
Report Example
The following graphics show an example of the output of the report.
Exporting an Invoice Batch
From the Invoice Manager program, you can export invoice data out of SBN. Use the Export procedure to create printed invoices in the template specified for your company.
The number of records in each export must be divisible by a blocking factor (10). If necessary, add records containing “9” in position 01-94 to make the number of records divisible by 10.
Note: Option bl023 must be on to include the total tax only. If this option is off, SBN calculates total tax and the tax percentage and you receive the message “Tax percentage of total amount”.
Note: If Option bl027 is on, SBN adds the tax location field from contract master to Export 11 (Word format). The default for this option is off.
To export a batch:
Choose Export [SHIFT+F8]. The Invoice Export window appears.
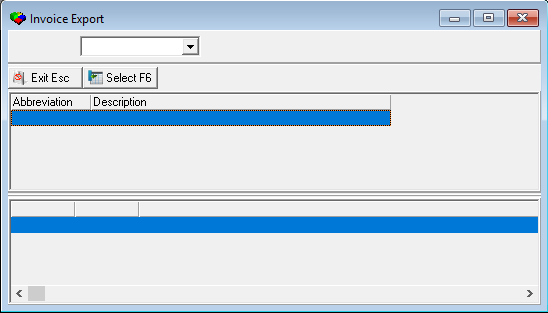
Select the type of export you want to run.
Note: You may only have one export, depending on your system configuration.
Choose Select Export [F6].
Note: You can also select the export you want to run by double-clicking on the line.
The Export dialog box opens.
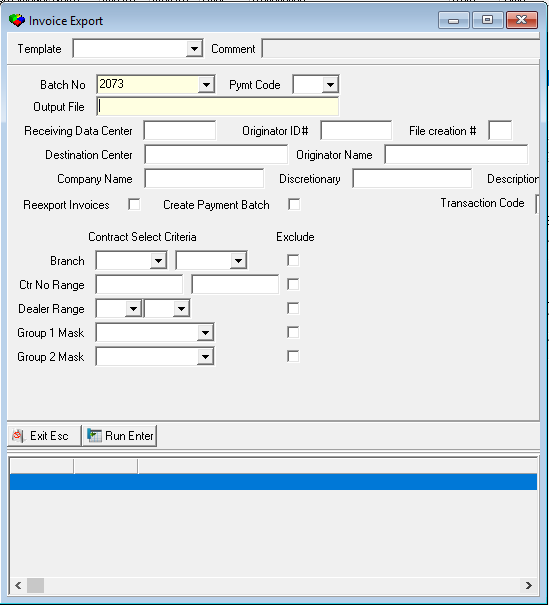
Complete the fields.
Note: You must type a name for the Output File that SBN creates when you run this program.
Choose Run Export [ENTER]. The lower pane displays the process.
Choose Exit [ESC] to return to the main window.
Creating a Statement Batch
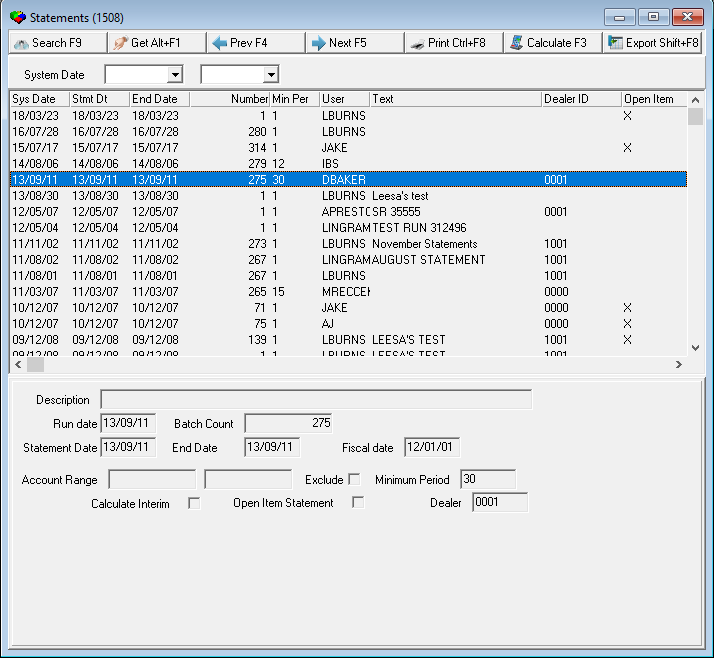
Use Statements (program #1508) to define parameters for calculating and exporting statement batches.
To access this program, select Statements (program #1508) from the main menu of SBN.
The following graphic shows Statements with information displayed. For descriptions of the columns and fields in this program, see the full Statements documentation.
Calculating a Statement Batch
To calculate statements:
In Statements (program #1508), choose Calculate [F3].
Fields in the lower pane of the window fill with statement information, but open for entering calculation criteria.
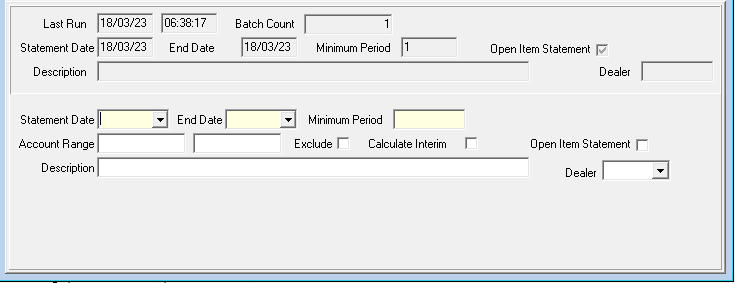
Enter the following information, as needed:
Note: Statements do not print for those accounts that are flagged as interim unless you select the Interim flag and select the print statements flag in the Billing Information pane of the account.
Choose Calculate [F3].
The lower pane of the window displays the calculation process.
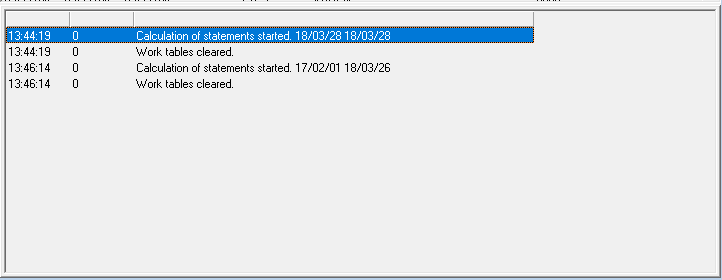
Choose Exit [ESC].
Exporting a Statement Batch
Once you have calculated statements, you can export them to print.
To export a statement batch:
1. In Statements (program #1508), choose Export [SHIFT+F8].
2. If you have more than one statement export, select the correct export from the list. If you only have one export, SBN will take you directly to the Statement Export dialog box.
The Statement Export dialog box opens. The upper pane of the dialog box displays information from the last run statement calculation. The fields in this pane may vary depending on your company requirements.
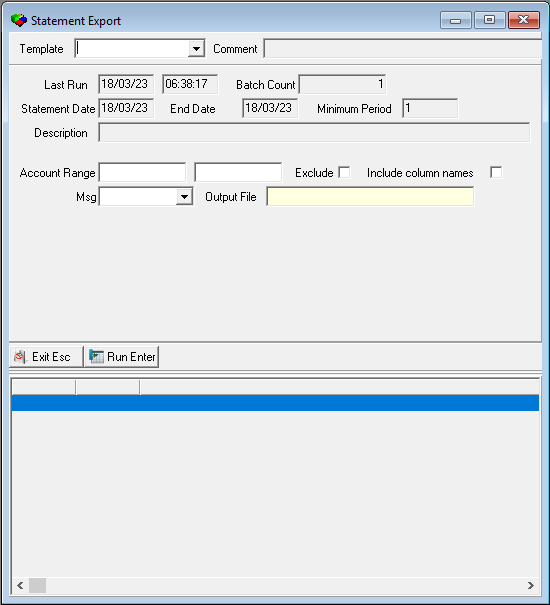
3. In Output file — you must type a name for the file.
4. Complete the other fields, as needed.
5. Select Run Export [F8].
Payments
Module topics
This module includes the following topics:
Open Batches
Use Open Batches to create new batches and to add and to post payments to existing open batches. A payment batch remains open until all payments that have been added to a batch have posted to that batch.
To access this program, select Open Batches (program #1577) from the main menu of SBN.
The Open Batches Window
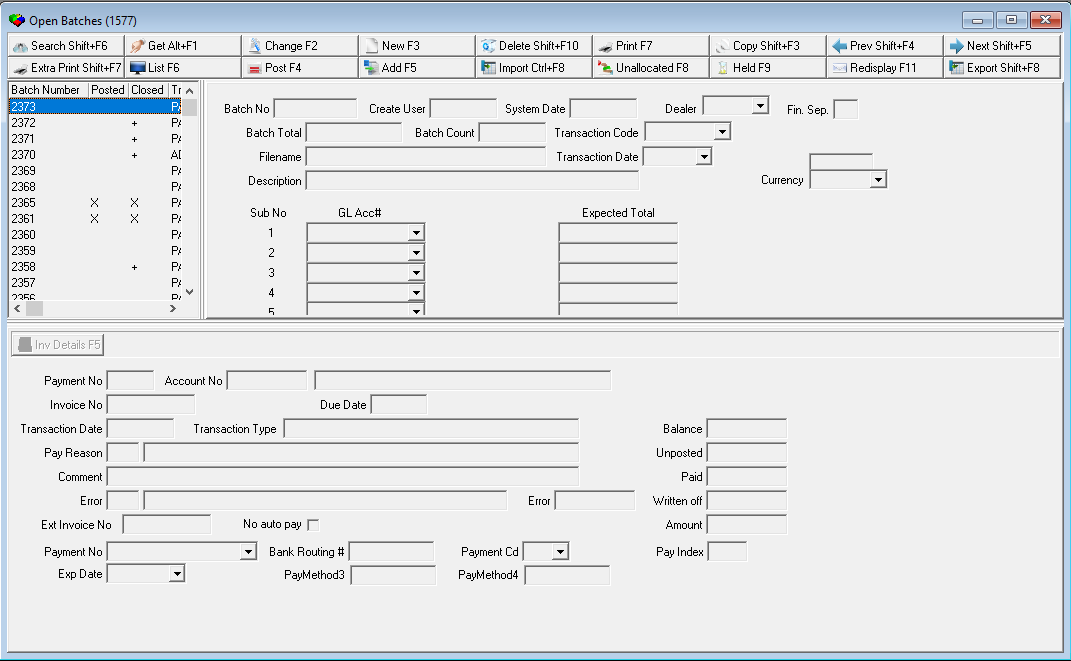
The Open Batches window displays information in several panes. The main window of Open Batches contains three panes to display information:
The Open Batches program also contains three additional detail windows:
For descriptions of the fields and columns in this program, see the document Open Batches.
Open Batches List Open Batches pane
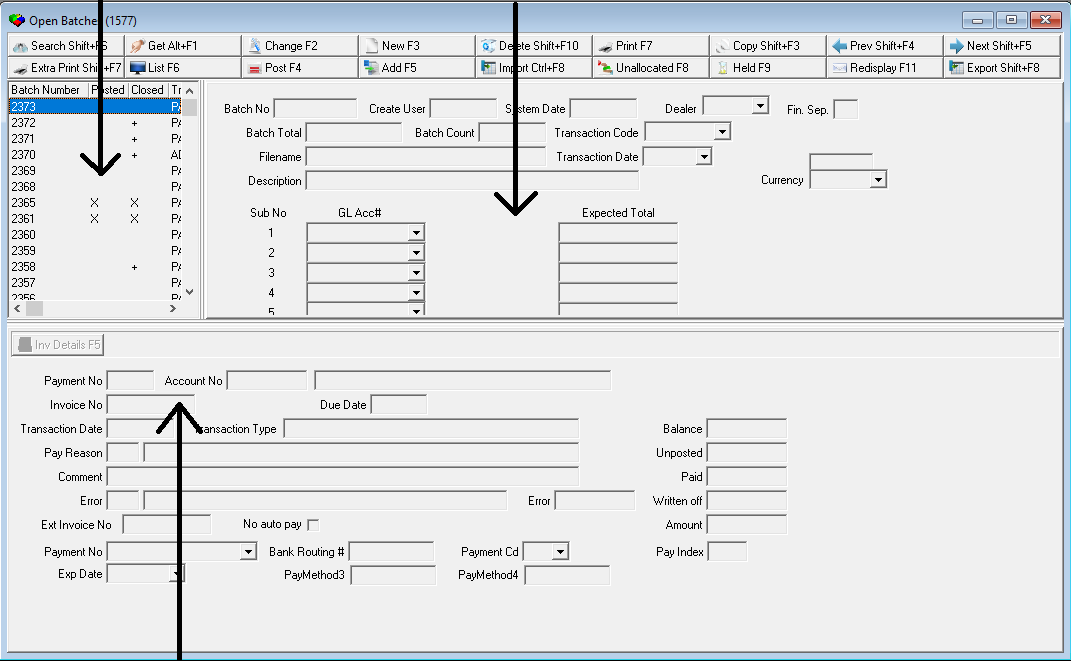
Invoice Details pane
The following graphic shows the Open Batches List. The columns display all open payment batches.
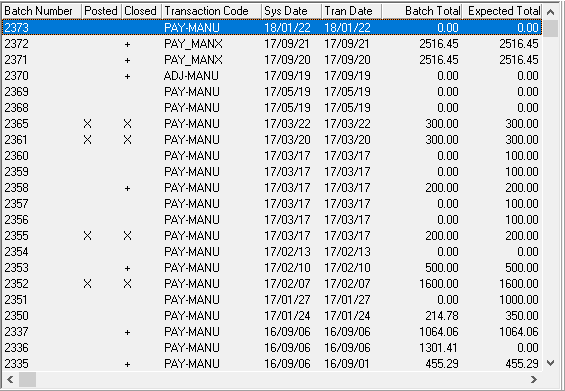
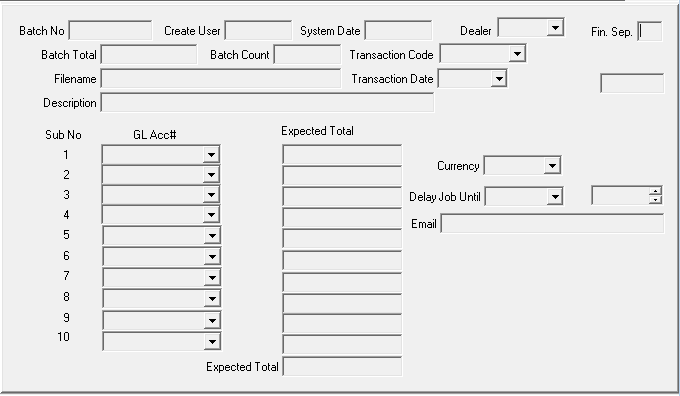
The Open Batches Pane
The following graphic shows the Open Batches pane. The pane contains fields for entering or changing payment batch information.
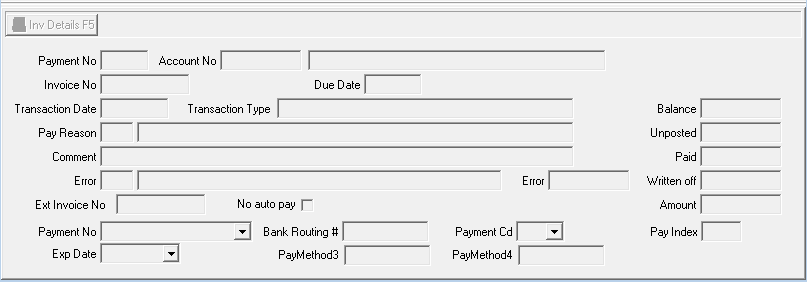
The Invoice Detail Pane
The following graphic shows the Invoice Detail pane. The pane contains fields for entering or changing invoice detail information for each batch.
Creating a New Batch
To create a new batch:
Choose New [F3].
The Open Batches Pane changes to the New Batch pane. For descriptions of the fields in this pane, see the full Open Batches documentation.
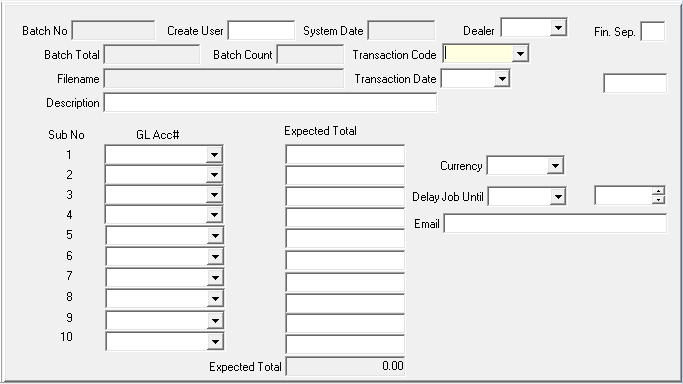
Enter the information in the fields.
Choose Save [ENTER].
Adding Payments to a Batch
To add payments to a batch, you must display the details of that batch. Then you can add payments to that batch by:
Each of the three methods uses a different dialog box for entering information.
Listing the Details of a Batch
To list details of a batch:
From the Open Batches List, select the batch for which you want details.
Choose Get Record [ALT+F1].
Choose List Details [F6].
The Open Batches pane changes to the List Details pane.
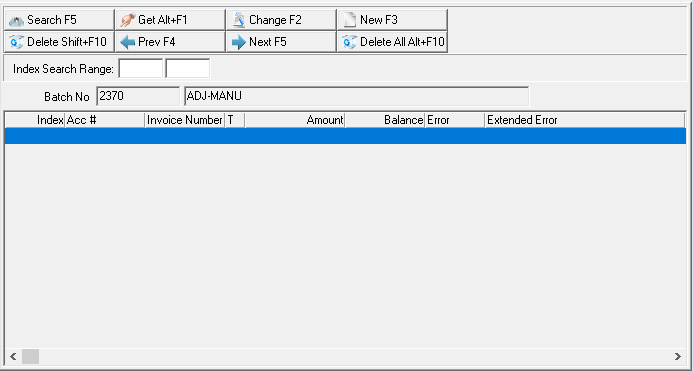
You may enter an Index Search Range to decrease the number of payments returned from the search.
Choose Search [F5] to find any payments on the selected batch. SBN displays the search results.
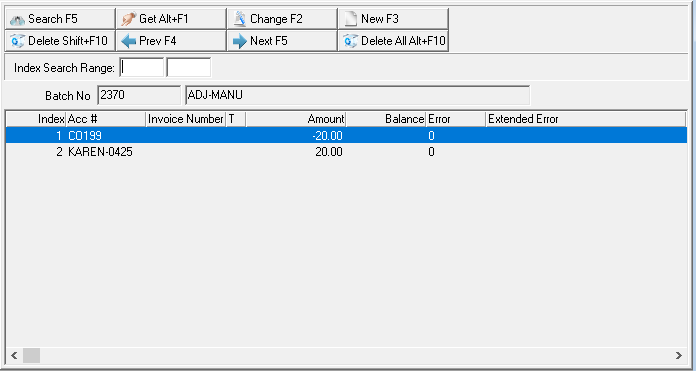
Adding a Payment by Invoice
Display the list details of the batch to which you want to add a payment. Then, you can add payments to that batch by invoice.
To add a payment by invoice:
From the List Details pane, choose New [F3]. The lower pane of Open Batches opens in Invoice mode.
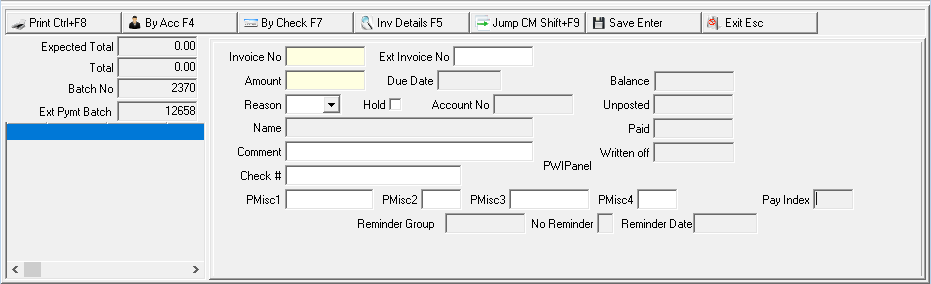
Enter the payment information in the fields on the right side of the pane.
Choose Save [ENTER].
Adding a Payment by Account
Display the list details of the batch to which you want to add a payment. Then, you can add payments to that batch by account. You can search for account by name.
To add a payment by account:
From the List Details pane, choose New [F3]. The lower pane of Open Batches opens in Invoice Mode.
Choose By Acc [F4]. The lower pane of Open Batches changes to Account mode.
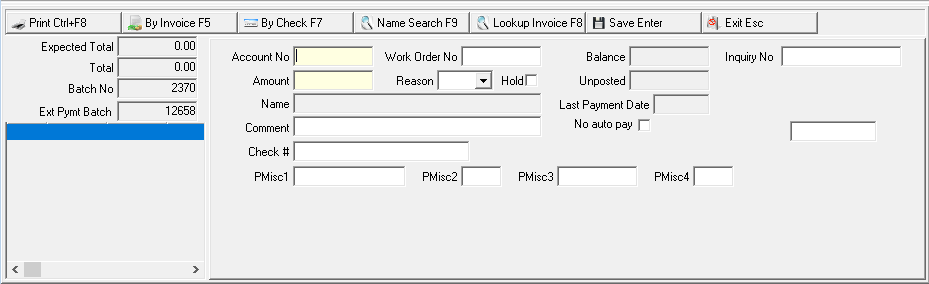
If necessary, search for an account by name. From the lower pane, choose Name Search [F9]. The Name Search dialog box opens.
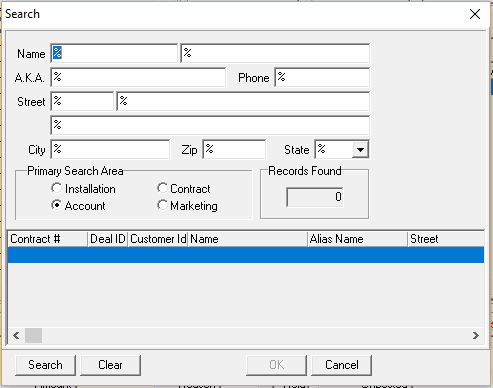
Enter the known information for the account for which you are looking.
Note: You can use wildcard characters in all fields in the Name Search dialog box. For more information on using wildcards, see Performing an Advanced Search. Choose Search.
SBN displays the results in the lower pane of the Name Search dialog box.
From the results, select the account to which you want to add a payment. Choose OK [ENTER].
SBN fills the fields in the lower pane of Open Batches with the information of the account you have selected.
Complete the fields
Choose Save [ENTER].
Applying a Payment Across Invoices
To apply a payment across invoices:
In Account mode, complete the payment information in the lower pane.
Choose Lookup Invoice [F8].
The invoices associated with the selected account appear in the lower pane of Open Batches.
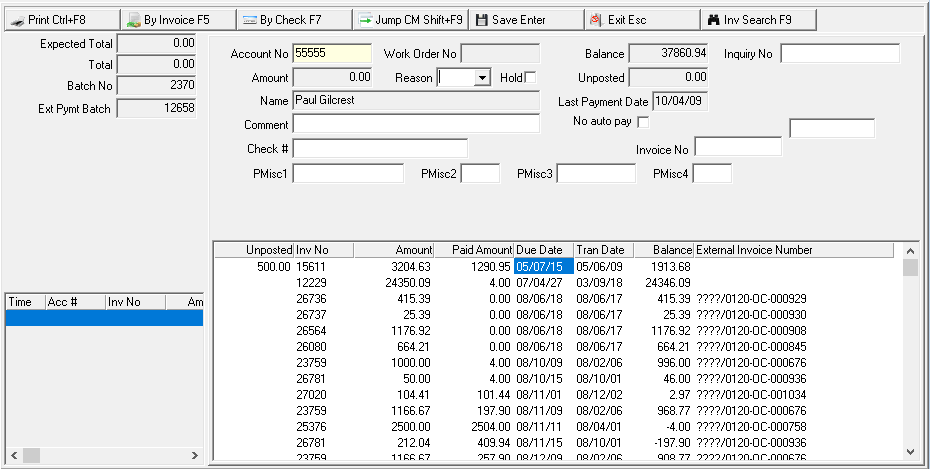
In the results, find the invoice to which you want to apply the payment, whole or part.
In the unposted column, add the amount of the payment you want to apply to an invoice. You can double-click the line to fill in the full invoice amount.
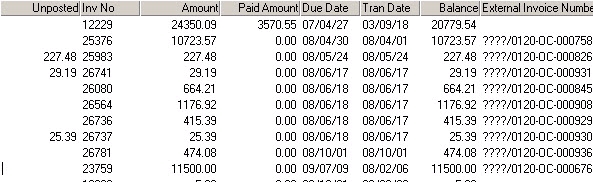
When you have finished applying the payment, choose Save [ENTER].
Adding a Payment by Check
Display the list details of the batch to which you want to add a payment. Then, you can add payments to that batch by check.
To add a payment by check:
From the List Details pane, choose New [F3]. The lower pane of Open Batches opens in Invoice mode.
Choose By Check [F7]. The lower pane changes to Check mode.
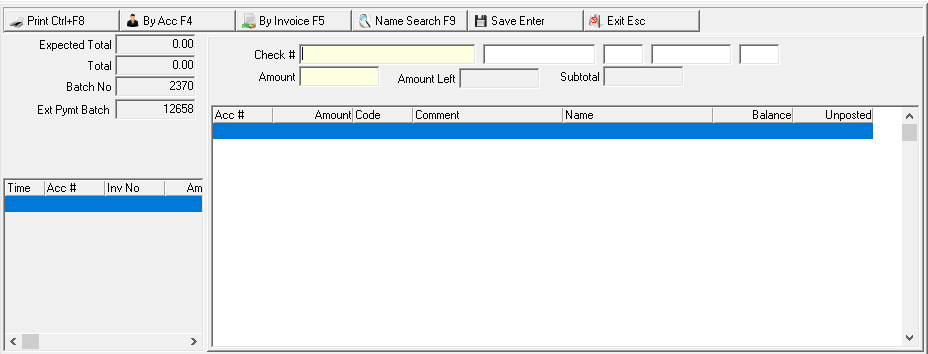
Enter the payment information in the fields on the right side of the pane.
Choose Save [ENTER].
Deleting Payments from a Batch
From the List Details pane, you can delete individual payments or all listed payments.
To delete a payment:
From the List Details pane, select the specific payment you want to delete.
Choose Delete [SHIFT+F10]. SBN asks you to confirm your selection.
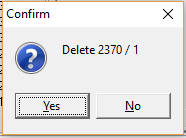
Choose Yes.
To delete all payments listed from the search in the List Details pane, choose Delete All [ALT+F10].
SBN asks you to confirm that you want to delete all payments.

Choose Yes.
Working with Held Payments
Use Open Batches to view and change details of Held payments.
Viewing or Changing Held Payments
To view held payments in SBN:
In Open Batches (program #1577), choose Held Payments [F9].
The Open Batches pane in the upper right of the window changes to display the list of held payments.
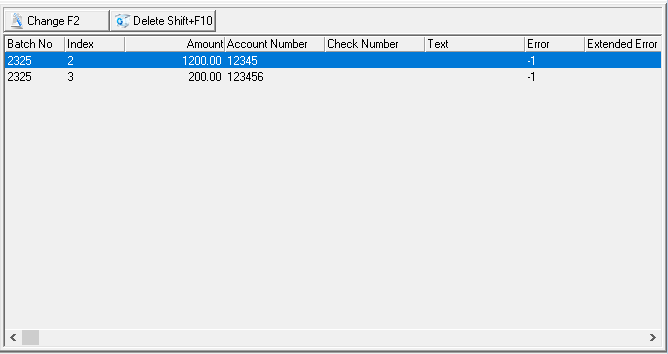
Select the held payment for which you want to change details.
In the Held Payments window, choose Change Record [F2].
Fields in the Invoice Details pane of the window open for changes.
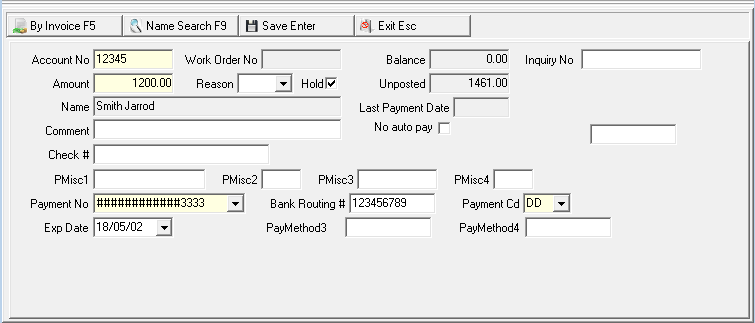
Enter changes as needed.
Choose Save [ENTER].
Importing Batches
From the Open Batches, you can import a batch to an existing file. You can also use this feature to email or print batch information.
To import a batch:
In Open Batches (program #1577), choose Import Batch [CTRL+F8]. The Payment Import window appears.
Select the payment import you want to run.
Choose Select Export [F6]. The Import File dialog box opens.
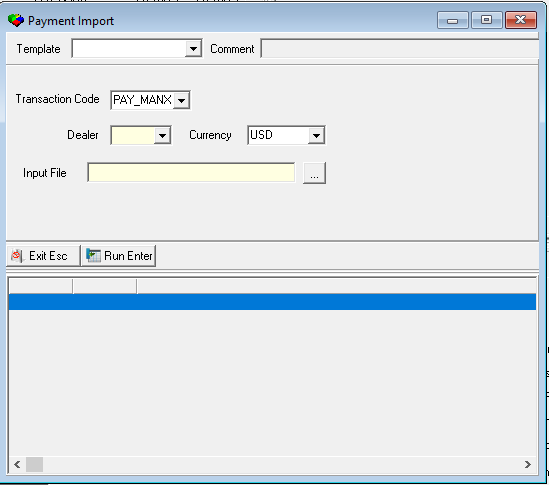
Select the Dealer.
Type the name of the file you want to import or choose to browse for the file.
Choose Run Export [ENTER].
Choose Save [ENTER].
Working with Unallocated Payments
Viewing Unallocated Payments
To view unallocated payments:
In Open Batches (program #1577), choose Unallocated Payments [F8].
The Open Batches pane changes to display the list of unallocated payments.
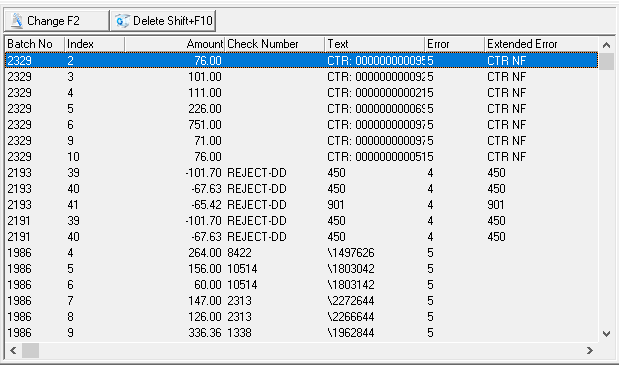
Select the unallocated payment for which you want to change details.
Choose Change Record [F2].
Fields in the Invoice Details pane open for changes.
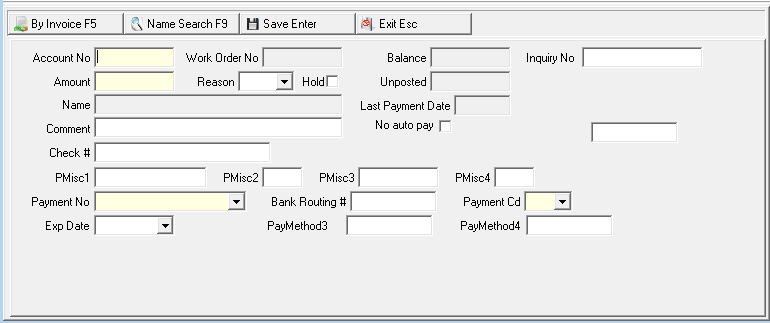
Enter the changes needed.
Choose Save [ENTER].
Printing the Payment Register
Use the Payment Register Report (program #1174) to accompany a deposit slip or run it without a “group by” parameter to locate errors in an unbalanced batch.
To access this report:
This report contains two panes. Use the upper pane to define the content of the report. Use the lower pane to define the job output — how, when, and where you want to print the report. For descriptions of the fields in this report, see the full document for Payment Register Report.
Note: Because all reports have the same lower pane, these fields are described in detail in the reference document Report Parameters Panes.
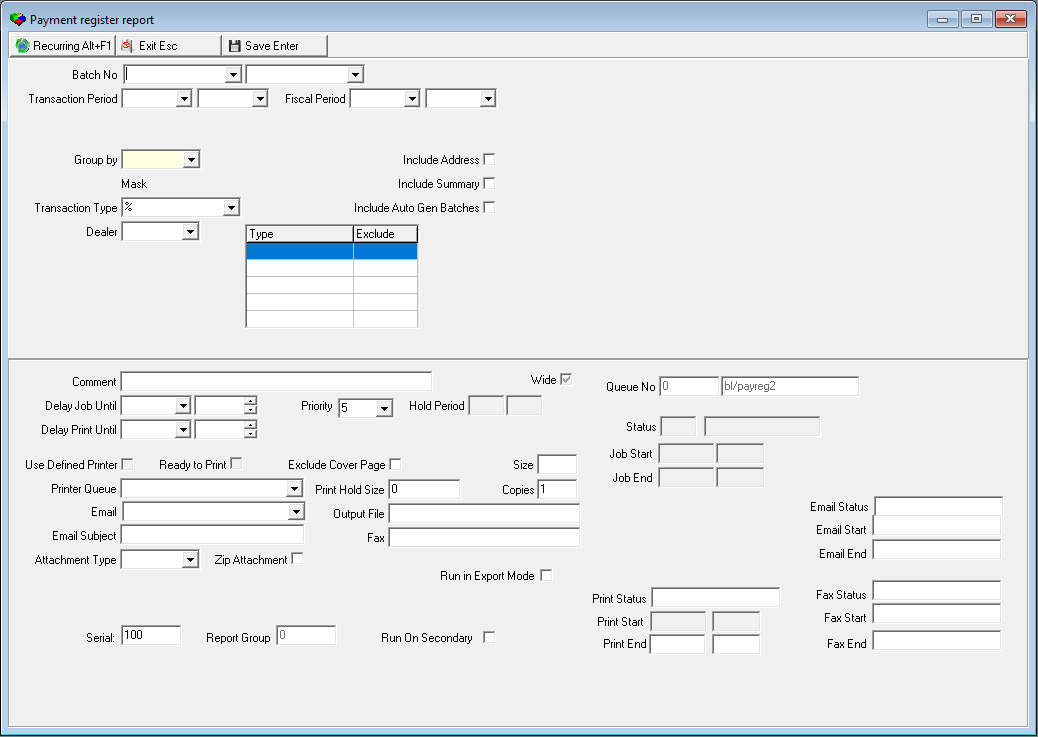
Running and Viewing the Report
To run the report:
In Payment Register Report (program #1174), define the parameters for the report.
Choose Save [ENTER] to save the report to the Report Queue.
In Report Queue (program #1558), choose Own [F5] to display the report list.
In the report list, locate the report.
When SBN displays an X in the Print Flag column of the selected report, which indicates the report is ready, double-click it to open the report or choose Get Record [ALT+F1].
Choose Display Report [F3]. The Print Preview window opens.
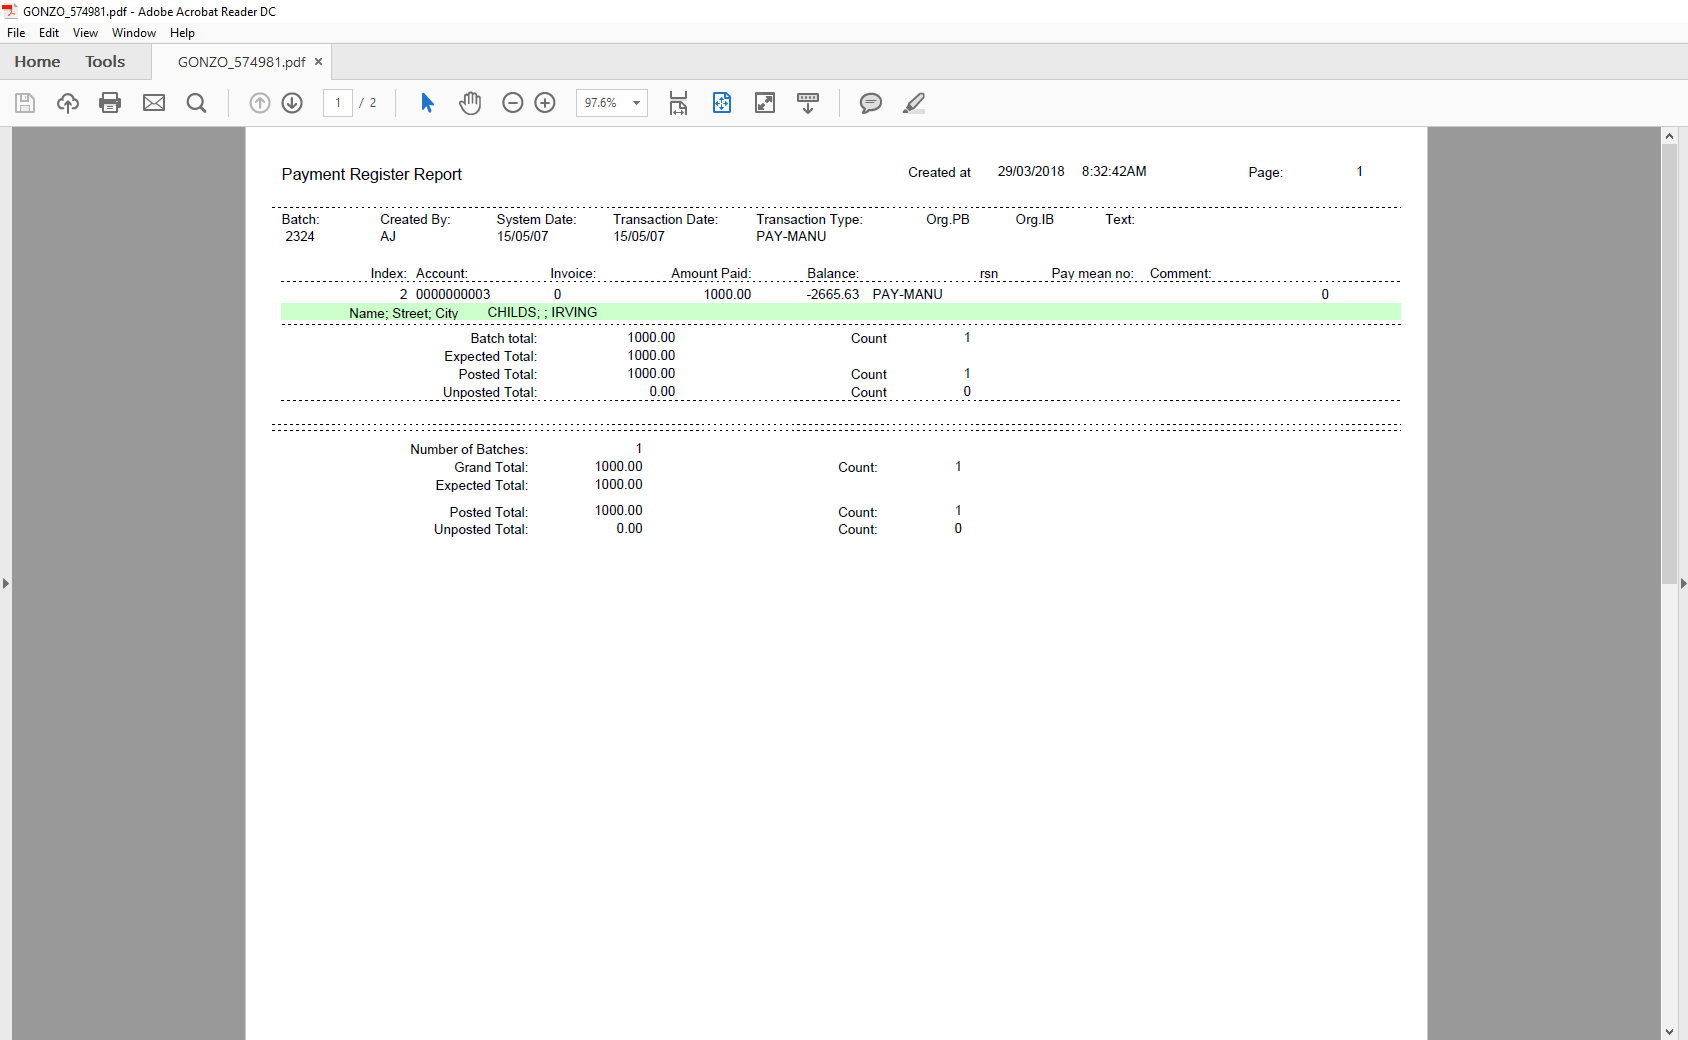
Report Example
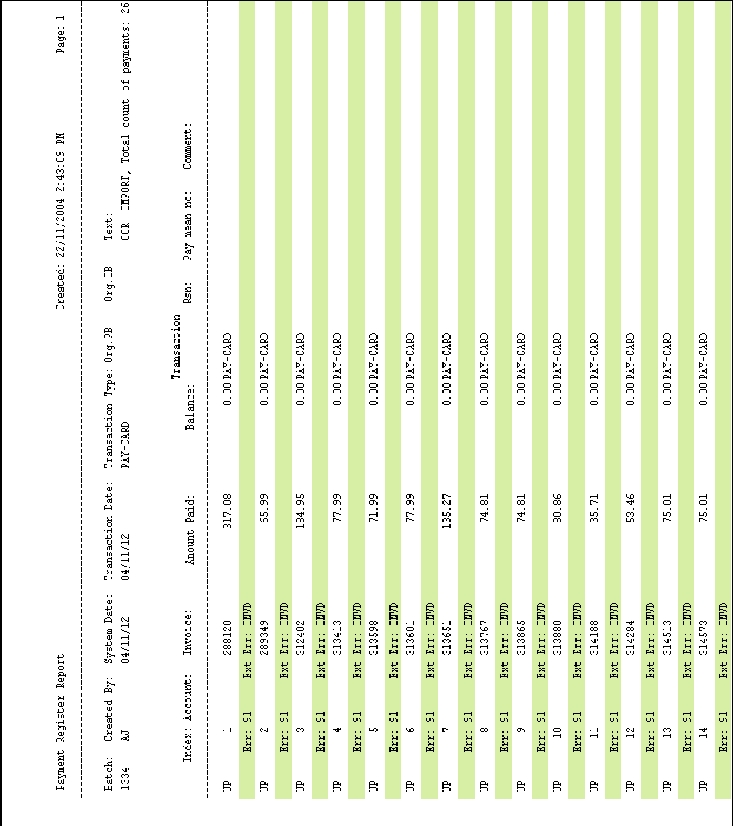
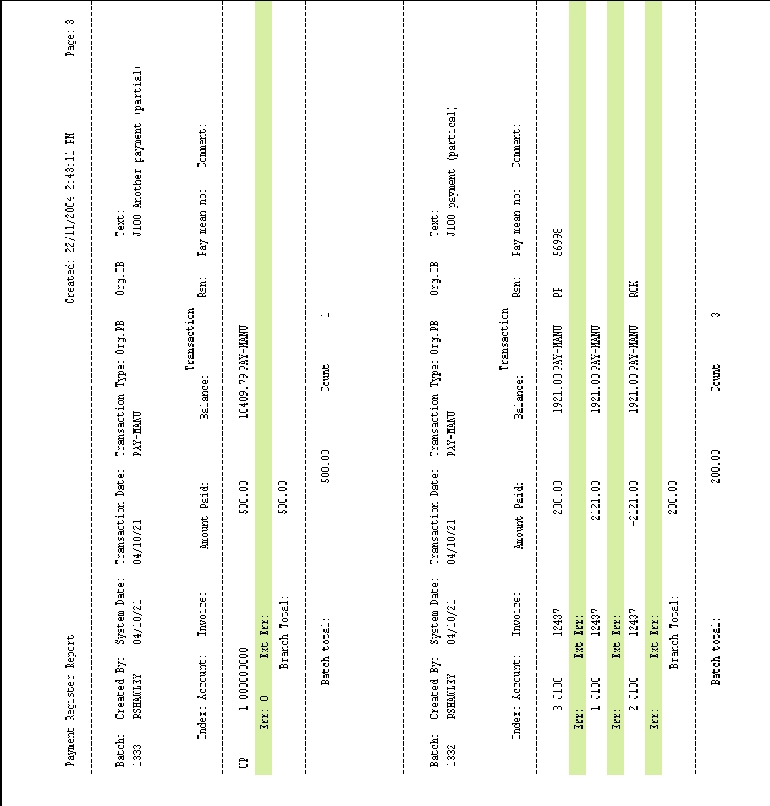
The following graphics show an example of the output of the report.
Posting a Batch
From Open Batches, you can post payments that you have added to a batch.
To post a batch:
In Open Batches (program #1577), choose Post Batch [F4].
The Open Batches pane changes to the Post Batch pane.
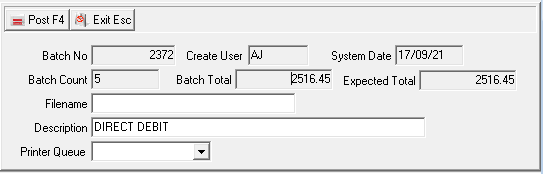
Details default into the fields; you can override the defaults.
In the Post Batch pane, choose Post Batch [F4].
SBN runs the posting procedure.
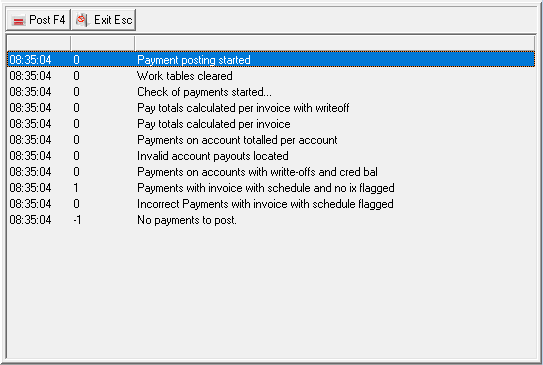
Note: SBN displays the pending amount and number of accounts left to process in the batch.
Choose Exit [ESC] to return to the main window.
Deleting an Open Batch
You can delete an open batch, but first you must delete all payments within that batch.
To delete an open batch:
From the Open Batches List, select the batch you want to delete.
Choose List Details [F6].
In the List Details panel, choose Search [F5].
Payments in the selected batch appear in the list details panel.
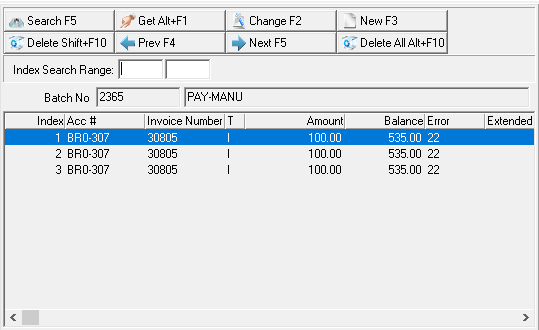
In the List Details panel, choose Delete All [ALT+F10]. SBN asks you to confirm that you want to delete all payments.
Choose Yes.
From the main toolbar, choose Delete Record [SHIFT+F10].
SBN asks you to confirm that you want to delete that batch.
Choose Yes. SBN deletes the batch.
Viewing a Posted Batch
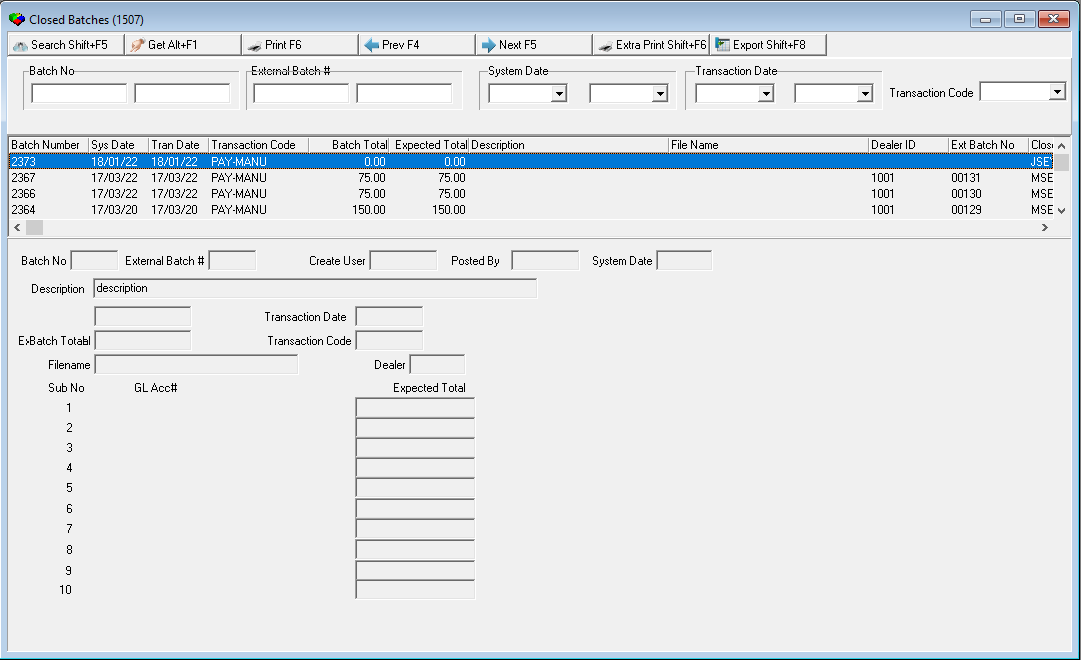
Use Closed Batches (program #1507) to view all closed payment batches for the Accounts Payable system. When the program opens, it displays all closed batches, but you can use the search fields to narrow the listed results.
To access this program, select Closed Batches from the main menu of SBN.
The following graphic shows Closed Batches as the program opens. For descriptions of the fields and columns in this program, see the document Closed Batches.
Reminders
Module topics
This module includes the following topics:
Calculating Reminders
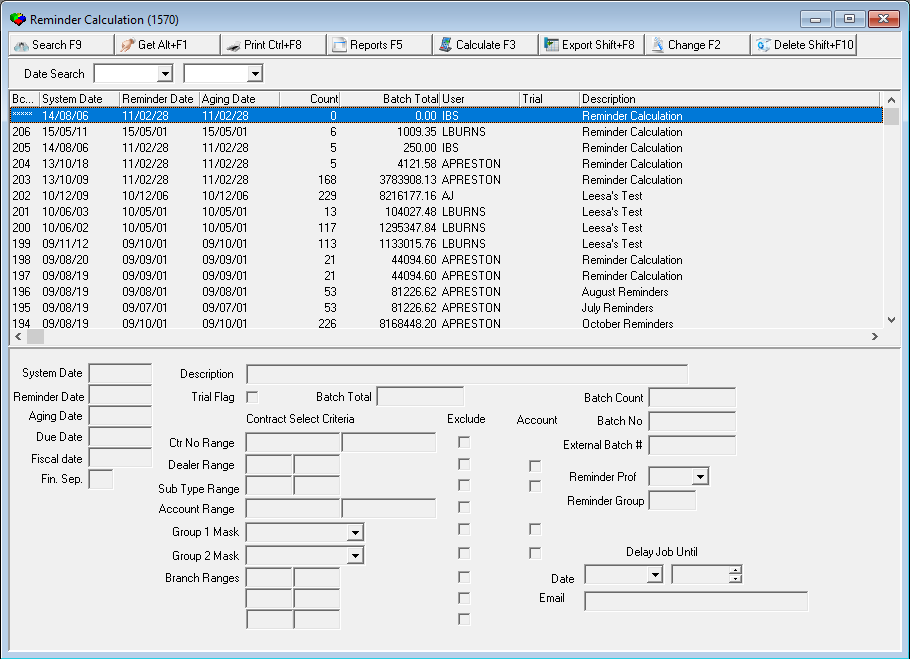
Use Reminder Calculation (program #1570) to create reminder notices for past due invoices. The calculation only includes customers flagged for reminders. Once you have calculated the reminders, you can export the reminder notices for printing.
The Reminder Calculation Window
The following graphic shows Reminder Calculation with information displayed. For descriptions of the columns and fields in this program, see the document Reminder Calculation.
Running the Reminder Calculation
You can calculate reminders for specific dates, contracts, and dealers.
To calculate reminders:
In Reminder Calculation (program #1570), choose Calculate Invoices [F3].
A warning message appears. Choose Yes to continue the calculation or No to return to the Calculate Reminders dialog box.
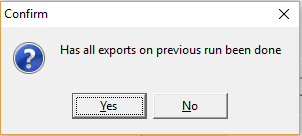
If Yes, the Calculate Reminders dialog box opens.
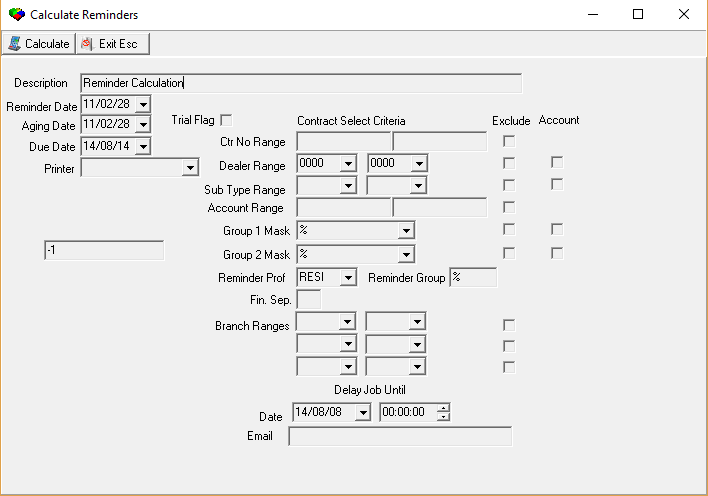
Complete the fields.
5. Hit the Calculate button.
SBN begins the calculation and displays the process.
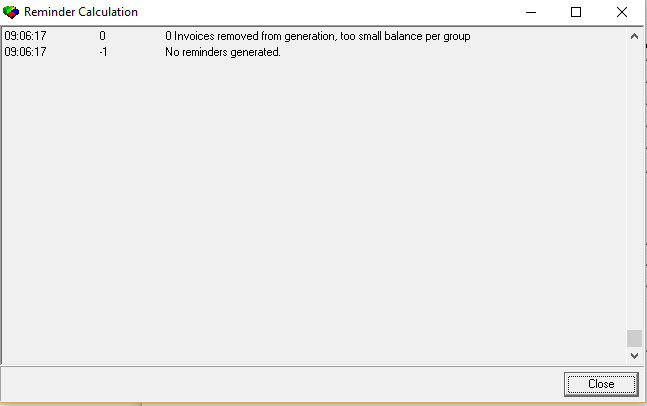
Choose Close.
Exporting Reminders
From the Reminders Calculation window, you can export the reminders.
To export reminders:
Choose Export [SHIFT+F8].
Select a Company from the dropdown.
Note: Abbreviation/Description fields will populate.
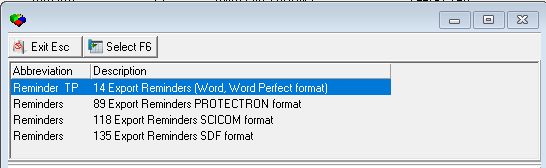
Choose Select Export [F6]. The Export Details dialog box opens.
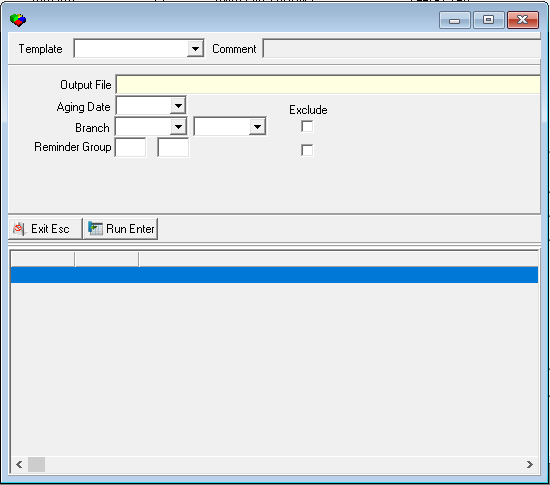
Enter the following information:
Choose Run Export [ENTER].
Accessing Reports
You may access two reports from Reminder Calculation. Use Run Reports [F5] to access:
Aging
Module topics
This module includes the following topic:
Updating Contract/Account Aging’s
Use Update Contract/Account Aging’s (program #576) to update the status of invoices. When you run the aging process, SBN:
To access this program, select Update Contract/Account Aging’s (program #0576) from the main menu of SBN.
The following graphic shows Update Contract/Account Aging as the program opens.
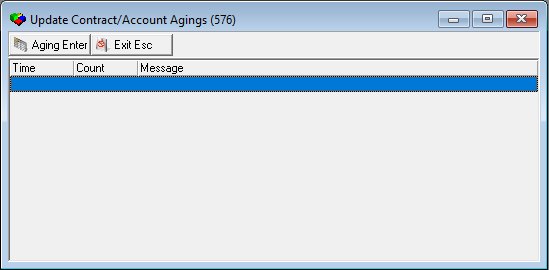
Aging Accounts
Use Update Contract/Account Aging’s to run the aging process.
To age accounts:
Choose Aging [ENTER]. SBN displays the aging process.
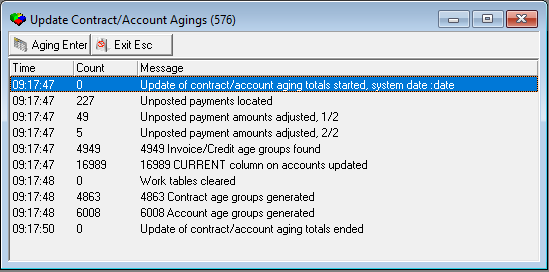
Choose Exit [ESC] to close the window
Fiscal Date
Module topics
This module includes the following topic:
Setting up the Fiscal Date
Use Fiscal Control (program #568) to define fiscal dates for your company. Each accounting period is usually set for either monthly or yearly.
To access this program, select Fiscal Control from the main menu of SBN.
This graphic shows Fiscal Control as the program opens.
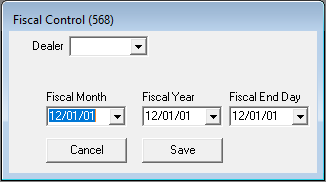
Setting the Fiscal Date
When you set the fiscal date, SBN computes all transactions coming in or going out of your company. Run the fiscal process only once for the selected fiscal dates. Once you set the fiscal date for a future date, you cannot reset it to an earlier date. For example, if you set the Fiscal Year for the year 2010, you cannot change the date to a date prior to that. Use this program carefully.
To set a new fiscal date:
Select the Fiscal Month or Fiscal Year you want to run from the calendars.
Note: You can type the date manually, but you must enter all 6 digits with slashes.
Choose Save.
If the date you select is before the current date the following warning appears.
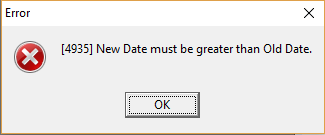
SBN copies all current balances and open invoices to special fiscal tables that are used to run financial reports.
Collections
Module topics
This module includes the following topics:
Using the Collections Tab
Use Collections (program #601) to manage the collection of past due balances on customer accounts. The Collections program produces the next account from the queue that you need to contact regarding a past due balance.
In Collections you record:
Once you have taken an assignment from the Collections tab, that assignment belongs to you and returns to you until it has been resolved.
To access this program, select Contract Master (program #548) from the main menu of SBN and then select the Collections tab.
The Collections Tab
The Collections tab contains three panes:
The following graphic shows the Collections tab as the program opens. The fields in the upper pane display critical information about this account to assist in the collection’s effort. The columns in the middle pane display the most current collection/communication log records for this account. Collectors can scroll down to view more records. The columns in the lower pane display invoice and payment history records for this account. For descriptions of the fields and columns in this tab, see the full Collections documentation.
Account information fields Communication/Collection Log records
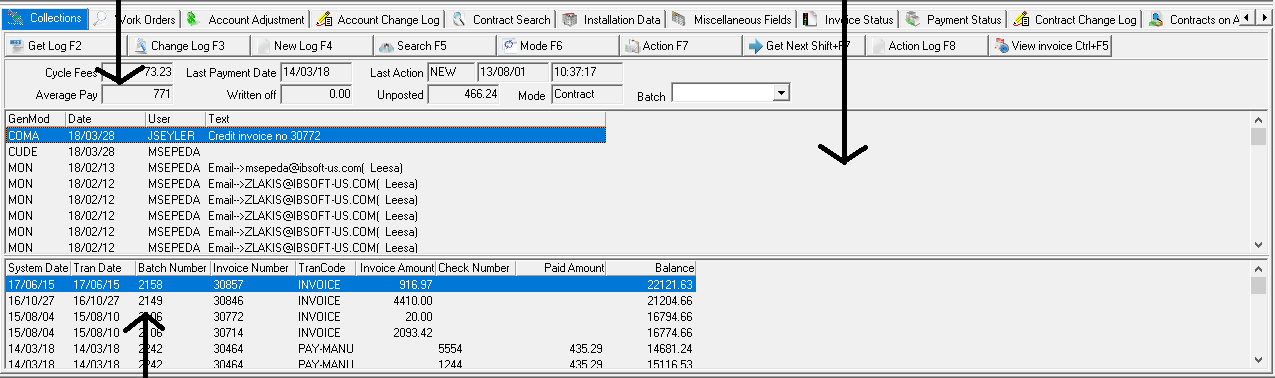
Invoice/payment history records
Logging Collection Actions
Use Collection actions to log telephone correspondence between the customer and your company in regard to collections. Use this feature to log the last action taken and the date and time to follow up on this account. The follow up date determines when SBN next presents this record to you for more action.
Note: When you take an action on an account that has not been previously assigned, SBN automatically assigns that account to you.
To log a collection action:
Choose Collection Action [F7]. The Collection Log Action dialog box opens.
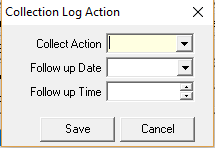
Complete the fields.
Choose Save.
Viewing the Account Action Log
The Account Action Log stores and displays each collection action that has been performed in the Collections tab. You cannot change past collection actions, but you can use the information as a reference for future contact with the customer. To view the action log, choose Show Action Log [F8].
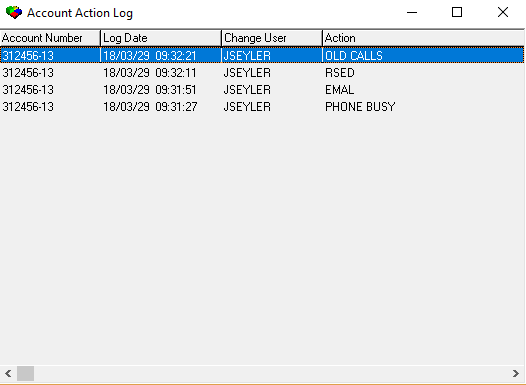
Creating New Entries in the Communication Log
From the Collections tab, you can enter a new entry in the Communication Log to record new correspondence that has occurred with the customer. See Creating an Entry in the Communication Log.
Using the Collection Database
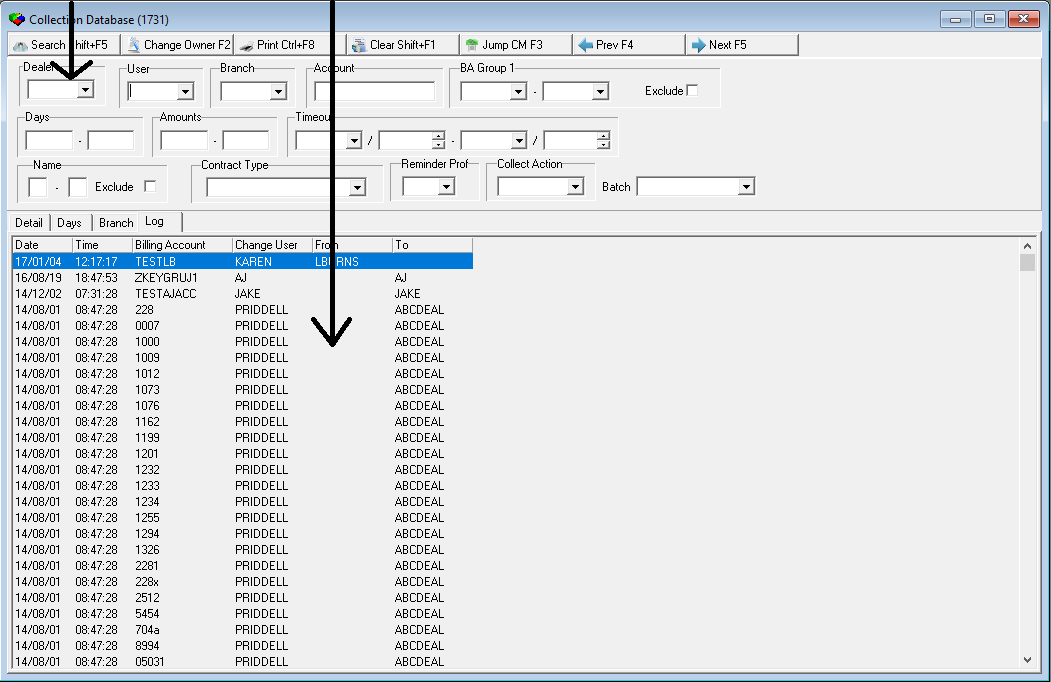
Use Collection Database (program #1731) to view collection accounts by a variety of criteria. The Collection Database window contains two panes:
The search results pane contains three tabs for displaying information:
The Days and Branch tabs contain totals of the collection entries for the number of days and for the included branches.
The window only displays data after you perform a search. For descriptions of the fields and columns in this program, see the document Collection Database.
The following graphic shows Collection Database with information displayed after an initial search.
Search fields Search results in tabs
Searching for Collection Accounts
To search for collection accounts:
In Collection Database (program #1731), select your search parameters. The more search parameters you select, the narrower your results.
Choose Search [SHIFT + F5].
SBN displays the results that match your search parameters in the tabs.
Changing the Collection Owner
You may change the ownership of a group of collection records from one owner to another.
To change the owner of the collection record:
In Collection Database (program #1731), search for records by the owner for whom you want to change records.
Choose Change [F2]. The Change Ownership of Records dialog box opens.
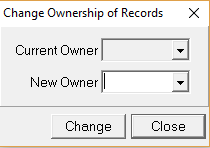
Select the User ID of the new owner.
Choose Change.
All records for the current owner now display the new owner in the User ID column, and now belong to the new owner.
Communication Log
Module topics
This module includes the following topics:
Using the Communication Log
The Communication Log maintains a log of all communication with customers. You can use the Communication Log to enter, view and search communications for an account, contract, or installation through the Service/Data Entry, Marketing, and Contract Master programs.
You must have a record active in one of these programs to get customer data in the Communication Log. Thus, you can only view and enter log entries from branches contained in your branch user profile.
The program groups log entries into the following categories:
Note: If you access the Communication Log from the main menu, the log only contains entries in the User ID mode.
Note: All times for each entry correspond to the user’s time zone.
You can toggle the display to each group type and to detail or summary view.
To access this program, choose Communication Log (program #1888) from the main menu of SBN. You can also access the log by pressing [CTRL+W] from anywhere in the system.
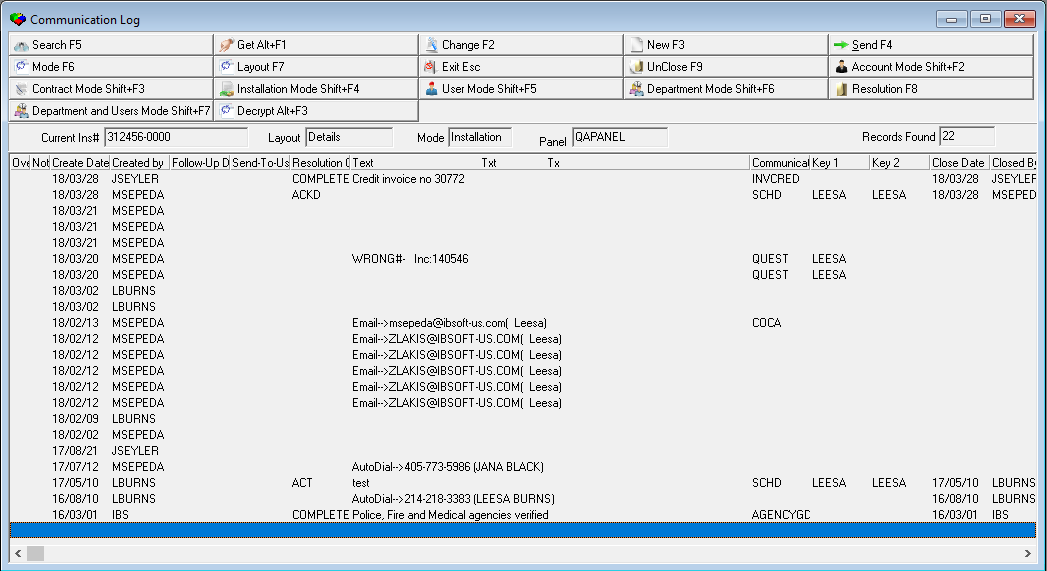
The following graphic shows the Communication Log with information displayed. For descriptions of the columns and fields in this window, see the document Communication Log.
Changing Display Modes
The Communication Log contains five display modes. You can change the display mode by choosing Toggle Comm Log Mode [F6]. The first three display modes present Communication Log entries that relate to a particular aspect of an account. The User and Department modes display Communication Log entries that belong to you or your department.
The log also contains two display layouts:
You can change the layout by choosing Toggle Comm Log Layout [F7].
Viewing Details of an Entry
You can view details of a Communication Log entry.
To view details of an entry:
In Communication Log (program #1888) select the entry for which you would like to view details.
Choose Get Record [ALT +F1]. SBN opens the Communication Log Details window.
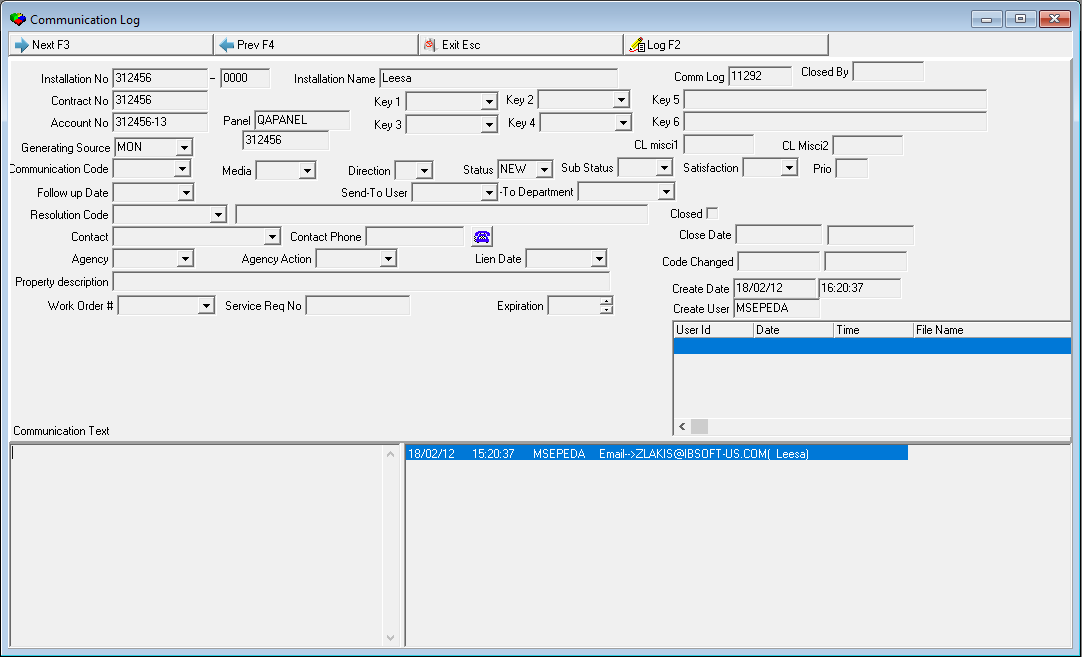
Use Next [F3] or Previous [F4] to view other entries from the Communication Log for the selected installation, account, or contract.
Creating an Entry in the Communication Log
You can only create new entries in the Communication Log from the following modes:
The New [F3] button is not available in the User mode.
To create a new entry:
Access the Communication Log by choosing [CTRL+W].
Choose New [F3]. SBN opens fields in the Communication Log.
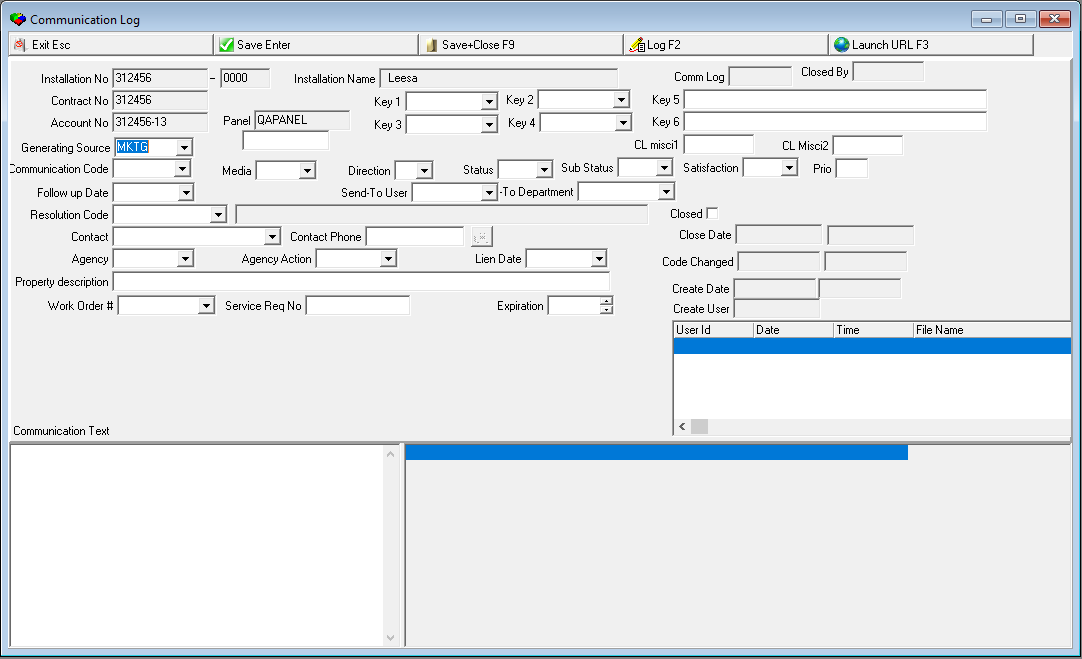
Complete the fields.
Note: You must either send the entry to another user, a department, or assign a resolution code and close.
Choose Save [ENTER].
Sending an Entry to Other Users
You can specify another user to follow up on a Communication Log entry by sending the entry to that user. Entries that you send appear on the user’s Communication Log.
If you send a Communication Log entry with a past-due follow-up date to another, the entry appears on both your Communication Log and on the new user’s Communication Log.
Note: To have entries appear in your Communication Log, or to resolve an entry that you create, send the entry to yourself.
To send an entry to another user:
In Communication Log (program #1888), choose Send to another user [F4]. The Communication Send dialog box opens.
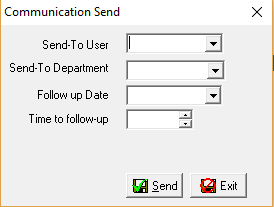
In Send-To User — select the ID of the user to whom you want to send the entry.
In Follow-up Date — select a follow up date, if necessary.
Choose Send [ENTER].
Note: You may only send Communication Log entries that you have created or on which you have taken some action.
Note: You may only send a Communication Log entry to one user at a time. If you send the entry to a second user, SBN will remove it from the User mode of the first user and enter it into the User mode of the second user.
Reading Entries Sent to You
SBN alerts you when Communication Log entries have been sent to you.
If you are logged into SBN when another user sends you a Communication Log entry, an alert icon will flash in the lower left corner of the SBN status bar.
Note: The alert icon will continue to flash as long as you have unread messages in your User mode.
To read Communication Log entries sent while you are logged into SBN. Double-click on the alert icon. The Communication Log opens in Installation mode.
Choose Toggle Comm Log Mode [F6] until you reach User mode.
The unread message will appear with an asterisk in the NotReadFlag column.
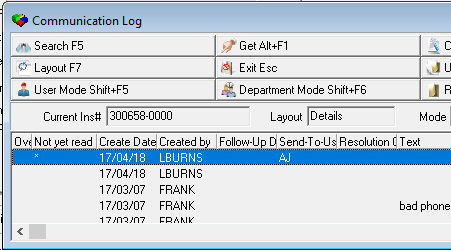
Double-click on the unread message or select the message and choose Get Record [ALT +F1].
The message appears in the lower right pane of the window.
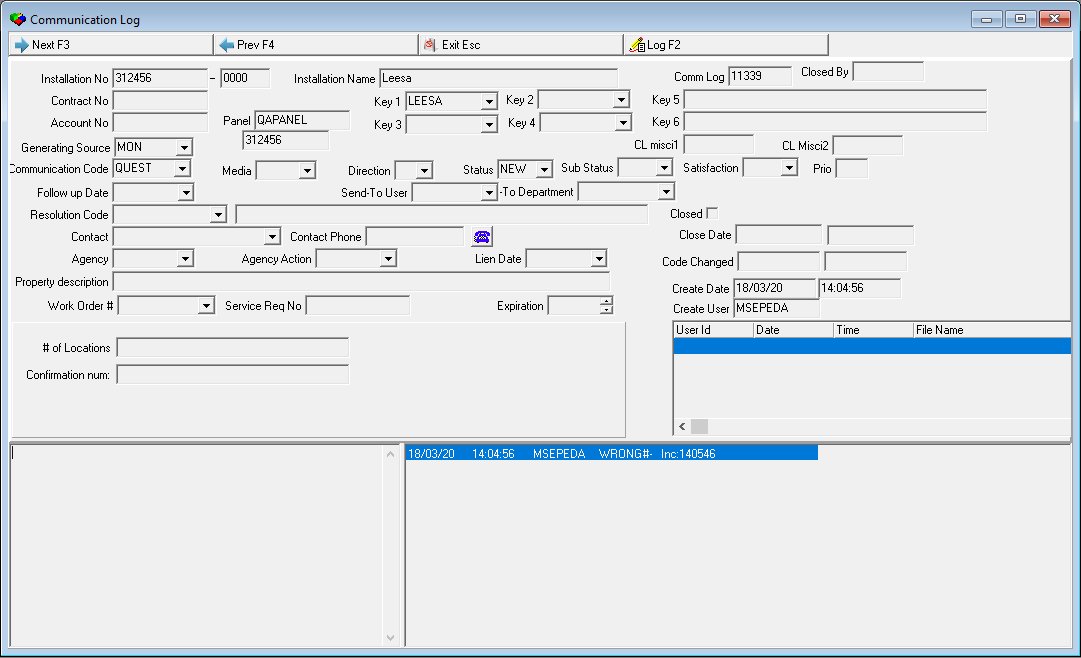
When you finish reading the message, you may choose:
If Communication Log entries have been sent to you while you were logged out of SBN, when you log in you will see the following message:
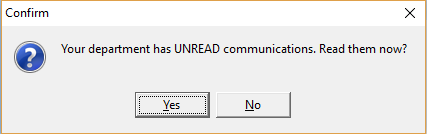
Adding Resolution Codes to an Entry
You must be in User mode to add resolution codes to an entry in the Communication Log. Once you enter and save a resolution code, SBN clears the entry from your User mode. (The entry remains visible in all other modes.)
Note: The explanation code selected in the log entry determines which resolution codes are available.
To enter a resolution code in an entry:
In Communication Log (#1888), select the entry to which you want to add a resolution code.
Choose Show Resolution [F8]. The Communication Resolution dialog box opens.
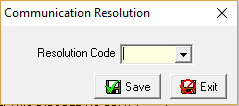
Select a resolution code from the menu.
Choose Save [ENTER].
Using the Communication Log Queue
Use Communication Log Queue (program #535) to view and edit entries in the Communication Log or to perform a more extensive search for finding log entries than found in the Communication Log (program #1888).
Note: You cannot create new entries in the Communication Log Queue.
Note: All times for each entry correspond to the user’s time zone.
To access this program, select Communication Log Queue from the main menu of SBN.
The window of the Communication Log Queue contains five panes:
The following graphic shows the Communication Log Queue with information displayed. For descriptions of the columns and fields in this window, see the full Communication Log Queue documentation.
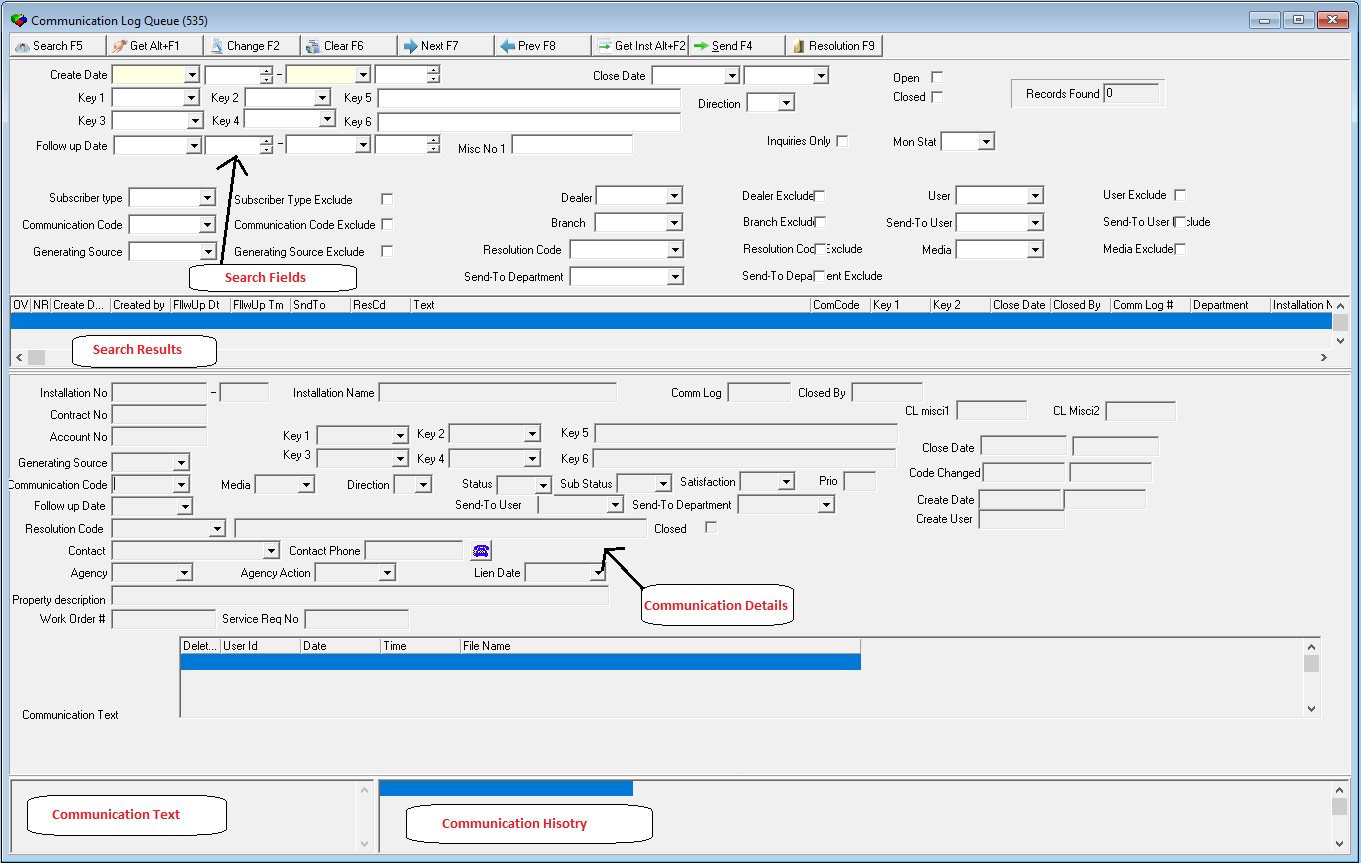
Searching for Entries
Before you can view or edit entries in the Communication Log, you must perform a search of the entries in SBN.
To search for entries:
In Communication Log Queue (program #535) select your search parameters to narrow the search.
Note: You must select a range of Create Dates.
Choose Begin Search [F5].
Results that match your search criteria appear in the search results section. SBN displays search results sorted by the Create Date, with the oldest appearing at the top of the list.
To perform another search, choose Clear Search Screen [F6].
Repeat Steps 1-2.
Note: When the Inquiries Only check box is selected, it limits the search results to those log entries that are associated with a Marketing Inquiry only, not an installation.
Viewing Details of an Entry
You can view details, including the communication history for any entry that appears in the results list.
To view details of an entry:
From the results list, select the entry you want to view. Choose Get [ALT+F1] or double-click on the entry. Details of the selected entry appear in the detail and history sections.
Changing an Entry
In the Communication Log Queue, you can edit certain fields and change a log entry without using the Communication Log (program #1888).
To change an entry:
From the results list, select the entry you want to change.
Choose Get [ALT+F1] or double-click on the entry.
Choose Change [F2].
Complete changes to the following fields, as needed:
Add free-form text in the Communication text pane, as needed.
Choose Save [ENTER].
SBN saves your changes and adds any new communication text to the communication history for the selected entry.
Getting Installation Information
Use Get Installation [ALT+F2] to jump directly to the Service/Data Entry window with the customers’ installation information displayed.
Notices
Trademark Notice
All products and services mentioned in this publication may be trademarks or service marks of their respective companies or organizations. Instead of listing all the names and companies that own these trademarks or inserting a trademark symbol with each occurrence of the trademarked name, Innovative affirms that they are using the names only for editorial purposes, with no intent to infringe upon that trademark.
Feedback
Innovative welcomes your comments and reserves the right to use any information you supply in any way it believes appropriate without incurring any obligations whatsoever. Please address your comments to documentation@innovative247.com
Support
For technical support, please contact Innovative on +1 (972) 518-2250 or via support.innovative247.com
Citations
This publication was prepared by Innovative. The information in this publication has been carefully checked and is considered reliable. No responsibility is assumed for inaccuracies. Innovative does not assume any liability arising from the application or use of any product described herein.
All data displayed in SBN documentation is fictional test data. Any names, addresses, phone numbers or other personal information that relate to any real person are strictly coincidental.
Publication date: June 2020