
Sybase Training
Sybase Training
Sybase Training
Overview
Sybase is a Structured Query Language database that stores all configuration and records data for the SBN application. The Sybase server has its own configuration, which you need to modify in order for SBN to function.
When discussing the server and database environment, the term “hardware� and “reboot� is used to describe the physical components, and “Sybase Server� and “stop/restart� is used to describe the software component. Rebooting the hardware is a power off/power on function, and stopping/restarting the Sybase server is done with Services (or daemons on a UNIX server).
The current running version for new installation is 15.0.2, EBF #5.
This document covers the following topics:
Copying/Reloading Databases from SBNA to SBNB
Before You Start
To set up the Sybase server, you need to have the hardware ready. For a large company, you need:
-
Dual quad-core processors, running 2Ghz+
-
8Gb RAM
-
300+ GB free space (files, logs, backups, etc. More is better).
-
RAID5 hard drive configuration for redundancy.
The Sybase server works on a device/database model, where the databases are put into device files on the physical hard drive. The devices and database are not necessarily matched one-to-one, but instead are set up as an “as-needed� configuration. The device files “hold� the databases. Databases can be spread over more than one device. In practice, you can build out all of the devices at the start of the installation without knowing the specific sizes of databases that will go onto the server.
Setting up the OS and installing all OS patches first saves you from having problems later.
You should have at least two partitions on the physical server – one for the OS and another for Sybase and the SBN files. You can put the base Sybase installation on the OS partition (c:\sybase), and create another directory on the second partition for Sybase device files (d:\sybase\data).
Installing Sybase
Install the Sybase server using the Sybase installer files. Use a Custom installation to set up the server, as there are many option changes.
1. Acquire the Sybase Installer file. (There is a different one for each OS and version you want to run.)
2. Copy the files from the installer zip to a temporary directory, and start the Sybase installer.
3. Choose the disk location for server installation, and then agree to EULA. You must choose the location of the installation – different countries have different privacy/copyright laws that specific EULAs address.
4. Choose the default directory for the installation. Most will be “c:\sybase,� but you may want to change this for your needs.
5. Choose the Custom install option – not Typical or Full. This allows you to add the features that you will need or may need in the future. Do not add features that you will never need.
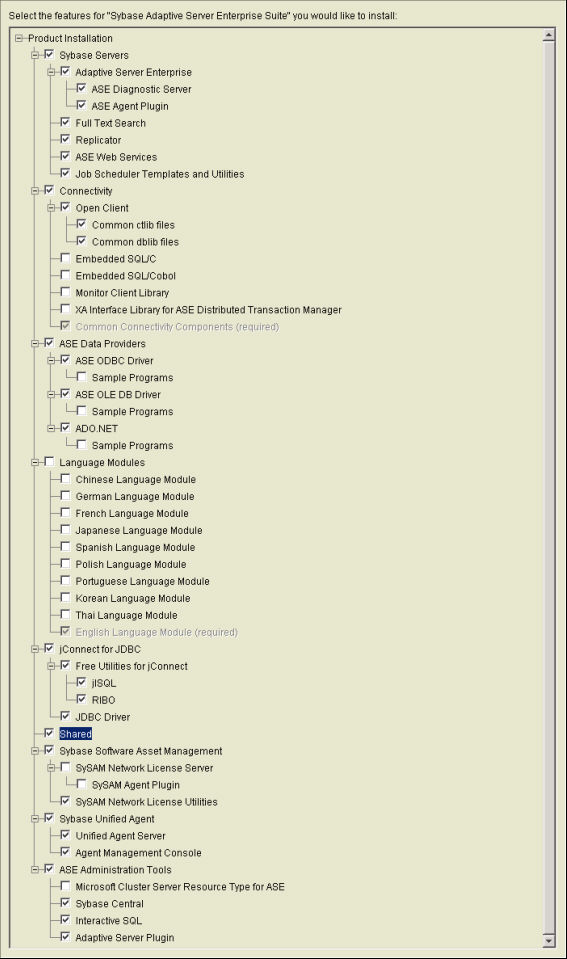
Add these to the default list of options:
-
Full text search
-
ASE web services
-
Job Scheduler
-
All ASE data providers (but remove the samples programs)
-
All jdbc options – they are used to for troubleshooting data issues between the application and database server.
-
Shared components
-
Leave the license server off – a 30 day temporary license installed is automatically installed, and IBS will provide the final license to be used on each server.
6. Check the Summary page and make sure you’ve picked the options you intend to have. Allow the server files to be installed.
7. Do not configure a license server. IBS provides the license that you will manually add later.
8. Configure the email setup for notification purposes with an email address, server, and port, according to the setup of the client.
9. Choose the Developer version for the Product at this time. (This affects several basic configuration parameters of the server, such as max memory and engines, and will change according to the license you add later.)
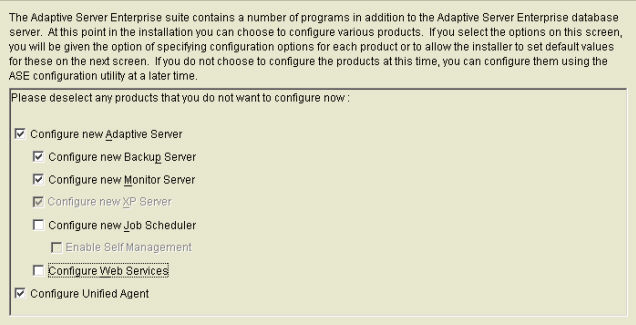
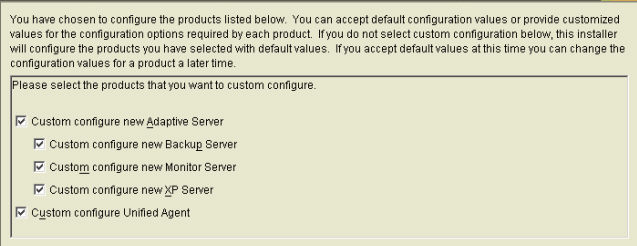
10. Configure the system databases and services for the Sybase server. As a default, you can leave most settings alone; but, in some specific configurations, you will want to change them.
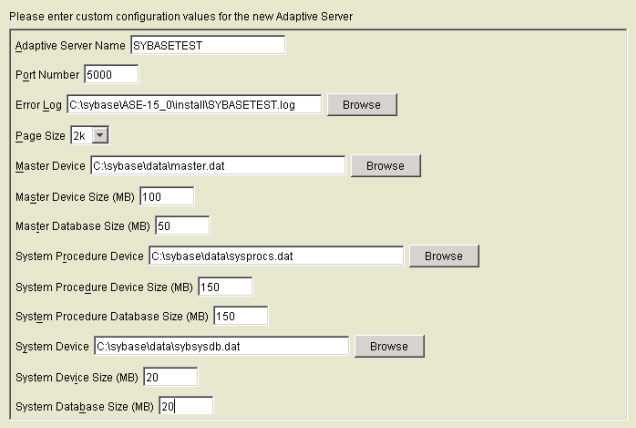
a. The name of the Sybase installation is by default the same as the name of the server. If your server is called SBNA, then the installation has the same name. To standardize, we typically name the primary server SBNA, the secondary SBNB, and the tertiary/test server SBNC.
b. The location for the log files can be the same as that of the installation, but you may want to put the devices on a separate partition. If you are putting the devices on a separate partition, you need to create the \sybase\data\ directory on that partition now, or the install will give errors and fail.
c. Change the size of the system partitions and databases to the following:
-
-
Master – 100MB device, 50MB database
-
System procedure – 150MB device, 150MB database
-
System – 20MB device, 20MB database
-
d. With exception for network traffic, leave the default names, ports, and log locations for the Sybase service.
11. Keep the default options for the windows for the following windows:
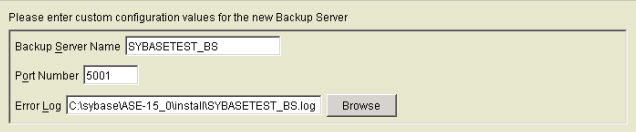
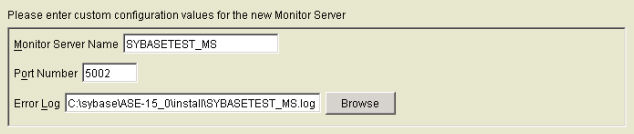
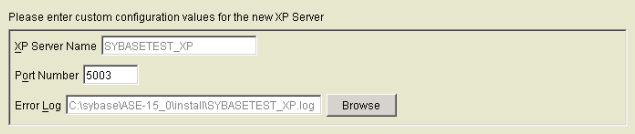
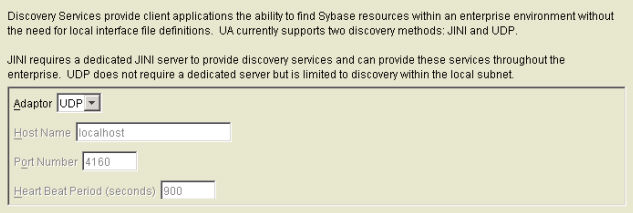
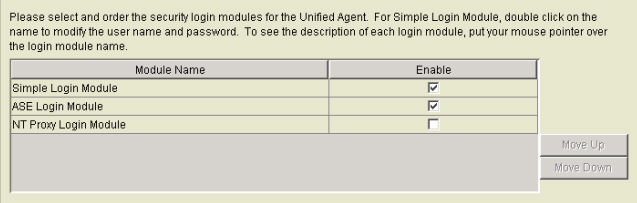
12. When you see the list of security login modules, check only the simple login and ASE login modules.
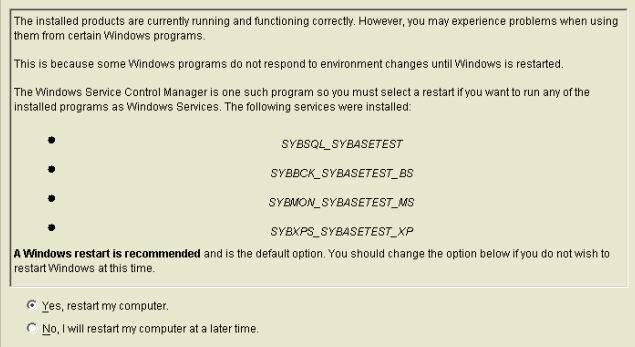
13. Once finished, install any EBF patches that are available before rebooting.
14. Go into the Windows Services console.
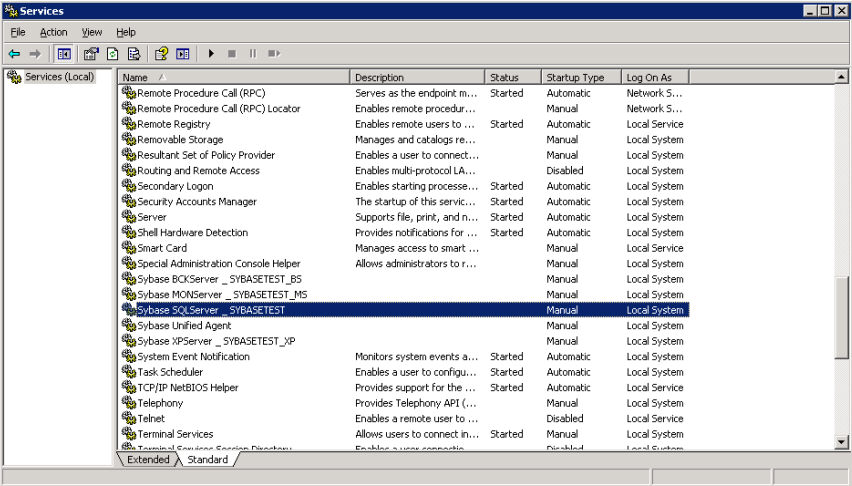
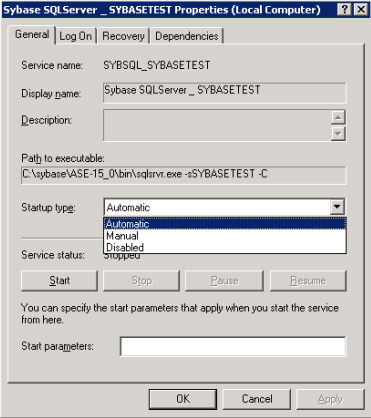
15. Change the startup of the Monitoring, XP, BS, and SQL services for Sybase to be “Automatic." This allows the services to load at startup, so that you don't have to manually start them later.
16. Go into the Sybase root directory, and then into the \ini\ directory. Take a look at the sql.ini file. Copy the “SBNA_BS� entry, and change the copy’s name to be “SYB_BACKUP."
17. Reboot the server.
18. Upon load, go into Sybase Central and connect to the database. Use the drop-down menu to pick the SBNA installation, and use “sa� for the username and a blank password.
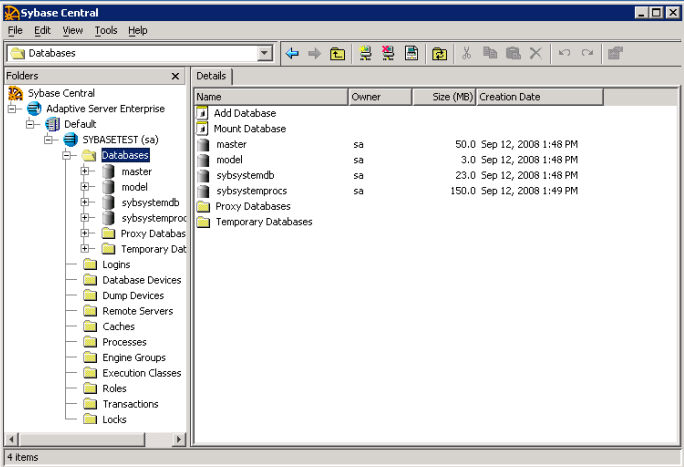
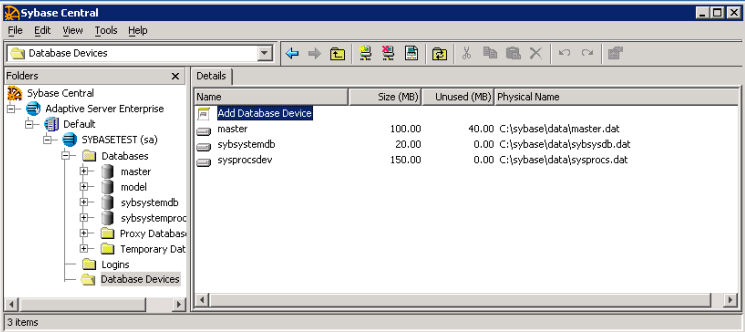
19. Once connected, go to “Database Devices� and create the devices you need.
-
Devices have a certain size that you can increase but never decrease. The default device (master) for a Sybase server is very small file, and does not hold more than the master database and a few other system databases. You need to create more devices to allow for enough space for all SBN databases. Do NOT just increase the size of the master device. (This is very bad administration policy, and can result in problems if you run low on space.)
Keep the system databases on their own devices, and create new devices for the SBN databases you create. Decide now on how your database devices are structured. With larger hard drives, it’s easier to create a few devices of 10GB in size instead of many that are 2GB or less. There is also a 10-device maximum in the default configuration of Sybase. Change a configuration parameter called “max devices� in order to have more. You can also choose to have separate transaction and database devices – this allows for a different recovery method in case of a server crash. The disadvantage to separate transaction/data devices for a database is that it’s difficult to see how much free space is available in the transaction log device allocation for a particular database at any time.
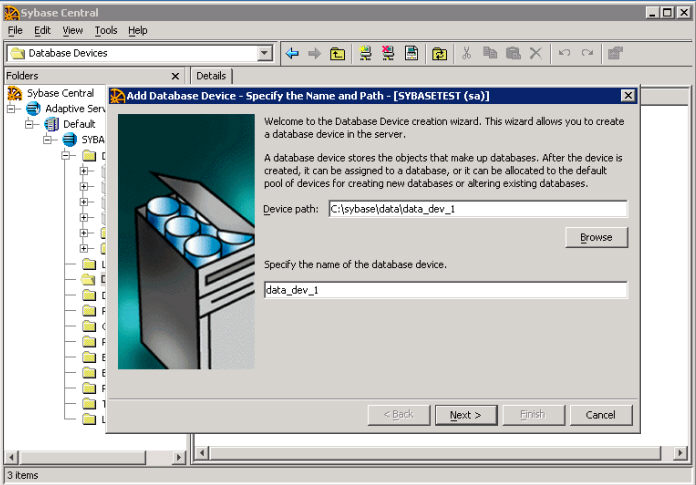
20. When you create the devices, make sure the location of the device files is the same as that of the master devices.
-
Add the name to the end of the device path textbox (the box below will be auto-filled). IBS typically uses “data_dev_1� or “trans_dev_1� for the names.
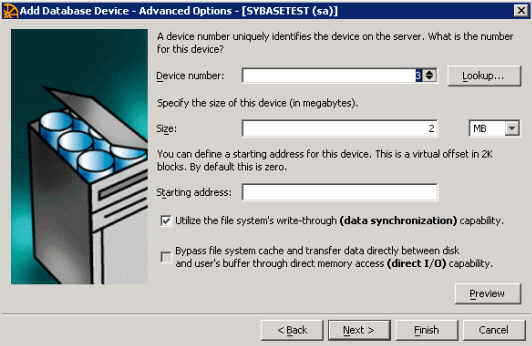
21. Choose Next. Make sure that the size is large – 10GB device files give plenty of room for today’s hard drive capacities. You may need more than one partition for large databases.
-
Choose Finish, and wait for the device to build.
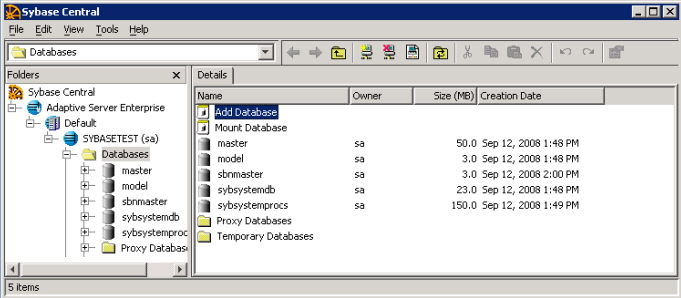
22. Go to the Databases list, and add a new user database.
-
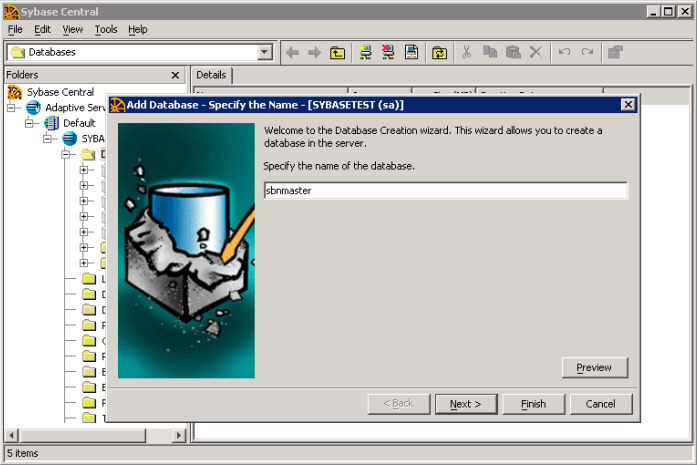
Name it with the database name, and choose Next.
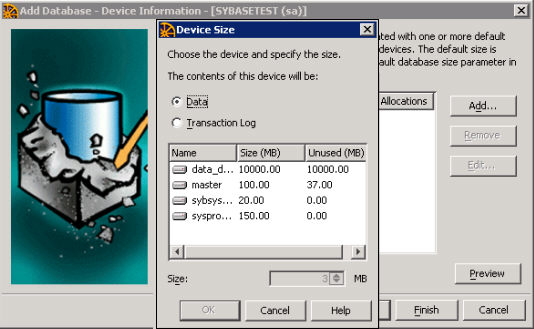
23. Assign device space to the database. Choose Add, and pick the data partition. Select the “Data� radio button, and add space as appropriate. The amount you need depends on the database and the client’s amount of customers. Each installation is unique.
24. Under Databases\Temp Databases\List View\, you see the tempdb. The default for this is too small. Create a device just for this database (make it 1GB in size to start with), and then increase the size of this database to the full size of the device. You cannot remove the 4MB allocation on the master device – leave that as it is.
25. Change the configuration for the new database. In Sybase Central, right-click Database, choose Properties, and then the Options for the database. In the list, you must check the following:
-
into/bulkcopy/pllsort
-
trunc log on chkpt
Once you check these options, choose OK and exit the Properties window.
Data and Transaction Logs
The two different types of device space allocations are data device allocation and transaction logs. The transaction log is where all data is written to initially. Each time you make a change that is part of a transaction, Sybase records it on the log device. Once it commits the transaction, it flushes the data out of the out the log device and writes it to the real device.
IBS recommends a separate transaction log and data device allocation for the databases that have a lot of input/output. The data allocation should be larger than the log allocation. If a data allocation is 10GB for sbnmaster, 1.5GB of transaction log space is a good number with which to start. However, if the i/o is too high, you need to allocate more log space.
The log space for the largest databases should be approximately 1.5 times the size of the tempdb data and log allocation. Using sp_helpdb databasename command line lets you see how much space is being used and how much is allocated, so that you know whether to add more. Use 10% increments, rounded up to the nearest 100MB. If the database is allocated 12GB and it’s already at 11.5GB, add 1.2GB more space.
Sybase Server Config Parameters
The SERVERNAME.cfg file in the root of the \sybase\ directory has some parameters that you need to modify.
-
Number of open databases – 200 (a small number will prevent some config changes, loads of dumps, and slow down the system)
-
Number of open objects – 15000
-
Number of open indexes – 16000
-
Number of open partitions – 5000
-
Number of devices – 20 (for later expansion – easier to change now than later)
-
Number of remote connections – 250
-
Number of remote logins – 250
-
Optimization goal – allrows_oltp
-
Max memory – 500000
-
Max online engines – (depends on number of processors, usually x-1)
-
Number of engines at startup – Same as above
-
Procedure cache size – 300000
-
Number of user connections – 250
-
Number of locks – 50000
-
Max cis remote connections – 250
SBN Databases
SBN is completely configurable software. You can span multiple databases instead of storing all data in one database. Looking at the server, you see these databases:
1. ibs - For IBS use; tells us which patches a client installation has applied.
2. sbnpro - location of all stored procedures. Every time SBN is patched, the changes usually go into this database.
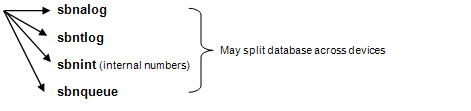
3. sbmaster
-
-
sbnalog - where the alarm history is stored. This database will grow the most, and you need to plan accordingly so that the database doesn’t use up all of it’s allocated device space.
-
sbntlog - stores the oc_toclog table, storing open close logs and related data.
-
sbnint - internal numbers for a very small database.
-
sbnqueue - where Alarm Queue and IMMQ resides.
-
Clients with a lot of data should consider using solid state drives. While solid state drives are more expensive, the read/write time is much faster than that of a hard drive-based system. The database server files and the data files should be run on the solid-state drives in order to get the fastest performance and minimize a hard drive data bottleneck.
Backups
IBS recommends that you backup your databases nightly. Files can be burned to CDs or DVDs for storage.
IBS has a set of backup batch files, SQL command files, and logs for doing daily backups. IBS provides and installs these for any current client who requests them. The batch files let you to create a scheduled task for each data of the week, dump all databases to a directory for that day, and output a list of all users once a week. You can use these backups both for syncing data onto the SBNB server and as a way of seeing how quickly the databases grow by the size of the dump files.
The backup server has its own log. Email notifications for the errors also do notifications for the backup server; if the backups fail, an email will be sent to the administrator.
The administrator should: 1) keep track of the database dumps, 2) check the log files for errors, and 3) assure there is adequate space on the drives for the dumps to complete. IBS recommends that backups be sent to a different drive than either the \sybase\ directory or that of the data. This way, if there is an issue and old backups are not removed, only the backups are affected.
Weekly Maintenance
(This section may vary by company.)
Server administrators should check the databases and servers on a weekly basis. Do NOT put off maintenance for a monthly (or longer) basis. The databases will fill up and errors that could have been prevented will occur, resulting in unscheduled downtime for servers.
Friday mornings are a good time for maintenance for many companies, but you should choose a time when there is a low volume of signals and few to no reports running. This allows you to continue operations and usage with minimum disruption.
Administrators should check over all of the SBN servers, including Sybase server, concentrators, and any dedicated services. A typical check of all logs should take between 15 minutes and a half hour. A check will take longer if you find issues that need to be fixed or researched.
Checking Sybase Database Usage
1. Connect to the server with “isql –Usa –P –SSBNA�, or use your own login credentials.
2. List the databases on the server:
sp_helpdb
go
This gives a list of databases, as well as device space allocation, configuration, and creation date. You must look into the individual databases for additional information.
3. To check allocation space, look at the specific databases for free device allocations and make sure there is more than 1GB of space available for smaller databases (5GB), and 2GB or more for larger databases. A good rule of thumb is 20% available for growth and transaction log space. Also, check log space to make sure it is clearing out.
sp_helpdb sbnalog
go
In sbnalog there is plenty of free space (8627400K) in a single allocation. This gives this database plenty of space for future growth.
sp_helpdb sbnmaster
go
With multiple allocations, it is a different situation. The first allocation of 10GB is a little less than half-full, but there are two others of 5GB and 1GB that are nearly empty. Some data has been written to those device allocations, but they are empty for the most part.
sp_helpdb tempdb
go
Space on tempdb should be nearly empty unless you are moving data or copying tables.
4. Look at e:\SBNA Backups\ directory for daily backup files. Make sure they are being created properly each day, and that the size of sbnalog, sbnmaster, and any other data-related databases are increasing steadily. If it does not look right, look in the backup logs to see if there is a problem for the day(s) you see an issue.
5. Check service logs (d:\Program Files\IBS\SBNServices\), and make sure the sizes of the logs are about equal each day, and slightly smaller on weekends. If you run several End-of-the-Week reports but not many during the week, your Report logs should indicate that. Algen logs are roughly equal each day (with perhaps fewer on Sundays). The pattern will become obvious after a month or two of monitoring.
6. Check the Sybase error logs in the d:\Sybase\ASE-15_0\install\ directory. There will be a SBNA.log file. Open and scroll to the end to look for recent errors. Do not be concerned with bad disconnects from clients; these are unclean disconnections from users not logging out and hard-quitting SBN. You should be concerned with entries such as “out of locks�, “out of memory�, and anything else unusual. After a while, you will notice the difference between normal messages and out of the ordinary errors. If Sybase is crashing each time it tries to start, or if you have signals flowing to the Algen but not into SBN, check this error log first for full databases or other problems.
7. Connect to the concentrators and check the queues. The three columns on the Alarms panel show the SBNA, SBNB, and Conc interconnect queues. Make sure that the signal queues are at zero (or return to zero quickly) and don’t have more than 10 signals at any given time. The signal queues are tied to the Frontends. If they are increasing not decreasing, there is a problem with the Frontends. Stop/restart the Frontend that corresponds to the queue (first for SBNA, second for SBNB), and check again to make sure the number decreased. If the third number is increasing, there is a communications problem between the two Concentrators. Shut down the Concentrators then restart them, with Conc1 going up first then Conc2.
8. Check the Frontends, and make sure that signals are going through to both servers. You can tell quickly if there is a problem. Look at the date/time stamp on the last entry; it should be within the minute. If you see a Frontend that does not seem to getting signals, restart it using the shortcut on the desktop. DO NOT run the SBNFrontend.exe directly; there are additional configuration parameters in the shortcut that tell it what ports to allow connections on for the Concs, as well as how to get to the Algen. Running just the exe will not work, and no signals will get into SBN. Remember that the Algen on SBNB does NOT accept signals when the server is in SECO mode; it waits until the mode is changed.
9. Take a look at the Copytasks on SBNB. Copytasks are a “pull� application that takes data from the primary server to the secondary. Watch the Copytasks for Data Entry, Services, and Monitoring. Make sure that data is being exported and imported, nothing is locked up, and that there are no errors in the copying of data. If you see an error, restart the Copytasks.
Copying/Reloading Databases from SBNA to SBNB
As part of the weekly maintenance, the administrator should be copy the backups from SBNA to SBNB and restore them on a weekly basis. Not all data is copied by the copytasks (e.g., billing), so you must restore the database dumps to SBNB in case of a failure.
Copy files from SBNA
1. Copy all SBN database dumps from the morning, as well as the syslogins.txt file, to the d:\Backups\ directory on SBNB. IBS will only restore the SBN databases, not any Sybase system databases.
2. Check copytasks, and turn them OFF in preparation for reloading the databases.
3. Turn OFF the Algen service.
4. Syslogins.txt
a. Go into the text file you copied to d:\backups\ and delete every row with a suid from 4 to 25. Do NOT delete any row with a suid greater than 25, even if it is in between two other rows. IBS can also set this up with the export on a daily basis, but it’s a good idea to know why you do this. The first two suids are “sa� and “probe� and are Sybase system logins. Removing them will make it impossible to use the database, so be careful. Make sure that the number of logins on the SBNB server and in the exported login list are contiguous and that they do not overlap or have missing entries.
b. Connect with “isql –Usa –P –SSBNB�
-
-
This command allows you to change system tables. Turn it on temporarily, and then turn it off when it is no longer needed. Leaving it on is a major security risk.
-
sp_configure “allow updates�, 1
go
-
-
This command removes the logins from 25 and up, in preparation for the import of the exported logins from SBNA
-
delete from master..syslogins where suid >24
go
c. Open a new command prompt window to load the users into the database
-
-
bcp master..syslogins in d:\backups\syslogins.txt -Usa -P -SSBNB -c
-
d. In the previous isql session, run:
-
-
This command turns off the ability to change system tables. Make sure you do this step after the import.
-
sp_configure “allow updates�, 0
go
5. Load databases from SBNA to SBNB
a. Once the database backups are copied to SBNB, run this from the open isql command line:
-
load database ibs from "d:\backups\ibs.bak"
load database sbnalog from "d:\backups\sbnalog.bak"
load database sbnatom from "d:\backups\sbnatom.bak"
load database sbnmaster from "d:\backups\sbnmaster.bak"
load database sbnpro from "d:\backups\sbnpro.bak"
go
online database ibs
online database sbnalog
online database sbnatom
online database sbnmaster
online database sbnpro
go
b. Run this batch file to change SBNB back to a Secondary (SECO) server:
-
-
D:\Program Files\IBS\SBN_Admin\SBNB_secondary.bat
-
6. Turn on Copytasks
a. Turn on SERV, MONI, and DAEN copytasks from the shortcuts on the desktop.
b. Watch each service to make sure it’s running correctly.
7. Turn on Frontend.
a. Make sure signals are coming in.
8. Turn on Algen service.
a. There will be no signals in the Algen on SBNB – this only works when the server is set to PRIM, not SECO.
Modifications and Updates to Sybase Training
The following table lists modifications and updates to the Sybase Training document.
|
Mod Number |
Date |
Description |