
Dealer Profiles
Program #: 1537
Module: System Administration
Overview
Use Dealer Profiles (program #1537) to define and maintain dealer profiles in SBN. You can attach defined dealer profiles to specific user IDs, to restrict system access to those records with a matching dealer ID. The menu of defined Dealer Profiles appears in Marketing (program #562), Data Entry Basics (program #559), Contract Master (program #548), and becomes part of the installation number and the contract number.
This document covers the following topics:
Changing the Details of a Dealer
Restoring a Deleted Dealer Profile
Using a Template for a New Dealer
Navigating to Dealer Profiles
Use the following steps to navigate to Dealer Profiles:
1. From the main SBN toolbar, select Menu.
2. From the drop-down menu, select Go To.
3. In the Go To Program dialog box, type in "1537" and press ENTER.
w Dealer Profiles opens.
The Dealer Profiles Window
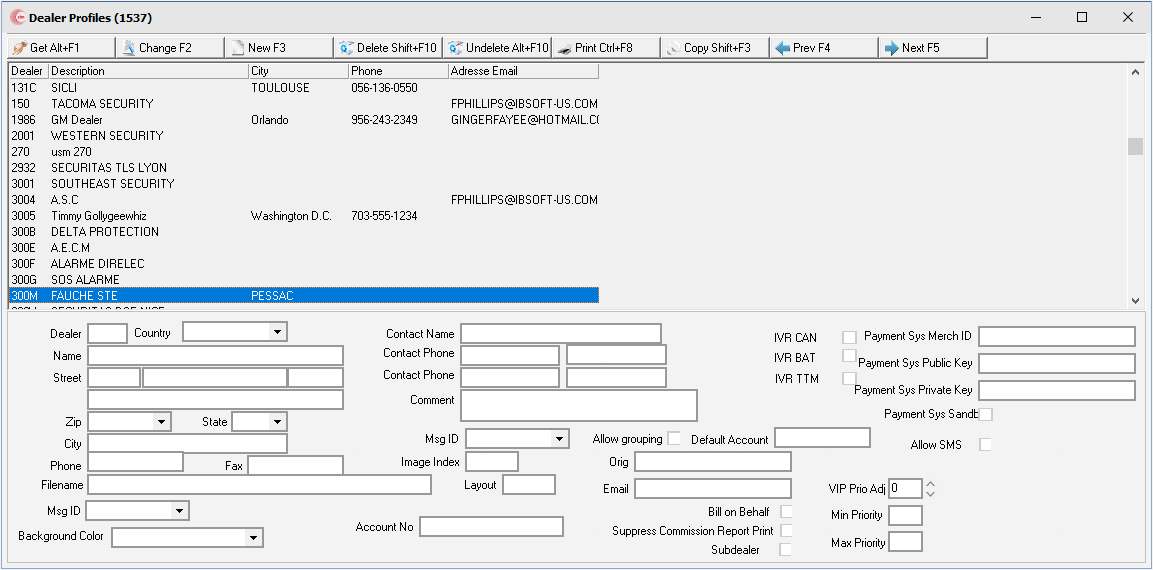
The following graphic shows Dealer Profiles as the program opens. The upper pane displays all previously defined dealer profiles.
Field/Column Descriptions
The following table describes the fields and columns used in Dealer Profiles.
Field/Column |
Description |
Dealer |
Abbreviation that identifies the dealer. |
Name |
Name of the dealer. |
Street |
Dealer's address; street number. |
Street Name (no label) |
Street on which the dealer is located. |
Apt. or
Suite Number |
Dealer's apartment or suite number, if applicable. |
Address (No label) |
Field for additional address information, if applicable. |
Zip |
Zip code for the dealer. |
State |
State in which the dealer is located. (This field holds a maximum of 60 characters.) |
Country |
Country where the dealer is located. |
City |
City where the dealer is located. |
Phone |
Phone number for the dealer. |
Fax |
Fax number for the dealer. |
Filename |
Filename for graphic to display on dealer-specific invoices and reports. Note: You do not need to enter a path name for the graphic, only the filename. The path is assumed to be in the img folder from which the Report Scheduler executable is running. |
Layout |
Designate the type of report layout for Invoice Print (report #2171). Enter a 0 for Dealer Layout and 1 for Monthly Invoice Layout. Note: If this field is blank, the report defaults to the Monthly Invoice Layout. |
Contact Name |
Name of the contact at the dealer. |
Contact Phone (1) |
Primary phone number of the contact. |
Primary Phone Extension (no label) |
Contact primary phone extension, if necessary. |
Contact Phone (2) |
Secondary phone number of the contact. |
Secondary Phone Extension (no label) |
Contact secondary phone extension, if necessary. |
Comment |
Free-form text comment about the dealer or contact. |
Msg ID |
Selected message appears when a user saves a work order on an installation with this dealer. (This menu originates from program #1766.) |
Allow Grouping |
Select this check box to include invoices and payments associated with the selected dealer to display in Group Mode in Invoice Status and Payment Status. O To use this feature: l Turn on option ba358 l Define option ba361 |
Image Index |
Index number of the graphic to use in the Contract Master tree view, when displaying by Dealer icons. |
Origin |
Dealer origin. |
Default Account |
SBN merges the action plan contacts of this account with an installation's contacts in the Dispatch (program #537) call list when option mo180 is on. |
Dealer's email address. Note: This email address is used to send emails to the selected dealer from the Dealer Communication dialog box in Data Entry Master (program #559). |
|
Message ID |
The message entered in this field appears in a dialog box when a user creates a new service request in the Service Log tab of Data Entry (program #559) for an installation with the selected dealer. (This menu originates from program #1828.) |
Bill on Behalf |
Company-specific check box; currently has no SBN function. |
Background Color |
Select a color to display in the background of the Dealer ID, Phone, and Phone 2 fields of Data Entry Master (program #559) on installations with the selected dealer. Note: On installations with a background color defined for the installation branch in program #1530, this color only appears in the Dealer ID field of Data Entry. The color of the Phone and Phone 2 fields is determined by the Background Color field of program #1530 for the installation branch. |
Suppress Commission Report Print |
Company-specific check box; currently has no SBN function. |
Subdealer |
Select this check box to indicate that the selected dealer is a subdealer. When this check box is selected, the selected dealer only appears in the drop-down menu of the Subdealer field in the Basics tab of program #559, and has been added to select dealer drop downs in select areas. Note: When option ba473 is on, users can only access installations in program #559 with a dealer and subdealer that match their Dealer Access Profile in program #1811. |
IVR CAN |
Customer-specific check box for company 156. Select this check box to allow the IVR terminal of the selected dealer to process alarm signals of type 'CAN' in Dispatch (program #537). Note: Option ba455 must be on and action 1537/989 must be active to make this check box visible. |
IVR BAT |
Customer-specific check box for company 156. Select this check box to allow the IVR terminal of the selected dealer to process alarm signals of type 'BAT' in Dispatch (program #537). Note: Option ba455 must be on and action 1537/989 must be active to make this check box visible. |
IVR TTM |
Customer-specific check box for company 156. Select this check box to allow the IVR terminal of the selected dealer to process alarm signals of type 'TTM' in Dispatch (program #537). Note: Option ba455 must be on and action 1537/989 must be active to make this check box visible. |
VIP Prio Adj |
Amount by which to increase or decrease the priority of alarm incidents on installations with the selected dealer. (This field accepts values between -10 and 10.) |
Min Priority |
Enter a range of alarm incident priorities that SBN adjusts on installations with the selected dealer. Enter the minimum priority to adjust. (This field accepts values between 0 and 99.) For example, if you enter a priority range of 5 to 10 and a VIP Priority Adjustment of 2, if an alarm comes in with a priority of 6 on an installation with the selected dealer, SBN adjusts the alarm priority to 8 in the Alarm Queue. |
Max Priority |
Enter a range of alarm incident priorities that SBN adjusts on installations with the selected dealer. Enter the maximum priority to adjust. (This field accepts values between 0 and 99.) For example, if you enter a priority range of 5 to 10 and a VIP Priority Adjustment of 2, if an alarm comes in with a priority of 6 on an installation with the selected dealer, SBN adjusts the alarm priority to 8 in the Alarm Queue. |
Allow SMS |
Check this field for an Incident to qualify for Interactive SMS. This field works with Interactive SMS Definitions (program #2510). |
Viewing a Dealer Profile
You can view the details of a Dealer Profile in the fields in the lower pane.
Use the following steps to view a dealer profile:
1. In Dealer Profiles, select the dealer for which you want to view details..
2. Double-click your selection or choose Get.
w The fields in the lower pane display the details of the selected dealer.
Adding a Dealer Profile
Use the following steps to add a new profile:
1. In Dealer Profiles, choose New.
w The fields in the lower pane open for changes.
2. Complete the Dealer field. Complete the reaming fields, as desired.
3. Choose Save.
w SBN adds the dealer profile to the list of defined dealers in the upper pane.
Changing the Details of a Dealer
Use the following steps to change the details of a dealer:
1. In Dealer Profiles, select the dealer profile you want to change.
2. Choose Change.
w The fields open for changes in the lower pane.
3. Enter changes, as needed.
4. Choose Save.
Deleting a Dealer Profile
Use the following steps to delete a dealer:
1. In Dealer Profiles, select the profile you want to delete.
2. Choose Delete.
w A Confirmation dialog box appears: "Delete XXX. Are you sure?"
3. Choose Yes.
w SBN deletes the selected dealer profile.
Restoring a Deleted Dealer Profile
You can restore a deleted profile back into SBN.
Use the following steps to restore a deleted profile:
1. In Dealer Profiles, choose Undelete.
w The Undelete window appears.
2. In the Undelete window, find the dealer profile you want to restore and double-click it, or choose [Enter].
w SBN restores the profile to the active list of defined dealer profiles.
Using a Template for a New Dealer
You can use one dealer as a template for another dealer profile.
Use the following steps to use one dealer as a template for new dealer:
1. In Dealer Profiles, select the profile you want to use as a template.
2. Choose Copy Current Record.
w Fields in the lower pane fill with the details of the selected dealer, but remain open for changes.
3. Change any information needed for the new dealer.
4. Choose Save.
w SBN adds the new profile to the list of defined dealer profiles.
Button Functions
The following table displays the buttons, describes the shortcut keys, actions, and functionality.
Button |
Name |
Shortcut Key |
Action |
Description |
|
Get |
ALT+F1 |
1537/ 1 |
Get record. |
|
Change |
F2 |
1537/ 2 |
Change selected record. |
|
New |
F3 |
1537/ 3 |
Create new record. |
|
Delete |
SHIFT+F10 |
1537/ 4 |
Delete selected record. |
|
Undelete |
ALT+F10 |
1537/ 5 |
Restore deleted record. |
|
CTRL+F8 |
1537/ 6 |
Print selected records. |
|
|
Copy |
Shift+F3 |
1537 |
Copy current profile to use as a template. |
|
Previous |
F4 |
1537/ 999 |
Select last record. |
|
Next |
F5 |
1537/ 999 |
Select next record. |







Comment Field Lengths
Service-ticket and inspection comment fields were lengthened (inspection comments allow about 2,000 characters), and dealer-profile comments in program 1537 hold their full length.
Modifications and Updates to Dealer Profiles
The following table lists modifications and updates to the Dealer Profiles document.
Mod Number |
Date |
Description |
n/a |
08/18/14 |
Images updated. |
07.92.26436, 08.92.11860 |
10/05/20 |
New "Allow SMS" checkbox added. Images updated. |
|
|
|